Order Backlog Workbench
This chapter covers the following topics:
- Order Backlog Workbench
- Selection Criteria for Scheduling with the Order Backlog Workbench
- Scheduling Order Lines with the Order Backlog Workbench
Order Backlog Workbench
The Order Backlog Workbench is a powerful graphics tool that enables you to easily manage the order lines that you want to reschedule. This workbench is especially useful when a significant issue, such as item shortage, occurs within your supply chain, manufacturing line, or distribution chain, and you need to react rapidly to reschedule groups of order lines affected by the item shortage.
-
Once you select orders for scheduling using system processing constraints and user-defined controls, the order lines are processed in a simulated scheduling mode and presented for your review.
Note: You must select and schedule order lines before you can navigate to the Order Backlog Workbench.
During the review process, you can:
-
Take actions based on system exceptions or errors resulting from simulated scheduling.
-
Update or modify the simulated scheduled dates or source organizations for order lines presented.
-
Accept or cancel all the simulated order line scheduling information.
-
Firm selected order lines for simulated rescheduling.
-
Select and accept a selected order line simulation results.
-
View the Oracle Global Order Promising Pegging Detail information.
-
Reschedule the order line information presented in the simulated schedule mode again.
Once you are satisfied with your scheduling simulation results, you should save your changes. Your new order line scheduling information will be updated for selected order lines.
Note: The Order Backlog Workbench does not support rescheduling of the ATO model. It excludes any order lines that are part of an ATO model or in a set with an ATO model during rescheduling.
Order Backlog Scheduling Process
The process for scheduling an order backlog is as follows:
-
Define Priority Rules by determining the processing order to use when scheduling orders through the scheduler.
-
Define filter criteria to enable you to determine order line selection criteria for scheduling within the Order Backlog Workbench.
-
Schedule orders using the Order Backlog Workbench.
-
Simulate Order Scheduling: shows the scheduling simulation results by:
-
Exceptions
-
Order Number
-
Organization / Item
-
-
Select to:
-
Firm all or selected simulated order lines scheduling results.
-
Pick all or selected simulated order lines scheduling results.
-
Save all scheduling simulation results.
-
Cancel all scheduling simulation results.
-
Modify the simulated order line schedule dates or source organization fields, and simulate scheduling again based on the modifications made. Perform any of the functions previously listed until satisfied.
-
-
-
Save your work. Once your simulation is saved, simulated order line schedule dates and sources become the scheduled date and source organization for all order lines selected.
Order Backlog Workbench User Interface
The Order Backlog Workbench consists of these three panes within a window:
Navigator Tree
The Navigator Tree controls the display of information for the Reschedule Lines Results and Order Line Pegging panes within the Workbench. Drill down to the different levels on the Exceptions, Orders, and Items tabs to view the order line and pegging information.
Exceptions Tab
The Exceptions tab is the default tab that Order Backlog Workbench displays in the Navigation Tree pane. This tab shows a tree containing the order line exceptions that occurred during simulated scheduling.
Exceptions are grouped and displayed by exception type, and a corresponding number appears to the right of each exception tree node to denote the number of occurrences for each of the exception types that occurred during simulated scheduling.
Exception Tree Drill-Down Details
Details of the exception tree drill-down are:
-
+ Exceptions
+ Exception Folder Name
+ Order Number
Orders Tab
The The Orders tab displays a folder tree of all orders selected for simulated scheduling. Orders within this folder tree appear in ascending order.
Order Tree Folder Drill-Down Details
-
+ Sales Orders
+ Order Number
+ Independent (Order) Lines
Items Tab
The Items tab displays a folder tree of all items contained within order lines that were selected for simulated scheduling. The system sorts items alphanumerically by the organization against which they were scheduled.
Item Tree Folder Drill-Down Details
Details of the item tree folder drill-down are:
Details of the item tree drill-down are:
-
+ Organizations
+ Organization Name
+ Product Families
+ Product Family
+ Categories
+ Item Category Sets
+ Item Category Set code combinations
Reschedule Lines Results
The Reschedule Lines Results pane displays order line information based on cursor placement within the Navigator pane.
If the Item field is highlighted in yellow, then simulated scheduling encountered an error during processing, and the order line was not modified in any way. Specific scheduling error messages can be seen in the Error column.
The Reschedule Lines Results pane displays the following order line information:
-
Firm Checkbox
-
Item
-
Order Line Number
-
Quantity Ordered
-
Order Line UOM
-
Ship from Org
-
Ship Date (Scheduled Date)
-
Scheduled Arrival Date
-
Available Quantity
-
Group Ship Date
-
Group Arrival Date
-
Request Date Quantity
-
Requested Ship Date
-
Requested Arrival Date
-
Firm Source Org
-
Firm Ship Date
-
Firm Arrival Date
-
Latest Acceptable Date
-
Ship Method
-
Lead Time
-
Demand Class
-
Ship Set
-
Arrival Set
-
Customer
-
Location (Customer Site)
-
Status (Order Line Status)
-
Error
Order Line Pegging Information
The Order Line Pegging Information pane displays pegging information based on the cursor location within the Navigator tree.
Note: If no information is contained within the Pegging Information window, based on the cursor location within Order Backlog Workbench, then
-
The entity referenced in the Navigator tree, such as Organization, is not related to pegging.
-
The item or order line that is referenced is not ATP-enabled.
-
The item or order line does not currently reside in Oracle Global Order Promising collection tables.
If you select a node element within the Order Line Pegging pane and select Details, the Oracle Global Order Promising ATP Details window appears.
For more information on the ATP Details window, see ATP Details.
Selection Criteria for Scheduling with the Order Backlog Workbench
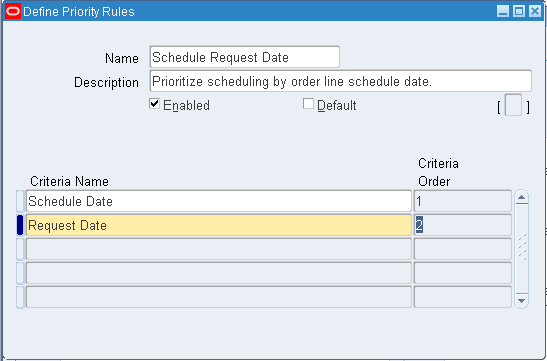
As a prerequisite, you must define at least one sequencing (priority) Rule before you use the Order Backlog Workbench. The terms sequencing rule and priority rule are used interchangeably.
Priority Rules
Oracle Advanced Planning Solution uses priority rules to determine the processing order used when scheduling orders through the scheduler. You can:
-
Define a default scheduling order processing priority rule.
-
Disable a priority rule.
-
Define single or multiple criteria within a priority rule to further define the processing order that the scheduler uses during line scheduling.
Priority rules are not instance-specific. They are defined by selecting specific criteria that determine the order input to the scheduler.
Note: At least one priority rule must be defined prior to utilizing the Order Backlog Workbench for scheduling.
To define Priority Rules:
-
Navigate to the Define Priority Rules window.
-
Enter a Name for the priority rule.
-
Enter a Description for the priority rule.
-
Select the Enabled checkbox to enable the priority rule to be used by the scheduler.
-
Choose whether the priority rule will be used as the default priority rule when the schedule is executed.
Select the Default checkbox to use the priority rule as the default rule.
Note: If another priority rule was defined as the default priority rule and you select the Default check box, you will see a decision box asking if you want to update the current default priority rule to the rule you are currently modifying. Select Yes to update your default priority rule.
-
Select the criteria name of the priority rule in the Criteria Name field. Values are:
-
Promise Date
-
Request Date
-
Sales Order and MDS Entities priority
-
Scheduled Date
-
-
Select the criteria processing order that the scheduler will use when scheduling order lines. Enter a numeric value in the Criteria Priority field.
-
Save your work.
Note: Once a priority rule is successfully saved, you can only update:
-
The Enabled checkbox
-
The Default checkbox
You can add additional criteria to the priority rule.
-
To schedule orders using the Order Backlog Workbench:
-
Navigate to the Order Backlog Workbench.
-
2. Determine your order selection with filter criteria for scheduling by selecting one of the following:
-
Select the Filter Criteria Name and proceed to Step 3, or
-
Select the Filter Criteria Name you want to modify and click the Create/Edit button.
-
Click the Create/Edit button if you want to enter new filter criteria information.
Note: Select the Exclude Picked Lines checkbox to avoid the rescheduling of order lines that are pick released.
The Criteria folder window appears. The window title is Criteria.
Criteria Window
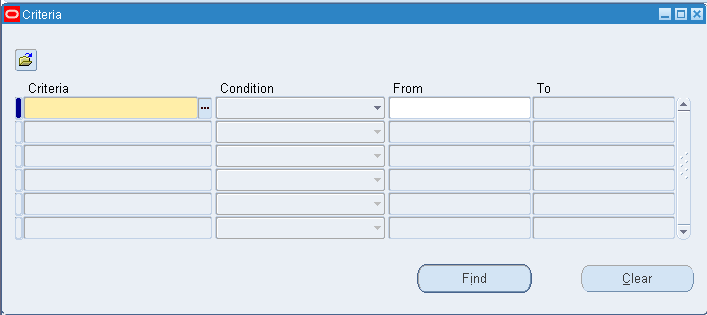
Create your order selection criteria for scheduling. Order selection is determined by current order line status and the filter criteria you defined.
-
Order lines that have a current status of Shipped or Cancelled are not selected for simulated scheduling.
-
Order lines whose source is External, for example, drop-ship order line are also not selected for simulated scheduling.
-
The Schedule Orders window uses Oracle Applications Folder technology to save filter criteria for reuse. Users can create filter criteria and save it to a folder, or they can query an existing folder and modify the filter criteria. You are not allowed to enter filter criteria for scheduling without first saving the criteria to a folder.
-
Either edit the filter criteria for the folder selected, or enter new filter criteria. Select the Field name from the list of values for Task:
-
Customer
-
Item name
-
Order Number
-
Project Number
-
Promise Date
-
Requested Arrival Date
-
Requested Ship Date
-
Scheduled Arrival Date
-
Scheduled Shipped Date
-
Ship from org
-
-
Select an operator for your criteria from these values:
-
Equals
-
Is Not (Equal)
-
Less Than
-
At Most
-
At Least
-
Greater Than
-
Between
-
Outside
-
Is Empty
-
Is Entered
-
Among
-
-
Further define your query criteria values by entering limiting values in the From and To fields. Enter values appropriate to the Field Name selected.
For example, if you are interested in displaying order lines that have a scheduled order date two weeks from today, enter the present date in the From field and a date two weeks from the present date in the To field.
-
Save your work to a folder. From the File menu, select Save As to save your folder. When you save your folder, there are several options available. Once you save your folder, close the Criteria window.
For more information on using folders within Oracle Order Management, see "Private Folders" in Oracle Order Management User's Guide.
-
Choose whether to overwrite or preserve all the existing source organizations for the current order line sources during scheduling.
-
Select No to use the current order line source information. Use existing sourcing rules and priority rules to determine the order line schedule date.
-
Select Yes to overwrite current order line source information. Use any source for your order, based upon sourcing and priority rules for scheduling, and use the modified sourcing information during scheduling to determine order line scheduled date.
Note: If no order source is specified on the order line, then the order source is determined by your Sourcing Rule ranking. Ensure that your profile MRP: ATP Assignment Set is properly defined.
-
-
Manually sequence the processing order during scheduling for your order lines or allow the system to schedule your order lines, based on the sequencing rule chosen by selecting Manual Sequence.
Selecting Manual Sequence enables a user, based on query criteria, to schedule, sequence, firm, or delete order lines that are selected for rescheduling.
-
Once you select Manual Sequence, the system queries open sales orders based on filter criteria that contain order lines. Then, the system displays the orders based on the sequencing rule selected in the Order Sequencing window.
-
Select the Firm check box if you do not want a particular order line processing sequence to be modified when you click Apply
-
Apply.
For example, suppose you update sequence 1 to sequence 5, sequence 6 to sequence 8, and select the Firm checkbox for sequence 2. Once Apply is selected, the order line associated with sequence 2 remains sequence 2.
If you did not select the Firm check box for sequence 2, then, based on your user changes, the order line originally associated with sequence 2 could be changed because of resequencing.
-
Choose to update the order processing sequence during rescheduling. Select the line you want to modify, and then update the sequence number assigned to the order line.
-
Select Apply to save the new order line sequence for use during rescheduling.
-
Select Schedule to initiate the simulated order line scheduling.
While scheduler is running, can track the process using the Progress window.Progress window to track
The Progress window continually updates the progress of the rescheduling concurrent program. The following information appears:
-
Total Lines #: Total order lines selected for scheduling.
-
Remaining: Total order lines remaining to be scheduled.
-
Time Remaining: Ttotal time remaining to process order lines currently not scheduled.
-
Complete: Total order lines that have completed scheduling.
-
Progress Indicator Bar: Graphic indicator of the current order lines scheduled as a percentage of the total order lines selected for scheduling.
Once the indicator bar reaches 100 percent and the Remaining field displays 0, select OK to see the scheduling results.
Results are presented within the Order Backlog Workbench.
-
-
Scheduling Order Lines with the Order Backlog Workbench
Once order lines are scheduled and processed, users see the Order Backlog Workbench, a graphical user interface that enables users to review, manage, and process simulated order line scheduling results.
To manage simulated order line scheduling results:
-
Review the following reschedule exceptions generated during the rescheduling process:
Note: Select Create/Edit in the Schedule Orders window and define the criteria to search for the order lines to be re-scheduled.
Exception Name Message Received When Item Shortage ATP date is greater than the latest acceptable date. Modified Source The new shipping warehouse is different from the original shipping warehouse. Later Than Old Schedule Date The new schedule ship date is greater than the old schedule ship date. Later than Promise Date The new schedule ship date is greater than the promise date. Later than Request Date The new schedule ship date is greater than the original request date. Errors Unexpected error is encountered. -
Modify the schedule date and source organization's fields for order lines.
-
Accept the current order line scheduling information.
-
Firm the current order line information.
Select the Firm checkbox if you:
-
Want to accept current simulation scheduling information for an order line.
-
Do not want a particular order line to be modified during any additional simulated rescheduling that may occur within the workbench for the current workbench simulation session.
For details, see Reschedule Lines Results
-
-
Modify simulated scheduling information.
-
You can modify only the Schedule Date and Source Organization fields for an order line.
-
Firm an order line or group of order lines, and then process new a new scheduling simulation using the current order line information by selecting Reschedule.
For details, see Reschedule Lines Results.
Accept simulated scheduling recommendations by clicking Save.
Once you Save, all simulated scheduling results for order lines are committed to the database. The Order Backlog Workbench closes, and the user sees the Schedule Orders window.
-
-
Reject simulated scheduling recommendations by clicking Cancel.
Simulated scheduling information is discarded, order line information is not updated within the database, the Order Backlog Workbench closes, and the user sees the Schedule Orders window.
Note: ATP in the Order Backlog Workbench is based on the detail supply demand tables, regardless of the profile setting for MSC: Enable ATP Summary Mode.