Order Entry Tools
This chapter covers the following topics:
- Transaction Types
- Overview
- Introduction
- Functionality
- Terminology
- Defining Line (Transaction) Types
- Defining Order Transaction Types
- Assigning Workflows to Transaction Types
- Workflow Validation
- Creating a Document Sequence
- Assign a Document Sequence
- Reports
- Example
- Using Workflow in Order Management
- Overview
- Workflow
- Fulfillment with Wait
- Line Flow: Generic, Performance
- Defaulting Rules
- Key Enhancements
- Terminology
- Attributes and Entities in Order Management
- Conditions
- Sequence of Defaulting
- Sources of Values
- Dependencies
- Examples
- Controlling Changes
- Reports
- Implementation Considerations
- New Defaulting Features
- Order Management Defaulting Rules
- Cascading
Transaction Types
Overview
Definition of transaction types is required in Oracle Order Management. Transaction Types provide default information for sales documents such as orders, quotes, and sales agreements, and establish process controls with Oracle Workflow.
Introduction
In this chapter, we will discuss the setup of Order Management Transaction Types and provide detailed examples. The setup steps required to create a new transaction type are described, including creating the order transaction type, the line transaction type, assigning the document sequence and associating the appropriate workflows. A detailed example is provided at the end of the chapter.
Some of the features of Transaction Types/Workflow are:
-
Each line in a sales order has its own workflow so each line may follow a different flow. This allows you to have both order and return lines on the same order.
-
You can create new workflow activities from custom PL/SQL code. This makes it very easy to extend OM.
-
Each quote is assigned a header flow only. Please note that line flows are not assigned for quotes.
-
A workflow process can have subprocesses.
-
Control of how Document numbers are generated as a document moves through the negotiation phase to the fulfillment phase.
-
Retain the same document number as the quote or generate a new document number when the transition to fulfillment occurs.
-
A workflow process can have an unlimited number of activities
-
There is no limit to the number of custom workflow activities that can be defined in Order Management.
-
You can view the status of the workflow on an order or order line in either tabular or graphical format. In graphical format you can see not only the activities that the workflow has completed but also the activities that still require completion.
-
Assign and sequence approvers for notifications.
Functionality
There are transaction types associated with both order types and line types. Order numbers are now controlled by assigning a unique document sequence to your order transaction type. Creating document sequences and assigning them to order transaction types are two separate steps in Order Management, and neither can be done directly from the transaction types window. Setup is discussed later in this chapter.
Note: Sales Agreements only use automatic numbering.
Terminology
Transaction type is the generic term that refers to transaction types for sales documents in Order Management. This is not to be confused with the Receivables Transaction Type, which is a completely different object.
The transaction type code may have values of Order or Line and determines whether the transaction type is an order transaction type or a line transaction type. In this document, order type is used synonymously with order transaction type and line type is used synonymously with line transaction type.
A document sequence is a range of numbers used for an order type and is defined by a numbering method (automatic, manual or gapless). This sequence is the beginning order number.
A document category is a specific type of document such as a sales order or a purchase order. These are used in many Oracle applications for key entities. In Order Management when you create an order transaction type the system automatically creates a document category with the same name attached to it, then two document sequence categories are created:
one, with the same name as that of the transaction type and the other with the same name as transaction type but appended with the string '-quote'. This is used to assign the numbering sequence to the order type.
Defining Line (Transaction) Types
The Define Transaction Types window is used to define transaction types for sales documents, including both order and line types. Define your line types first. You should define line types for both order lines and return lines. Navigate to the Transaction Types window to define a line type. See Define Order Management Transaction Types for more information.
Note the following when defining a line using transaction type:
-
Enter a name for the line type in the Transaction Type field. This name must be unique; you cannot create an order type and a line type with the same name.
-
For the Transaction Type Code, enter “line.”
-
Select the operating unit from the list of values.
-
Enter either Order or Return for the Order Category depending on whether your new line type is for sales lines or return lines.
-
Many of the other fields on this window as well as the assign line flows button are not applicable to line types so when you enter the transaction type code they will become inaccessible. The inaccessible fields include Order Workflow, Default Return Line Type, Default Order Line Type, Agreement Required, Purchase Order Required, and all the Credit Check rule fields.
-
The Agreement Type field is used for validation on the order line. If you enter an agreement type here, you can only use agreements of this type on sales order lines. If the field is blank you may enter agreements of any type.
-
If you want to use the line type for a defaulting source, you may enter a Price List on the Main tab and this will default your Price List on every order with this transaction type. The Enforce List Price flag will determine whether a user can apply a manual discount to the line at the time of order entry.
-
On the Shipping tab the autoschedule flag is inaccessible because it only applies to order types. The inspection required flag determines whether inspection is required when return lines are received.
There are five Scheduling level choices to control the way scheduling works at the time of order entry for lines of this type: ATP Only, Allow all scheduling actions, No reservations, Inactive Demand with Reservations and Inactive Demand without Reservations. The remainder of the fields can be used for defaulting.
Two values on the Schedule Level LOV on the Shipping tab support different requirements for reservations: Inactive Demand with Reservations and Inactive Demand without Reservations. These levels can be set on the transaction types, which would mean that the line will not be scheduled and will not be seen as demand in APS. When this level is set, Schedule Ship Date entered by the user will be accepted and no scheduling is done. If scheduling is done as an action or through WF, Request Date will be copied to the Schedule Ship Date if it is already not there. The values are:
Inactive Demand with Reservations
-
Meaning: The line is not visible to APS demand
-
Manually enter schedule date but the system will not schedule
-
The line can be reserved
-
This is for standard items and does not support Ship or Arrival Sets
-
Inactive Demand without Reservations
-
Meaning: The line is not visible to APS demand
-
Manually enter schedule date but the system will not schedule
-
The line cannot be reserved
-
This is for standard items and does not support Ship or Arrival Sets
-
The Finance tab fields contain information which affects the interfaces with the financial applications. The Invoicing Rule and Accounting Rule fields are used as defaulting sources for the sales order, and this information is passed to Autoinvoicing. For the fields Invoice Source, Non-Delivery Invoice Source, and Receivables Transaction Type these values are required for interfacing to Receivables but they are not on the sales order header or line. When the invoice interface activity in the workflow is executed the system will look for a value in the following order: line transaction type, order transaction type, profile option. The invoice interface activity fails if no value is found. The Cost of Goods Sold Account can be used by the Account Generator function of the inventory interface when a line is ship confirmed.
Order Management Line Transaction Types
The following table displays the various column controls that are available for Order Management Line transaction types.
| Column | Purpose | Usable on Line Type | Required for Line TYpe | Defaulting Source for Line |
|---|---|---|---|---|
| NAME | Unique within the table for a given language. | Yes | No | |
| TRANSACTION_TYPE_ CODE | Distinguish between order and line types. Valid values for Line types: Order/Line. | Yes | Yes | No |
| ORDER_CATEGORY_CODE | Defaulting for order or line; If used on Order Type, restricts line types. Valid values for Line Types: Order/Return | Yes | Yes | Yes |
| CURRENCY_CODE | Defaulting Source | No | No | No |
| CONVERSION_TYPE_CODE | Defaulting Source | No | No | No |
| CUST_TRX_TYPE_ID | Used by Invoicing | Yes | No | No |
| COST_OF_GOODS_SOLD_ ACCOUNT | Used by Inventory Interface | No | No | No |
| COST_OF_GOODS_SOLD_ACCOUNT | Used by Inventory Interface | No | No | No |
| ENTRY_CREDIT_CHECK_RULE_ID | Used by Credit Checking | No | No | No |
| SHIPPING_CREDIT_CHECK_RULE_ID | Used by Credit Checking | No | No | No |
| PRICE_LIST_ID | Defaulting Source | Yes | No | Yes |
| ENFORCE_LINE_PRICES_FLAG | Used for validating discount application on Order/Lines | No | No | No |
| WAREHOUSE_ID | Defaulting Source | Yes | No | Yes |
| DEMAND_CLASS_CODE | Defaulting Source | Yes | No | Yes |
| SHIPMENT_PRIORITY_CODE | Defaulting Source | Yes | No | Yes |
| SHIPPING_METHOD_CODE | Defaulting Source | Yes | No | Yes |
| FREIGHT_TERMS_CODE | Defaulting Source | Yes | No | Yes |
| FOB_POINT_CODE | Defaulting Source | Yes | No | Yes |
| SHIP_SOURCE_TYPE_CODE | Defaulting source. Valid values: Internal/External | Yes | No | Yes |
| AUTO_SCHEDULE_FLAG | Used by Scheduling. Valid values: Yes/No | No | No | No |
| SCHEDULING_LEVEL_CODE | Used by Scheduling. Valid values: ONE, TWO, THREE | Yes | No | No |
| AGREEMENT_TYPE_CODE | Validation on Header | No | No | No |
| AGREEMENT_REQUIRED_FLAG | Validation on Header | No | No | No |
| PO_REQUIRED_FLAG | Validation on Header | No | No | No |
| INVOICING_RULE_ID | Defaulting Source | Yes | No | Yes |
| INVOICING_CREDIT_METHOD_CODE | Defaulting Source | Yes | No | Yes |
| ACCOUNTING_RULE_ID | Defaulting Source | Yes | No | Yes |
| ACCOUNTING_CREDIT_METHOD_CODE | Defaulting Source | Yes | No | Yes |
| INVOICE_SOURCE_ID | Used by Invoicing | Yes | No | No |
| NON_DELIVERY_INVOICE_SOURCE_ID | Used by Invoicing | Yes | No | No |
When you define OM line transaction types, you can define the line flow that lines of this type will follow. A line transaction type can be coupled with different OM order transaction types. For example, a return transaction type can be used with a standard order type or an international order type. However, you need to specify the flow couplings for the permitted transaction type combinations.
Defining Order Transaction Types
Navigate to the Transaction Types window to define an order type.
Order Management Transaction Types
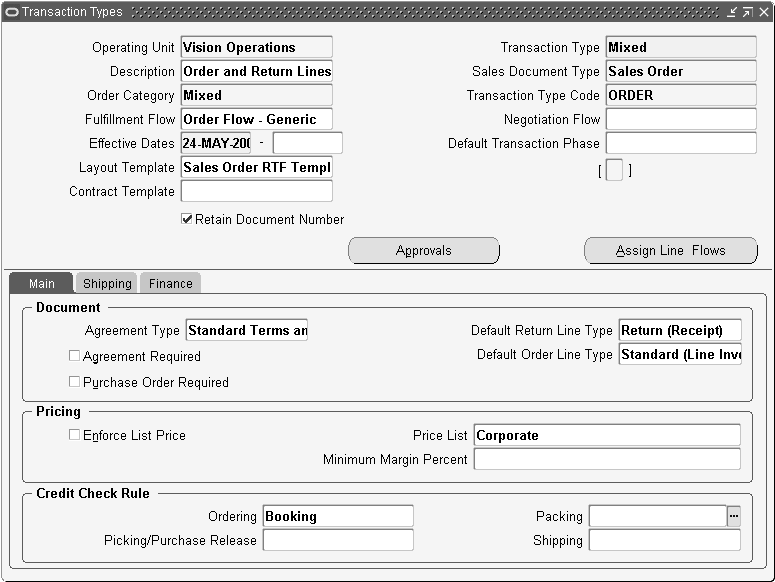
Note the following when defining an order transaction type:
-
Select the operating unit from the list of values that will capture this information. If Multi-Org Access Control is enabled, you can manage Transaction Types across all Operating Units accessible to you via your MO: Security Profile.
-
Enter a name for the order type in the Transaction Type field. This name must be unique; you cannot create an order type and/or a line type with the same name.
-
Description (optional).
-
Enter Sales Document (optional).
-
Enter the value Mixed, Order or Return for the Order Category. If you enter Order the order type can only have lines with transaction type of “order.” If you enter Return the order type can only have lines with transaction type of “return.” If you enter “mixed” the order can have lines with either Order or Return transaction types. For SAs, select 'Order' for Order Category and Sales Document Type. Note: As quotes and SAs do not support return as a type of 'order' should be selected.
-
Select a Transaction Type code either Order or Line.
-
Assign a fulfillment flow for the transaction type. This indicates that orders are processing using this transaction type. Quotes are Sales Orders that start with Negotiation phase - there are no line level WF in the Negotiation phase but the tabs can be used for defaulting information Assign lines only applies to the Fulfilment phase.
-
Assign a negotiation phase if you are processing quotes using the same transaction type. Note: Negotiation flows are applicable for SA.
-
Enter an effective date and, optionally, select a default transaction phase for use by the defaulting framework.
-
Layout Template (optional) refer to the transaction type section of the setup chapter.
-
Contract Template (optional) refer to the transaction type section of the setup chapter.
-
Optionally, select the Retain Document Number check box. If the transaction type is associated with both a negotiation flow and fulfillment flow, the document number can be retained when the document transitions to fulfillment.
-
Select the Approvals button if you want to assign a list of approvers for the transaction flow.
-
Assign Line Flows button to assign the appropriate line workflows. Note: SA only uses the header flow and it does not take advantage of defaulting rules - there are no line level workflows for SAs.
Main Tab
-
The Agreement Type field is used for validation on the order. If you enter an agreement type here, you can only use agreements of this agreement type on sales orders of this order type. If the field is blank you may enter agreements of any type. The Agreement Required and Purchase Order Required are used for validation. If the box is checked then these fields will be required on all orders of this type when the order is booked. If you want to use the order type as a defaulting source for Price List on the order you may enter a Price List on the Main tab. The Credit Check rules for ordering and shipping determine whether credit check will occur for this order type. If the fields are blank, no credit checking will occur for orders of this type, the Minimum Margin Percent field lets you input the minimum acceptable margin that you want to allow for orders of this order type. If an order has an overall margin less than this minimum, it is put on a Margin Hold at Booking so that it can be reviewed. You must have the Calculate Margin feature enabled in the OM Parameters to use this attribute.
-
The Approval and Assign Line Flow buttons Return Line Type field and the Default Order Line Type field; those will be filled in later. This applies only to quotes.
-
Pricing section has optional fields for defaulting pricing information.
-
Credit Check rule section has optional fields for defaulting credit check information.
Shipping Tab
-
On the Shipping tab the autoschedule flag determines whether scheduling will try to autoschedule the lines on orders of this type. The inspection required flag is not accessible (it only applies to lines). The rest of the fields can be used for defaulting purposes.
Finance Tab
-
The Finance tab fields are used for information which affects the interfaces with the financial applications. The Currency and Currency Conversion Type can be used as defaulting sources for the order header. The Invoicing Rule and Accounting Rule fields are used as defaulting sources for the sales order line, and this information on the sales order is passed to Autoinvoicing. For the fields Invoice Source, Non-Delivery Invoice Source, and Receivables Transaction Type these values are required for interfacing to Receivables but they are not on the sales order header or line. When the invoice interface activity in the workflow is executed the system will look for a value in the following order: line transaction type, order transaction type, profile option. If no value is found the invoice interface activity will fail. The Cost of Goods Sold Account is used by the inventory interface when a line is ship confirmed.
Note: Normally the credit memo transaction type is defaulted from the following in the order in which they are written: Line Transaction Type, Order Transaction Type, and Profile option (Credit Memo Transaction Type). However if multiple operating units are being used, then the profile option value is not considered.
Enforce Price List Flag
The Enforce List Price flag determines whether a user can apply a manual discount to the order at the time of order entry. However this flag will not work on Pricing and Availability and Order Import windows. Please make sure this check box (Enforce List Price) is unchecked if you want to use Pricing and Availability or Order Import.
At the order type and line type levels, you can check the Enforce List Price flag so that modifiers are not applied on the lines during pricing. However Freight Charges will be applied even if the flag is checked as Freight Charges do not change the selling price.
Pricing does not support the Enforce List Price flag, so in order to ensure that modifiers are not applied, the following actions take place: The Calculate Price Flag is set to Y at the Price Event. For subsequent events (like Save and Book), the Calculate Price Flag is set to P (Partial) so that only the Freight Charges are calculated and no modifiers are applied.
Order and Line Level Controls
You can define order controls that apply to the order as a whole and are not overridable at the line level. For example, order numbering is controlled at the order level. An order can be numbered differently based on the order type, such as an order or return.
You can also define line controls that affect the line type level. You can set up certain controls that default from the order level and can be overridden at the line level. For example, you can have both return and order lines on a single order, however, the return and order lines process differently. The individual line processing is controlled at a higher line type level. You need to specify the workflow couplings for the permitted transaction type combinations. If a combination has notifications or workflow activities at the header flow which need to be completed before the line can proceed, then the header flow needs to have a Continue-flow activity. The line flow needs to have the appropriate Wait-for-flow activity.
The following table displays the various column controls that are available for Order Management Order transaction types.
| Column Name | Purpose | Define for Order Transaction Type | Required on Order Transaction Type | Defaulting Source for Header |
|---|---|---|---|---|
| NAME | Unique within the table for a given language. | Yes | Yes | No |
| TRANSACTION_TYPE_CODE | Distinguishes between order and line types. Line types are Order and Line. | Yes | Yes | No |
| ORDER_CATEGORY_CODE | Defaulting on the order or line. Restricts the types of lines on an Order. Mixed, Order, or Return. Line types are Order or Return. | Yes | Yes | Yes |
| CURRENCY_CODE | Defaulting Source | Yes | No | Yes |
| CONVERSION_TYPE_CODE | Defaulting Source | Yes | No | Yes |
| CUST_TRX_TYPE_ID | Invoicing Interface./Tax | Yes | No | No |
| COST_OF_GOODS_SOLD_ACCOUNT | Invoicing Interface | Yes | No | No |
| ENTRY_CREDIT_CHECK_RULE_ID | Credit Checking | Yes | No | No |
| SHIPPING_CREDIT_CHECK_RULE_ID | Credit Checking | Yes | No | No |
| PRICE_LIST_ID | Defaulting Source | Yes | No | No |
| ENFORCE_LINE_PRICES_FLAG | Used for validating discount application on order and lines | Yes | Yes | No |
| WAREHOUSE_ID | Defaulting Source | Yes | No | Yes |
| DEMAND_CLASS_CODE | Defaulting source | Yes | No | Yes |
| SHIPMENT_PRIORITY_CODE | Defaulting Source | Yes | No | Yes |
| SHIPPING_METHOD_CODE | Defaulting Source | Yes | No | Yes |
| FREIGHT_TERMS_CODE | Defaulting Source | Yes | No | Yes |
| FOB_POINT_CODE | Defaulting Source | Yes | No | Yes |
| SHIP_SOURCE_TYPE_CODE | Defaulting source. The values are Internal, External | No | No | No |
| AUTO_SCHEDULE_FLAG | Used by Scheduling. The values are Yes, No | Yes | No | No |
| SCHEDULING_LEVEL_CODE | Used by Scheduling. The values are 0, 1, 2 | Yes | No | No |
| AGREEMENT_TYPE_CODE | Validation at header level | Yes | No | No |
| AGREEMENT_REQUIRED_FLAG | Validation on Header | Yes | Yes | No |
| PO_REQUIRED_FLAG | Validation at header level | Yes | Yes | No |
| INVOICING_RULE_ID | Defaulting Source | Yes | No | Yes |
| INVOICING_CREDIT_METHOD_CODE | Defaulting Source | Yes | No | Yes |
| ACCOUNTING_RULE_ID | Defaulting Source | Yes | No | Yes |
| ACCOUNTING_CREDIT_METHOD_CODE | Defaulting Source | Yes | No | Yes |
| INVOICE_SOURCE_ID | Invoicing Interface | Yes | No | No |
| NON_DELIVERY_INVOICE_SOURCE_ID | Invoicing Interface | Yes | No | No |
| DEFAULT_INBOUND_LINE_TYPE_ID | Defaulting source for inbound lines. Use this value as Source for defaulting Line type on Line | Yes | No | No |
| DEFAULT_OUTBOUND_LINE_TYPE_ID | Defaulting source for outbound lines. Use this value as Source for defaulting Line type on Line | Yes | No | No |
Defaulting source for inbound lines. Use this value as Source for defaulting Line type on Line.
Note: The transaction type name for the base language cannot be changed once there are orders or lines referenced.
The Line Flow Assignments window is available only for OM order transaction types only. Use this window to assign line flows to the various line types that can be used with an order type.
A line flow can be assigned to an order type, line type and item type combination. Order Management enables you to define only one effective assignment for a given combination. If the item type is left blank, then that assignment will apply to all item types that do not have a specific assignment. If you plan to use a line type for ATO models then Order Management requires that you specify an assignment for the item type of configured item. Refer to Overview of Workflows and Setting up Workflow.
The following table displays sample Order Line types and associated Order line workflow assignments.
| Line Type | Order Types used with | For Item Type | Line Flow Assignments | Comments |
|---|---|---|---|---|
| Standard | Domestic | Outbound Domestic | For all item types (except configured items) | |
| Standard | Domestic | Configured Item | Outbound Domestic Configuration | Workflow specific to configured items. |
| Standard | International | Outbound International | This has the appropriate Wait-for Flow defined for the notification activity on the International Header flow. The workflow is for all item types (except configured items). | |
| Standard | International | Configured Item | Outbound Domestic - Configuration | This workflow is specifically for configured items. |
| Return | Domestic | Inbound Domestic | For all item types. | |
| Return | International | Inbound International | This has the appropriate Wait-for- Flow defined for the notification activity on the International Header flow. This workflow is for all item types. |
Assigning Workflows to Transaction Types
Select appropriate workflows for your order type and line types. Several header and line workflows are seeded. You can perform all standard OM processing including orders, returns, drop ship orders, orders for configured items and orders for assemble to order items using only seeded workflows. You can also assign a new negotiation flow for quotes. You may also define your own workflows if you need additional steps (such as notifications) or additional processes. Not all order workflows can be used with all line workflows. Some workflow steps between an order and line are dependent on each other. For example, the order flow with header level invoicing has a step which waits for a continue activity in the line flow with header level invoicing to complete. If you do not use order and line flows which are designed to work together you can have orders or lines that either complete activities when you are not ready for them to complete or which will never complete.
The order type alone determines the order workflow. In the define transaction types window for the order type, enter the order workflow that you have selected. This is the name of the process in the workflow builder. Save the order type and/or the negotiation flow. You cannot select the order type in the next step if you do not save.
The combination of the order type, the line type and the item type determine the workflow that a line will have. For this reason, you define the line workflows from the order type workflow definition window. Press the Assign Line Flows button. Enter the order type. For each combination of line type and item type that you want to use with this order enter a line in the Assign Workflow processes window. The line types are the ones that you defined in the first step. The item types are based on the definition of the items in the inventory module and include values such as standard item, kit, and PTO model. If you leave the item type blank the workflow process that you define will be used for all item types. (Exception: If you use the configure to order process, you must specifically assign a workflow to the configured item type; the configured item will not use a workflow where the item type field is blank.) The process name is the name of the workflow process as defined in the workflow builder. You must enter a start date for each line flow definition. Note: Once documents have been created using an order type you cannot change the associated workflow assignments. Therefore if you need to change the workflows assigned to a transaction or disable a transaction you must enter an end date for the existing assignment, and if appropriate enter a new assignment for the for the new workflow.
Finally you may enter a Default Order Line Type and a Default Return Line Type on the order transaction window. These values can be used as sources for defaulting the line type to orders of this order type.
Quotes
The Order Management framework includes a workflow phase to support the activities that typically occur within a negotiation phase, such as internal approval and customer acceptance. A document in the negotiation phase is called a Quote. This allows you to create and manage quotes during the negotiation phase and transition the quote to a firm order.
In order to use approvals with negotiations, you must first assign the “Negotiation Flow - Generic with Approval” with the transaction type you are using. Negotiation can apply to SA as well. It uses the same workflow as quotes, the difference is that a SA is still a SA whether in the Negotiation or Fulfillment phase.
See:
Approvals
Order Management provides the ability to define an approval hierarchy and associate it with a transaction type. The OM Approvals form enables setup of a list of approvers who will receive the approval notification. To access the form go to: Setup -> Transaction Type -> Approvals or you can set it up from the Transaction Types form from the Approvals button. Assign the list of members who will receive the approval notification and set the active flag for each. Make sure to specify the transaction type.
See:
Approvals.
The order type determines the order workflow. The combination of the order type, the line type, and the item type determines the line workflow.
Select appropriate workflows for order types, line types and item types:
You can perform all standard processing including orders, returns, drop ship orders, orders for configured items, and orders for assemble-to-order items using seeded workflows. You can also create your own workflows if you need additional steps, for example, additional notifications or processes.
You cannot select any order workflow to be used with a line workflow. Some workflow steps between an order and line are interdependent based on how Continue-flow and Wait-for-flow activities are paired. Therefore, the same line transaction type needs to follow a different line flow when used with a different order transaction type.
For example, the order flow with header level invoicing waits for an activity in the line flow to complete. If you do not use order and line flows which are designed to work together you can have orders or lines which either complete activities too early or which never complete.
The inventory item that a line is processing may have specific flow requirements. For example, a configuration needs to have a BOM and work order created before it can be picked and shipped. The standard item can be picked from stock and shipped. Therefore, the workflow for a configuration item is different than a standard item. However, both types of order lines can be use the same line type. The Workflow Assignments window displays the following item types for which a workflow can be assigned for a given order or order line type assignment:
-
ATO Models, Classes, Options, Items
-
Configured Item
-
Kits
-
Included Items
-
PTO Models, Classes, Options
-
Standard Items
-
Service Items
If the item type code is left blank, the specified workflow assignment applies to all item types for which there is no specific assignment.However, you should specify an assignment for the configured item type, if you plan to use the line type for ATO models.
Note: A workflow assignment is required for a given line type to support creation of lines using that line type.
The service details region in the Quick Sales Order window is used to view the Service information for a line rather than creating a Service line. The window does allow the creation of the Service Line in the service details region but assumes that the Transaction Setup is defined correct so that defaulting happens. Line Type is not a folder item in this region and you cannot choose a value for it. You require to associate a Line Workflow to Items of type Service. Please refer to the Oracle Order Management User's Guide for more information on defining Transaction Types.
The following table displays sample Order types and associated Order Header workflow assignments.
| Order Type | Header Flow Assignment |
|---|---|
| Domestic | Header - Standard |
| International | Header - International (This has a post-booking approval.) |
Workflow Validation
Oracle Workflow drives Order Management. You can use the Oracle Workflow Builder to customize and extend your Order Management workflows, so that they meet your specific Order Management needs.
Sometimes customizations and modifications can bring in exceptions that cause data corruption and degrade performance. In order to ensure that a workflow process does not error out during run-time , you can use the Order Management workflow validation feature to validate the workflow process before it is actually used. The Order Management workflow validation, provides additional validation over and above the basic validation performed by the Oracle Workflow Builder.
In Order Management, you can validate workflow processes in the Transaction Types window.
While saving your transaction type definition, implied or mandatory validation takes places for most workflow processes. However if you need to validate a specific workflow process, you can use one of the following three options:
-
Validate Workflow button in Transaction Types window – this calls the Validate OM Workflow concurrent program.
-
Validate OM Workflow concurrent program - you can run for specific parameters.
-
OE_Validate_WF.validate() Public API – you can call this a custom program/UI to validate your workflow definitions.
Below are the events where implied (mandatory) workflow validations take place:
Transaction Types Main Window
-
When you create a new order type or assigna workflow process to an existing order type, implied (mandatory) validation will take place on saving the record. When applicable, assigned blanket and negotiation workflows are also validated against fatal errors.
-
When a header workflow is updated, and it had previously assigned line flows, then implied (mandatory) validation will determine whether the new header workflow is compatible with all the existing line workflows or not. This occurs when the changes are saved
Transaction Types - Line Workflow Assignments Window
Implied mandatory validation takes place when you create a new line flow and save the record. Some other considerations for line workflow assignments:
-
You can perform workflow validation in two modes: 'Errors Only' and 'Errors and Warnings'. Please note that the Transaction Types window and the Line Workflow Assignments window enables you to perform implied or mandatory validation checks for Errors only, and not for Warnings, on saving. However when you run the concurrent program, both errors and warnings are shown.
-
While saving the record, implied (mandatory) validation for the errors occurs only after the existing form level validations and complements the existing error reporting functionality.
-
Validations take place for Error and Warnings. Order Header, Order Line, Sales Agreement and Negotiation workflows.
A complete list of errors and warnings is in the section below.
Errors
-
Activities with no OUT transitions.
-
FULFILL_LINE activity not preceded in the workflow by the activity specified by its Fulfillment Activity Name item attribute: This is a two-step check. If the Fulfillment Activity (for example, SHIP_LINE) is not present in the workflow at all, it’s treated as an error at workflow assignment time (during the implied (mandatory) validation). Otherwise, a message is displayed advising another validation using the validation button. If the validation can detect that the Fulfillment Activity does not come before FULFILL_LINE, it is an error. Otherwise, a warning is displayed to verify this manually.
-
Header Level Invoice Interface defined only for the line flow or its corresponding header flow, or vice versa, instead of both.
-
BOOK_WAIT_FOR_H present in line flow, but no BOOK_CONT_L in the header flow, or vice versa.
-
CLOSE_WAIT_FOR_L present in header flow, but no CLOSE_CONT_H in the line flow, or vice versa.
-
Seeded ATO Model, ATO Item, configuration item or education item workflow processes (R_ATO_ITEM_LINE, R_ATO_MODEL_LINE, R_CONFIGURATION_LINE and R_OTA_LINE) assigned to OM item types to which they are not applicable.
Warnings
-
WFSTD: WAIT (Standard Wait activity) has Wait Mode of Relative Time, but the time specified is 0: It is an error if it is in a loop, otherwise it displays a warning. Due to performance issues, however, this check should not be done at workflow assignment time.
-
WFSTD: WAIT (Standard Wait activity) has Wait Mode of Relative Time, and the activity is in a loop. A warning is displayed stating that the wait time specified should be longer than the longest expected running time of the Workflow Background Process, otherwise performance issues with the Workflow Background process may occur.
-
WFSTD: DEFER (Standard Defer activity) is in a loop. This can also cause issues with WFBG performance.
-
WFSTD: WAIT (Standard Wait activity) has Wait Mode of Absolute Time: Warning to alert the user to check if the time specified is appropriate.
-
No FULFILL_LINE in a line flow.
-
Header flows without BOOK_ORDER or CLOSE_HEADER activity.
-
Line flows without CLOSE_LINE activity.
-
INVOICE_INTERFACE coming before SHIP_LINE.
-
Custom workflow processes which were likely derived from the seeded ATO Model, ATO Item, configuration item or education item workflow processes (R_ATO_ITEM_LINE, R_ATO_MODEL_LINE, R_CONFIGURATION_LINE and R_OTA_LINE) assigned to OM item types to which they are not applicable.
-
Performance allowing, validate all other cases of master-detail workflow synchronization besides the one mentioned above, would practically involve searching the header flow and all line flows for all activities assigned wf_standard.waitforflow() standard workflow API and checking if there exists a continuation activity in the assigned header/line workflow. Similarly, every activity assigned wf_standard.continueflow() should be matched by the specified waiting activity in the assigned header/line workflow. This should be reported as an error, but due to performance concerns, the concurrent program can only do the validation.
Creating a Document Sequence
Order Management uses the AOL document sequence functionality for numbering orders. You must define at least one document sequence to be used for your order types, unless you are upgrading from a previous release of Order Entry in which case your document sequences will be upgraded. You may use this sequence for all your order types. For instance, you could define an automatic sequence beginning with 1 and assign it to all your order types. Then each new order that you enter will receive the next number in the sequence. Alternatively, you may define multiple document sequences and use different ones with different order types. One sequence could be used with your domestic orders which begins with 1 and another sequence could be used for your international orders which begins with 10000. The number ranges would be separate and order types easily identifiable.
Assign a Document Sequence
Assign your order type to a document sequence. Navigate to Order Management > Setup > Documents -> Assign. On the Document tab enter Oracle Order Management in the Application field and the order type in the Category field. Select the ledger. Enter Manual in the method field if the number sequence is manual, otherwise enter Null. On the assignment tab enter the start date and the sequence that you defined for your order type in the previous step. Note that you cannot change the assignment for an order type and ledger. To change the assignment you must assign an end date to the existing assignment and create a new one for the new assignment. You cannot have more than one assignment for the same date range, document type and ledger.
There are additional controls to be considered when a quote transitions to a sales order in reference to the document number and how the number is generated.
If a gapless numbering type is a requirement, then the Retain Document Number check box should not be selected when using a transaction type for negotiation and fulfillment.
See Negotiation in Order Management for more information about assigning negotiation flows to transaction types.
Define Document Sequences for Order Numbering
Sales Document Numbering
Define your order numbering options using the Oracle Application Object Library (AOL) Document Sequence functionary. You can set up various OM order transaction types and different document sequences. Both OM transaction types and document sequences can control which types of orders are numbered automatically or manually.
For example, you can have all your outbound orders numbered in a certain sequence and all your returns in a different sequence.When an OM order transaction type is created, a document category with the same name is automatically created. You can define sequences and assign them to the respective document category.
Reports
There is a report available which will print the setup information for your transaction types. It is called the Transaction Type Listing Report and you can print for one transaction type by name, a range of transaction types by name, only order transaction types, only line transaction types or any combination of these parameters.
Example
This example creates a new order type with associated line types, assigns the workflow processes, and creates and assigns a document sequence. After completing those steps, you can enter an order.
Create a line type for your order lines. Navigate to Setup -> Transaction Types -> Define. Create a new transaction type with the following information. Leave fields not in this table blank.
| Region | Field | Value |
|---|---|---|
| Header | Operating Unit | Default |
| Transaction Type | Standard | |
| Description | Standard Order Line | |
| Order Category | Order | |
| Transaction Type Code | Line | |
| Effective Dates | [Today's Date | |
| Shipping | Scheduling Level | Allow all scheduling actions |
| Finance | Credit Method For Invoices with Rules | Prorate |
| Credit Method for Split Term Invoices | Prorate |
Next, create a line type for your return lines. On the same window create a new transaction type with the following information. Leave fields not in this table blank.
| Region | Field | Value |
|---|---|---|
| Header | Operating Unit | Default |
| Transaction Type | Return with Receipt and Credit | |
| Description | Standard Return Line | |
| Order Category | Return | |
| Transaction Type Code | Line | |
| Effective Dates | [Today's Date] | |
| Shipping | Scheduling Level | Allow all scheduling actions |
| Finance | Credit Method For Invoices with Rules | Prorate |
| Credit Method for Split Term Invoices | Prorate |
The last transaction type that you need to create is the order transaction type. On the same window create a new transaction type with the following information. Leave fields not in this table blank.
| Region | Field | Value |
|---|---|---|
| Header | Operating Unit | Default |
| Transaction Type | Mixed | |
| Description | Standard Order with both Order and Return Lines | |
| Order Category | Mixed | |
| Transaction Type Code | Order | |
| Effective Dates | [Today's Date] | |
| Shipping | Scheduling Level | Allow all scheduling actions |
| Finance | Invoicing Rule | ADVANCE INVOICE |
| Accounting Rule | IMMEDIATE | |
| Credit Method For Invoices with Rules | Prorate | |
| Credit Method for Split Term Invoices | Prorate | |
| Receivables Transaction Type | Invoice |
Now assign your workflows to your transaction types. You should still be on the define transaction type window for the Mixed order type. Add the following information to this window:
| Tab | Field | Value |
|---|---|---|
| Main | ||
| Fulfillment Flow | Order Flow - Generic | |
| Default Return Line Type | Return with Receipt and Credit | |
| Default Order Line type | Standard |
Save your order transaction type so that you will be able to use it in the next step.
Click Assign Line Flows and enter the following information on the Line Workflow Assignments window:
| Field | Value | |
|---|---|---|
| Order Type | Mixed | |
| Line 1 | ||
| Line Type | Standard | |
| Item Type | [Blank] | |
| Process Name | Line Flow - Generic | |
| Start Date | [Today's Date] | |
| Line 2 | ||
| Line Type | Return with Receipt and Credit | |
| Item Type | [Blank] | |
| Process Name | Line Flow - Return for Credit with Receipt | |
| Start Date | [Today's Date] |
Create a document sequence for Orders. Navigate to Order Management > Setup > Documents > Define. Enter the following information:
| Field | Value | |
|---|---|---|
| Name | Mixed Orders Sequence | |
| Application | Oracle Order Management | |
| Effective From Date | [Today's Date] | |
| Type | Automatic | |
| Initial Value | 1 | |
| Start Date | [Today's Date] |
Finally, assign the order type to the document sequence. Navigate to Order Management Setup > Documents > Assign. Enter the following information:
| Tab | Field | Value |
| Document | ||
| Application | Oracle Order Management | |
| Category | Mixed [This is the name of the order type] | |
| Ledger | [The ledger for the order type] | |
| Assignment | ||
| Start Date | [Today's Date] | |
| Sequence | Mixed Orders Sequence |
You should now be able to enter an order of type Mixed and process both order and return lines through invoicing.
Using Workflow in Order Management
Overview
Workflow technology supports automation and continuous improvement of business processes. It supports routing information of any type according to user-defined business rules. Business transactions, such as order placements or purchase requests that involve various controls, routings, and approvals, can be managed more efficiently by leveraging Workflow technology. This is the primary reason why Oracle Order Management integrates with Oracle Workflow: to provide you with a comprehensive order processing and fulfillment system.
Oracle Order Management uses Oracle Workflow to control the sequence of events that occurs in the processing of orders, returns, order lines, and return lines. Oracle Workflow manages activities, executes functions, sends notifications, maintains completed activity history, detects errors, and initiates error processes. Oracle Order Management also uses Oracle Workflow to enable you to track the history of orders. Oracle Order Management enables you to model your business processes in terms of generic order processes. When defining a new workflow, you can begin with the basic activities of order processing. You can extend your business processes copying and editing seeded flows, or by using seeded and custom activities as components. Oracle Workflow in Oracle Order Management provides details about how to extend Oracle Workflow in Oracle Order Management to best meet your business needs. This guide also provides detailed information regarding the workflow processes that come seeded with Oracle Order Management.
Using Oracle Workflow in Oracle Order Management
Workflow
A basic order flow, from entry to invoicing, will most commonly use the Generic Order and Line flows which are assigned to a Generic order type. Figure 5 is an example of a Generic Order Workflow process (enter > book > close):
Order Flow - Generic Workflow Process
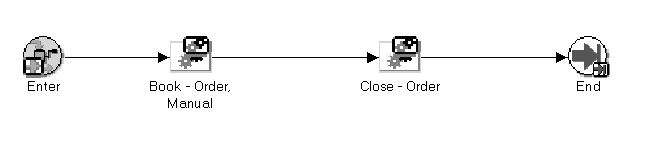
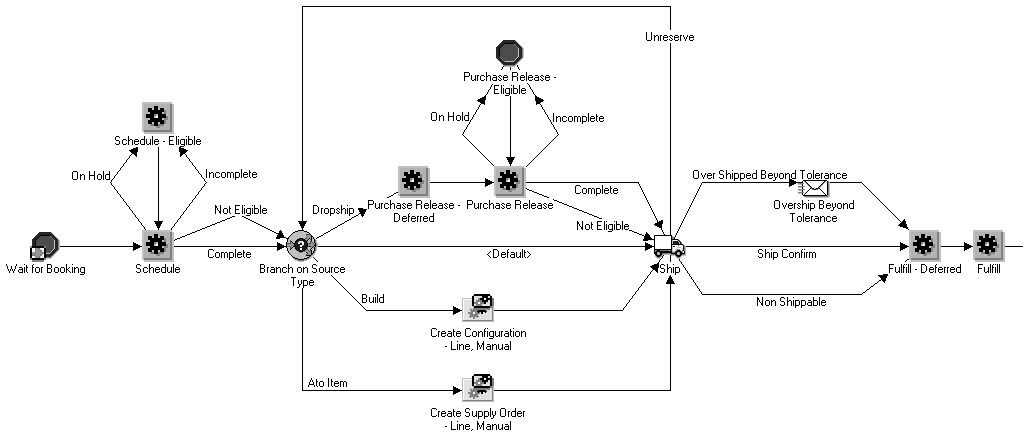
Figure 6 is an example of a Generic Order Line Workflow process (enter > schedule > ship > bill > close):
Line Flow - Generic Workflow Process

Fulfillment with Wait
Oracle Order Management has enhanced the Fulfillment Workflow activity to provide a new seeded workflow subprocess “Wait to Fulfill Line.” You can add this subprocess before the existing “defer fulfillment” and/or “fulfill line” subprocesses.
With the Wait to Fulfill Line subprocess, Order Management enables more flexibility on order changes and cancellation. This subprocess can be used for shippable, non-shippable and bill only lines alike to defer the fulfillment activity thus creating an opportunity to make changes or corrections before fulfillment.
The timeout activity is set to Fulfill-Wait for Line activity in the Header workflow. You can open OEOH (Order Header Workflow) in the workflow builder and check the Order Flow - Generic with Header Level Invoice Interface process. The timeout for the above activity is set to 1 day, which would mean that the activity would be retried after a day. You can modify this value to suit your requirement.
Note: You can copy the “Wait to Fulfill Line” subprocess and write a procedure to handle the copied check_wait_to_fulfill_line function such that it returns a value of Yes for order lines eligible to delayed fulfillment specific to their business requirement.
Note: The default logic in the OE_Fulfill_WF.check_wait_to_fulfill_line procedure will hold non-shippable order lines at the Fulfill_Line_Eligible block. The following type of non-shippable order lines will not be held at the block:
-
lines part of a configuration
-
service lines referencing a shippable order line in the same order.
See: Using Oracle Workflow in Oracle Order Management
Line Flow: Generic, Performance
This seeded workflow process is designed to improve workflow performance by eliminating workflow subprocesses. It contains all the activities in the Line Flow—Generic process, but most of the activities are included directly in the main flow instead of being decomposed into subprocesses.
Line Flow: Generic, Performance
Line Flow: Generic, Performance (Continued)
This process is optimized for performance and/or high volume users and is recommended when you do not need to make changes to the Generic Flow to suit their business needs. This flow is also intended as an example for process streamlining. It is not recommended to use this flow to create a customized workflow process because after the application of any patch containing workflow changes, the entire customized workflow must be compared to the seeded workflow to check if any changes need to be copied over.
Defaulting Rules
Order Management Defaulting Rules reduce the amount of data input required when entering orders or returns. You can define business rules for defaulting values, and prioritize how conditions and validation rules are implemented. If a defaulting rule definition fails to default desired values for orders or returns, you can choose to define additional defaulting rules for most attributes (fields) within Entities such as Order or Line.
Order Management provides seeded defaulting rules, and you can create additional Defaulting Rules by either:
-
Defining a new defaulting rule, either with a new Condition you create or using an existing Condition
-
Disabling a seeded defaulting rule and creating your own. You can not change seeded defaulting rules but you can disable the defaulting rule's condition
Note: You cannot update defaulting rules marked as seeded. However, you can create additional rules based upon seeded rule definitions and consequently disable the seeded rule.
Note: Depending on your release level, if you wish to default the Item Identifier type attribute for an order line, select either INT or Internal Item.
You can use defaulting rules to default values into fields (attributes) in both the Header and Lines Entities
-
Entities include groups of related attributes such as Order or Line
-
Attributes are the individual fields within a particular entity, such as Warehouse, Ship To Location, or Agreement
A default is a value that Order Management automatically places in an order or line field.
If the Attribute name is the same on both the Order and the Line, you can initially default the value from the Header to the Line.
For example, you can default Purchase Order at the Header to Purchase Order at the Line when you first create a PO number
Note: The initial value will default, but if you change the PO the new value will not default automatically from the header to the line unless Cascading has been enabled and all the lines can be updated.
-
You can also default the value of an attribute from another attribute within the same entity. For example, you could default Promise Date on the Line from Request Date within the Line Entity.
A defaulting condition is evaluated at run time to select the appropriate default source assignments for all the object attributes. You can define defaulting conditions that control defaulting of object attributes of an object (data object) in given mode of functionality. For example, you may have set up a condition for defaulting to occur one way if the Payment Terms are A, and another way if the Payment Terms are B.
Defaulting conditions created for an Entity must be based on attributes within that Entity.
A defaulting rule includes the following components:
-
Defaulting Source/Value (Entity and Attribute, Source Type)
-
Defaulting Condition
-
Precedence of Defaulting Condition (if multiple defaulting conditions exist, precedence determines the condition to use)
-
Sequence (in what order is the rule applied if multiple rules exist)
-
Source Type and Defaulting Source/Value: (how the attribute value is derived
Defaulting Rules
You can define several different rules to use in different order processing situations.
Sequence of Initial Attribute Defaulting
When attributes have equal sequence numbers, defaulting takes place alphabetically. You can change these sequences, if you need defaulting to happen in some different order. For example, you might define a sourcing rule that says default attribute A on the line from attribute B on the same line. For better performance, change defaulting sequence such that attribute B defaults before attribute A.
Attribute A must also be setup to be dependent on attribute B for rule to work correctly in all scenarios. Refer to 'Dependencies' section for further details on how to set this up.
Defaulting Rule Sequences
Specify the priority sequence in which you want to search for a field'sdefaulting value. Order Management looks at the lowest sequence number initially to begin searching for a default value, and continues to the next highest sequence number until it finds a value. For example, if your first and second sources are null, but your third source contains a value, Order Management uses your third source as the source.
Defaulting Sources
A defaulting rule source is the location from which you obtain a defaulting value; usually the location is another entity and attribute. For most attributes, you can assign at least one entity/attribute defaulting source, in addition to using other defaulting sources.
Defaulting Sources include:
-
Same Record
-
Related Record
-
System Variable
-
Constant Value
-
Application Profile
-
PL/SQL API.
For example, you may want to define a rule to default the Price List to the order header based upon a variety of different sources. Potential defaulting sources include customer agreement, customer, and order type; the potential attribute for all three of these entities would be Price List. You can choose any of the three source entities. Your choice may depend on your business practices, whether those sources exist for a particular order, and whether those sources have a price list defined for them. For the customer, you may have defined separate price lists for the Bill To and Ship To addresses in addition to the customer itself. All three of these fields are available as sources.
Examples of Defaulting Sources
Application Profile
The profile option source enables you to use a profile option, either system- or user-defined, as a default value source. You must indicate the name of the profile option to be used as the default value in your rule. Profile options sources enable for flexible default value tailoring without complex customizations.
Note: If you intend to use a profile option as a defaulting source, be certain that it is defined before attempting to reference it in a defaulting rule.
Constant Value
The constant value source option enables you to specify a constant value instead of a field that contains a value. This is especially useful if you want your default to be the same value or to be used if no other sources you have defined for your rule can provide a value.
For example, if all items in your organization are sold with the unit of measure, you could define a defaulting rule to default the value of Each for the Unit of Measure attribute within the Order Line entity.
System Variable
This system variable source option enables you to default system variables or functions of system variables for a field. This is commonly used to default date fields where SYSDATE expression or functions on SYSDATE can be used to default the current date or a function of the current date.
For example if the policy of your organization is to ship all items on the next day, you can setup the Request Date defaulting rule with System Variable as sysdate + 1
Same Record
Using same record as a source, you can default an attribute from another attribute on the same entity record.
For example a common requirement is to compute tax for an order line based on the scheduled ship date for that line. Set up a defaulting rule for tax date with Same Record source and Source Attribute as Schedule Ship Date.
Related Record
The Related Record is one of the most frequently used defaulting sources. Defaults for certain attributes can be setup when defining related object records such as Customer, Ship To, Bill To and Item.
For each attribute that you can use as a default, related record source objects/ source attributes are pre-defined in the system.
PL/SQL API
If you have a complex defaulting rule that cannot be defined using any other defaulting source, you can use the API source. Your logic to derive default values can be coded into your custom PL/SQL API, enabling you to reference you API within a defaulting rule.
Dependencies
Some attributes are dependent upon the value of other attributes on the same record. Dependencies can be established only among attributes on the same entity, not across entities. The list of available Source Attribute and Dependent attributes is pre-defined; most attributes are available but some are not.
If an attribute is changed, either by the user or by the system, any attributes that are dependent on it will be cleared and then re-defaulted.
For example, the Freight Terms for the Header Entity is dependent on Agreement. If the Header Agreement is changed, the Freight Terms for the Header entity will be cleared and re-defaulted.
If you create a rule for attribute X based on a condition using attribute Y, ensure that attribute Y is defaulted (not manually entered) before attribute X. Please note that if you manually enter Y and want to default X based upon the current value of Y, you will need to define a dependency where the source attribute is Y and the dependent attribute is X.
For example, if you define a Condition for defaulting the Unit of Measure by using the Customer, ensure that Customer is defaulted before the UOM. If you were to enter the Customer and you want Unit of Measure to re-default based on this new Customer value, you must define a dependency for Unit of Measure on Customer.
If you wish to create additional dependencies or disable existing dependencies, you can update a dependency extension API.
For additional details on dependencies and usage of the APIs within Defaulting Rules, refer to the Order Management white paper Defaulting Rules Setup, available on OracleMetaLink, http://www.oracle.com/support/metalink/.
Effects of Modifications to Orders and Rules
Modifications to orders may cause Order Management to re-apply defaulting values from your defaulting rules. This reapplication of defaults also may lead to changes that trigger another default.
If re-application changes a value and results in inconsistent information on the order, Order Management prevents users from committing the order and provides messages to assist in correcting the data. For example, depending on the defaulting rules, changing the line type on the order line could change the price list on the line. If the line items are not in the new price list, Order Management prevents you from committing the order and issues instructions.
Modifications to defaulting rules take effect for any new orders that use the modified defaulting rules when you open the Sales Order Header or Lines windows or if you update an attribute (field) on an order. If you do not or query an order or make a change to an existing order that uses the modified defaulting rules, thus activating validations for defaulting, then the order is not affected by the modification.
During order and line defaulting, Order Management does not replicate the value of defaulted attributes to all common lower level entities (cascading) when performing updates to existing orders. If you want to change the value of lower level entities for defaulting attributes on existing order or line records, you should utilize Mass Change functionality.
For example, assume you have a defaulting rule set up to default the line-level attribute Ship Method from the order header to all order line. You create an order using Ship Method A, and then add several lines. Since you are using Ship Method A for the order header, each subsequent order line created will use the default, Ship Method A. Now, you decide to change the Ship Method for the order header to Ship Method B.
Changing this attribute at the order header will result in any subsequent new order lines created to use Ship Method B as a default. Existing order lines that have Ship Method A are not updated to Ship Method B as a result of your changing the header attribute.
Use mass change to update order lines to Ship Method B.
Generating Defaulting Packages for Rules and Conditions
To generate or update defaulting rules or defaulting conditions, you must submit the Defaulting Generator concurrent program. When you submit the Defaulting Generator concurrent program, a defaulting handler package is generated for each attribute on each entity. The creation of new rules or conditions, as well as modified rules and conditions are not effective until the defaulting package for the attribute is successfully generated.
The concurrent program must be submitted if you perform either of the following:
-
Update an existing defaulting rule
-
Update a defaulting condition: When validation rules for a defaulting condition are updated, defaulting packages need to be re-generated for all attributes of the entity
-
Disable a defaulting condition
Key Enhancements
Some of the great new enhancements that this framework allows are:
-
the ability to define defaulting rules for returns and return lines - they used to be hard-coded.
-
the ability to define formulas to create the defaulted data - see the Sources of Values section below.
-
a clear distinction between ‘defaulting' behavior and ‘cascading'.
Terminology
Since Defaulting Rules are now generic, and potentially can be used by other Oracle applications, generic names are used. You default to attributes and entities and default from sources.
See: Sources of Values
Attributes and Entities in Order Management
An Entity in this context is a group of related attributes that roughly correspond to a table or a form in Order Management. There are entities of Order Header, Order Line.
An Attribute is a field or column that belongs to that entity. Therefore, the ordered unit of measure is an attribute of the Order Line entity. When you query up the Defaulting Setup window for a particular entity, a list of all the attributes for which you can define defaulting rules display.
You will not be able to define defaulting rules for descriptive flexfields, since their defaulting is controlled by AOL's flexfield routines.
Conditions
Defaulting Condition Validation Templates
Conditions are rules set up that control when a particular group of default sources will be looked at. Define one or more condition validation templates per entity based on common business rules to meet your business needs. Then you can use them over and over for the attributes of that entity. For example, you might set up a condition template for all return lines, or another one for all internal order lines. The ALWAYS condition is seeded for each entity. When defining a set of Conditions and using them in rules, be sure to place the ALWAYS condition last in the Precedence for Defaulting Conditions.
Defining Condition Validation Templates
Once you query up the entity that you want to work with in the Defaulting Setup window (use the flashlight icon to get the LOV of available entities), press the Defaulting Condition Template button to get to the window to define the conditions. A window that lists all the conditions already defined for this entity displays. To add a new condition, go to a blank line (or use the green + icon to create a blank line) and key in a name and description for your new condition.
-
The lower half of the window is where you enter the details of the condition you are defining or viewing.
-
The Group Number is an arbitrary number used to control AND and OR conditions. Indicate that rules are to be connected by an AND rule by giving them the same group number. Rules to be connected with OR should be given different group numbers.
-
In the Attribute column, choose from the list of attributes on which a condition can be based. Available attributes that show up here are ones from this entity that have the ‘Include in Building Defaulting Conditions check box checked on the Defaulting Setup - Entity Attributes window. The only attributes that have this check box checked are ones that are the source for a dependency relationship. See section on Dependencies below. You cannot add to this list of attributes.
-
In the Operator column, choose an operator from equal, not equal, greater than, less than, not greater than or not less than.
-
In the Value String column, key in (or choose from the LOV) the actual value you want to compare to.
Sequence of Defaulting
On the main Defaulting Setup screen, where all the attributes of the entity are listed, there is a column called Defaulting Sequence. This number determines the order in which attribute defaulting takes place. When attributes have equal sequence numbers, defaulting takes place alphabetically. All the attributes are seeded with a sequence of 50. You can change these sequences, if you need defaulting to happen in some different order. For example, you might define a sourcing rule that says default attribute A on the line from attribute B on the same line.
Sources of Values
Sources are places where values can be defaulted from. Defaulting Rules provide a variety of sources that can be used in building your defaults. Most of them will be familiar to users of Oracle Order Entry.
-
Constant Value: A fixed value that will be used.
-
Application Profile: is the value of a profile option. This can be a system provided profile option, or a new profile option that you've defined just to provide a defaulting value.
-
Same Record: The value of another attribute on the same entity (or record) as the attribute you are defining the rule. For example, you might set up the Promise Date to default from the Request Date on the same line.
-
Related Record: The value of another attribute on a related entity (or record). For example, you might set up the Ship Method on the line to default from the Ship Method on the header. Similarly, an attribute on the order header might default from an attribute on the related customer record.
-
System Variable: The value of a system (server) variable, such as System Date. For this type of source (and this type only), you can use an expression containing a formula, for example, sysdate + 7.
-
PL/SQL API: Define your own routine to provide the default. There are a few seeded defaulting rules that use this - for example, defaulting of the currency on the order header from the ledger is seeded this way.
-
Others: there are several esoteric source types relating to the Web App Dictionary definitions for this attribute.
Defining Sourcing Rules
Default Sourcing Rules
Once you query up the entity that you want to work with in the Defaulting Setup window and have defined your Conditions, you are ready to define your Sourcing Rules. Select the attribute you want to work on, and then click on the Defaulting Rules button to get to a window called Attribute Defaulting Rules. This window lists all the conditions and rules that have been previously defined for this attribute. To add a new condition and its rules, go to a blank line in the Defaulting Conditions section of the window (or use the green + icon to create a blank line), key in a precedence and choose from conditions you have already defined. (The precedence controls the sequence in which the conditions are evaluated.)
The lower half of the window is where you enter the details of the rule you are defining or viewing for this condition. This set of defaulting rules will be used if its corresponding Defaulting Condition is TRUE.
-
The Sequence here controls the order in which the system attempts to locate a default.
-
In the Source Type column, choose from the list of Source Types as described above.
-
In the Default Source Value column, specify the attribute or value you want to use for the source. Selection choices here depends on the Source Type you have selected. What you'll see in this field is a flexfield whose context is based on the Source Type. Then you can choose among pre-seeded possible source attributes.
There are similar restrictions to defaults. The data type has to match that of the attribute you are defaulting, and the source relationship has to be pre-defined.
Dependencies
Some attributes are dependent upon the value of other attributes on the same record. If an attribute is changed, either by the user or by the system, only other attributes that are dependent on it will be cleared and then re-defaulted. As of September 2000, functionality was changed for certain fields such that if re-defaulting did not come up with a default for the dependent field, the old value would be retained instead of clearing that value. These fields are: price list, salesperson, customer po number, order type.
For example, the Price List is dependent on Agreement. If the Agreement is changed, the Price List will be cleared and re-defaulted. If re-defaulting does not come up with a default for the dependent field, the old value is retained instead of clearing that value.
In the initial implementation of Defaulting Rules, dependencies are hard-coded. You can also check current code in the hard coded dependencies package - OE_Dependencies (file: $ONT_TOP/patch/115/sql/OEXUDEPB.pls) to get the latest list.
If you need to create additional dependencies or disable existing dependencies that you do not need, you can use an API hook: package OE_Dependencies_Extn ($ONT_TOP/patch/115/sql/OEXEDEPB.pls).
Adding dependencies via this hook is SUPPORTED as long as the guidelines documented in the file are followed. Following the guidelines would also ensure that patches do not over-write the changes introduced by customers.
However, please note that:
-
The list of source/dependent attributes that can be used to setup the dependencies is restricted. Refer to comments in file - OEXEDEPB.pls - for the complete list.
-
Dependencies can be established only among attributes on the same entity, not across entities such as changing an attribute on order header will NOT result in a change to attributes on order line.
Examples
There is an updated Ship To on the order but this results in Invoice To being cleared/updated. Deleted/disabled defaulting rule to default Invoice To from Ship To and still the behavior does not change. The reason is that there is a hard coded dependency of Invoice To on the Ship To field. In order to ensure that Invoice To is not affected by a change to Ship To, dependency should be disabled via this new hook. Source Attribute: Ship To, Dependent Attribute: Invoice To.
IF p_entity_code = OE_GLOBALS.G_ENTITY_HEADER THEN
x_extn_dep_tbl(l_index).source_attribute := OE_HEADER_UTIL.G_SHIP_TO_ORG;
x_extn_dep_tbl(l_index).dependent_attribute := OE_HEADER_UTIL.G_INVOICE_TO_ORG;
x_extn_dep_tbl(l_index).enabled_flag := 'Y';
l_index := l_index + 1;
If it is required that updating of Ship To should not change the value of Invoice To on the order line either, dependency should be separately disabled for line also.
ELSF p_entity_code = OE_GLOBALS.G_ENTITY_LINE THEN
x_extn_dep_tbl(l_index).source_attribute := OE_LINE_UTIL.G_SHIP_TO_ORG;
x_extn_dep_tbl(l_index).dependent_attribute := OE_LINE_UTIL.G_INVOICE_TO_ORG;
x_extn_dep_tbl(l_index).enabled_flag := 'Y';
l_index := l_index + 1;
It is somewhat more involved if you want to create a dependency for a source or dependent attribute that is not listed in OEXEDEPB.pl. This requires CUSTOMIZATION of existing packages, and patches in the future might over-write your changes.
-
Adding a new Source Attribute. You want to make Shipping Method on the header dependent on Shipment Priority.
-
Add a dependency in OEXDEPB.pls as above with Source Attribute: Shipment Priority, Dependent Attribute: Shipping Method.
-
Customize another entity specific utility package, because Shipment Priority is not listed as one of the source attributes available on Order Header.
-
Add the following statement in OE_Header_Util.Clear_Dependent_Attr
(file: OEXUHDRB.pls). If you're want a change in the Shipment Priority on the order line to also affect Shipping Method on the order line entity, code similar to the following needs to be added to OE_Line_Util_Ext.
IF NOT OE_GLOBALS.Equal(p_x_header_rec.shipment_priority_code
,p_old_header_rec.shipment_priority_code)
THEN
l_index := l_index + 1.0;
l_src_attr_tbl(l_index) := OE_HEADER_UTIL.G_SHIPMENT_PRIORITY;
END IF;
-
Adding a new Dependent Attribute: You want to make Planning Priority on the line to be defaulted based on Demand Class. You need to add a dependency in OEXDEPB.pls as shown above with Source Attribute: Demand Class, Dependent Attribute: Planning Priority. If Demand Class is not listed as one of the source attributes available on Order Line entity, you need to go through the steps outlined above to add it as a source attribute. And if Planning Priority is not listed as one of the dependent attributes for order line entity, you also need to CUSTOMIZE another section of the entity specific utility package.
Add the following sub-procedure in OE_Line_Util_Ext.Clear_Dependents (file: OEXULXTB.pls).
PROCEDURE PLANNING_PRIORITY IS
BEGIN
IF (p_initial_line_rec.PLANNING_PRIORITY = FND_API.G_MISS_CHAR
OR OE_GLOBAlS.Equal(p_initial_line_rec.PLANNING_PRIORITY
, p_old_line_rec.PLANNING_PRIORITY))
THEN
p_x_line_rec.PLANNING_PRIORITY := FND_API.G_MISS_NUM;
END IF;
END PLANNING_PRIORITY;
Note that for VARCHAR2 fields, you must replace G_MISS_NUM with G_MISS_CHAR For DATE fields, it should be G_MISS_DATE. Also, add a statement in the big IF loop in the main procedure to call this new sub-procedure:
ELSIF l_dep_attr_tbl(I) = OE_LINE_UTIL.G_AGREEMENT THEN
AGREEMENT;
For adding dependent fields on Order Header entity, follow the above steps & add similar code in header utility package: OE_Header_Util (file: OEXUHDRB.pls).
Controlling Changes
Order Management's Defaulting Rules controls who can change data and when using the Processing Constraints framework regardless of how or whether an attribute was defaulted. In addition, when defining Processing Constraints you have the ability to indicate that you want the system to be able to update an attribute, but limit your other others privileges to make changes.
The only time that Defaulting Rules result in a change to an existing attribute on an entity is when that attribute has a dependency on another attribute that has been changed.
Reports
There is a new report in Order Management that lists the Defaulting Rules you have set up. It replaces the old OE Standard Value Rules Listing. The report is called Defaulting Rules Listing, and it has parameters to allow you to limit the listing to a specific object (entity), attribute or condition. One more parameter is the option to specify if it is: Seeded (yes or No).
Order Management seeded defaulting rules that defaulted Order Type and Salesrep from the customer have been deleted. A report has been provided to enable you to view the deleted defaulting rule list. The report is ontkexc01.lst generated by ontkexc01.sql and is available from the patch log..
Implementation Considerations
Creating Conditions
As stated previously, conditions give you powerful flexibility in designing how you will implement defaulting rules for your company. However, there are a few behaviors to take into consideration when creating Conditions.
What Attributes can you use?
Be aware that Conditions you create for an entity can only be based on attributes that belong to that entity. Therefore, for example, you cannot set up a Condition for a line attribute based on Contact because Contact is a header attribute. You'll have to examine carefully your business rules so you can state Conditions in terms of attributes on the same level. Fortunately, in Order Management, most attributes (with few exceptions such as Price List and Currency) at the header are also present at the line level. Even the sold-to customer is present as a line-level attribute, even though the software enforces that the customer is the same throughout an order. This way, the customer can be used in a condition template for the line.
Sequencing of Attributes Used in Conditions
Sequencing of defaulting of attributes plays an important role in the correct design of Conditions and Sourcing Rules. If you create a rule for attribute X based on a Condition using attribute Y, you must be sure that attribute Y gets defaulted before attribute X, or your Condition will not evaluate true. For example, if you define a Condition for defaulting the Unit of Measure by using the Customer, it will only work if you ensure Customer gets defaulted before UOM, and even then, it will only work for the initial defaulting of the UOM field. That is because of Dependencies.
Dependencies of Attributes Used in Conditions
So you must also regard dependencies when you are building Conditions. If a Condition involving attribute Y is used to setup the defaulting rule for attribute X, then the rule will work during subsequent updates of attribute Y only if attribute X is dependent on attribute Y. So in the UOM and Customer example above, if you later change the Customer on the order, the UOM will not re-default based on the new customer, because UOM is not dependent on Customer.
Defaulting vs. Cascading
In Order Management, a clear and unambiguous distinction has been made between defaulting and cascading, that will cause data to populate in the windows in different ways. In Order Entry, defaulting and cascading were intermixed, making it sometimes difficult to predict what might happen when an attribute at one level was changed. In Order Management, the defaulting logic will come into play only when the record is initially created (when you click on a new record on the window), or when an attribute upon which this attribute is dependent is changed. Cascading, on the other hand, means that if the header attributes change, the corresponding line attributes change. During Cascading either all the lines are updated or if there is a failure, none of the lines are updated. Again, this is different from the new mass change capability, where you multi-select the rows you want to change, and then they are updated on clicking Ok in the Order Mass Change window.
How are these concepts applied? Assume you have a defaulting rule set up to default an attribute such as Shipping Method from the header to the line. Create an order with several lines and use Shipping Method A for the header and the line values get defaulted to Shipping Method A. Then you want to change the shipping method to Shipping Method B at the header level. Changing this attribute at the header will result in any subsequent new lines getting Shipping Method B defaulted onto them. The existing lines that have Shipping Method A will not get changed to B as a result of your changing the header attribute unless Cascading for the Shipping Method attribute is enabled. In such a situation, the Shipping Method attributes at the line level will automatically update to Shipping Method B. Apart from the Shipping Method, other related fields will also be updated automatically due to Cascading.
New Defaulting Features
Now, End Customer functionality allows defaulting for Install Base information for better accuracy. You can optionally default values for Install Base Owner, Current Location and Installed At Location at the header and line levels. The End Customer fields are located on the Others Tab of the Sales Orders form.
Also with the new Pricing and Availability functionality, you can setup to default pricing & availability attributes including, demand class, item identifier type, warehouse and price list.
Because of the magnitude of the changes to the fundamental architecture between SVRS and Defaulting Rules, the decision was made to not upgrade any user-defined SVRS. Defaulting Rules have been seeded that provide equivalent functionality to the R12 seeded SVRS.
Users of Order Entry who created their own Standard Value Rules or customized the seeded rule sets will need to carefully review the logic behind their changes or customizations, and create equivalent Defaulting Rules for the attributes affected. Typically a user will need to create Conditions corresponding to their particular business need, and then create Defaulting Rules using those Conditions for the necessary attributes.
Order Management Defaulting Rules
The Defaulting Rules Listing Report shows the possible entities and attributes for which you can define defaulting rules. Entities like Order Header, Order Line, Line Payment, Order Payment.
Cascading
In previous releases, the number of attributes that cascaded to the lines on update were limited. The cascading feature introduced in the current release expands on the number of attributes that may be cascaded to the order lines if required and can be determined at set up. Cascading will occur for either all or none of the lines. If there is an update failure for one line, then the cascade processing will fail for the other lines. For example, if there is a processing constraint in place at the line level that restricts update and that attribute is updated at the header, which subsequently fails for the line, cascading will fail for all other lines.
Note: Cascading should not be used as a substitute for or an extension of masschange/multi-select.
The existing profile OM: Sales Order Form: Cascade Header Changes to Line determines what choices the user has when using this feature, but does not enforce cascading.. The attributes need to be enabled in the quick code lookup before Cascading will take place. The attributes can be enabled or disabled and the profile will determine the manner in which they cascade, for example, you can either confirm cascade to lines or set it to be done automatically.
The profile has the three modes: If the value is set to Automatic, the system will cascade the header attributes to lines whenever a header attribute is cascaded. If the value is set to Askme, you are given a choice to cascade or not. If the value is set to Manual, you should manually change the values for the attributes on the lines and the system doe not cascade the changes from header to lines.
When the profile has been set, the attributes need to be enabled to complete the set up. Cascading in this manner is supported via the user interface but is not supported for APIs.
The lookup OM: Header To Line Cascade Attributes has the list of the attributes that can act as a defaulting source from the order header to its lines. This lookup is used to determine which of the attributes should be cascaded from the header to the lines whenever the attribute is updated on the order header. You can choose to disable the attributes in the lookup if you prefer not to have changes to the value of a header attribute to cascade from the header to its lines. Quickcodes/ the lookup is set at the user level and is not extensible.
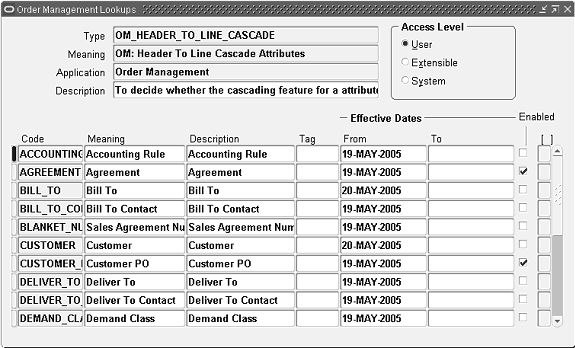
For a list of line attributes that change due to Cascading please refer to the Appendix, Header to Line Cascade Attributes Lookup.