Change Management
This chapter covers the following topics:
Processing Constraints
Overview
Processing Constraints enable you to control changes to sales documents in Oracle Order Management. This chapter describes the Processing Constraints framework in detail.
Introduction
Processing constraints are rules that control who can change what and when they can change it. Processing constraints can prevent certain changes, but can also be set up to perform actions based on those changes. They can define actions that can result from these changes, such as requiring a reason for the change, triggering an action in Audit Trail or Versioning, or raising an Integration Event.
With processing constraints, you can control:
-
Who can make changes based on responsibility. A constraint (rule) may apply to all responsibilities, to only a list of constrained responsibilities or to all except a list of authorized responsibilities.
-
More than just what can be updated. The following operations can be controlled: Create, update, delete, cancel, and split all at the entity level. For example, given a set of conditions you may not want to allow a user to create a new order line. You can also control the update operation down to the attribute level. For example, given a set of conditions, you could choose to allow update to the warehouse field of an order line but not to the price list field.
-
Changes to entities. An entity roughly corresponds to a table or window. The entities you can control in Order Management are:
-
Order Header
-
Order Line
-
Order Sales Credit
-
Line Sales Credit
-
Order Price Adjustment
-
Line Price Adjustment
-
Order Payment
-
Line Payment
-
Sales Agreement Header
-
Sales Agreement Line
-
-
Changes based on a group of conditions. The conditions must be collectively true for the constraint to fire or prevent the changes. The conditions may be based on either the state of a workflow activity (where the entity is in the flow) or a value in a table. A condition may also be based on a custom API, which means that you can call your own PL/SQL code to evaluate the condition.
Multiple conditions can be combined using either AND logic (all the conditions must be true) or OR logic (at least one of the conditions must be true.)
A custom message can display when an attempt is made to violate a constraint.
This chapter details the differences between Processing Constraints and the functionality in Order Entry that it replaced - Security Rules. It describes in detail the implications of selected values in the following forms: Processing Constraints, Validation Templates and Record Sets. Finally, set up for processing constraints is demonstrated using the following business examples:
-
No one can change the customer purchase order at the line level; your company requires that one sales order can relate to only one customer purchase order.
-
No one can add a line to an order after any of the lines on the order have been invoice interfaced.
-
A reason is required to cancel an order line after it has been booked.
-
Only the Customer Service Manager can change the discount percentage on an order line after the line has been shipped.
-
Require all return orders, identified by order type = Return, to be shipped to a central returns processing facility.
Constraints for drop ship functionality enable you to control changes within the drop ship flow between Oracle Order Management and Oracle Purchasing. See Processing Constraints for details on these constraints.
Versioning in Order Management uses constraints to enable automatic versioning. You can use validation templates for example to drive versioning by transaction type as a condition. By using the processing constraints and workflow activity, you can increment the version and determine the statuses available to version, which give you complete flexibility setting up versioning.
See: Versioning
Background
Security Rules provide functionality to control changes to orders. However, they have certain limitations both in the philosophy and in implementation. In Order Management there is a processing constraints framework usable by other products.
This framework provides to you the ability to:
-
Control changes based on who is trying to make them (by responsibility)
-
Define constraining conditions based on the state of related objects (for example, define a constraint on a line based on the state of the order)
-
Control changes based on the value of a field - see Validation Templates section below
-
Call custom PL/SQL code to determine whether a condition is true
-
Constrain operations at any point in the process flow. In prior releases you could only control operations for certain hardcoded cycle actions.
Terminology
Processing Constraints are very powerful and setting them up is not difficult; however, knowledge of the following terms is helpful:
Entity
A group of related attributes that roughly correspond to a table or a window in Order Management. The entities that can be managed using processing constraints are Order Header, Order Line, Order Price Adjustment, Line Price Adjustment, Order Sales Credit, Line Sales Credit, Order Payment, Line Payment, Sales Agreement Header, and Sales Agreement Line. Entities correspond to ‘objects' in the old security rules.
Attribute
A field or column that belongs to an entity. For example, the ordered unit of measure is an attribute of the Order Line entity. Attributes correspond to fields in the old security rules.
Operation
An action that you can take on an entity. The operations that can be controlled by processing constraints are Create, Update, Delete, Cancel and Split.
Processing Constraints Framework
A generic facility that will enable you to define processing constraints for application entities and attributes. It includes the set of APIs that will enable you to query the existence of any constraint against the operations you wish to perform on that entity or its attributes.
Seeded constraints have the System box checked and cannot be modified.
Validation Template
Names a condition and defines the semantics of how to validate that condition. These validation templates can be used in the processing constraints framework to specify the conditions for a given constraint.
Record Set
A record set is a set of records that are bound by some common attribute values (for example all lines on an order). In the processing constraints framework, when you define constraining conditions, you may specify a record set to be validated for a given condition as defined by its validation template.
Scope
Given a record set and a condition, the scope (Any/All) defines how the validation should be performed on records of the record set. "All" requires the validation to be TRUE for every record in the set. "Any" requires the validation to be TRUE for at least one record in the set.
Conditions
The test(s) which must be passed for a constraint to be active. For example, a condition for a constraint might be that the order is booked.
Defining Processing Constraints
Processing Constraints Window Conditions Tab
Navigate to the Processing Constraints window. Order Management > Setup > Rules > Security > Processing Constraints.
Note that the window is divided into several regions. The top region has fields for the Application and the Entity. Any one of the OM entities are the valid values for the entity field. This is used for querying—you cannot create new entities. When you query an entity you will see all the constraints defined against that entity.
Constraints
The Constraints region is where most of the details of a processing constraint are defined. The region enables you to view the seeded constraints, view, or update the constraints that were created for your company. You can create new constraints, but you cannot change the seeded constraints with the system check box marked.
Operation Field
The Operation field can have the values of Create, Update, and Delete for any of the entities, Cancel for Order Header and Order Line entities only, and Split for the Order Line Entity only.
Attribute Field
The Attribute field can only be used if the operation selected is UPDATE. You may enter a value here, and the constraint will only apply to that field. For instance you may define a constraint that affects only the warehouse field on the order line. If the Attribute field is left blank the constraint will be in effect for all the attributes of the entity. For instance, you may define a constraint which prevents updates to any of the fields of an order line. Please note that only when constrainable attributes are updated, processing constraints execute. All attributes are not constrainable, therefore processing constraints will not execute for such attributes, even though the operation selected is UPDATE.
Action Field
The Action field allows you to select the action to be taken if the constraining conditions are met.
Note: There is no unique Require Reason action; it must be used in conjunction with Versioning or Audit.
Processing Constraints Window with User Action Menu Displayed
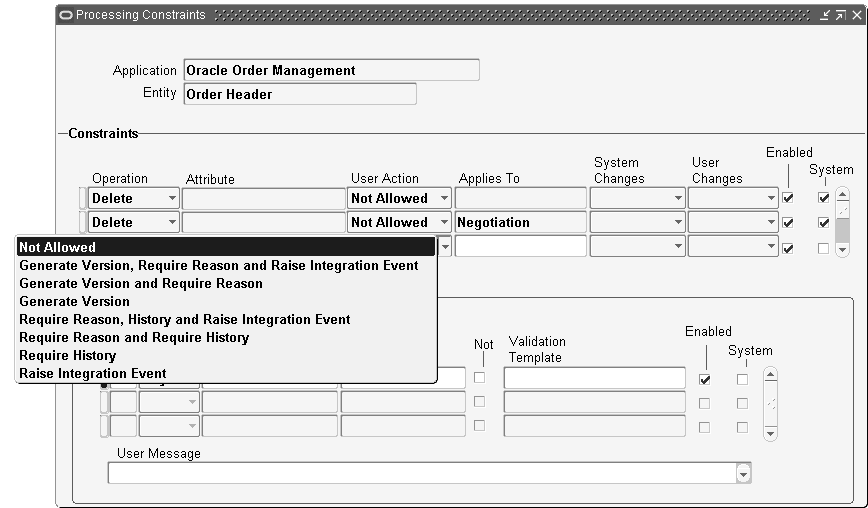
The combination of Actions that can be selected are:
-
Generate Version, Require Reason and Raise Integration Event
-
Generate Version and Require Reason
-
Generate Version
-
Require Reason, History and Raise Integration Event
-
Require Reason and Require History
-
Require History
-
Raise Integration Event
Actions of Require Reason and Require Reasons and Require History for audit history are supported only for the UPDATE operation.
Constraints are evaluated in the following order (Only one constraint may take effect for a change):
-
User Action
-
Not Allowed.
-
Generate Version, Require Reason and Raise Integration Event. This activates automatic versioning.
-
Generate Version and Require Reason. This activates automatic versioning.
-
Generate Version. This activates automatic versioning.
-
Require Reason, History, and Raise Integration Event. This activates Audit Trail to capture changes.
-
Require Reason and Require History. This activates Audit Trail to capture changes.
-
Require History. This activates Audit Trail to capture changes.
-
Raise Integration Event. This can be used with versioning.
-
During implementation any action which includes "Raise Integration Event" may be selected. This event is presently used by XML processing and can be used by any other product.
Actions that Require Reason take precedence over actions that do not.
Example
Assume that both versioning and audit constraints apply to update of price list. Only version is captured as it takes precedence and audit history is not available for this update. However, if audit constraint is on a different attribute like update of payment term and you change the payment term and price list, both version and audit history are captured.
Applies To Field
The Applies To field is used to define whether the constraint is applicable in the Negotiation or Fulfillment transaction phase. If the field is blank, then it is applicable to both phases.
Enabled Field
The Enabled field indicates whether the current Constraint is active. This allows constraints to be temporarily disabled if necessary.
System Changes Field
Use the System Changes field to indicate if system changes are allowed even if the constraining conditions are met. The system changes here refer to an attribute initially getting a default value or being re-defaulted when a source attribute changes. This is applicable only for attribute or field level UPDATE operations. The possible values are:
-
Never after Insert: System changes are allowed to this field only if the entity has not yet been saved to the database. This is the default value.
-
Always: System changes are always allowed on the attribute
User Changes Field
Use the User Changes field to indicate when the user performing the operation is constrained. This is applicable only for attribute or field level UPDATE operations. The possible values are:
-
Never after Insert: You can change this field only if the entity has not yet been saved to the database. This is the default value.
-
Always: You can never enter a value for this attribute, even if the entity (for example an order) is being created for the first time.
System Field
The System Field indicates if a constraint included with the OM system is user updateable. System constraints help prevent data integrity problems and cannot be updated. Any operation, field, action, or list of responsibilities attached to these constraints cannot be modified. However, additional validation conditions can be included as long as they do not have the same group number.
Enabled Field
The Enabled field indicates whether the current Condition is active. This allows conditions to be temporarily disabled if necessary. Note that if all conditions are disabled and the constraint itself is not disabled, the constraint always applies for that change. Care must be taken to ensure that the disabling of conditions does not introduce problems in the business flow.
The bottom section of the window has two tabbed regions - the Conditions region and the Applicable to region.
Conditions
The Conditions region allows you to define the condition(s) that must be true for the constraint to fire. Unless the group of conditions are true, the constraint will not be active.
Group Number Field
The Group Number field determines whether AND or OR logic is used to combine conditions. For conditions that should together evaluate to TRUE (AND conditions), enter the same group number. Define OR conditions by using different numbers.
Scope Field
The Scope field is evaluated with the Record Set field to determine if the condition is true. The possible values are:
-
ANY: If the record set on this validation condition can select multiple records, then this condition should be TRUE for AT LEAST ONE of the records. For example you can evaluate a condition against any line on an order: If ANY line on the order is canceled.
-
ALL: If the record set on this validation condition can select multiple records, then this condition should be TRUE for ALL the records. For example you can evaluate a condition against all lines on an order: If ALL lines on the order are canceled.
Validation Entity
The Validation Entity is the one for which the condition is evaluated. The validation entity can be the constrained entity (displayed in the Entity region) or any related entity. For example, the constrained entity could be an order line and the constraint could be evaluated based on characteristics of the validation entity order header.
Select the Record Set and based on the selected scope, the conditions will be evaluated for any or all of the records in the set. An example of a seeded Record Set is a ship set. You may define additional record sets as needed.
Note: If the validation entity on the condition is different from the constrained entity, then only the record set based on the primary key for the validation entity will be available in the LOV
Check the NOT Box to create a NOT condition. For example if the condition is Booked, checking this flag will evaluate the condition NOT Booked.
System Field
The System field is checked for the conditions that were included with the OM system and are not user updateable. You cannot define new AND conditions with the same group number as a system condition.
User Message Field
The User Message field displays when an attempt is made to violate a constraint. The message is specific not just to the constraint but also to the specific condition that was violated. For example, you can create a user message that states: "line has been booked." If the constraint is set up to prevent any update to the item field on the order line if the line had been booked, the complete error message displayed at run time is: "You are not allowed to update the item; line has been booked."
The following screen shows the Processing Constraints window again, this time with the Applicable To tab selected. Use this tab to define the responsibilities the constraint applies to.
Processing Constraints Window, Applicable Tab
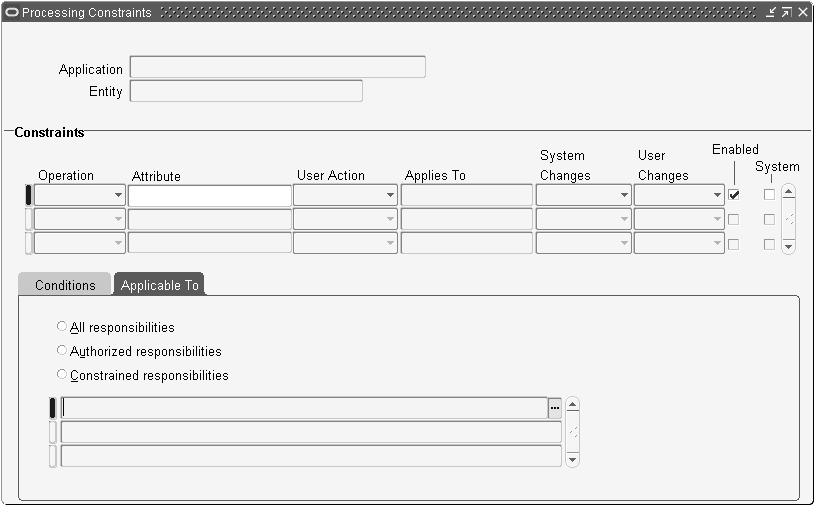
If the button for All Responsibilities is selected, then the constraint will apply to all users. No one will be able to perform the constrained action. All seeded constraints are applicable to all responsibilities.
If you select the Authorized Responsibilities button, then only the responsibilities that you list will be allowed to perform the action. All other users will be stopped from performing the action by the constraint.
If you select the Constrained Responsibilities button, then all users except for the responsibilities defined will be able to perform the action. The users that you list will be stopped from performing the action by the constraint.
There are two other forms that are used in setting up processing constraints. These are the Validation Templates window and the Record Sets window. The validation templates and record sets you create, as well as the seeded ones can be used in the Processing Constraints window as described above.
Note: After updating constraints and/or conditions, close and reopen the sales document windows for the updated constraints to apply correctly.
Defining Validation Templates
Validation Templates Window
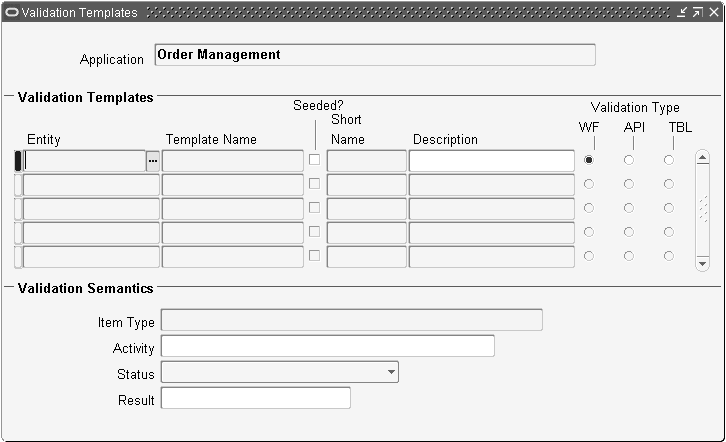
Navigate to the Validation Templates window. Order Management > Setup > Rules > Security >Validation Templates.
This window is divided into several regions. The top region displays the Application field. The Validation Templates region has one row for each validation template, and each row has several fields. The Entity field is one of the ten OM entities. Check this entity to determine if the condition is true. Give the validation template a name in the Template Name field, a short name in the Short Name field and a description in the Description field. These are user defined. The short name cannot be changed once the validation template is saved. The box is checked if the validation template is seeded by Oracle development. Seeded validation templates cannot be modified.
The Validation Type field is a group of radio buttons with the possible values of WF, API and TBL. The available fields in the Validation Semantics region of the window change depending on the selection that you make from this group. If you select WF, then the validation is based on the status of a workflow activity. An example of this is the seeded validation template Booked that is based on the status of the Booked activity of the order header workflow. If you select API, then PL/SQL code is called to evaluate whether the validation template is true. There are several seeded validation templates that call APIs including the Lines Exist template that determines if lines have been entered for an order. If you select TBL then validation is based on the value of a field. For example, the condition will be true if the field order type has a value of Standard.
Note: When the validation template has an activity Booked, and the processing constraint operation is Cancel, if the user tries to cancel the line before booking, the Ordered Quantity decreases to 0, but the line status displays as Entered and not Cancelled.
Validation Semantics for Validation Type WF
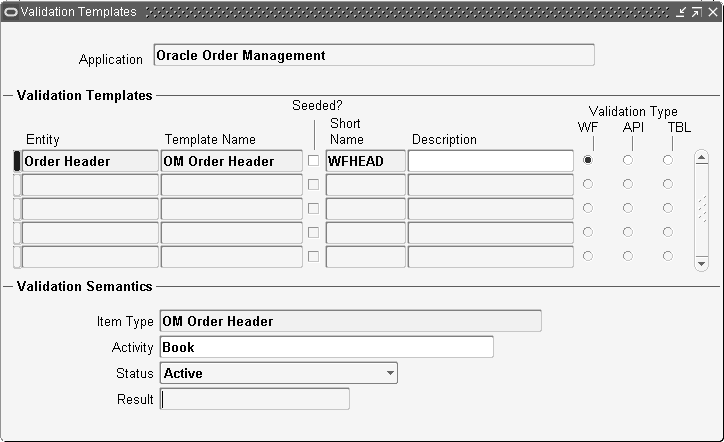
This graphic depicts the Validation Semantics for Validation Type WF. The Item Type field can be used to define the workflow item type associated with the entity, such as "OM Negotiation Header" or "OM Order Header for the Order Header entity." The Activity field is the name of the workflow activity for which you are checking the status. The Status and Result fields are the attributes of the workflow activity that will make the validation template return a true value. In this graphic, the validation template would be true if the order header had an activity called Invoice Interface - Header Level which had completed with any result.
Validation Semantics for Validation Type API
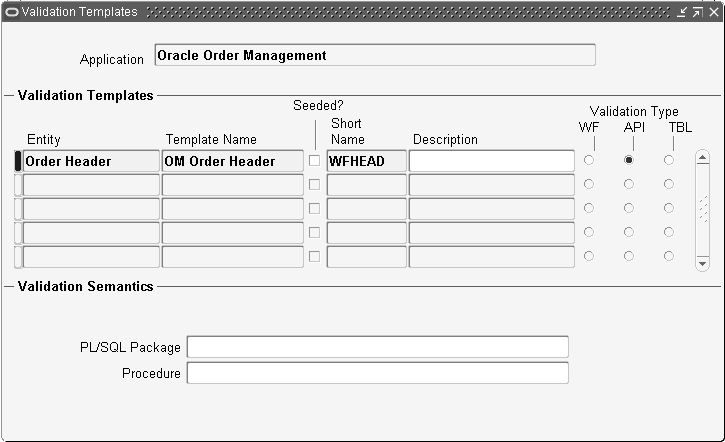
This depicts the Validation Semantics for Validation type API. Enter the validation semantics for validating the API for return value TRUE. (This may be used for complex validations.)
-
Database Package: Enter name of the data package
-
Procedure Name: Enter the name of the API
All validation APIs should be written with a framework defined signature format
PROCEDURE YourValidationAPI
(p_application_id in number,
p_entity_short_name in varchar2,
p_validation_entity_short_name in varchar2,
p_validation_tmplt_short_name in varchar2,
p_record_set_short_name in varchar2,
p_scope in varchar2,
x_result out number);
x_result returned should be 1 if the condition is valid and should be 0 if condition is NOT valid.
The procedure should push all error messages (if any) into OE_MSG_PUB Stack. It can reference the record being constrained by referring to the global record variable in the entity's constraint API package. The naming conventions are as follows.
Entity's constraint API package Name:
ApplicationShortName_Entity_Short_Name_PCFWK
(e.g. OE_HEADER_PCFWK)
global record variable name: g_record
(e.g. for the entity HEADER, the variable name will be OE_HEADER_PCFWK.g_record)
Validation Semantics for Validation Type TBL
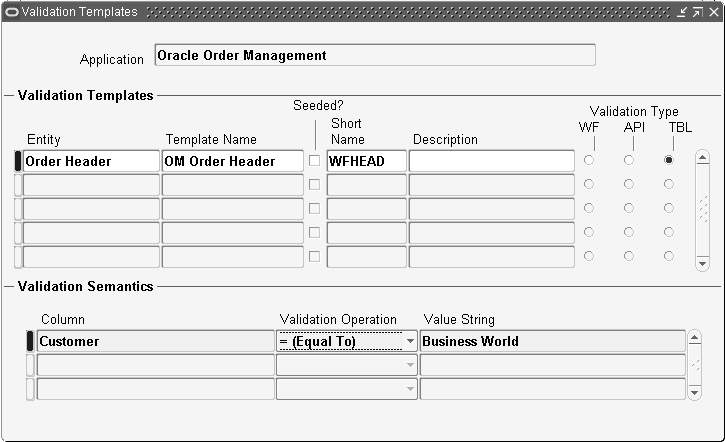
This graphic depicts the Validation Semantics for Validation Type TBL. Enter the Column Name in the Column field. The Validation operation can be one of the following:
= (Equal To)
<> (Not Equal To)
Is Null
Is Not Null
The Value String can be any value. An example of validation semantics for a column is:
Column - Order Type
Validation - = (Equal To)
Value String - Standard
This would return TRUE for all orders with type Standard. Note that it wouldn't work if you typed a value string of STANDARD (it must match exactly).
Defining Record Sets
The window for creating record sets is depicted below. This window is also divided into several regions.
Record Sets

The top region has the name of the application, Oracle Order Management.
The Record Sets region has a row for each record set. The Entity field will be one of the ten OM entities. Each record in the record set will be of this entity. For example you can make a record set of lines or orders. The box is checked if the record set is seeded. This flag is not modifiable by the user, and the seeded record sets cannot be modified by the user.
Give the record set a name in the Record Set field, a short name in the Short Name field and a description in the Description field. These are user defined. You cannot change the short name once the record set has been saved. Select the Based On Primary Key Box if this record set is selected using the primary key. There can be only one primary record set for a given entity.
At the bottom of the window is the Matched Columns for Record Selection region. Enter the name of the columns that match from the validated record so that multiple rows can be selected from the validated entity's table. For example, matching the Header ID and Ship Set Number of the order lines entity will select all order lines in the same ship set.
Concurrent Program
In order to create or update new processing constraints, you must run the Create Validation Packages concurrent program, which is required for creation of new validation templates or record sets. Run this program from the Tools option on the menu bar of either the Validation Templates or Record Sets window or from the navigation menu by selecting Setup > Rules > Security > Generate Constraints Package. Run this program anytime you create, update, or modify your processing constraints.
Report
A report, Processing Constraints Listing, lists defined Processing Constraints. It replaces the old OE Security Rules Listing. It has the following parameters:
Entity
The entity that is constrained.
Attribute
The attribute that is constrained. Enabled only if an entity is selected for the previous parameter.
Operation
The operation that is constrained. Enabled only if the attribute parameter is not selected.
Validation Entity
Only include constraints that have conditions based on this validation entity. Enabled only if the entity parameter is selected.
Record Set
Only include constraints that have conditions set up for this record set. Enabled only if the validation entity parameter is selected.
Validation Template
Only include constraints that have conditions using this validation template. Enabled only if the validation entity parameter is selected.
Seeded
If this field is left blank, both seeded and non-seeded constraint conditions are listed. If you select Yes only seeded conditions are listed. If you select No only non-seeded conditions are listed.
All of these parameters are optional. If none are specified, the report will include all values in the report.
Migration/Upgrade from Security Rules
Because of the magnitude of the changes to the fundamental architecture between Security Rules and Processing Constraints, the decision was made to not upgrade any user-defined Security Rules. Because of the inherent differences between Processing Constraints and Security Rules, the seeded processing constraints do not mimic the seeded OE Security Rules. The only processing constraints that are seeded are those required to ensure data integrity.
Companies that are implementing Order Management will need to spend more time evaluating their Processing Constraints setup than companies that implemented Order Entry. Companies that are upgrading from Order Entry to Order Management should include some time in their upgrade project plan for setting up the Processing Constraints.
Examples
This example shows how you can use Processing Constraints to meet real business needs. Here are the setup steps and results for five business scenarios.
-
No one can change the customer purchase order at the line level; your company requires that one sales order can relate to only one customer purchase order.
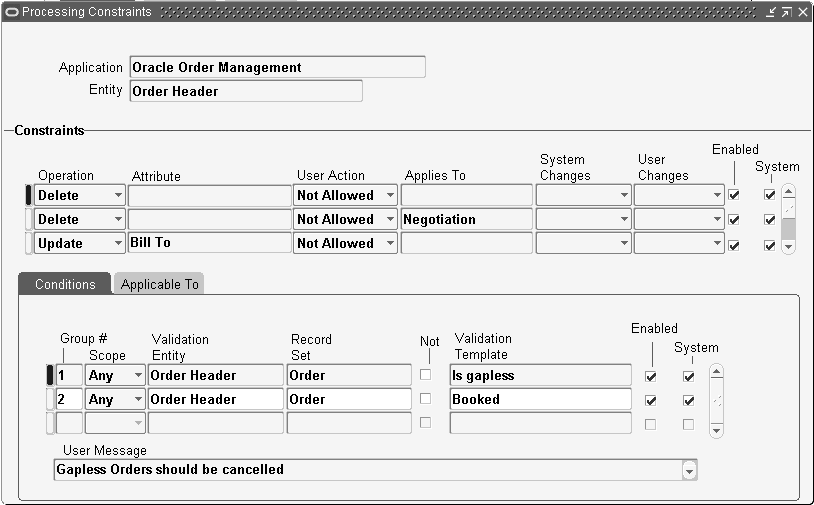
Navigate to the processing constraints window. Find the constraints for the application Oracle Order Management and the entity Order Line. Add a new line in the constraints region with the following values:
Operation Attribute User Action UPDATE Customer PO Not Allowed Save the constraint. This is the simplest type of constraint to create. It applies to all responsibilities in all conditions. The user will receive a message when they try to change the purchase order number for a line.
-
No one can add a line to an order after any of the lines on the order have been invoice interfaced.
Navigate to the processing constraints window. Find the constraints for the application Oracle Order Management and the entity Order Line. Add a new line in the constraints region with the following values:
Operation Attribute User Action CREATE [Blank] Not Allowed In the Conditions region, enter a line with the following information:
Order Line Conditions Group # Scope Validation Entity Record Set Validation Template [Any Number] Any Order Line Order Invoice Interfaced For the user messages enter: "A line on the order has been invoiced." Save the constraint. This constraint has a condition, so it will only be activated if the condition is true. The condition will be true if any of the lines on the order have been invoice interfaced. This constraint is a good example of a using a record set. It applies to all responsibilities. The user will receive a message when they try to create a new line for an order with lines which have been invoice interfaced. The message will say: The order line cannot be created because: A line on the order has been invoiced. Notice that the error message includes the user message that you entered for the condition.
-
A reason is required to cancel an order line after it has been booked. Navigate to the processing constraints window. Find the constraints for the application Oracle Order Management and the entity Order Line. Add a new line in the constraints region with the following values:
Operation Attribute User Action CANCEL [Blank] Require Reason and Require History In the Conditions region, enter a line with the following information:
Group # Scope Validation Entity Record Set Validation Template [Any Number] Any Order Line Line Booked For the user messages enter "The order has been booked." Save the constraint. This constraint has a condition, so it will only be activated if the condition is true. The condition will be true if the order has been booked. It applies to all responsibilities. All users will be required to enter a reason when they cancel a line which has been booked.
-
Only the Customer Service Manager can change the discount percentage on an order line after the line has been shipped. Navigate to the processing constraints window. Find the constraints for the application Oracle Order Management and the entity Line Price Adjustment. Add a new line in the constraints region with the following values:
Operation Attribute User Action UPDATE Operand Not Allowed In the Conditions region, enter a line with the following information:
Group # Scope Validation Entity Record Set Validation Template [Any Number] Any Order Line Line Ship Confirm For the user messages enter "This line has been shipped." Go to the Applicable To tab and select the Authorized Responsibilities radio button. Enter Customer Service Manager in the table below the radio buttons.
Save the constraint. This constraint has a condition, so it will only be activated if the condition is true. The condition will be true if this line has been shipped. Note that this is not a seeded responsibility. This example assumes the responsibility was created using the System Administrator Define Responsibility functionality. Any user not logged in under the Customer Service Manager responsibility will receive a message when they try to change a discount percentage for a line which has been shipped. The message will say “The percent cannot be updated because: This line has been shipped.”
-
Your company requires that all return orders, identified by order type = Return, are shipped to a central returns processing facility.
This example assumes that you have used the defaulting rules framework to create a rule that will default the warehouse to Wichita for all the lines on orders of type Return. For details on how to create a defaulting rule, see the white paper Using Defaulting Rules in Oracle Order Management.
To create the constraint, first create a new validation template for orders with an order type of Return. Navigate to the validation templates window. Find the validation templates for the application Oracle Order Management. Enter a new line in the validation templates region with the following information:
Entity Template Name Short Name Description Validation Type Order Header Return Order RETURN Order of type Return TBL In the validation semantics region enter the following:
Column Validation Op Value String Order Type = (Equal To) Return Navigate to the constraints window to create a constraint using the new validation template. Find the constraints for the application Oracle Order Management and the entity Order Line. Add a new line in the constraints region with the following values:
Operation Attribute User Action UPDATE Warehouse Not Allowed In the Conditions region, enter a line with the following information
Group # Scope Validation Entity Record Set Validation Template [Any Number] Any Order Header Order Return
For the user messages enter "All returns are processed in Wichita."
Save the constraint. This constraint has a condition, so it will only be activated if the condition is true. The condition will be true if the order type is Return, because this is the way you created the validation template. This assumes that your company has created a Transaction Type for an order with a name of Return. It applies to all responsibilities. Any user who tries to change the warehouse on an order line will receive a message which states: The warehouse cannot be updated because: All returns are processed in Wichita.
Oracle Order Management Open Interfaces, API, & Electronic Messaging Guide
Versioning
Overview
Versioning is a method to capture changes and updates made to a transaction. Versioning is currently available for sales orders, quotes and Sales agreements. There is support for both manual versioning as well as automatic versioning.
Versioning includes the following:
-
Version Control: Capture of changes and updates made to Sales Orders, Quotes and Sales Agreements. This feature offers:
-
Version generation
-
Validation of version number
-
Version history maintenance and comparison
-
Searching prior versions
-
Reasons and comments for versioning
-
Tracking modifications to contract terms on Sales Agreements, Orders or Quotes
-
API's and Order Import: Versioning support for sales transactions created or updated from multiple modes
-
-
Versions can be created, managed, viewed and compared, providing comprehensive information about a given transaction
-
Assists during the negotiation phase of a sales transaction by maintaining a history of the transaction cycle
Note: Price Lists and Modifiers are not versioned on a Sales Agreement.
Version Generation
Versioning is manual by default. If you want to enable automatic versioning, you must set up the appropriate processing constraints. For example, you can use validation templates to drive versioning by transaction type as a condition. By using the processing constraints and workflow activity, you can determine when to increment the version and which statuses are available to version.
For example, you can increment a version only when specific attributes of the transaction are changed/updated. You can increment the version number whenever there is a change in order quantity, payment terms, price list, required date, or other attributes.
You can link versioning control to workflow activities statuses. Version generation functionality includes:
-
Manual / Automatic option
-
Version number as a whole number and as separate field, following the document number
-
Update manually at any time, provided the setup allows amendment in a specific status
-
Option to retain the document number during the transition to a Sales Order
-
Specify the required conditions for automatic versioning
Version History
Version history maintenance is useful for reference and comparison. This is particularly true of quotes and Sale Agreements (SAs) with a negotiation phase where the transaction document changes a number of times before it is approved. This may occur with complex products that are frequently redesigned to meet customer requirements, or with a loyal customer who negotiates for a long time for the best price with the promise of higher order quantities over an extended period of time.
Versioning maintains the history of previous versions, when the active version is changed. However, one can use the previous versions as templates for creating new sales order, quotes or sales agreements at any time with the copy feature.
Version history maintenance and comparison enables:
-
Maintenance of transaction history of previous versions
-
Ability to amend the current version of the transaction
-
Tracking changes over a period of time and view those changes
-
Comparison of changes made to transactions across versions
-
Copy any version of a Quote to a Sales Order
Deciding Priorities for Audit Trail versus Versioning in a Processing Constraints Framework
Constraints are evaluated in the following order (Only one constraint may take effect for a change):
-
User Action
-
Not Allowed
-
Generate Version, Require Reason and Raise Integration Event (Version Activation)
-
Generate Version and Require Reason (Version Activation)
-
Generate Version (Version Activation)
-
Require Reason, History and Raise Integration Event (Audit Trail)
-
Require Reason and Require History—only for Fulfillment phase (Audit Trail)
-
Require History—only for Fulfillment phase (Audit Trail)
-
Raise Integration Event (Electronic Messaging)
-
During implementation any action which includes "Raise Integration Event" may be selected. This event is presently used by XML processing and can be used by any other product.
See: Oracle Order Management Open Interfaces, API, & Electronic Messaging Guide
Note: If multiple constraints are set up for an attribute and the conditions for both versioning and audit constraint apply, only versioning is captured. To improve system performance, limit the number of processing constraints to key updates during setup. The entire transaction is saved in history and increased save times result for large orders where version is activated.
Setup
To use versioning, set up the appropriate attributes with a processing constraint.
To set up Versioning in Order Management:
-
Navigate to the Order Management Processing Constraints window. Navigate to Order Management > Setup > Rules > Security > Processing Constraints.
Processing Constraints Window with User Action Menu Displayed
-
Set up a processing constraint for versioning. See Define Processing Constraints . Select the desired user action from the User Action field. Options are:
-
Generate Version, Require Reason and Raise Integration Event
-
Generate Version and Require Reason
-
Generate Version
-
Require Reason, History and Raise Integration Event
-
Require Reason and Require History
-
Require History
-
Raise Integration Event
-
-
-
Optionally, apply any necessary validation templates. Navigate to the Validation Template window. Order Management > Setup > Rules > Security > Validation Templates.
Setting up Versioning in Validation Templates
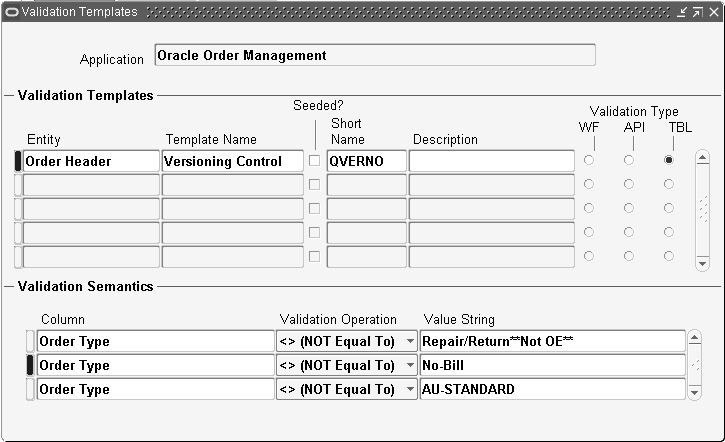
Note: If conditions are applied you must use a validation template.
Open Interface Considerations
Public Process Order API / Order Import
Manual Versioning
Pass Update Operation with change to version number. Specify a reason if required on change_reason parameter on p_header_rec parameter or change_reason column on the interface tables for order import.
Automatic Versioning
Any other transaction change through API/Order Import rolls the version based on the constraints setup. The reason should also be passed if the constraint action includes the require reason.
Troubleshooting
Audit is not captured even though Require History constraint is defined?
Check if there is a versioning constraint for the same operation. Versioning takes precedence and version is captured instead of the audit record.
Example:
You have processing constraints defined for:
-
Update of price list on booked order with action Require History
-
Update of price list on booked order with action Generate Version
System Behavior
A version is generated when price list is updated on booked order but no audit is captured. This change is not visible on the audit history form.
The version rolls even though there were no changes that required versioning?
Check if there were any system updates due to the user change.
Example:
Update to request date triggers a schedule date change that in turn has a versioning constraint. The reason stored for such versions is "SYSTEM."
Line splits generate two versions?
The processing constraint exists on a split operation and update of other attributes updated during split, for example, the warehouse.
See:
Defining Processing Constraints
Processing Constraints for more information see: Oracle Order Management User's Guide
Audit Trail
Overview
Audit Trail records and tracks updates to specified order attributes as they occur. Reports of comprehensive audit trail updates of Oracle Order Management are generated using Processing Constraints, Lookups, a system parameter, and the Audit Trail Consolidator concurrent program. Current Processing Constraints functionality enables you to specify exactly what business functions, by entity you wish to control when performing order modifications. You can define new processing constraints that specify when, and for what attributes of an order, audit trail updates are recorded. The Order Management system parameter Audit Trail must be enabled to use this feature.
Process Flow
Oracle Order Management gives businesses the flexibility to audit as much or as little of their order process as they require. Each business can decide what order attributes are so critical that an audit needs to be maintained and then set up the processing constraints accordingly. Once the constraints are defined, users can enter and change orders as they always have. If a change is made to an attribute that has been defined as requiring a reason to change it, then the user is prompted to select a reason code from a user-defined list.
Finally, queries can be run or reports produced to show what actual changes have been made to auditable attributes, who made the changes and when.
Now, versioning works in conjunction with audit trail only when the transaction enters the fulfillment phase, not during the negotiation phase. The audit trail may track all sales order changes that may not necessarily constitute revising the sales order to a new version. You cannot track a single change with both Versioning and Audit Trail. The user must decide what method they wish to use to track the change history. The differences between Version Control and Audit Trail include:
Version Control records the entire business object, allowing users to view the changes to the document real time and online. Whereas, Audit Trail records a single change in order to capture who made the change and what the change was.
Version Control can be viewed on line whereas, audit trail can be viewed on line once a report has been generated. Version control can compare against previous versions where audit trail cannot. Audit trail captures changes within a version but version control captures changes that increment a version. And finally, version control applies to all sales documents including Sales Orders, Quotes and Sales Agreements but audit trail is ONLY applicable to Sales Orders.
New Forms:
Audit History window can be invoked from Orders, Returns/Audit History menu path.
The query window will be used to show the audit history for all the user changeable attributes of all entities related to Order.
This form consists of a Find window and a Results window. The Find window will take history date range, entity name, attribute) and order number range, userid and responsibility as input. All input parameters are optional.
Audit History Find Window

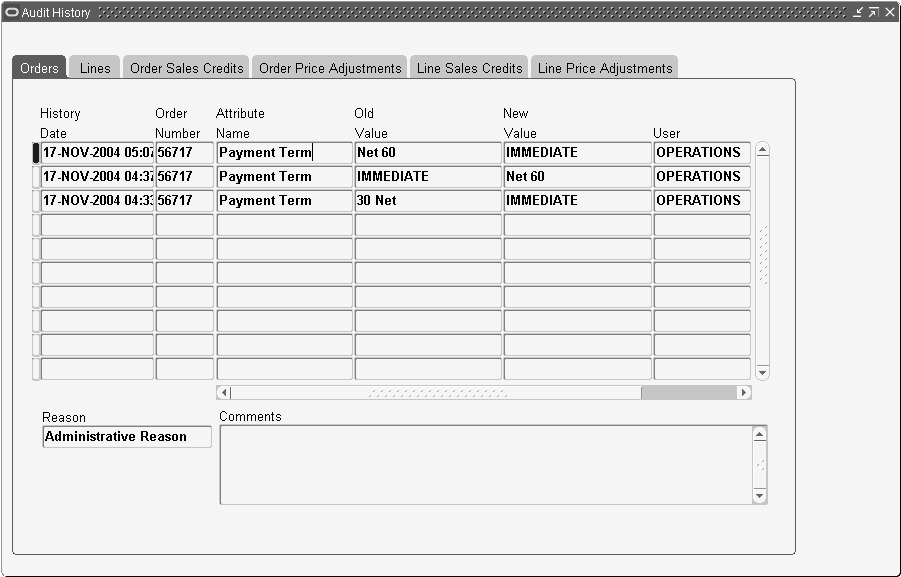
The Results window shows the history records based on the query criteria entered. The window has tabs for each entity that can have audit records. The format of each tab is similar, showing all the data. The tabs for the lines entities shows the line number as well as all the rest of the data. This window is not a folder form, since all data can be seen without much scrolling. The reason code and comments are shown in the overflow region for the selected row.
Audit History Results
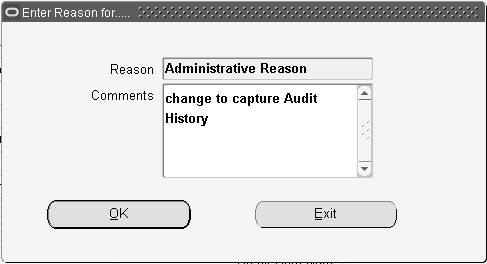
A new pop up window is added to this form to allow the user to input a change reason code and comments. If a change reason must be entered for an update, based on Processing Constraints setup, then this little window will popup to allow for entry. Users can also invoke this window from the Tools menu to record an audit reason even if it's not required.
Audit History Change Reason window
Setup
To set up Audit Trail:
-
Add "View Audit History" menu option to the Order Management menu for those responsibilities that need to be able to view the new Audit History forms - this menu option will be created through seed data.
-
Set up Processing Constraints to indicate which attributes on the order you want to have audit trail recorded for. See Define Processing Constraints.
-
Create some new Validation Templates if you have specific conditions to control whether or not to record audit information. See Defining Validation Templates.
-
Set the OM System Parameter Audit Trail.
Navigate to Order Management > Setup > System Parameters > Values.
-
Select your Operating Unit.
-
Select Generic Parameters from the list of values.
-
For the Audit Trail Parameter, select from the list of values: "Enable when Order is Booked," "Enable when Order is Entered," or "Disabled."
-
-
Enter and process orders as usual.
-
Schedule the Consolidator program to run periodically to make audit information available to query and report.
-
Run report or execute queries to view audit information.
Note: Based on the processing constraints that have been set up, users will sometimes be required to input reasons when they make changes to orders.
Different scenarios in which Audit History is captured
System Parameter Processing Constraint Order Status History Captured? Disabled Entered/Booked Entered/Booked No history captured Entered Entered Entered Yes Entered Booked Entered No Entered Booked Booked Yes Booked Entered Entered No Booked Entered Booked Yes Booked Booked Booked Yes Audit History Report:
This report enables users to retrieve audit information by different parameters. The report parameters include: start/end dates, entity, attribute, order number, user and responsibility of who made the change.
To run this report, navigate to Reports -> Requests -> Audit History Report.