Internal Trading Setup
Overview
The Internal Trading setup procedure defines service types, charge centers and associated services, account ranges, originators, and authorizers, and defines system options associated with internal trading.
Charge centers are business units that raise the internal charge. Account ranges must be unique to charge centers because the account flexfield ranges describe the charge center. Authorizers have the authority to accept or reject a cross charge.
This setup is required to perform the Internal Trading procedures, which let you raise charges between charge centers within the same organization.
Internal Trading setup procedures are used to perform these tasks:
-
Define whether automatic creation of encumbrance journals is required for the selected ledgers
-
Define the encumbrance type for internal trading encumbrance journals
-
Define whether Workflow approval is required for each ledgers
-
Define a time limit within which cross charges must be authorized before they are automatically authorized
-
Define charge center service types
-
Define charge centers for each ledger
-
Query and update information for charge centers associated with each ledger
-
Define account ranges for a charge center
-
Define an authorizer for each account range
-
Link originators to the appropriate charge center
-
Link service types to charge centers
Prerequisites
Before setting up Internal Trading, you must:
-
Define ledgers.
-
Enable the Internal Trading feature for the required ledgers as specified in the GL: Data Access Set profile option.
Related Topics
Defining Ledgers, Oracle General Ledger User Guide
Enabling Oracle Public Sector Financials (International) Features Procedure
Internal Trading Setup Steps
This table lists the setup steps for Internal Trading.
| Step Number | Step Description | Required or Optional |
|---|---|---|
| 1 | Define Journal Sources See Defining Journal Sources, Oracle General Ledger Implementation Guide | Required |
| 2 | Define Journal CategoriesSee Defining Journal Categories, Oracle General Ledger User Guide | Required |
| 3 | Define Automatic Posting Criteria. See Posting Journal Batches Automatically, Oracle General Ledger User Guide | Optional, but recommended |
| 4 | Define Encumbrance Types See Defining Encumbrance Types, Oracle General Ledger User Guide | Optional, but recommended |
| 5 | Set Up Internal Trading Setup Options | Required |
| 6 | Set Up Internal Trading Service Types | Required |
| 7 | Set Up Internal Trading Charge Centers | Required |
Setting Up Internal Trading Setup Options
To set up Internal Trading Setup options:
-
Navigate to the Internal Trading Setup window.
-
Select a ledger.
-
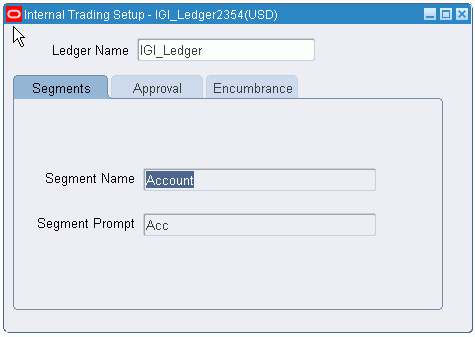
In the Segments tab, select a segment to override the default segment associated with a service type.
-
Enter a prompt for the selected segment.
This prompt is displayed on the Enter Cross Charges window.
-
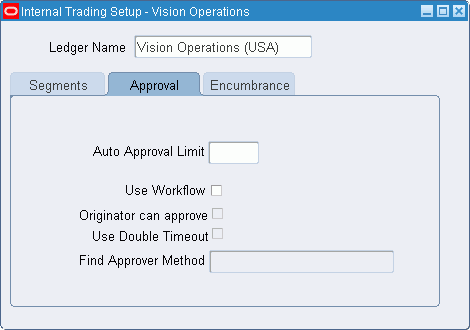
Select the Approval tab.
-
In the Auto Approval Limit field, enter the number of days after which a cross charge is automatically approved if it was not manually approved or rejected.
Note: The time limit begins after the internal cross charge lines are submitted for authorization.
-
Select Use Workflow to enable the Workflow approval process.
Warning: If Workflow is enabled, it cannot be disabled if any cross charge is submitted in Workflow.
-
Select Originator Can Approve to enable a cross charge originator to approve that cross charge.
-
Select Use Double Timeout to enable double timeout before a charge is automatically approved.
-
In the Find Approver Method field, select an approval method.
-
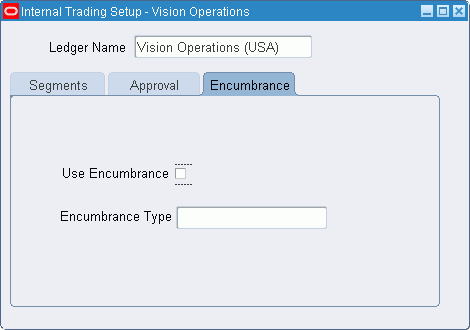
Select the Encumbrance tab.
-
Select Use Encumbrance to enable encumbrancing for raised cross charges.
Warning: If encumbrancing is enabled, you cannot disable it after creating the first cross charge.
-
Select an encumbrance type.
Setting Up Internal Trading Service Types
To set up Internal Trading service types:
-
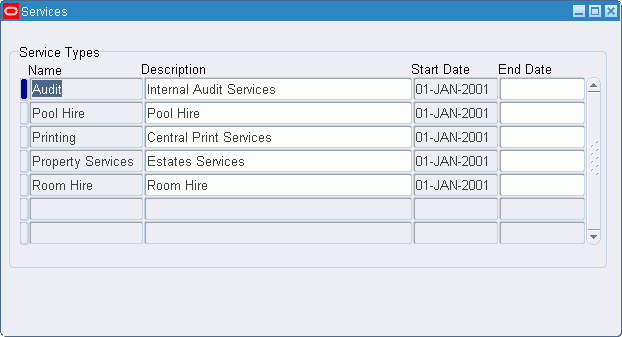
Navigate to the Services window.
-
Enter a name and description for the service type.
-
Enter a date range within which the service type must be active.
Defining Charge Centers
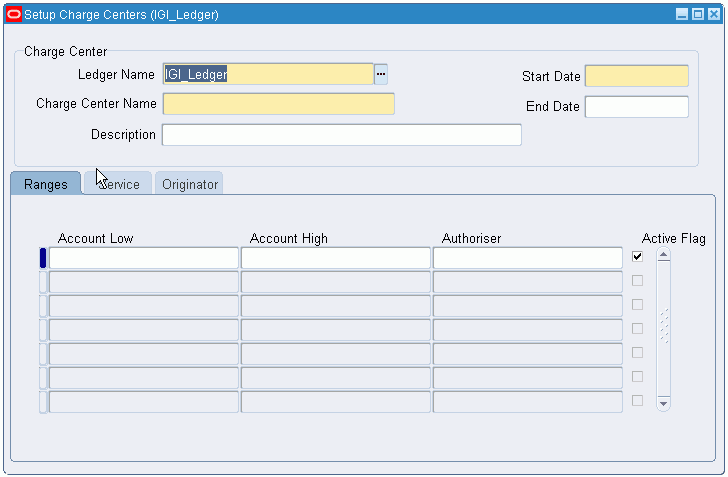
To set up Internal Trading charge centers:
-
Navigate to the Setup Charge Centers window.
-
Select a ledger.
Note: An originator can be assigned to multiple charge centers across ledgers, but an originator is limited to one charge center per ledger.
-
Enter a charge center name and its description.
-
Enter a date range within which the charge center must remain active.
-
Select the Ranges tab.
-
Place the cursor in the Account Low field.
-
Entering a value in the Low field populates both the High and Low fields, indicating that one accounting flexfield is assigned to that row.
-
The account range must be unique to the charge center and must not overlap another active range in any charge center.
-
-
Select the authorizer's name.
-
Select Active to mark the account range as active.
-
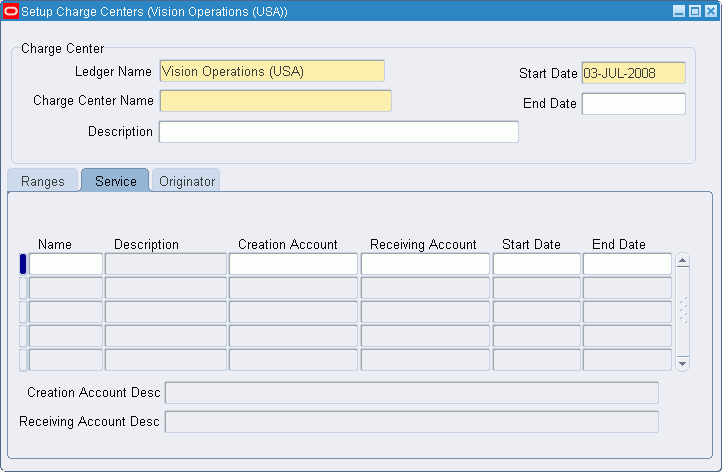
Select the Service tab.
-
In the Name field, select the service type.
-
Select the creation account to be assigned to the service type.
-
Select the receiving account to be assigned to the service type.
-
Enter a date range within which the service type for this charge center must remain active.
-
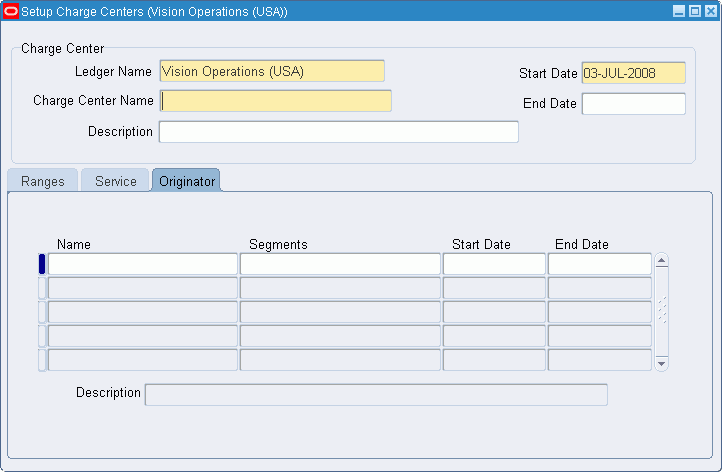
Select the Originator tab.
-
In the Name field, select the originator’s name.
-
In the Segments field, select the segment values associated with the originator.
-
Enter a date range within which the originator must remain active.