Managing Trips
This chapter covers the following topics:
- Overview of Trips
- Creating a Trip
- Firming a Trip
- Unfirming a Trip
- Purging Trips and Trip Stops
- Assigning Freight Costs to a Trip
- Printing a Document Set for a Trip
- Printing a Master Bill of Lading for a Trip
- Calculating Weight and Volume for a Trip Stop
- Ship Confirming at Trip
- Trip Workflow Status
- Using Quick Ship for Trips
- Finding and Confirming Quick Ship Trips
Overview of Trips
A trip is an instance of a specific freight carrier departing from a particular location containing deliveries.
A trip is carrier specific and contains at least two stops, such as a stop to pick up goods and another stop to drop off goods, and may include intermediate stops. Trip stops are displayed in sequence on the Stops tab within the Shipping Transactions form once you have queried your trip. The Stop sequence will not re-sequence if a stop is removed. For example, if you have two stops, each with an arrival and departure date and time, and you remove one, the remaining stops will stay in the same sequence as they were originally.
Trips can be created automatically or manually.
You can perform the following tasks with trips:
Creating a Trip
You can create trips automatically or manually.
Automatic
Trips are required for all deliveries and can be created automatically as part of Ship Confirmation transparent to the user for those not interested. If your shipping process does not require advanced planning, you may prefer to automatically create trips:
-
Auto-creating a trip for a delivery: You can find the delivery you want to ship, and auto-create a trip and related trip stops.
-
Auto-creating a trip for containers and lines: You can find the lines and containers you want to ship and auto-create a trip which creates a trip, related deliveries, and trip stops.
To autocreate a trip for a delivery
-
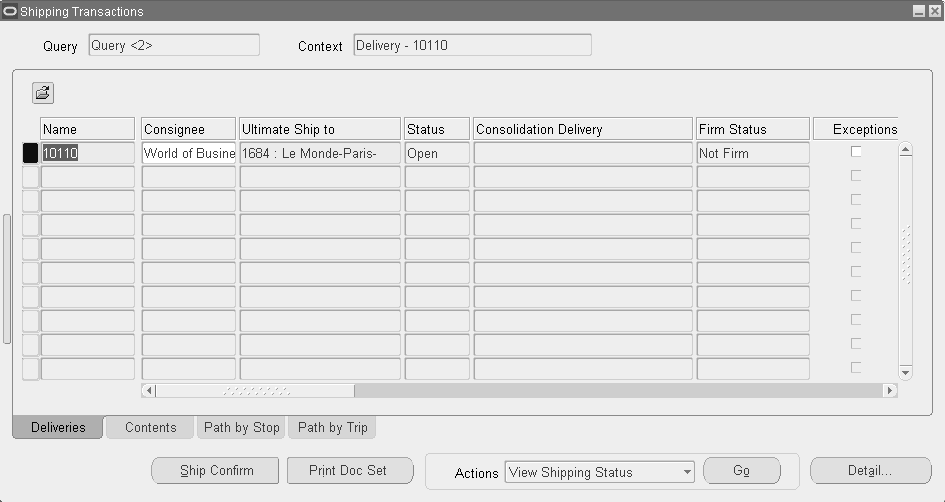
Navigate to the Query Manager window, and find the delivery or group of deliveries.
Shipping Transactions Form - Delivery Results
-
If more than one delivery displays, select the deliveries.
-
From the Actions menu, select Auto-create Trip.
-
Click Go.
At least one trip and its related stops are created based on the deliveries Shipped From and Shipped To locations.
You can view information about the trip by choosing the Detail button, the Path by Stop tab, or the Path by Trip tab.
-
Save your work.
To autocreate a trip for delivery lines and containers
-
Navigate to the Query Manager window and find the delivery lines and containers.
-
Select the delivery lines.
-
From the Actions menu, select Auto-create Trip.
-
Click Go.
-
At least one trip, stop, and delivery(s) are created for the lines and containers.
To view additional information about the trip, choose the Detail button, Path by Stop tab, or the Path by Trip tab.
-
Save your work.
Manual
You can manually create a trip and later assign delivery lines or find the delivery lines and create a trip. For example, for a regular trip scheduled to depart every Friday, you can manually set up a trip ahead of time and then assign delivery lines.
When you manually create a trip, you can manually assign stops, deliveries, and delivery lines to that trip.
To manually create a trip
-
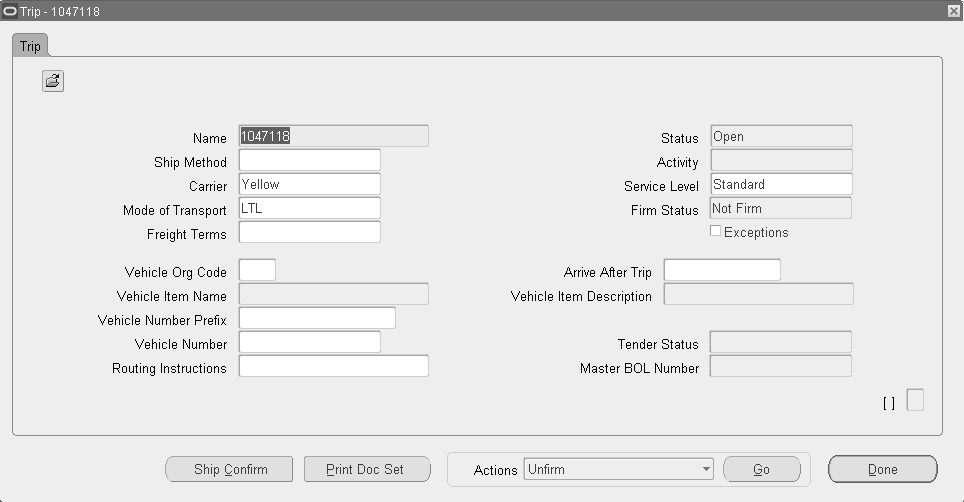
Navigate to the Trip window.
Trip Window
-
Enter a name for the trip.
Note: If you do not define a name, then a default name is assigned by Shipping Execution.
-
Select the Ship Method. For example, Overnight or LTL.
If you update Ship Method and one or more delivery legs of the trip have bill of lading numbers generated, Oracle Shipping Execution checks the Document Code for the Document Type BOL from the Document Categories form and:
-
If Document Code is All, it updates ship method for the trip and all of its delivery legs.
-
If Document Code is One, it cancels all the bill of lading numbers associated with the trip and logs a trip exception. You must then regenerate and reprint those bills of ladings.
Note: If the trip is firmed, you cannot change the stops on the trip, but you can add deliveries to the trip as long as they are for existing stops. You can also unassign deliveries from trips and if the delivery is the last delivery on the stop, the stop will remain associated with the trip, however it will be empty.
-
-
Select a Vehicle Org Code.
-
Select the Vehicle Item Name such as 50' Truck.
-
Select the Vehicle Number Prefix and Vehicle Number.
-
Optionally, enter Routing Instructions.
-
Optionally, select a trip in the Arrive After Trip field if you want the new trip to follow after another trip.
In the Arrive after Trip field, you can define the order in which trips arrive at their final destination. For example, if you created Trip B and want it to arrive after Trip A, enter Trip A in the Arrive after Trip field.
-
Save your work.
-
Click Done.
Related Topics
Firming a Trip
Once deliveries and delivery lines have been assigned to a trip, you can set the status of the trip to one of the following:
-
Firm Routing: Prevents trip stops from being added, or removed for the selected trip.
-
Firm Routing and Contents: Prevents trip stops from being added, or removed for the selected trip and prevents contents from being added or removed.
If the trip status is Firm Routing, you can still update trip details, delivery, and delivery line information. For example, you can add delivery lines and make changes to the delivery. However, to add or remove trip stops, you first must set the status of the trip to Unfirmed before making the changes.
When you firm a trip, Shipping Execution performs the following:
-
Validates that the sequence numbers between the deliveries of the trip are unique for containers within the deliveries
-
Validates that the weight, volume, and fill percentage do not exceed their maximum number of containers in the delivery
-
Validates that the minimum fill percentage is met
-
Validates the planned arrival date and planned departure trip dates are not in the past
-
Validates pick-up and drop-off dates and times with the Transportation Calendar for the shipper, carrier, and receiver
Prerequisites
At least two stops must be assigned to the trip.
At least one delivery must be assigned to the trip.
At least one delivery line must be assigned to each delivery in the trip.
All delivery lines for the trip must be assigned to a delivery.
To firm a trip
-
Navigate to the Query Manager window, and find the trip.
-
From the Actions menu, select Firm Routing or Firm Routing and Contents.
-
Click Go.
-
Save your work.
Unfirming a Trip
When a trip is in Firm Routing or Firm Routing and Contents status, you cannot add, remove, or re sequence trip stops unless you first Unfirm the trip. When the trip is in Not Firm status, you can remove or rescreen existing trip stops or add new stops.
After the changes are done, the trip can be Firmed to prevent the trip stop settings from being changed. However, if you leave the trip Not Firm, the existing trip stops can be removed or new trip stops can be added.
When you unfirm a trip, Shipping Execution:
-
Sets the status of all deliveries in the trip to Open.
-
Sets the status of the trip to Open.
Note: All delivery lines remain assigned to their respective deliveries when you unfirm a trip.
Prerequisites
Trip Firm status must be set to Firm Routing or Firm Routing and Contents.
Trip Firm status for all deliveries must be set to Firm Routing or Firm Routing and Contents.
To unfirm a trip
-
Navigate to the Query Manager window and find the trip.
-
From the Actions menu, select Unfirm.
-
Click Go.
-
Save your work.
Purging Trips and Trip Stops
If purge criteria of deliveries, delivery lines, and LPNs associated to trips and trip stops are met, then Oracle Shipping Execution enables you to purge (permanently delete) trip and trip stop records from the Oracle Shipping Execution tables. The following criteria must be met before trips and trip stops are purged:
-
Trip entities (stops, deliveries, lines, and LPNs) must meet the given criteria of the entity in order to purge the trip that they belong to. For example, in order to purge a trip that contains two stops and one delivery, the stops must meet the purge criteria and the delivery must meet the delivery purge requirements. See Purging Deliveries.
-
If a trip is part of a multi-delivery consolidation and is in progress, then the trip will not be purged.
-
Only Closed trips and Intransit trips (if selected) can be purged.
All information associated with the purged entities is also purged, for example freight costs, weight and volume, dates, and exceptions.
Related Topics
Shipping Purge Concurrent Process
Assigning Freight Costs to a Trip
You can assign freight costs to a specific trip, override the suggested freight costs, or update existing freight costs. For example, if you wanted to add additional costs to a particular vehicle that is used in the trip to deliver goods. A freight cost can also be assigned to a delivery, a stop, a delivery leg, a delivery detail, or a container.
To assign freight costs to a trip
-
Navigate to the Query Manager window, and find the trip.
-
From the Actions menu, select Assign Freight Costs.
-
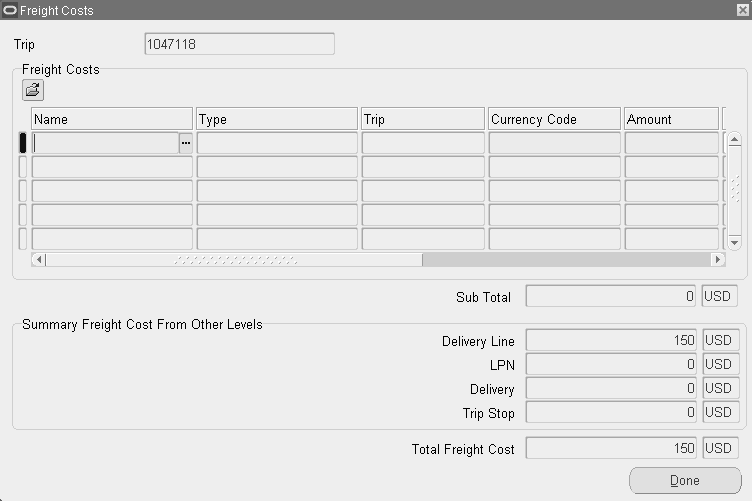
Click Go to display the Freight Costs window.
Note: When assigning freight costs from the Quick Ship window, the Freight Costs window is displayed for the Delivery that your cursor is on.
Freight Costs Window
-
Enter the Freight Cost Name.
The Type and Trip will default based on the Name.
-
Enter a Currency Code or accept the default.
-
Enter an Amount or accept the default.
-
Optionally, enter a Conversion Type, Conversion Date, and Conversion Rate.
-
Click Done to save your work.
To view freight costs
-
Navigate to the Query Manager window and find the trip.
-
From the Actions menu, select Assign Freight Costs.
-
Click Go.
-
View the freight cost information.
Type displays the freight cost type associated with the freight cost name. Freight cost name and freight cost type uniquely identify a freight cost charge.
Trip is blank for manually entered freight costs.
Printing a Document Set for a Trip
You can print a group of shipping documents and other reports in a set for a trip. These document sets might include pick release documents, pack slip, bill of lading, or any other shipping document.
Any Shipping document enabled for XML Publisher can also be included in a document set. Once included, the document automatically prints with other documents in the document set. XML Publisher enabled Shipping documents enable the flexibility to define your own report layouts, include additional fields on reports, and print the document in PDF format. See: Report Customization with Layout Templates
To print a document set for a trip
-
Navigate to the Query Manager window, and find the trip.
-
From the Actions menu, select Print Document Set, or if you have added a Print Document Set button, click it.
-
Click Go.
The Document Sets window displays a list of document sets.
-
Select the document set and click OK.
The document set for the trip is printed.
Printing a Master Bill of Lading for a Trip
You print the Master Bill of Lading report for trips from the Actions menu on the Trips window. The Master Bill of Lading is XML Publisher enabled and can be printed in PDF if the Master Bill of Lading PDF template is enabled in the document set for Master Bill of Lading. See: Report Customization with Layout Templates.
To print a Master Bill of Lading for a trip
-
Navigate to the Query Manager window, and find the trip.
-
From the Actions menu, select Print Master BOL.
-
Click Go.
Calculating Weight and Volume for a Trip Stop
The weight and volume is always calculated based on values defined as the physical attributes in the Master Item window in Oracle Inventory. The automatic calculation of weight and volume includes the fill percentage.
You can manually enter the weight and volume in each delivery, which will be used at ship confirmation.
When the weight, volume, and fill percentage for a trip stop is calculated, Shipping Execution:
-
Calculates the weight, volume, and fill percentage of each open delivery and adds the values to the trip stop's current weight, volume, and fill percentage.
-
Validates that the maximum load weight, the maximum internal volume, and the maximum fill percentage are not exceeded.
-
Validates that minimum fill percentage requirements are attained.
Note: A vehicle must be assigned to the trip before the actual fill percentage can be calculated.
To manually enter weight and volume for a trip stop
-
Navigate to the Query Manager window, and find the trip stop.
-
Click Details.
-
Enter your weights and volume.
-
Save your work.
Related Topics
Calculating Weight and Volume for a Delivery
Calculating Weight and Volume for Delivery Lines
Ship Confirming at Trip
You can ship confirm a trip from the Shipping Transactions form which will also progress the status of all assigned deliveries, LPNs, and delivery lines. This method of ship confirming might be preferable if your trips consist of multiple deliveries.
Note: A new role, with the privilege Ship Confirm enabled at the trip tab, will need to be defined in order for you to perform ship confirm at the trip level.
To Ship Confirm at the Trip level
-
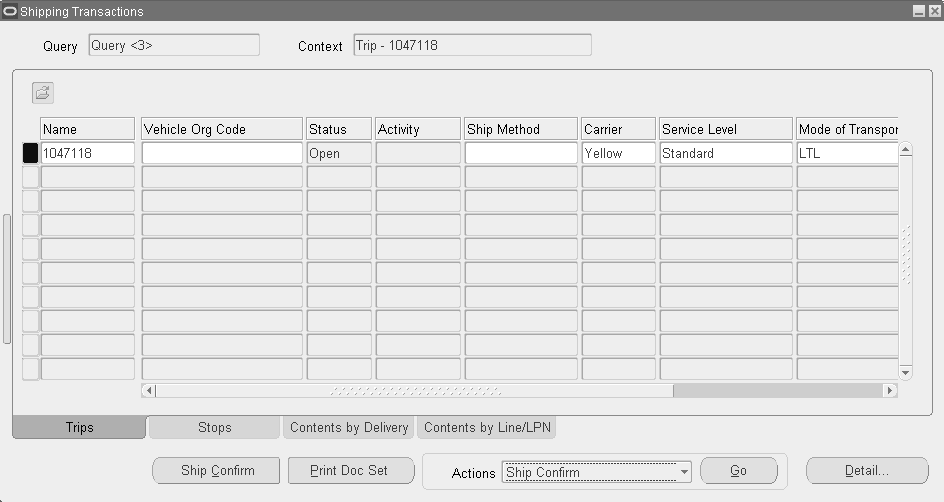
Navigate to the Query Manager window.
-
Find your Trip.
-
From the Actions menu, select Ship Confirm.
Shipping Transactions - Trip Window
-
Within the Confirm Trip window, select the options suitable to your needs.
Confirm Trip (Ship Confirm Trip) Window
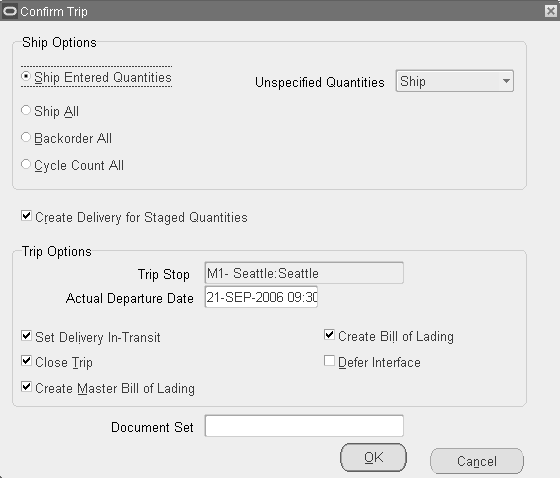
Note: You can ship confirm all deliveries, set deliveries in-transit, or close trip, if the deliveries have the same pickup location. If the trip has multiple pickups, Multiple is defaulted in the Pickup Stop field and you will not be able to choose any of the trip options. Clicking OK will confirm all deliveries at the initial pickup location and you must close the drop off stops manually. If the trip includes multiple pickup stops, you must manually ship confirm any delivery that is not part of the initial pickup otherwise it's pickup will not be closed. Ship confirming a trip only closes the pickup stop for deliveries that occur at the start of the trip; not intermediate pickup stops.
Related Topics
Trip Workflow Status
With the use of Oracle Workflow, Oracle Shipping Execution enables you to view the status of trip specific workflow through the Shipping Transactions Form or the Quick Ship window.
The Workflow Monitor is used to graphically display the status of the workflow associated with the trip.
Trip Workflow must be enabled in the Global parameters.
Viewing Trip Workflow Status
To view the workflow status of a trip
-
Navigate to the Shipping Transactions form.
-
Find your trip.
-
From the Tools menu, select Workflow status.
Related Topics
Using Quick Ship for Trips
The Quick Ship window enables you to process shipments quickly, using the minimum shipping requirements with the benefit of a highly configurable window. You can access trips and perform several actions within the Quick Ship window.
Related Topics
Finding and Confirming Quick Ship Trips
Finding and Confirming Quick Ship Trips
Similar to finding deliveries, you use a find window to search for applicable trips.
To find a trip
-
Navigate to the Quick Ship window.
-
Ensure that the window view is set to Trip Confirm View.
-
With the cursor in the trip Name field, press F11 or select Find from the View menu.
There are several ways to find trips in the Quick Ship window:
-
The Find icon
-
The LOV for the Trip Name
-
Enter the Trip Name and press [Tab]
-
-
Enter your search criteria.
-
Click Find.
To confirm a trip using the Quick Ship window
-
Navigate to the Quick Ship window.
-
Ensure that the window view is set to Trip Confirm View.
-
Within the Trip region, enter or find the trip Name.
-
Verify all data in the header fields and update as necessary.
Any of the following actions can be executed by clicking the appropriate button at the bottom of the window, or by right-clicking and selecting the action from that menu:
-
Click the Ship Confirm button or right click and select Ship Confirm.