Logistics Service Provider (LSP) Management in Oracle Warehouse Management
Overview of LSP Management
To reduce costs and achieve a leaner distribution model, some companies outsource parts of their supply chain to specialized third party companies called logistics service providers (LSPs). Logistics service providers provide typical warehousing activities such as receipts, shipments, inspections, packing for specific clients, and then bill the client for these warehouse services. After the logistics service provider receives the shipment or receipt notifications from the client, the logistics service provider sends a confirmation to the client who can then invoice their customer or pay the supplier.
The LSP assists in maintaining a smooth flow of material across the supply chain by enabling timely delivery of finished goods to end customers or storing and supplying the raw materials to clients for just-in-time manufacturing.
Oracle Warehouse Management supports two fundamental components for LSP management: multi-tenancy capability and third party logistics (3PL) billing. Multi-tenancy refers to supporting the same purchase and sales order and item number of different clients in the same warehouse, while third party billing refers to the ability to bill the transactions periodically based on the agreements between the client and the LSP.
Multi-Tenancy Warehousing Within a Warehouse
Multi-tenant warehousing occurs when LSPs provide third party logistics (3PL) services to more than one client at a time within a warehouse. When engaging in multi-tenant warehousing, the LSP must differentiate between each client’s material. The LSP must also be able to support the same purchase order number, sales order number, and item number of different clients in the same warehouse.
Features of Logistics Service Providers Management
LSP Management
Logistic service providers management is the outsourcing of logistics operations to a third party. Companies, or clients, use these third parties known as logistics service providers (LSPs) to provide logistics services. LSPs may provide logistic services to one or more clients at any given time. Clients may choose to outsource a portion, or all of their logistics services to one or more LSPs. When sending information to an LSP, the client communicates the receipts or shipment to the LSP, which then runs the transaction on behalf of the client.
LSP Billing
LSPs provide logistic services for clients and bill them periodically for services rendered. An LSP may handle the logistics services for one or more client at any given time. The LSP establishes an agreement with an individual client for the warehousing, services provided, rates, and billing frequency. Third-party billing for LSPs within WMS enables you to bill by activity.
It uses service contracts, pricing of logistics services and activity data in WMS to produce an itemized bill based on the actual services an LSP performs on behalf of its clients. WMS provides billing sources for common logistics services such as receiving, put away, storage, staging and shipping of goods. It also enables you to identify your own billing sources such as sweeping and processing of hazmat material.
Understanding the LSP Management Process Flow
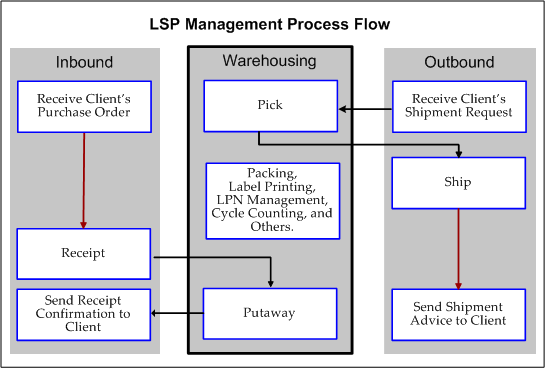
The following section describes the LSP management process flow including the inbound, warehousing, and outbound flows.
Inbound Flow
In a typical third party billing scenario, clients synchronize the master data such as items and UOMs with the logistics service provider before outsourcing the inbound and outbound activities. In the Inbound process, the client communicates the purchase order (PO) information to the LSP, and provides advanced communication about the supplies to be received. The LSP creates a client PO reference, and when the material arrives, the receiving clerk receives the material with reference to the client’s PO and item information. On completion of receipt, the LSP sends a receipt confirmation to the client which signals the Client to proceed with the supplier invoicing process.
For Inbound Transactions
-
A client purchase order (PO) is synchronized to the LSP system with the necessary receiving controls. A unique PO number is created in LSP system with:
Note: The following events result from integrations.
-
Client PO Number + Client code as LSP PO number (concatenated number is stored in the segment 1 of PO headers).
-
Clients PO line numbers are mapped as lines numbers in the LSP system (it is assumed that the clients PO line numbers are always numeric, Positive integer).
-
Client's item is copied as PO line item after the client code is added to the item segment as in the following example:
* Client Item: AS549888
* Client Code: WMT
* Item is stored in the LSP as (AS549888.WMT). For an item, the client code is always stored in the client segment (to be defined by the customer). If customer is using multiple item segments, then the client segment must be the last segment in the item key flexfield definition.
-
-
Client: Optionally sends an advanced shipment notification (ASN) messages referencing the PO and item. The LSP converts and stores this ASN with reference to the internal PO.
-
LSP: Receives the material and goods by client-specific PO or ASN using the Receipts window.
-
Client-specific receipt transactions are identified as ready for receipt confirmation.
-
LSP system communicates the receipt confirmation to the specific LSP clients.
For Inventory Onhand Balances and Adjustments
-
Onhand balances of LSP items (the item's client segment with client code) are stored and sent periodically to the client.
-
Adjustments of LSP-specific requests with the onhand inventory are communicated back to the client.
For an item, the client code is always stored in the client segment (to be defined by the customer). If the customer is using multiple item segments, then the client segment must be the last segment in the item key flexfield definition.
Warehousing Flow (Features)
Client-Specific WMS Rules
You can define client-specific WMS rules to perform picks, putaways, label printing, task management, and related actions defined by client-specific business rules. You can define a specific client category and associate the category to items and use this category to define client-specific rules.
Inventory counts/adjustments can be carried for all clients' items based on the agreed frequency of the counts. (Clients can communicate the frequency and tolerance limits for adjustments while synchronizing the item data. This helps in setting up different tolerance limits for different items for adjustments.)
Label Printing
You can create and assign labels by client to ensure that material is associated with the proper client. When you create a label format, you can assign the client code and client item code information.
Note: You can use the flexfield attribute you created during setup to assign the client code information.
You can define client and client item information for the following label types:
-
Material
-
Serial
-
LPN Content
-
LPN Summary
-
Shipping Contents
Onhand Tracking by Client Using the Material Workbench
The LSP user can track onhand inventory by client and client-specific item using the Material Workbench to query client-specific item inventory (it is recommended to define a category to identify client-specific items).
Cycle Counting
Cycle counting can also be used in an LSP warehouse:
-
LSP creates a predefined classes and all client items are allocated to any one of the class. While synchronizing items, client also synchronizes the following:
-
Cycle counting class
-
Cycle counting tolerances
-
-
Adjustments are approved if the difference is within the tolerance limits specified in the item.
-
If variations exceeds the tolerance limits, the LSP communicates the details to the client, gets approval, and then approves the adjustments.
Outbound Flow
For the outbound flow, the client sends the shipment request to the LSP to ship the material to its customer. The LSP performs the picking, packing, and shipment transactions and sends a shipment confirmation to the client. Note that all of the outbound documents such as the packing slip and the bill of lading have client-specific information. The client updates the inventory in its system and raises an invoice to bill the customer.
Shipment requests from the clients are created as sales orders using WSH delivery interfaces ( the sales order terms and their LSP equivalent are shown in the following table):
| Sales Order Entity | In LSP System |
|---|---|
| client code (in header) | order source |
| request number | sales order number |
| order type (defined in the Client Definition window) | sales order type |
| request line (client sales order line) | sales order line number |
The LSP should creates a unique order type for each client and associates it in the Client Definition window. If two clients of an LSP have the same sales order number, then the unique order type makes the sales order number and order type combination unique for definition and transaction purposes in the LSP system.
-
Client items on the shipment requests are included in the Lines items in the sales order lines.
-
LSP ships the goods with reference to client sales order and shipment documents are printed with client information.
-
Client-specific shipment transactions are identified as ready for confirmation similar to inbound side.
-
The concurrent program communicates the shipment confirmation to the specific LSP clients.
Returns
Returns LSPs can also perform returns for their clients. They can return material to suppliers as well as handle customer returns. In the return to supplier process, the LSP notifies the client of the need to return goods to a supplier. The client sends a return request to the LSP and requests the LSP to return the goods to the supplier. When returning the goods to the supplier, the LSP references the client’s PO. The LSP performs an return to vendor (RTV) transaction and returns the material to the client’s supplier based on the return request and sends return confirmation to the client. The client receives the return confirmation from the LSP and a material receipt confirmation and credit note information from the supplier. The client then creates a debit note, which will be adjusted in the future payments.
Related Topics
Oracle Warehouse Management User's Guide, Logistic Service Providers (LSPs) Management
Setting Up LSP Management Services
Oracle Warehouse Management enables logistics service providers (LSP) to manage their warehouse in multi-tenant mode. Multi-tenancy enables multiple clients to access warehouse services, allows automatic segregation of activities for every client, and also enables process level differentiation for each client using client level rules.
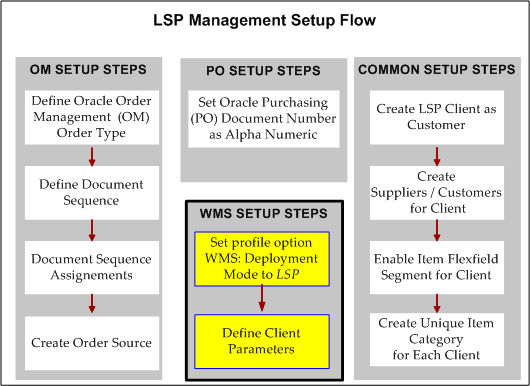
The following graphic shows the general setup steps and specific steps required in Oracle Warehouse Management to enable the LSP management feature:
Complete the following setups specific to Oracle Warehouse Management:
-
Set the profile option WMS: Deployment Mode to LSP to enable multi-client support for the logistics service provider industry.
Note: If the profile option WMS: Deployment Mode is set to LSP, then the Client field is enabled on Oracle Shipping Execution windows such as the Release Sales Orders for Picking and the Query Manager window.
-
Define client parameters.
Defining client parameters enables the LSP to define client-specific WMS rules for picking, putting away material, printing labels, managing tasks, and other actions that require client-specific business rules.
Related Topics
Defining Client Parameters
Use the Client Parameters window to define parameters such as the client code, receiving and shipping parameters, and warehouse controls for a specific client. The system uses this information to differentiate between clients, and to set shipping and receiving standards required by individual clients. For example, suppose Warehouse Corp. provides logistics services to both ABC Stores and BigMart. ABC Stores requires that you inspect all customer returns at receipt. BigMart does not. However, BigMart requires that you are able to create deliveries across orders. ABC Stores does not have such a restriction. You can then bill the client for the services rendered. The Client Parameters window enables you to satisfy all of these requirements. Use the following procedure to define client parameters
Prerequisites
- The profile option WMS: Deployment Mode must be set to LSP.
- The client name must exist as a customer in the trading community architecture setup (TCA).
To define client details
-
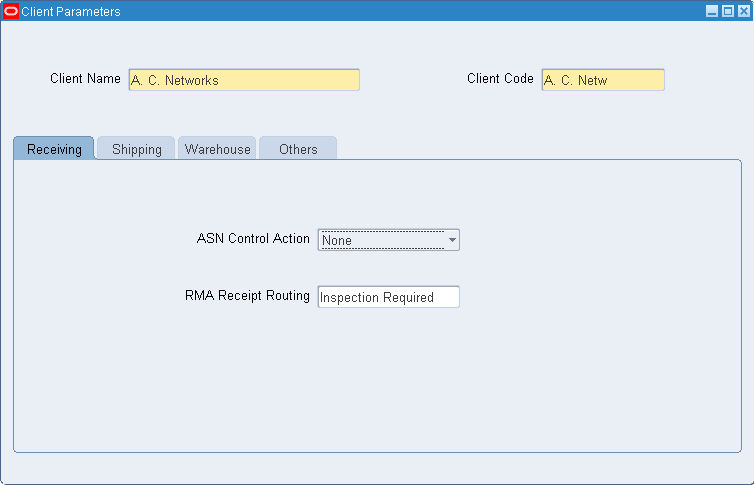
Navigate to the Client Parameters window.
-
Enter the client you defined in the Trading Community page.
-
Enter a Client Code. This is the code by which the customer will be known in the system, and which will be appended to items (for example, AS18947.Cargill). In outbound labels, typically the client code is removed from the item name, so the end customer sees the actual item name as defined by the client and not the appended client code.
Important: The code will be appended to the item only after the setup in the item key flexfield is done.
You can search by Client code in various places throughout the application. The maximum length for the client code is 10 characters.
Note: The client code cannot be changed after you save the client record.
-
Select an ASN Control Action:
-
None
-
Reject
-
Warning
-
-
Select the action to perform when you receive an RMA receipt for this customer:
-
Standard Receipt: Perform the standard two-step receipt for this return.
-
Direct Delivery: Perform a direct receipt for this return.
-
Inspection Required: Inspect the return before putting it away in to inventory.
-
-
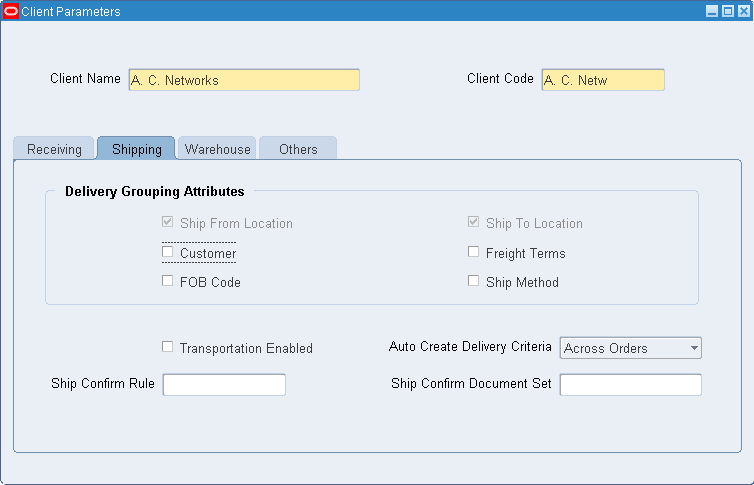
Click the Shipping tab. For Outbound transactions specific to a client, these parameters are considered over the regular shipping parameters. This helps LSP to have different shipping controls for each client in the same warehouse.
-
In the Delivery Grouping Attributes region, select one or more of the following attributes which will be used to group delivery lines into deliveries.
-
Delivery Grouping Attributes
-
Ship From Location: The location from which the material is shipped. This is the ship-from location you entered in the Trading Community page.
-
Ship To Location: This is the final destination for the material.
-
Customer: This is the customer to which the material is being shipped.
-
Freight terms
-
FOB Code: This is the code which identifies when the transfer of ownership will take place.
-
Ship Method: The method which the material is shipped to the customer, for example, DHL.
-
-
-
Select Transportation Enabled, if you are an Oracle Transportation Management customer, and you perform transportation activities for this client.
-
Select the Auto Create Delivery Criteria:
-
Null
-
Across Orders: Enables you to create deliveries across orders for the same ship-to location.
-
Within an Order: All picks for the delivery must be for the same sales order.
-
-
Select the appropriate Ship Confirm rule and Ship Confirm Document Set for the client.
-
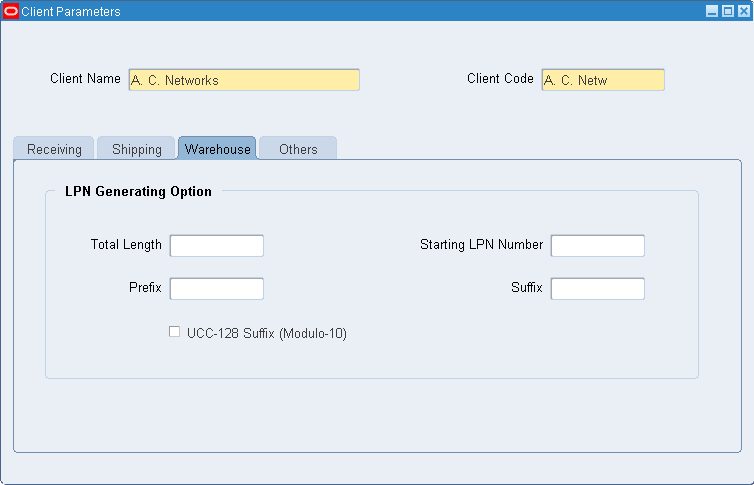
Click the Warehouse tab. When you perform warehousing transactions specific to a client, the system considers these parameters over the standard WMS parameters. If you do not enter any warehouse parameters, then the system uses the standard warehouse parameters.
-
In the LPN Generation Option region, optionally enter the following parameters:
-
Total Length: This is the total length of the LPN.
-
Prefix: Enter a prefix for the LPN. For example, you can enter BIG for your client Bigmart and CAR for your client Cargill. The LPN for Bigmart would then be BIG123456, and for Cargill the LPN would be CAR123456.
-
Optionally, enter the Starting LPN Number.
-
Optionally, enter a Suffix.
-
If your client has UCC-128 labeling requirements, then select the UCC-128 Suffix (Mofulo-10) check box.
-
-
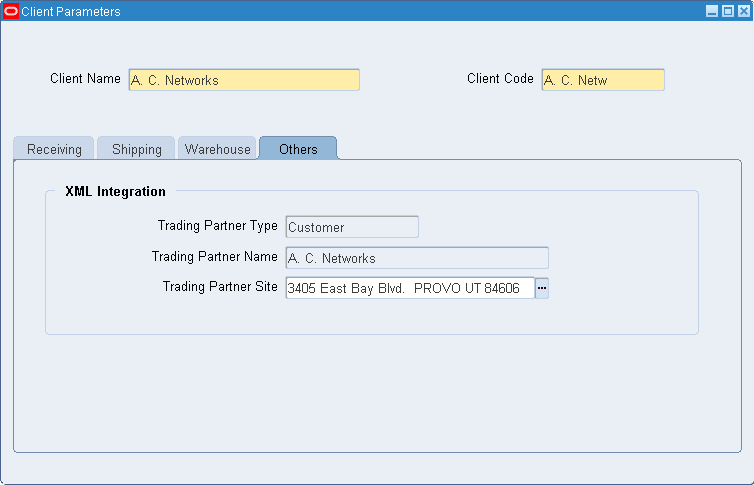
Click the Others tab. The Trading Partner Type and Trading Partner information automatically default from customer definition that you defined on the Trading Community page.
-
Select the Trading Partner Site from the list of values. This is the customer location with which you would like to associate the client.
Setting Up LSP Billing
The following section provides an overview of the general setup steps required to implement LSP billing (also called, 3PL billing). Implementing the LSP billing feature requires various setups in Oracle applications including Oracle Service Contracts (usage based billing feature), Oracle Install Base, Oracle Advanced Pricing, and Oracle Warehouse Management. The steps specific to Oracle Warehouse Management are identified with the product code (WMS) and are described in more detail in this guide.
-
Foundational Setups
-
Set the profile option WMS: Deployment Mode to LSP (a site level profile).
Note: This profile option is enabled only if you have licensed the LSP billing capability
-
Complete setups in Oracle Service Contracts.
Complete the basic setups in Oracle Service Contracts that enable service agreement and usage-based billing capability.
-
Create service items and counter items.
Create service items (non shippable, non inventory) with service type as Usage. Create counter items as non-shippable, non-inventory, and install base trackable items.
-
Complete setups in Oracle Install Base.
Complete the basic setups in install base for associating service item and counter item instances.
-
-
Create Service Agreement and Billing Rules
-
Create service agreements.
Create a service agreement and add the service items to the agreement. Define the payment and billing terms. Add the service items to the contract and associate the price lists, discounts, and surcharges to the service item. Create the billing schedules for each service line. Optionally, add legal terms and conditions using the structured terms library. Validate the agreement ensuring all conditions are satisfied, then route the agreement through approvals to identify any exceptions.
-
Create price lists, discounts, surcharges.
Based on your negotiations with the client, set up the price lists as appropriate with price breaks. Add any promotional offers such as discounts or surcharges as appropriate.
-
Create billing sources (WMS)
A billing source determines how the billing/usage units of a service are calculated. Although Oracle Warehouse Management provides some basic seeded billing sources, you can write custom PL/SQL procedures to calculate the billing units and then select the procedure when setting up the billing source.
-
Create billing rules (WMS)
A billing rule extends the service agreement to enable LSP billing. In this setup, each service line of the agreement is associated to a billing source so that the billing units for each service can be calculated as desired.
-
Billing
-
Calculate usage/billing units for each service (WMS).
This Calculate Billing Units concurrent program calculates the billing units on a periodic basis for each service provided to a client. The billing units are stored against the counter instance in the Oracle Install Base.
-
Run billing program.
The billing concurrent program in Oracle Service Contracts calculates the charges for the service based on the billing schedule and posts the date to Oracle Receivables for creating the invoice. You can also run the concurrent program in a preview mode so you can review the bill and make any corrections before generating the final bill.
-
Review invoice details and billing history.
After the accounts receivable system generates the invoice, you can review the invoice details from the service agreement and view the entire billing history.
-
-
Related Topics
Oracle Warehouse Management User's Guide, Creating Billing Rules
Oracle Warehouse Management User's Guide, Creating Billing Sources
Oracle Warehouse Management User's Guide, Calculate Billing Units concurrent program