The Contract Process
This chapter covers the following topics:
- Contract Process Overview
- Creating New Contract Documents
- Using Contract Authoring Workbench
- Main Region in the Contract Header Tabbed Window
- Administrative Region in the Contract Header Tabbed Window
- Financial Region in the Contract Header Tabbed Window
- Main Region in the Contract Lines Tabbed Window
- Financial Region in the Contract Lines Tabbed Window
- Billing Region in the Contract Lines Tabbed Window
- Additional Billing Region in the Contract Lines Tabbed Window
- Other Region in the Contract Lines Tabbed Window
- Splitting Lines on a Contract Document
- Parties and Contacts
- Terms and Conditions
- Articles Tabbed Window
- Administration Tabbed Window
- Standard Notes Tabbed Window
- Print Forms Tabbed Window
- User Attributes Tabbed Window
- Creating Templates for Contract Documents
- Viewing and Logging Contract Communications
- Comparing Contract Versions
- Calculating Contract and Line Totals
- Termination Process for Contracts
- Deleting Contracts
- Defining Line Style
- Contract Printing
Contract Process Overview
Contract authoring comprises the data entry of a contract document. You create the contract document in the Contract Authoring Wizard. Next you add information in the Contract Authoring Workbench including defining terms and conditions, assigning contacts, and linking it to billing methods. After the document is created, the Contract Organizer window provides a single entry point to different functional areas including deliverable tracking, funding, contract hold statuses, and change management.
Typically, a solicitation or a request for parts or services is the first step in the contract process. A solicitation may include:
-
Supplies or services needed
-
Description of specifications
-
Work statement
-
Packaging and marking specifications
-
Inspection requirements
-
Delivery dates
-
Special requirements
The next step is creating a proposal, a document that is a negotiated response to the solicitation. In a proposal you might add other elements to the document such as:
-
Acceptance period
-
Discount for prompt payment
-
Acknowledgment of amendments
Awarding contract is the final step. The proposal is accepted and the contract is awarded.
Creating New Contract Documents
Oracle Project Contracts provides an Authoring Wizard that guides you through the process of creating a new contract document. You can create a new document, or copy another existing document or template into a new contract document.
To create a new contract document:
-
Navigate to the Contract Authoring Wizard.
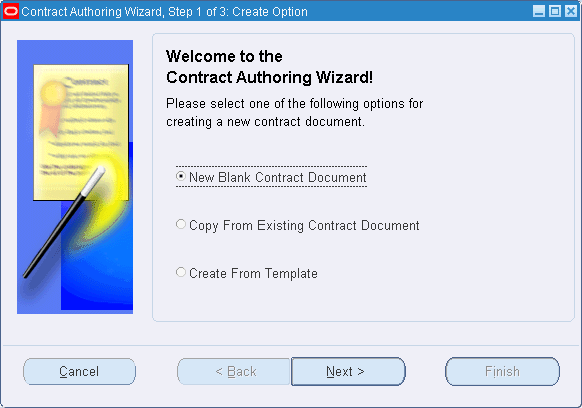
The first window is Contract Authoring Wizard, Step 1 of 3: Create Option.
-
Choose one of the radio buttons to select a method for creating a document.
Your choices are:
-
Create a New Blank Document
-
Copy From Existing Contract Document
-
Create From Template
-
-
Choose Next.
Depending on your selection, either Step 2 or Step 3 windows display.
-
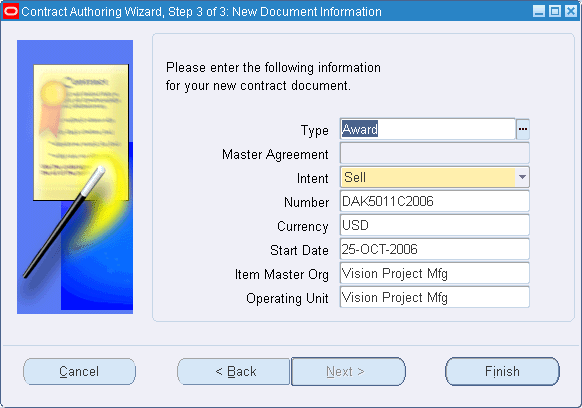
If your choice is Create a New Blank Document, the window displaying is the Contract Authoring Wizard, Step 3. Select values in the fields for this contract.
Depending on the contract type, some fields are enabled or disabled:
Type: You can have a number of different contract types including award, bid, proposal, subcontract, and so on. These types are defined in the System Setup window, Contract Document Types tab. See: Creating Data in the System Setup Window.
Master Agreement: This field is enabled if your contract type is a delivery order. The value entered here would be the master, basic order agreement, or blanket order number.
Intent: This field indicates the designation of the order. Buy is used for subcontracted deliverables, or as a customer buy document. Sell is used for all outbound deliverables. An award type contract can be either buy or sell. This value is defined for document types in the System Setup window, see: Creating Data in the System Setup Window.
Number: This field is enabled if your contract document type numbering is set to manual. Otherwise, it is automatically generated. If the numbering is set to manual, enter a unique value; it can later be changed to another value on the Contract Authoring Workbench. See: Defining Numbering Options.
Currency: The currency in which the contract amounts and prices are defined within this contract. You can set up currency codes in your Oracle General Ledger Currency Codes window. See: Defining Currencies, Oracle General Ledger User’s Guide.
Start date: Date on when the contract begins or the effective from date.
Item Master Org: The manufacturing organization where you have defined inventory items; it is a manufacturing entity. It is linked to an operating unit which displays on the Contract Authoring Workbench.
Operating Unit: The displays the operating unit for which the contract is being created.
-
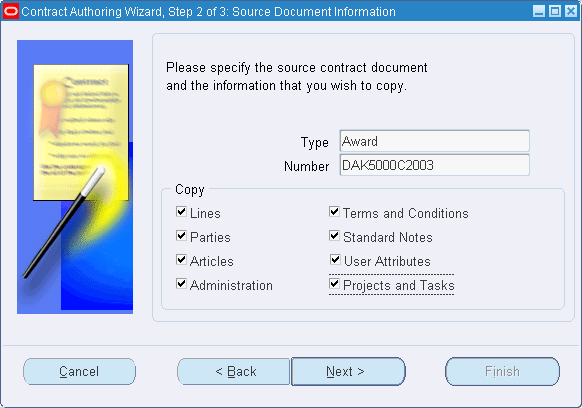
If your choice is Copy From Existing Contract Document, the window displaying is the Contract Authoring Wizard, Step 2. You can use the values in the Type and Number fields, or select another contract document.
-
The default values in the Type and Number fields display from the record selected in the Contract Organizer window.
-
In the Copy region, the defaulted values display from the original contract for Lines, Parties, Articles, Terms and Conditions, Standard Notes, Organizations, and Projects and Tasks. Deselect the check boxes that you do not want to copy into the new contract document.
-
Choose Next.
The system displays the Contract Authoring Wizard, Step 3 of 3: New Document Information window.
-
If your choice is Create From Template, the window displaying is the Contract Authoring Wizard, Step 2. Select a document type in the Type field.
-
In the Number field, select the document you want to use as a template in the Copy From window.
You can save a document as a template in the Contract Authoring window, see: Creating Templates for Contract Documents.
-
In the Copy region, the defaulted values display from the source contract. Clear the values you do not want to copy into this new contract document.
You can select any document to use as the source document. All values and information can be copied from the template document with the exception of the Award Date, Project, and Due Date values. This includes the line information, parties, articles, terms and conditions, standard notes, and organizations.
-
Choose Finish when you have entered all the information needed to create a new document.
The Contract Authoring Workbench displays. In this workbench you can enter detailed information on the contract lines, terms and conditions, notes, and any data applicable to this contract. See: Using Contract Authoring Workbench.
Using Contract Authoring Workbench
After you create your contract document, use the Contract Authoring Workbench to assign terms and conditions, designate parties and contacts, enter financial and administrative data, assign print forms, and update any changes. The Contract Authoring Workbench consists of a tree hierarchy in the left pane displaying the contract selected and corresponding line numbers. The right pane consists of nine tabbed windows accessing different document regions. These tabs access the following areas:
-
Contract Header: This is a region of information applying to the entire contract including type, status, start date, document number, and any applicable master agreement.
-
Contract Lines: The individual lines within a contact contain information specific to that line such as quantity, due date, part number, description, and status.
-
Parties and Contacts: You can specify the parties to the contract, their contract roles, and contact names.
-
Terms and Conditions: This text contains clarifying language about rules, instructions, notices, agreements, and other parameters under this contract.
-
Articles: This is standard or nonstandard text clauses for the contract.
-
Administration: You can assign workflows to a contract, such as an approval workflow. It can be generated from this region in order to receive authorizations.
-
Standard Notes: You can enter and view standard notes for such items as packaging or shipping instructions.
-
Print Forms: This tabbed window is used to define print forms, if required for this contract.
-
User Attributes: Each user-defined attribute group is defined as a descriptive flexfield context. You can define as many contexts as required.
The first field on the window enables you to access several different regions for creating header and line data. You update different information on the window according to the region selected:
-
Main: Used to enter primary contract data including type, number, status, and currency.
-
Administrative: Used to enter dates and customer requirements.
-
Financial: Used to enter costing and other accounting information.
-
Billing: Used to enter billing information for various contract types.
-
Additional Billing Used to enter additional billing data such as incentive information.
-
Other: Used to enter export and inspection data.
Note: Contract number, line number, and deliverable number are listed as the source information within the Item Master Demand Schedule Entries window.
Using Filters to View Contract Documents
The Contract Authoring Workbench provides the ability to filter out information so you can display specific data by due date. In the Filters pull-down menu, located above the tree hierarchy, select a filter for displaying contract information. These filters use the Due Date value in the Contract Lines window. For example, you can filter the available contract data by Due On Today, Due On This Month, or Due On Next Month.
Creating Deliverable Records
The Deliverables Tracking System window is used to monitor the execution of the contract. After creating the contract, you then create deliverable records in the Contract Authoring Workbench. For subsequent changes to the contract, you can automatically default those changes to the Deliverables Tracking System window. See: Deliverables Tracking System Window, and Defaulting Contract Changes to the Deliverables Tracking System.
See Also
Main Region in the Contract Header Tabbed Window.
Administrative Region in the Contract Header Tabbed Window.
Financial Region in the Contract Header Tabbed Window.
Main Region in the Contract Lines Tabbed Window.
Financial Region in the Contract Lines Tabbed Window.
Billing Region in the Contract Lines Tabbed Window.
Additional Billing Region in the Contract Lines Tabbed Window.
Other Region in the Contract Lines Tabbed Window.
User Attributes Tabbed Window.
Main Region in the Contract Header Tabbed Window
The Contract Header tabbed window is used to enter information applying to the entire contract including type, status, start date, document number, and applicable master agreement.
To create and update a document on the Contract Authoring Workbench:
-
Navigate to the Contract Authoring Workbench.
-
Select the Contract Header tab.
-
Select the Main region in the first Contract Header field
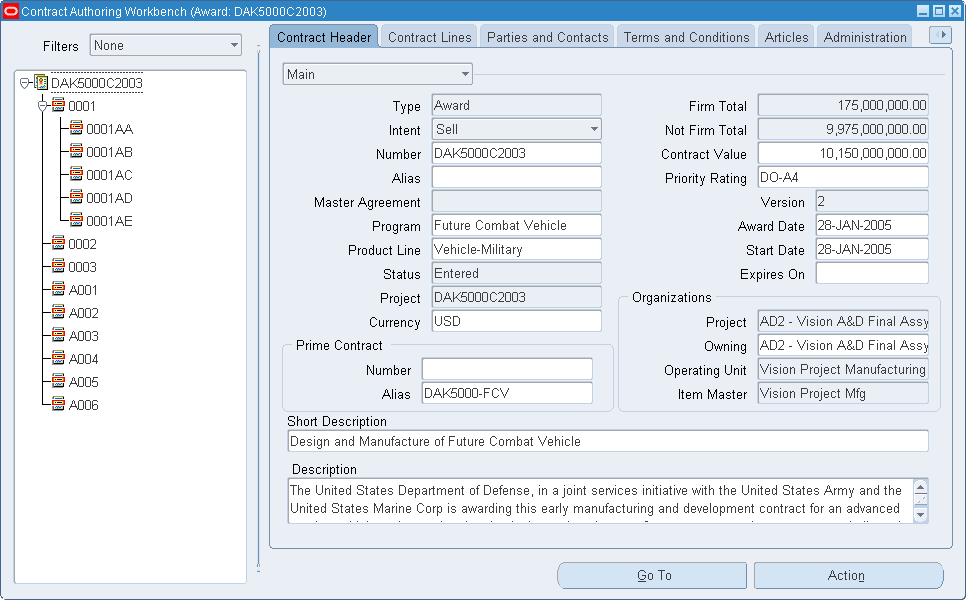
The information entered from the Contract Authoring Wizard, or from later updates displays on this window. This includes the Type, Intent, Number, Master Agreement, Status, Currency, and Start Date fields. See: Creating New Contract Documents.
In the Title section of Contract Authoring Workbench, the system displays the contract type and contract number. Also, if you create a Delivery Order contract type using a master agreement, the master agreement number is concatenated to the contract number and displayed in the Title section. The concatenated information is also available in other applications such as Shipping and Procurement so you can easily identify the master agreement that is associated with the delivery order.
This includes the Type, Intent, Number, Master Agreement, Status, Currency, and Start Date fields. See: Creating New Contract Documents.
You can change the Number, Currency, and Start Date fields. Predefined workflows enable you to change the contract status as you move the document through the contract process.
-
Optionally, select values for the Program and Product Line.
Programs and Product Lines enable you to group contracts according to your definitions. Programs are defined on the Programs window, and Product Lines are defined on the Oracle Project Contracts: Product Line Lookups window. See: Programs Window, and Application Object library Lookups for Oracle Project Contracts.
-
If you are using Oracle Projects, you can assign a master project and, optionally, a task to the contract header. You can associate subprojects to the master project and assign them to the contract lines. See: Entering Project and Task Options, Oracle Projects User's Guide, and Creating a New Project from a Project Template or Existing Record, Oracle Projects User's Guide.
-
The Contract Total field displays the results of the Calculate Totals function
This rollup function is accessed from the Tools menu; it adds the values of all the lines on the contract. See: Calculating Contract and Line Totals.
-
Optionally, in the Alias field enter an internal identifier for this contract.
-
Optionally, select a Priority Rating. This is a rating assigned to customer contracts for national defense, although commercial organizations may also use this value. These types are defined in the System Setup window, Priority Ratings tab. See: Creating Data in the System Setup Window.
-
In the Version field, the system displays the number for the current version of this contract. See: Creating a New Version of a Contract Document.
-
Enter the date the contract was awarded in the Award Date field.
-
In the Start Date field, enter the date when actions for this entire contract begin.
-
If you want to have an expiration date for the entire contract, enter that date in the Expires On field.
-
Optionally, in the Prime Contract Region enter a value to identity a contractor. You can use an alias as an internal reference for this number.
-
-
Review the information that system displays in the Project, Operating Unit, and Item Master fields. These are view-only fields. The value of the Project Organization field is based on the code that you entered in the Project field.
-
In the Owning field, select the owning organization from the list of values..
-
-
Use the Short Description and Description fields to provide details and explanations for the contract.
Administrative Region in the Contract Header Tabbed Window
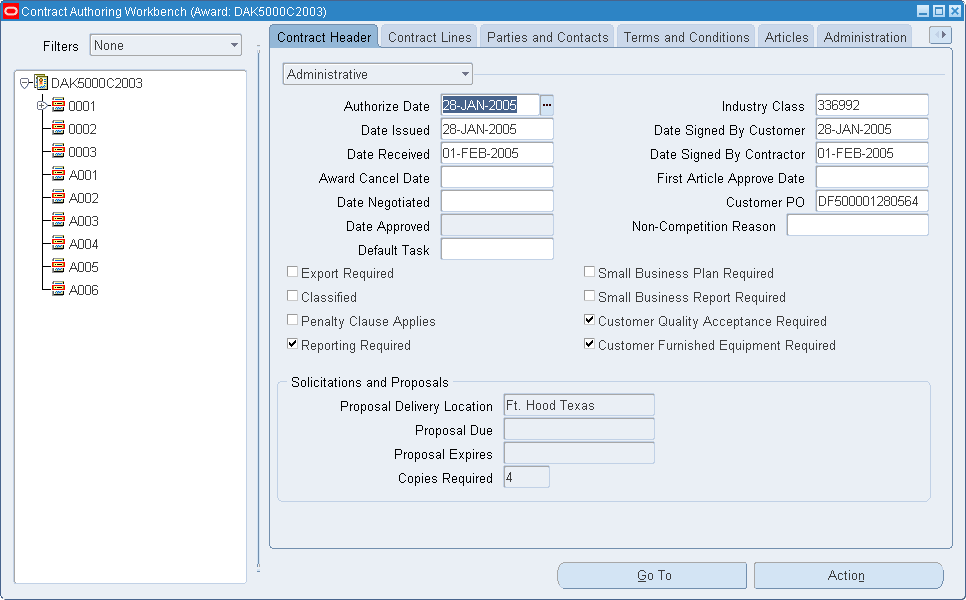
The Administrative region of the Contract Header window is a repository for approval dates, clauses, and regulations used for a particular contract.
The upper part of the window contains date information. After you create a contract document, it may go through a cycle of approvals. As these authorizations proceed, the dates of the actions are marked here including Authorize Date, Date Negotiated, Date Issued, Date Received, Award Cancel Date, Date Approved, Date Signed By Customer, Date Signed By Contractor, and First Article Approve Date.
You can use the Default Task field to copy the project task information from the contract header to contract lines automatically.
Regulatory information is marked in the check boxes for reporting, penalty, export, small business, and quality requirements.
The Solicitations and Proposals region is enabled when that document type is created. You can keep track of solicitations and proposals through location and date information entered in this region.
Financial Region in the Contract Header Tabbed Window
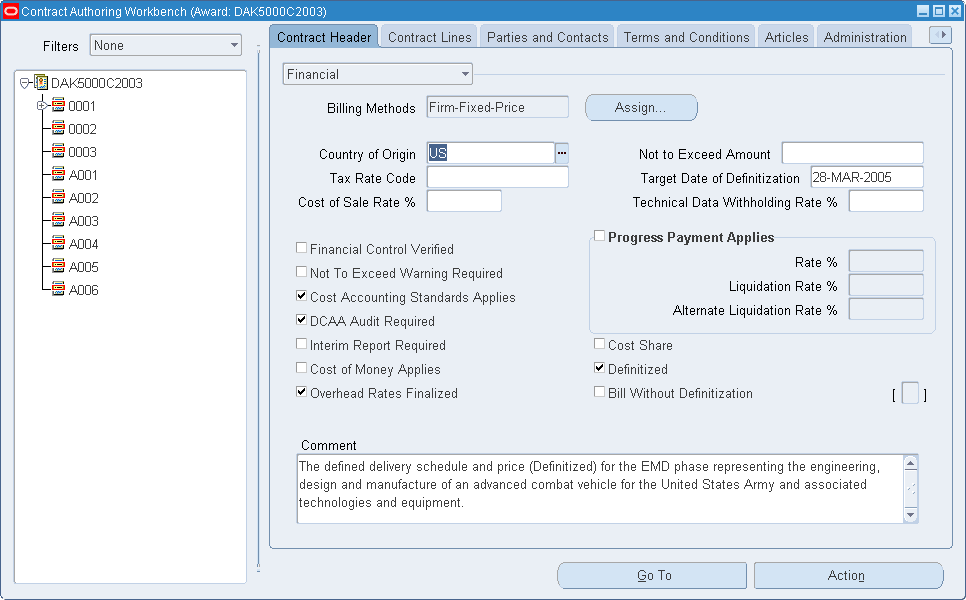
The Contract Header financial region is used for negotiated contract costing data. This region includes fields and check boxes to flag information used for reporting, and check boxes to enable billing transactions. This is also the region where you access the Define Billings Methods window.
Your organization's billing methods are defined in the System Setup window, Billing Methods tab. See: Creating Data in the System Setup Window. After the methods are defined for the organization, methods also need to be set for specific contracts and individual lines.
To add costing information pertaining to the entire contract:
-
Select a contract document and navigate to the Contract Authoring Workbench.
-
In the Contract Header tab, select Financial from the pull down menu.
-
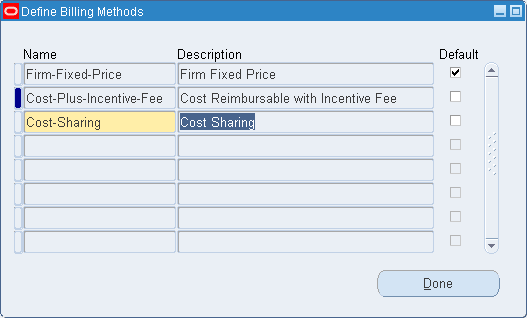
The Billing Methods field displays the way the contract is billed, such as fixed price or cost sharing. Choose Assign to access the Define Billing Methods window to select methods.
When Multiple displays in this field, in indicates that individual lines on the contract have different billing methods. See: Billing Region in the Contract Lines Tabbed Window.
-
Select the methods you want to use in the Name field. The description automatically displays.
-
Optionally, select the Default indicator if you want the billing method assigned at the contract header to default to each line. This defaulted value can be changed at the line level.
-
Choose Done to save your work and return to the Contract Header tabbed region.
-
In the upper area of the Financial region window, optionally you can enter information in the fields used for reporting.
This includes the following fields: Country of Origin, Tax Code, Cost of Sale Rate, Not to Exceed Amount, Target Date of Definitization, Technical Data Withholding Rate.
-
In the lower region of the window, optionally, you can mark check boxes for reporting purposes.
This includes: Financial Control Verified, Not To Exceed Warning Required, Cost Accounting Standard Applies, DCAA Audit Required, Interim Report Required, Cost of Money Applies, Overhead Rates Finalized, and Cost Share.
-
If you are using Deliverable-Based Billing, check the Definitized or Bill Without Definitization indicators to enable that function.
See: Creating Billing Records for Contract Lines. When one of these indicators is flagged on the Contract Header tabbed window, the values are defaulted to the contract lines. You can change the information on the Contract Lines financial region.
-
In the Progress Payment Applies region, mark this check box if you want to add information about advance ongoing payments from your customers on this contract.
The information in these fields indicate:
Rate: Enter a percentage value indicating the contract progress payment rate.
Liquidation Rate: Enter a percentage value indicating the reimbursement rate for the payments
Alternate Liquidation Rate: If you negotiated another alter rate, enter that rate here.
-
Optionally, you can enter any descriptive text regarding this contract in the Comments box.
-
Save your work.
Main Region in the Contract Lines Tabbed Window
After the contract header information is created, the next step is to define the individual lines. If the contract document is created by copying from another contract or template—the line information is duplicated and you can change the specific information for the new document.
To create and update line numbers on your contract:
-
Select the Contract Lines tab.
-
If you are viewing a line that has been previously created, then select that line in the left pane navigator.
The line information appears in the right pane window.
-
If you are creating a new line, then select either the top level to create a new line, or any node in the navigator to create a level beneath the line. Choose New.
The navigator displays a node titled New Line in the left pane, and a blank Contract Lines window in the right pane.
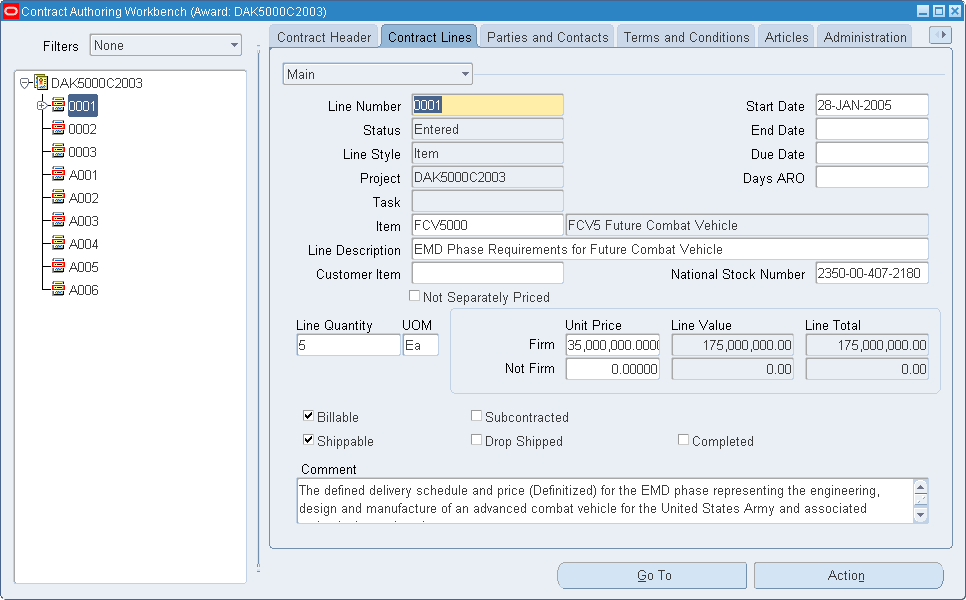
-
Enter the Line Number.
-
The Status field value is blank when you are creating a new line. After the line is created it displays the stage that this line is in the contract cycle.
The Status field value reflects the status of the new line.
Select either the default values or style which you defined for the line in the Line style field. See: Defining Line Style.
Each line on the contract can be a different style type for contracting inventory items, services, data items, labor, spares or subcontracted.
Note: You need to assign user defined line style to a category for it to appear in the list of values. See: Defining Line Style.
-
At the contract line and sub-line level, optionally you can assign any of the following values.
-
Master project
-
Master project and task
-
Subproject
-
Subproject and task
See: Projects Window.
-
-
In the Date fields, enter the information that is applicable.
-
The value for the Start Date is defaulted from the Contract Header window.
-
End Date is the date when this contract line is closed.
-
Due Date is the date that this line item is due to the customer. The system calculates and displays the due date on contract line based on the information you enter in the Award Date and Days ARO fields. If necessary, you can manually change the due date.
-
Days ARO is the number of days after the receipt of the order that is due to the customer
-
-
If this line is for a part listed in Oracle Inventory's Item Master file, enter that number in the Item field.
The description automatically appears.
-
If this line is for a part not defined in the Items window, enter a specific description in the Line description field.
-
If applicable, you can enter the Customer Item number.
-
Optionally, enter the National Stock Number if this is a government contract and a number is given for cataloging and stocking parts.
-
Check the Not Separately Priced check box if the price for this item is included in a rollup price on this document.
-
Enter the number of items for this line in the Line Quantity field. The default unit of measure appears in the UOM field, and this value can be changed.
-
Enter a value in the Firm or Not Firm Unit Price field.
The Firm and Not Firm buckets for Unit Price and Line value fields separate prices that are either definitized or negotiated final prices (Firm), or undefinitized or option lines (Not Firm).
For items bought in bulk or a lot, enter a value in the Firm or Not Firm Line Value field.
-
The Line Total field displays the results of the Calculate Totals function.
This rollup function is accessed from the Tools menu; it sums the value of the selected line, and any sublines under this line. See: Calculating Contract and Line Totals.
-
Select the check boxes that are applicable for this line, indicating if this item is Billable, Shippable, Subcontracted, Drop Shipped, or Completed.
This information is supplied to the Deliverable Tracking system window to monitor the line activity. See: Billing Region in the Contract Lines Tabbed Window.
-
Enter any descriptive information for this line in the Comment text field.
-
Save your work.
Financial Region in the Contract Lines Tabbed Window
The Contract Lines financial region is used for negotiated contract costing data. This region includes fields and check boxes to flag information used for reporting, check boxes to enable billing transactions, and descriptive text documenting pricing justifications.
To add costing information for contract lines:
-
Select a contract document and navigate to the Contract Authoring Workbench.
-
Select a line and the Contract Lines tab, select Financial in the pull down menu.
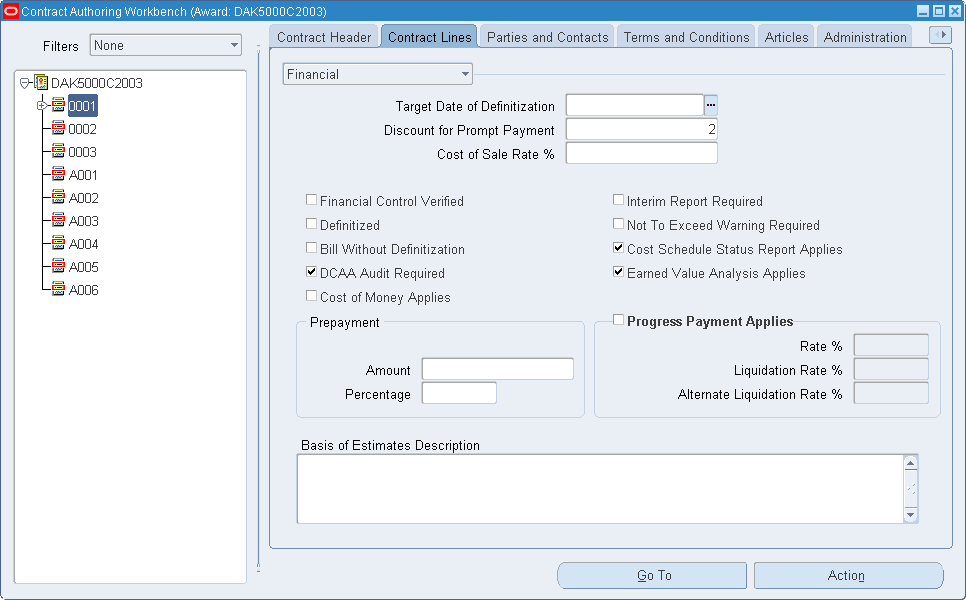
-
In the upper region of the window, you can enter reporting information in the fields.
This includes Target Date of Definitization, Discount for Prompt Payment, and Cost of Sale Rate.
-
In the lower region of the window, you can select indicators for reporting purposes.
This includes the following indicators: Financial Control Verified, Definitized, Bill Without Definitization, DCAA Audit Required, Cost of Money Applies, Interim Report Required, Not To Exceed Warning Applies, Cost Schedule Status Report Applies, and Earned Value Analysis Applies.
If you are using Deliverable-Based Billing, then select the Definitized or Bill Without Definitization indicators to enable that function. See: Creating Billing Records for Deliverables.
Note: Billing methods are specified for each contract on the Contract Header. See: Defining Billing Methods Window for a Contract.
-
Optionally, in the Prepayment region enter the amount and percentage of the line item cost your customer pays in advance.
-
In the Progress Payment Applies region, select this check box if you want to add information about advance ongoing payments from your customers on this line.
The information in these fields indicate:
Rate: Enter a percentage value indicating the contract progress payment rate.
Liquidation Rate: Enter a percentage value indicating the reimbursement rate for the payments
Alternate Liquidation Rate: If you negotiated another alter rate, enter that rate here.
-
In the Basis of Estimates Description region include text explaining estimates and justifications for costs of the items on this contract document.
-
Save your work.
Billing Region in the Contract Lines Tabbed Window
The Contract Lines Billing region is used for billing information. This region is divided into two sections, one for cost data and one for fee data, used for billing.
To add billing information for contract lines:
-
Select a contract document and navigate to the Contract Authoring Workbench.
-
Select a line and the Contract Lines tab, select Billing in the pull down menu.
-
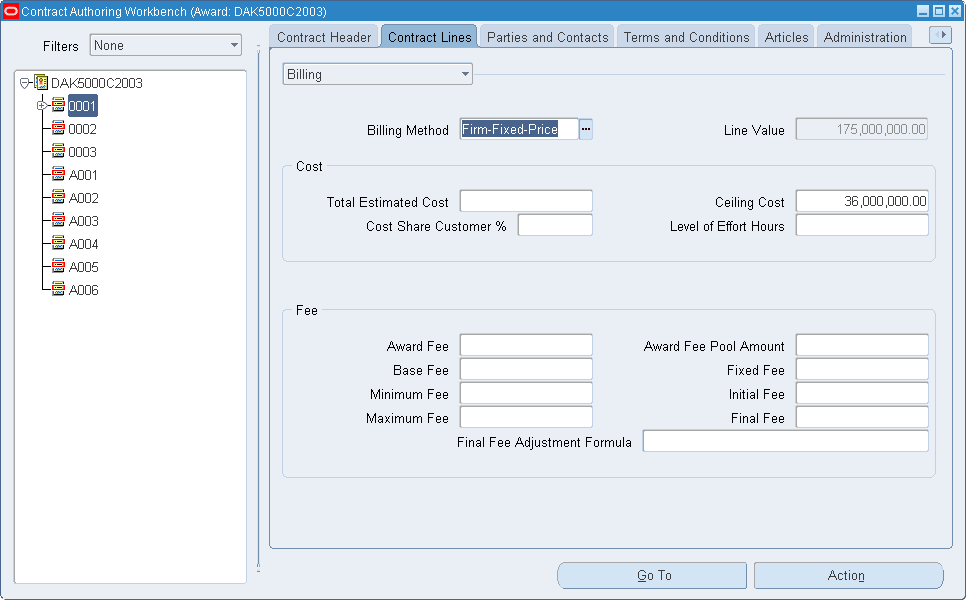
In the Billing Method field, you can change the default billing method assigned from the Contract Header.
Billing methods are specified for each contract on the Contract Header. See: Defining Billing Methods Window for a Contract. The system displays the methods that you have selected in the Define Billing Methods window in the list of values for this field.
-
Use the Cost region to enter data applying to this line. This includes the following fields: Total Estimated Cost, Cost Share Customer Percentage, Ceiling Cost, and Level of Effort Cost.
-
Use the Fee region to enter data if this line is priced at a fee rate. This includes the following fields: Award Fee, Base Fee, Minimum Fee, Maximum Fee, Award Fee Pool Amount, Fixed Fee, Initial Fee, Final Fee, and Final Fee Adjustment Formula.
-
Save your work.
Additional Billing Region in the Contract Lines Tabbed Window
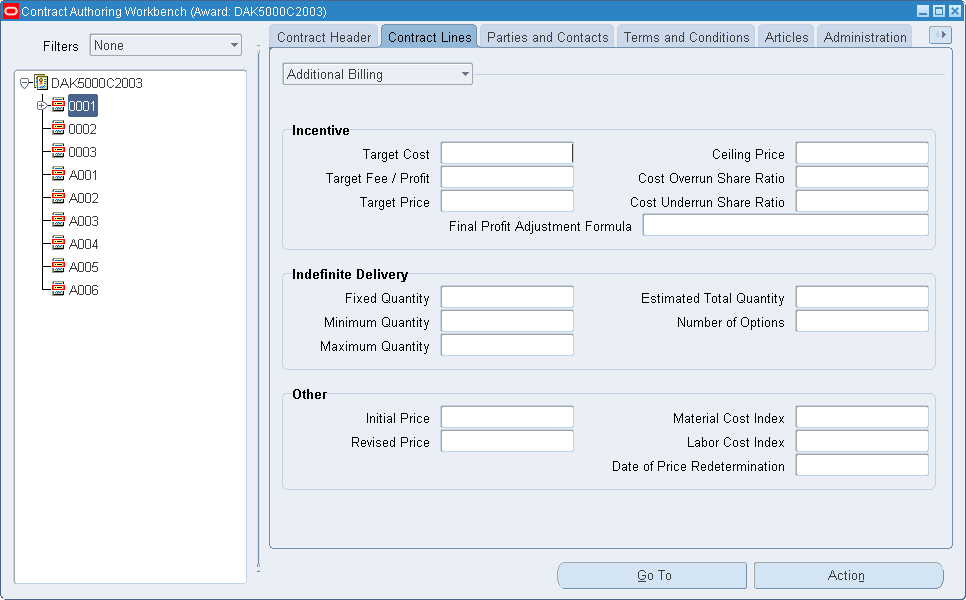
The Contract Lines Additional Billing region is used to group information for different contract types for billing purposes. This region is divided into three sections—Incentive, Indefinite Delivery, and Other—to collect information for lines that are billed in different manners.
To add additional billing information for contract lines:
-
Select a contract document and navigate to the Contract Authoring Workbench.
-
Select a line and the Contract Lines tab, select Additional Billing in the pull down menu.
-
Enter information in the Incentive region, if this is an incentive type line for this contract.
Incentive contracts are agreements where the buyer and seller agree to a target cost and maximum price. Cost savings, as well as cost overruns, are shared between buyer and seller. Enter values in the following fields: Target Cost, Target Fee/Profit, Target Price, Ceiling Price, Cost Overrun Share Rate, and Cost Underrun Share Rate.
-
Enter information in the Indefinite Delivery region, if this is an indefinite delivery line item.
Indefinite delivery contracts typically define a minimum or maximum quantity for the entire contract. The cost or pricing arrangement is for an estimated quantity. Enter values in the following fields: Fixed Quantity, Minimum Quantity, Maximum Quantity Estimated Total Quantity, and Number of Options.
-
The Other region is used to collect information for contract lines that are classified as redetermination and economic price adjustment contracts.
A redetermination contract establishes an initial price and a time for negotiating a price adjustment. An economic price adjustment contract uses labor and material costs compared to price indexes for price adjustments. Enter values in the following fields: Initial Price, Revised Price, Material Cost Index, Labor Cost Index, and Date of Price Redetermination.
-
Save your work.
Other Region in the Contract Lines Tabbed Window
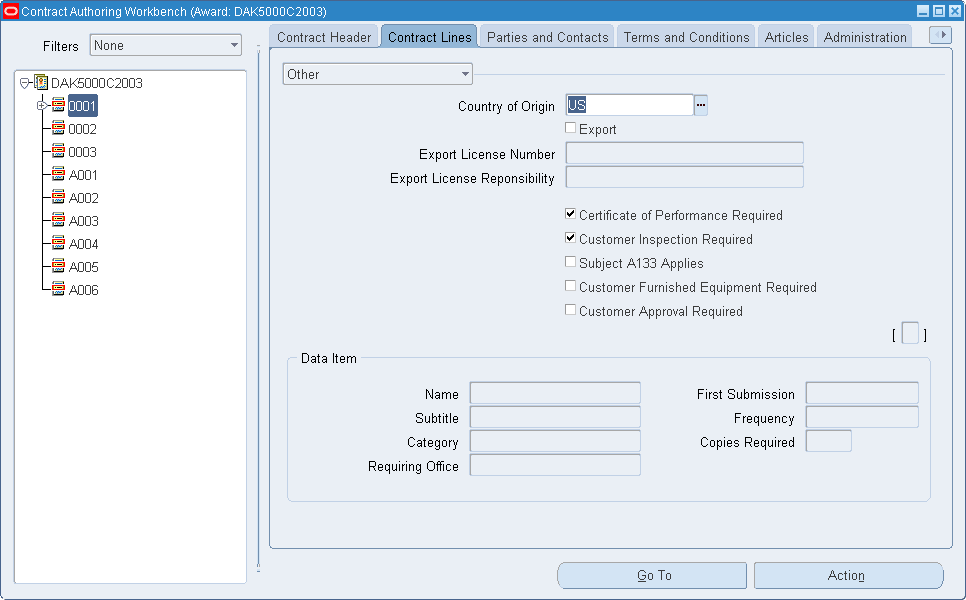
The Contract Lines Other region is used to add additional line item data for export, inspection regulations, and data item information.
To add export, inspection regulations, or data item information for a contract line:
-
Select a contract document and navigate to the Contract Authoring Workbench.
-
Select a line and the Contract Lines tab, select Other in the pull down menu.
-
If this line item is to be shipped to another country, select a value in the Country of Origin field.
-
Select the Export check box to enable the Export License Number and Export License Responsibility fields. Optionally, you can enter values in those fields.
-
Optionally, select any of the check boxes that are used for performance and inspection regulations.
The check boxes are: Certificate of Performance Required, Customer Inspection Required, Subject A133 Applies, Customer Furnished Equipment Required, and Customer Approval Required.
-
The Data Item region is enabled when the line style type is data item, also called Contract Data Requirements List (CDRL). Data items can include specifications, standards, drawings, associated lists, manuals, and reports.
Optionally you can enter information in the following fields: Name, Subtitle, Category, Requiring Office, First Submission, Frequency, and Copies Required. This information is defaulted to the Deliverable Tracking System window when you are tracking submissions of these materials. See: Tracking Drawing or Report Submissions.
-
Save your work.
Splitting Lines on a Contract Document
You may want to divide the quantity on your contract lines in order to have separate deliveries defaulted to the Deliverable Tracking System. You can split lines into sublines in the Contract Authoring Workbench through the Actions menu.
After the line is split, the price information for the sublines is calculated in the following way:
-
Lines with Unit Price values, the original unit price defaults to the sublines
-
Lines with Line Value data, the line value is null and can be updated in the Contract Lines tabbed window
To split contract lines:
-
Navigate to the Contract Lines tabbed window, and select the line you want to divide.
-
Choose Action, and select Split Line.
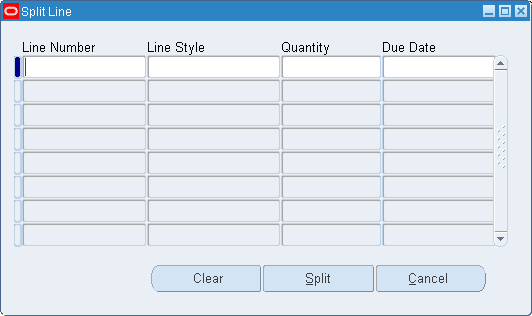
The Split Line window displays.
-
In the Line Number field, enter the line number for the first subline.
-
In the Line Style field, select a style for the subline.
-
In the Quantity field, enter the split quantity. Select a date in the Due Date field.
-
Select a date in the Due Date field.
-
Repeat the above steps for the second subline in the next row.
Note: You must have at least two rows of data, and the total quantity of the sublines must equal the original quantity of the line.
-
Click Split.
Parties and Contacts
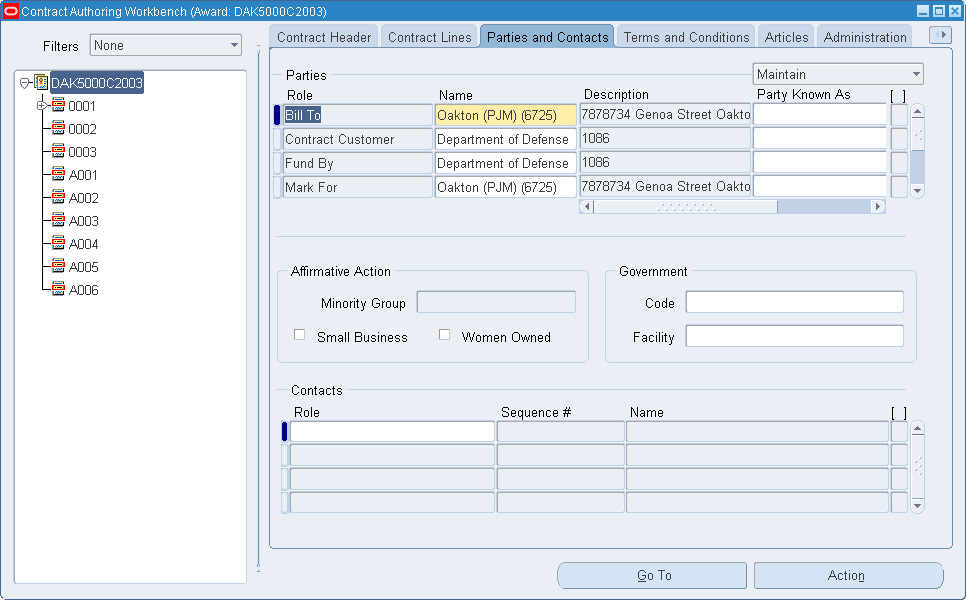
Use this window to indicate specific groups and people associated with each contract, and the roles they have in the contract. The window has 4 regions: Parties, Affirmative Action, Government, and Contacts. There are two modes, Maintain and View:
-
The View mode displays all the Parties and Contacts from the Contract Header level, this information defaults to the contract line level.
-
The Maintain mode is used to add, change, or delete the header information for individual lines that use different values.
To create or change parties and contact information on your contract:
-
Navigate to the Parties and Contacts window and select the Maintain mode from the menu.
-
Select the contract level, or individual contract lines.
-
In the Parties region, enter information about the specific parties.
-
Role: The name for the specific activity. For example, you can have a party that is a customer, contractor, ship to location, or funding entity.
Note: If you assign a role of Customer or Contractor, the name displays in the Customer or Contractor fields on the Summary tab. If more than one record exists for either customer or contractor, Multiple displays in the respective fields.
-
Name: The name of this role, for example, the city for a shipping location.
-
Party Known As: Any other familiar name used for this party.
-
Contract Alias: You can indicate any alias created for this contract.
-
-
In the Affirmative Action region, you can indicate if this contract is awarded to a group defined as a Minority Group. And if applicable, if it is either small business or women owned type of minority.
-
In the Government region, enter any applicable government code or government facility used for this contract.
-
In the Contacts region, you can select information for individuals to communicate with regarding the contract.
-
Save your work.
Terms and Conditions
Terms and conditions represent the clauses and other sections of a contract document that contain clarifying language about rules and procedures. They include text for payment, consignment, and contract line specific terms. The Terms and Conditions window provides the repository to associate these clauses with a specific document. There are two modes, Maintain and View:
-
The View mode displays all the Terms and Conditions available on the contract from the Contract Header level.
-
The Maintain mode is used to add individual line level terms and conditions.
To Define terms and conditions:
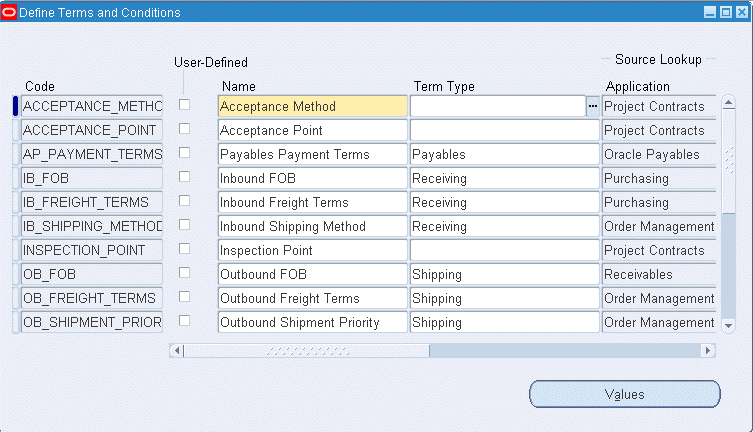
-
Enter the name of the term in the Name field.
-
Select the type in the Term Type field.
-
Select the application which term and conditions assigned to in the Application field.
-
Save your work.
To add or change terms and conditions to your contract:
-
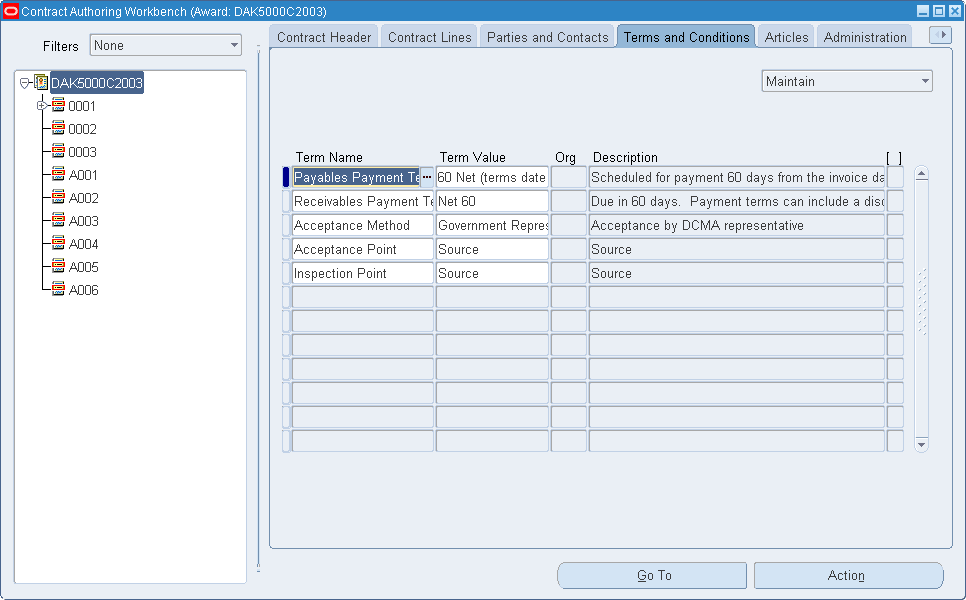
Navigate to the Terms and Conditions window, and select Maintain mode from the pull-down menu.
-
Select either the contract level, or individual contract lines.
-
In the Term Type field, select a type indicating the area this concerns such as shipping, receiving, or budget.
-
Select the name of the term in the Term field.
-
Select the Term Value.
For example, if this is a payment term, you might select 2 percent for net 30 days.
-
Save your work.
Articles Tabbed Window
Articles represent standard or nonstandard text clauses. The Articles window is the place that you associate the articles to the specific contract. Standard clauses can be referenced on a contract; nonstandard ones can be copied from standard ones. Referenced standard clauses cannot be changed for a specific contract. Available modes are:
-
The View mode displays all the contract articles from the Contract Header level, this information defaults to the contract line level.
-
The Maintain mode is used to modify the articles per individual lines; either to stipulate if specific articles are not applicable, or to insert other provisions for the line.
To associate or add information to the articles on your contract:
-
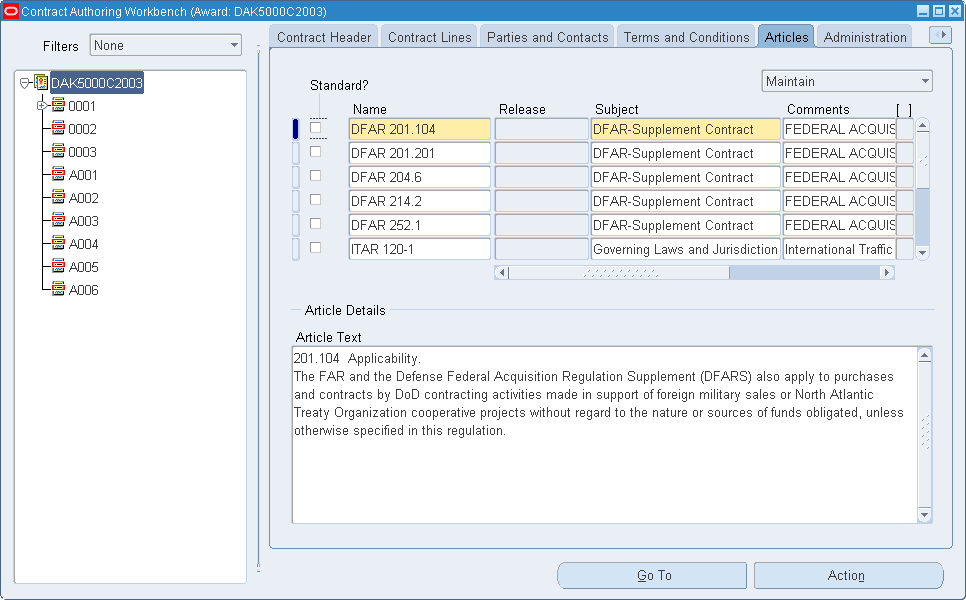
Navigate to the Articles window and select the Maintain mode from the pull-down menu.
-
Select either the contract level, or individual contract lines.
You can associate both standard and non-standard clauses to your contract.
-
For standard article clauses, check the Standard check box.
-
Place the cursor in the Name field to access the list of values for the names of the articles defined in your organization.
The Standard Article Sets window displays.
-
Select an article, and choose Copy.
Information for this article displays in the Release and Subject fields. In the Article Details region, the wording for this article displays in the Article Text box.
-
Optionally, you can add any descriptive text in the Comments field.
-
For non-standard article clauses, uncheck the Standard check box.
-
Enter the article name in the Name field.
-
Optionally, you can select a value in the Subject field, and add any descriptive text in the Comments field.
-
Enter the text of this article in the Article Details region, in the Article Text box.
-
Save your work.
Administration Tabbed Window
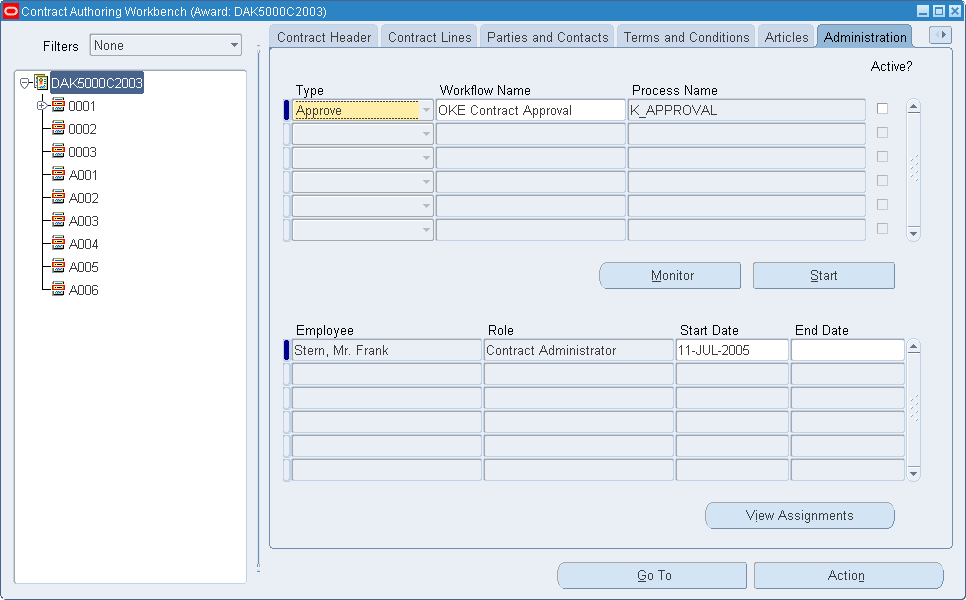
The Administration tabbed window is divided into two regions. The upper region enables you to associate approval workflow processes to contract documents, submit, and monitor the workflow process. The lower region enables you to assign employees to contract roles.
Note: During contract approval, approvers can also provide comments. The system includes these comments in the reply notifications that are sent the requestor. This functionality provides the contract approvers the ability to send comments to the contract administrators and other users during approval process.
To associate a workflow process to your contract:
-
Navigate to the Administration window.
-
In the Type field, select a class of workflow from list of values
-
Select a workflow in the Workflow Name field.
-
Choose Start to initiate the Workflow process.
The Active? check box is selected when the workflow is running.
-
Choose Monitor to navigate to the Workflow Monitor to view the status of this process.
This is a tool that enables you to view the status of a specific instance of a workflow to identify the activity currently being executed for the process.
-
If you want to assign employees to roles, select the appropriate values in the Employee, Role, Start Date, and End Date fields.
-
Save your work.
-
Choose View Assignments to display all assignments relevant to this document.
See Also
Overview of Setting Up Oracle Workflow, Oracle Workflow User's Guide.
To Schedule Background Engines, Oracle Workflow User's Guide.
Reviewing Notifications via Electronic Mail, Oracle Workflow User's Guide.
Standard Notes Tabbed Window
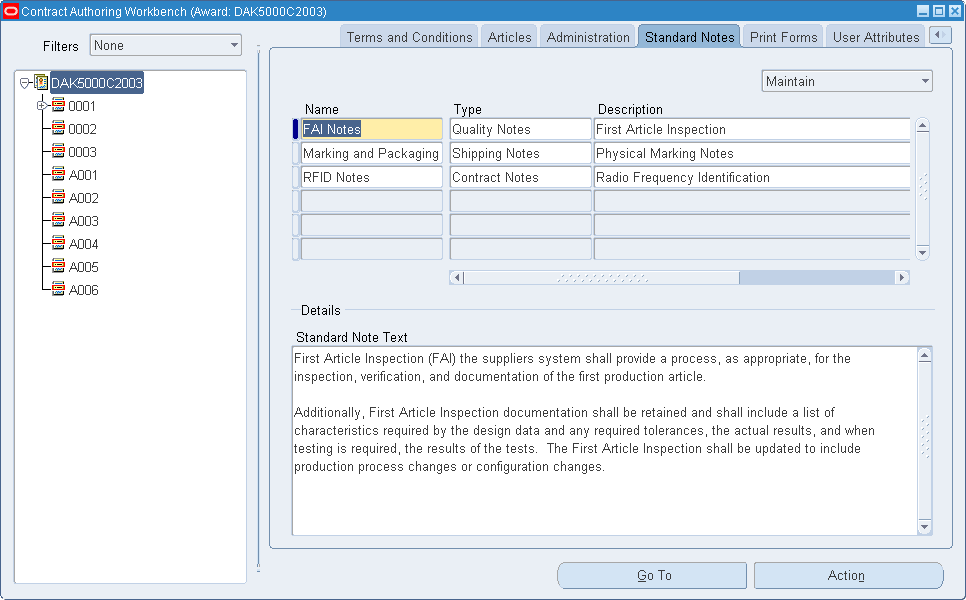
The Standard Notes window is used to enter and view information such as packaging, shipping, or any other instruction that you want to put on a contract document. There are two modes, Maintain and View:
-
The View mode displays all the contract standard notes from the Contract Header level, this information defaults to the contract line level.
-
The Maintain mode is used modify the notes per individual lines; either to add notes specific to a line, or stipulate if a note is not applicable.
To add standard note information to your contract:
-
Navigate to the Standard Notes window.
-
In the Name field enter a designation for this note, select a value in the Type field, and enter any applicable data in the Description field.
-
Select the Default Down check box if you want the notes to pass on to individual contract lines. You can change these defaults at the line level.
-
In the Article Details region, enter or paste any textual information in the Standard Note Text box.
-
Save your work.
Print Forms Tabbed Window
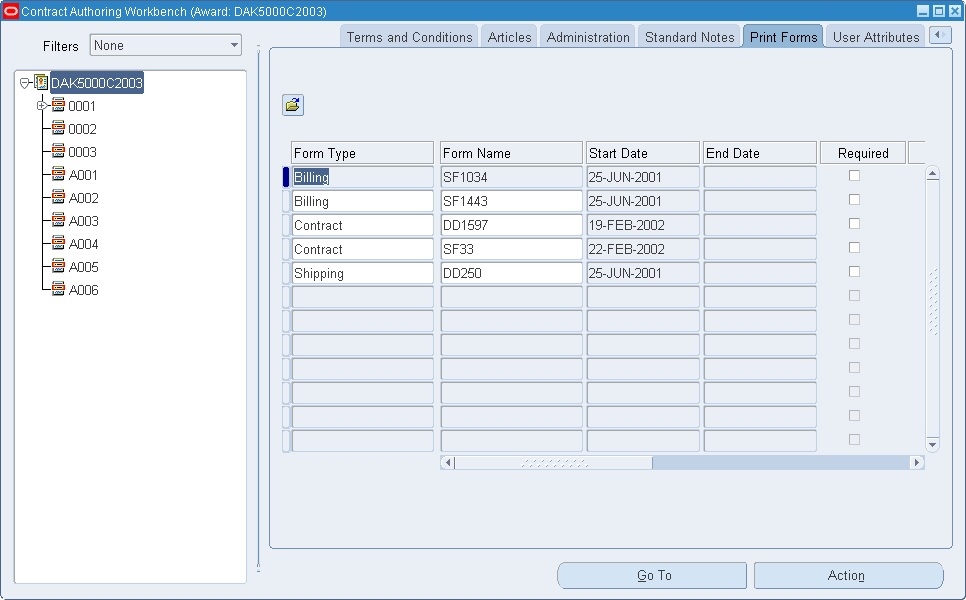
This window is used to define the printing forms a customer or government agency requires for shipping, billing, and so on.
To define printing forms used for a contract or contract line:
-
Navigate to the Print Forms window.
-
A Completed check box in the scrolling region is used to indicate if all the requirements of the form have been met. You can select the Complete All check box, in the upper region of the window, to indicate that required forms have sufficient data to fulfill their requirements.
-
Select values in the Form Type and Form Name fields.
The Start Date and End Date fields display information created in the Print Forms tabbed window of the System Setup window. See: Creating Data in the System Setup Window.
-
Select the applicable check boxes regarding information about this form.
-
Required indicates if this form is mandatory.
-
Customer Furnished indicates that your customer is supplying the form.
-
Completed indicates that the requirements of the form have been met.
-
-
Use the Description field to enter any textual information for this form.
-
Save your work.
User Attributes Tabbed Window
Use the User Attributes window to define descriptive flexfield context. Descriptive flexfields are user-defined to provide customization on windows for tracking additional information and data unique to your business.
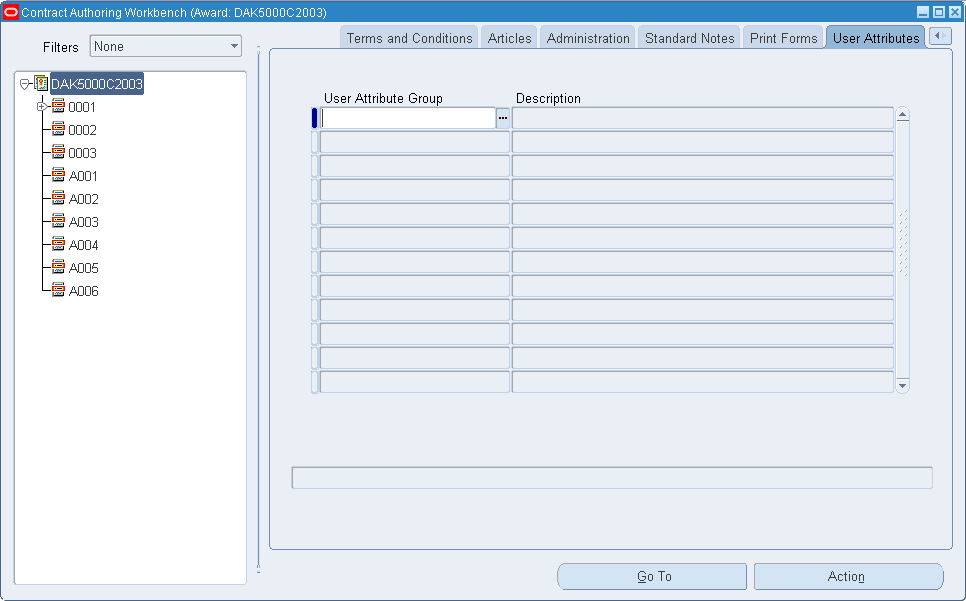
When you select a value in the User Attribute field, a pop–up window displays the prompts created in the Descriptive Flexfields windows.
See Also
Entering Data in Forms, Oracle Applications User's Guide.
Entering Data in a Descriptive Flexfields Window, Oracle Applications User's Guide
Creating Templates for Contract Documents
You can use templates to create contract documents. Templates are documents with predefined structure and default values. You can select any working contract document to save as a template, and later create a new contract document by copying the template.
When you create a new contract document from a template, you can copy all values and information from the template document with the exception of the Award Date, Project, and Due Date values. This includes the line information, parties, articles, terms and conditions, standard notes, and organizations.
To create a new template from an existing contract document:
-
Select a contract document and navigate to the Contract Authoring Workbench.
-
Choose Action.
-
Select Save As Template
The system displays the Save As Template window.
-
Enter a value in the Template Number field.
-
Choose OK to save your work.
This template is now available when you are creating a new document. See: Creating A New Contract Document.
Viewing and Logging Contract Communications
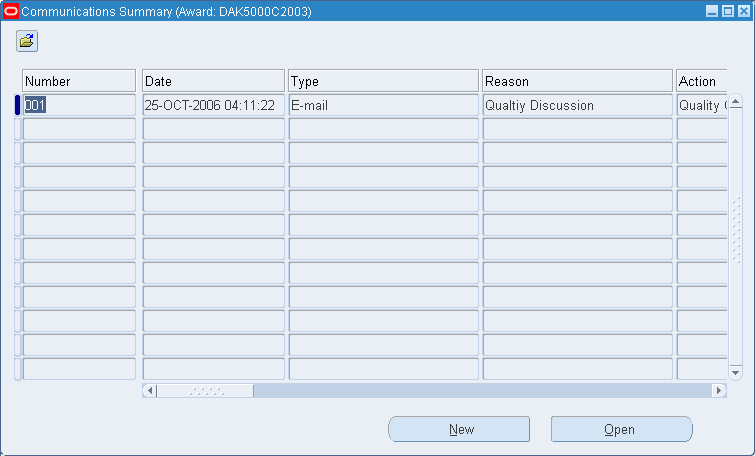
Use the Communications Summary window to add and view electronic exchanges and furnish an audit trail for contractual communications. This information can consist of logged conversations between contracting parties, internal memoranda, and other exchanges such as electronic mail or text files.
To view and add communication information to a contract:
-
Select a contract document and navigate to the Communications Summary window.
The communications for this contract are listed by Number. This window also outlines dates, communication types, contact names, contract document lines, projects, tasks, and funding information.
-
To view detailed information, select a record and choose Open.
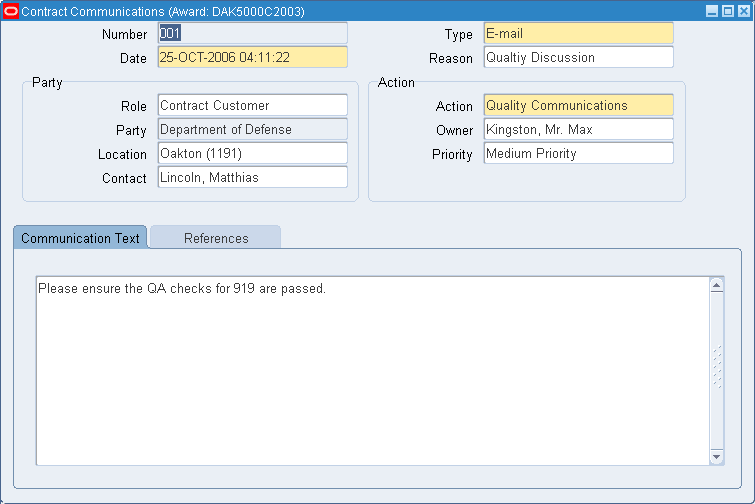
The system displays the Contract Communications window. Information for this communication number is displayed in the following areas:
-
The upper region of the window displays the date, type, and reason for this communication. The Party region lists the parties and contracts for this record. The Action region shows if there is a response.
-
The Communication Text tabbed window is used to enter or paste textual information.
-
The Reference tabbed window is used to associate Contract, Project, and Funding references with this communication number.
-
-
To create a new record for this contract document, choose New.
-
In the Contract Communications window, enter a value in the Number field for this communication.
The system displays the current date and time.
-
Select a value for communication type in the Type field, and optionally, a reason for this exchange.
-
Optionally, in the Party region select values in the Role, Location, and Contact fields. The system displays the Party for this Role value.
-
In the Action region, select your response in the Action field. Optionally, you can select values in the Owner and Priority fields.
-
In the Communication Text tabbed window, enter or paste textual information. For example, you can paste an e-mail communication or record the information from a telephone conversation.
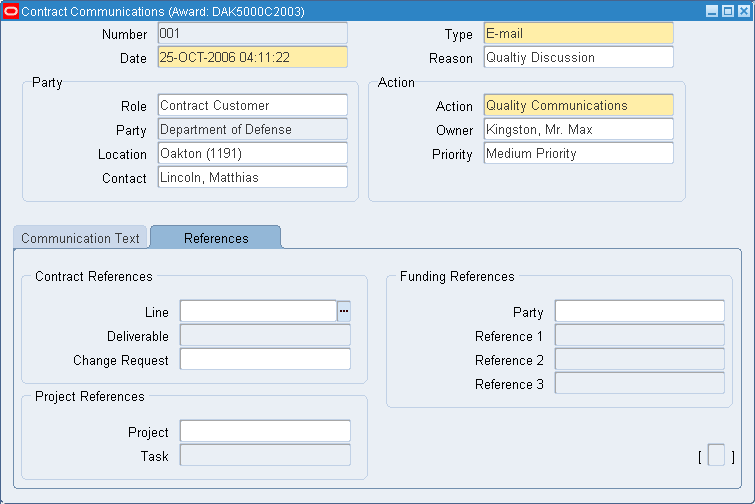
-
The Reference tabbed window is used to associate, if applicable, Contract, Project and Funding references with this communication.
-
In the Contract References region, you can select the line number, deliverable number, and change request number.
-
In the Project References region, you can select a project and task.
-
In the Funding References region, you can select a party and up to three references.
-
-
Save your work
Comparing Contract Versions
Changing or creating new versions of contract documents may occur numerous times for a contract. In Oracle Project Contracts, you can create different contract versions either manually or through the workflow process within the Change Management functionality. Every new version of a contract is displayed in the History tabbed window of the Contract Organizer.
You can also compare versions of a contract document to see the specific changes. This is available in a self service inquiry mode, accessing a report through a browser window. The report displays columns with the changes made in fields on each version selected.
See Also
Creating New Versions of a Contract Document.
To compare different versions of a contract
Steps
-
Navigate to the Contract Organizer and select your contract.
-
Select the History tab.
The system displays the version number in the Version field.
-
Choose View to display the Actions menu, and select Compare Versions.
The system displays the Version Comparison window.
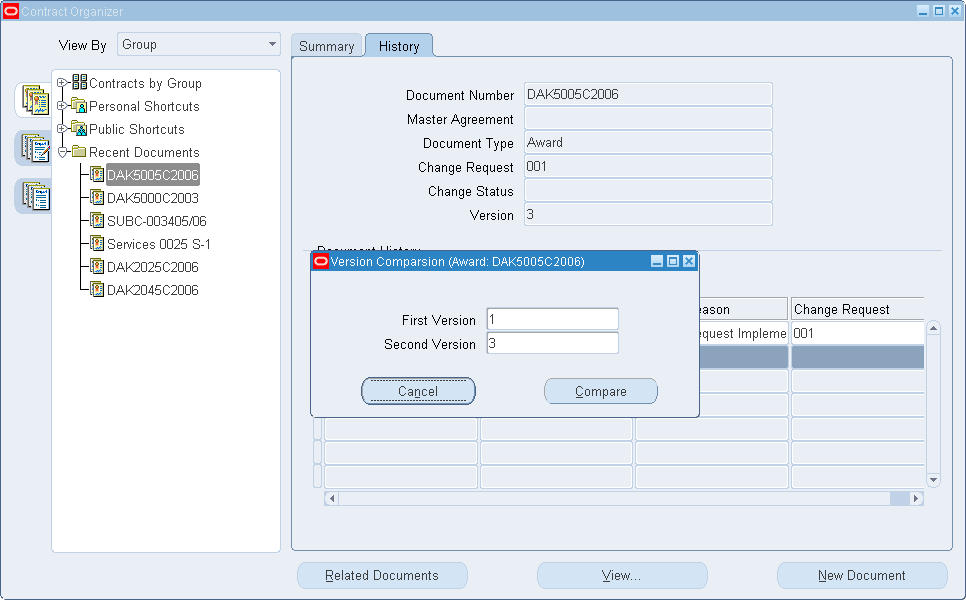
-
Select values in the First Version and Second Version fields for the documents you want to compare.
-
Choose Compare to display the report.
The report displays only the columns that show a difference in the versions selected.

Calculating Contract and Line Totals
You can calculate the value of a contract line or an entire contract by generating a rollup function. The rollup values display in several places depending on the rollup type selected:
-
If you are calculating the entire contract total, the value displays in the Contract Total field, on the Contract Header tab of the Contract Authoring Workbench.
-
If you are calculating the value for a line, or the sublines feeding into a specific line, the result displays in the Line Total field, on the Contract Lines field of the Contract Authoring Workbench.
-
You also have the option to move the subline totals into the Line Value field for the primary line.
To calculate contract and line totals:
-
Select your contract and navigate to the Contract Authoring Workbench.
-
In either the Contract Header or Contract Lines tab, select Calculate Totals from the Tools menu.
Note: You must select a line in the Contract Lines tab to enable the Calculate Totals function.
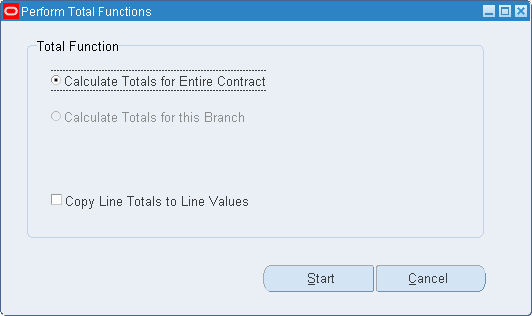
The system displays the Perform Total Functions window.
-
Choose one of the rollup options:
-
Calculate Totals for Entire Contract: Adds the values of all the lines on the contract.
This is calculated by multiplying the value in the Line Quantity field, by the value in the Unit Price field. The totals for all the lines are then summed. The result displays in the Contract Total field, on the Contract Header tab, of the Contract Authoring Workbench.
-
Calculate Totals for this Branch: Sums the value of the selected line, and any sublines for this line.
This is calculated by multiplying the value in the Line Quantity field, by the value in the Unit Price field. The result displays in the Line Total field in the Contract Lines tab.
-
-
Use the Copy Line Totals to Line Values check box to copy the subline roll up values into the Line Value field for primary lines.
-
Choose Start to generate your selected roll up type.
The Contract Authoring Workbench refreshes to the Contract Header tab, and the results display in the fields specific to the roll up selected.
Termination Process for Contracts
You can terminate a contract, contract line, or deliverable. Terminations to a contract are automatically applied to all their contract lines, and terminated on a contract line are applied automatically to all contract deliverables for that contract line.
To terminate contract and line:
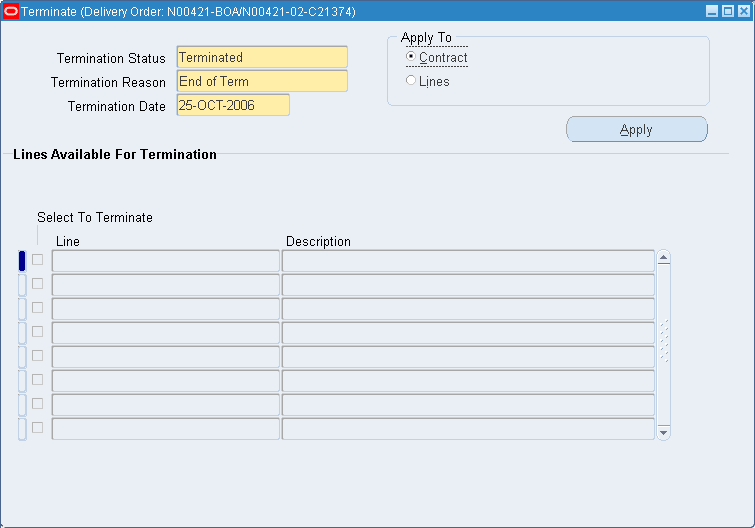
-
Select a contract document in the Contract Organizer and select the Closeouts/Terminations option from the Actions list of values.
The system displays the Terminate window.
-
Select Terminated in the Termination Status field.
-
Select the reason for the termination in the Termination Reason field.
-
In the Termination Date field, select the effective date for the termination.
Note: After the contract is terminated, you cannot open it again.
-
In the Apply To region, select the part of the contract document you want to terminate. You can select:
-
Contract: This button specifies that the entire contract is terminated. If this is selected, the Select To Terminate region is blank and disabled.
-
Lines: This button enables you to select specific line to terminate. The Select To Terminate region displays the line number and description for all lines available for termination.
-
-
If you have selected Lines, flag the specific records you want to terminate by checking the Select To Terminate check box next to the Line field.
-
Choose Apply to create the termination transaction.
Deleting Contracts
You can delete only contracts that are in Entered or Canceled status. By deleting unwanted contracts, you can reduce the build up of unwanted data and avoid potential risk of accidentally referring such contracts in other transactions or contracts.
Steps
To delete a contract that is in Entered or Canceled status:
-
Navigate to Contract Organizer window.
-
Select the contract document that you want to delete.
-
Click the Go To button to open the Actions window.
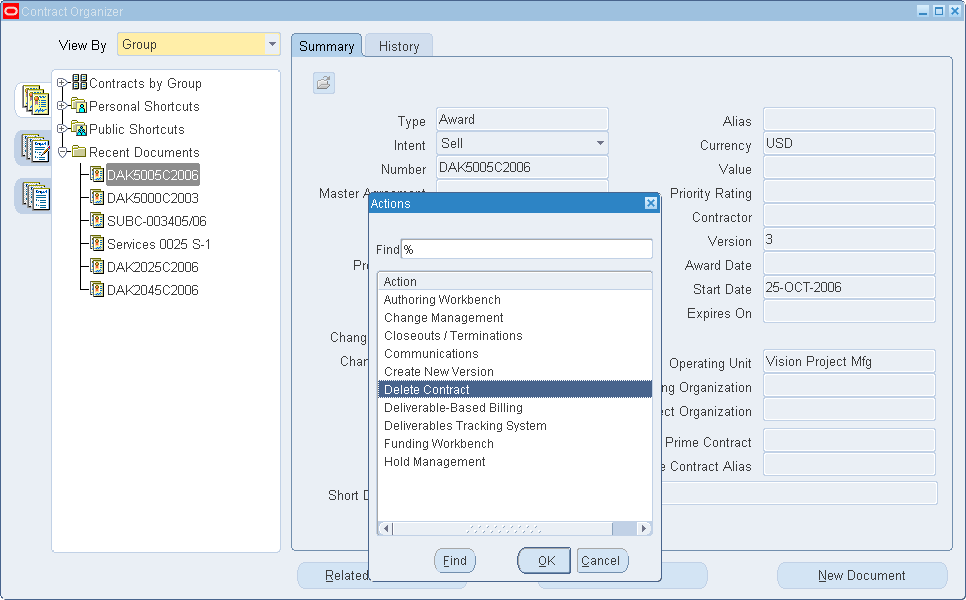
-
Select the Delete Contract option from the Actions list of values.
-
Click Go.
The system displays the Decision window.
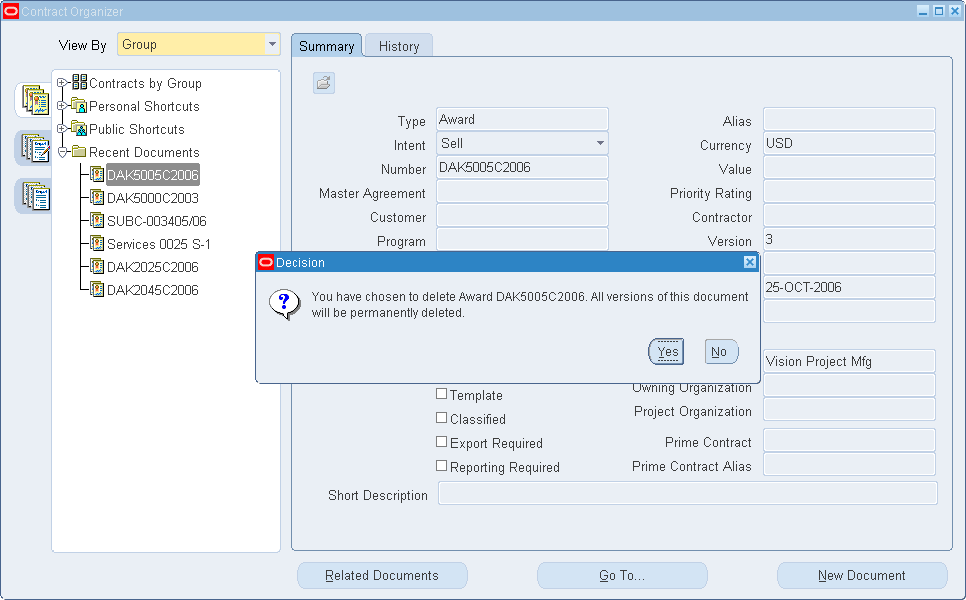
-
Click Yes to confirm.
Defining Line Style
In addition to the default values, you can define a line style such as labor, spares, subcontracted, and so on.
To Define Line Style:
-
Navigate to the Line Style window.
Navigation: Setup > Framework > Line Styles
-
Select the line in the left pane of the navigator.
You can select the top level to create a new line style, or any node in the navigator to create a level beneath the line. Choose New.
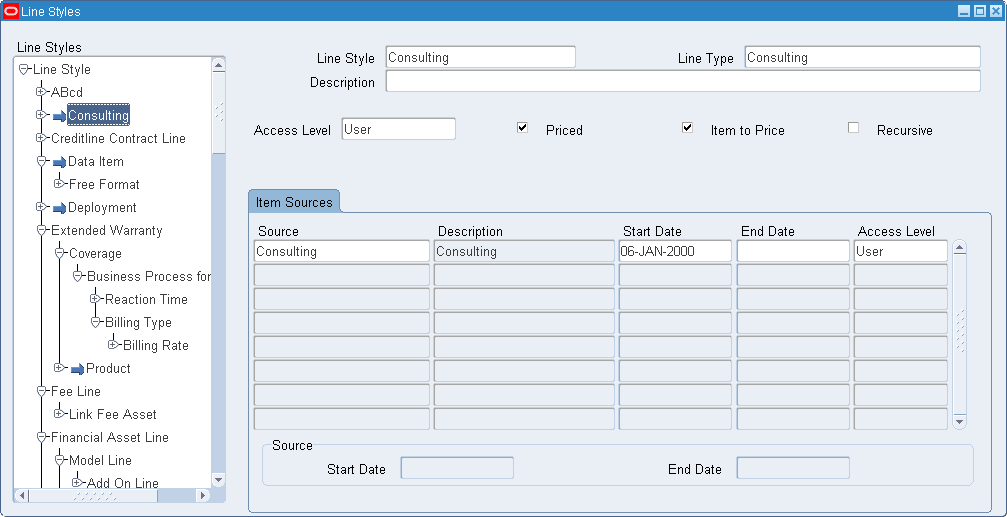
-
Enter the Line Style name.
-
Select a type for the line in the Line Type field.
-
Optionally, you can enter a description for this line in the Description field.
-
Select level of access in the Access Level field.
-
In the Item Sources region, select the source for the item you want to use in the Source field. The description automatically appears.
-
In the Start Date field, select the start date for the line style.
-
Save your work.
To Define Line Category:
-
Navigate to the Category window.
Navigation: Setup > Framework > Category
-
Choose Find All from the View menu to display the category code.
Position the cursor in the Category Code field, and using the up and down arrow to select the code of category.
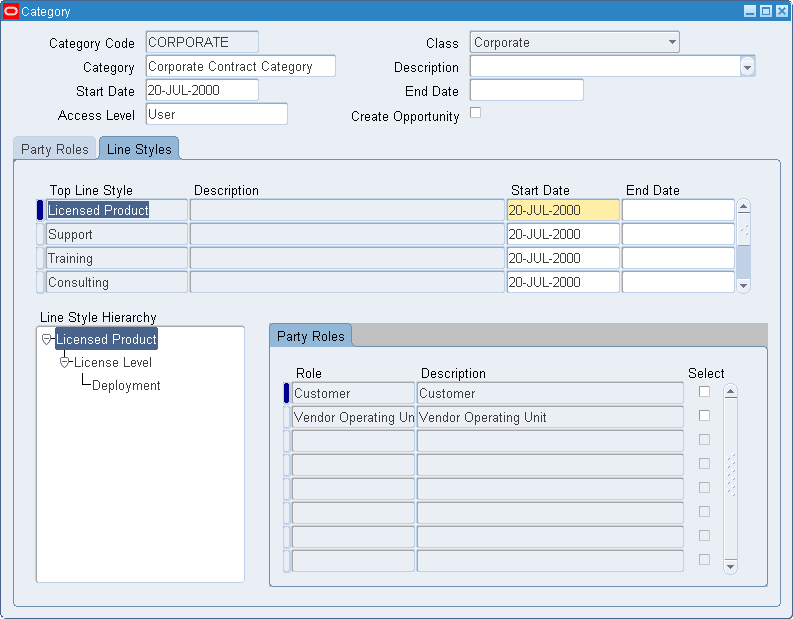
-
Select the Line Styles tab.
-
Select a style type in the Top Line Style field.
-
Select a type for the line in the Line type field.
-
Select the Select indicator to enable the category.
-
Save your work.
Contract Printing
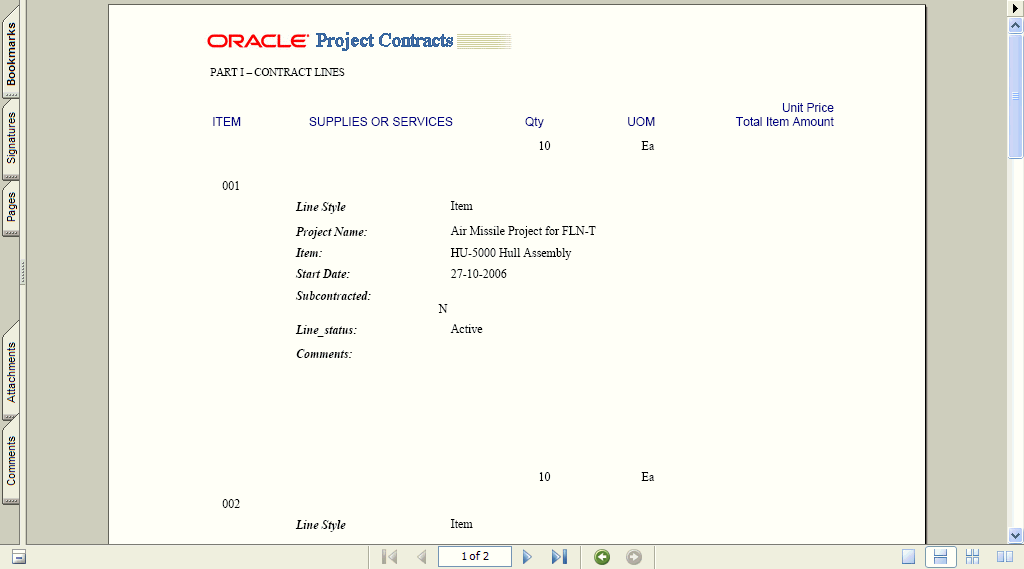
Any version of a contract document authored in Oracle Project Contracts can be printed as a draft document for internal review and recordkeeping purposes. You can print the document in whole or in part using your unique style format. This new capability enables printing of a contract document from the Authoring Workbench for internal review and approvals, and for record-keeping purposes. Contract Printing requires XML gateway and XML Publisher (XDO) installation.
Setup for Contract Printing
If you plan to use the Contract Printing feature, then complete the following steps. Oracle Project Contracts uses Oracle XML Publisher (XDO) to merge contract XML data and layout template. The layout template controls the format and layout of the printed contract document.
To set up contract printing
-
Create your own contract template using Adobe Acrobat following the guideline provided by Oracle XML Publisher.
-
Navigate to the XML Publisher Administrator responsibility and choose Templates.
-
Choose Create Template. Project Contracts provides a seeded template as a sample template.
-
Enter the required fields for creating a new template:
-
Enter a descriptive Name for the template.
-
Enter a unique Code for the template.
-
Enter Project Contracts for the Application.
-
Choose seeded Data Definition Project Contracts Data Source.
-
Choose PDF for Type.
-
Start Date is the date when this template is available.
-
File is the physical path and filename of the template file.
-
Language is the language of the template.
-
Choose Territory Independent for the Territory.
-
-
The template field name must be the same as database column name. Contract Printing does not support mapping each template field to the corresponding data source element (database column name).
-
Choose Apply to upload the template.
-
If you have more than one customized templates, then repeat step 1 through 6 for each customized template.
-
The new templates display in the list of values, when you choose Print Contract from the Authoring Workbench window.
To print contracts
Steps
-
Navigate to the Contract Authoring Workbench and select a contract.
-
Choose Print Contract from the Tools menu.
-
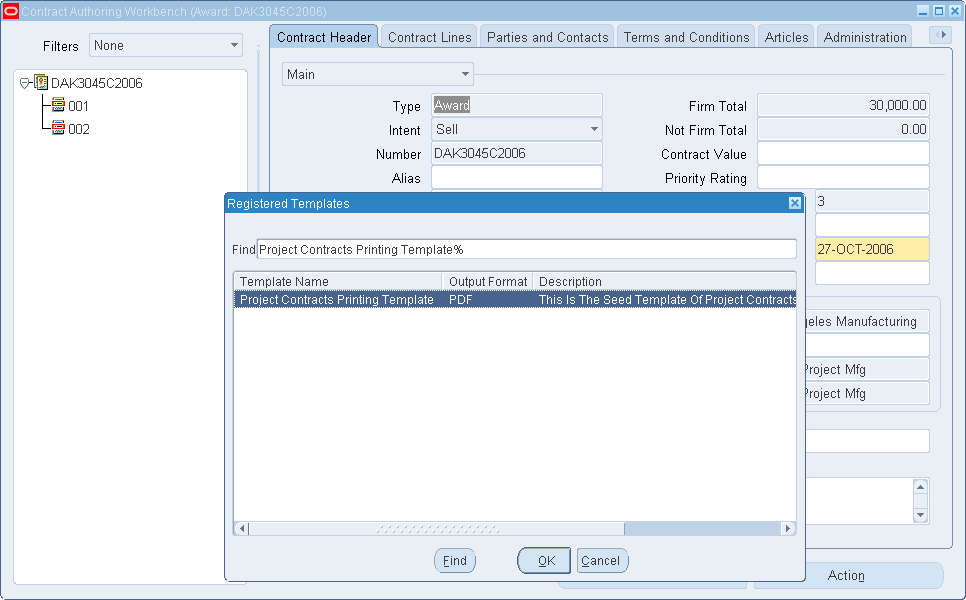
Select a template from the Registered Templates window.
-
Choose OK. The application prints the contract using the selected style format. For more information about creating contract printing templates, see Oracle Project Contracts Implementation Guide.
