Implementing High Availability
This chapter describes about implementing High Availability.
This chapter covers the following topics:
- About High Availability
- High Availability Solution
- Critical Business Functions Available in High Availability
- Setting Up High Availability
- Importing Transaction Logs
- About Mapping Responsibilities
- Concurrent Program Supported in TeleService in High Availability
- User Actions Supported in TeleService in High Availability
About High Availability
Organizations providing round the clock support to their customers require computer systems to also be available 24x7. Hence, any planned or unplanned outages may bring down employee productivity, reduce customer satisfaction and affect business until all systems are back up and running. Service companies that have shorter turnaround times can adversely be affected by such downtimes. Oracle TeleService provides high availability (HA) of critical features. This feature is especially useful where a single instance is run and entire operations are affected by these downtimes.
High availability refers to enabling operational continuity of the business critical functions of application or system during a scheduled production outage. Planned production downtime may be due to patch applications or other system configurations that require that the production instance is taken offline or restarted.
High Availability Solution
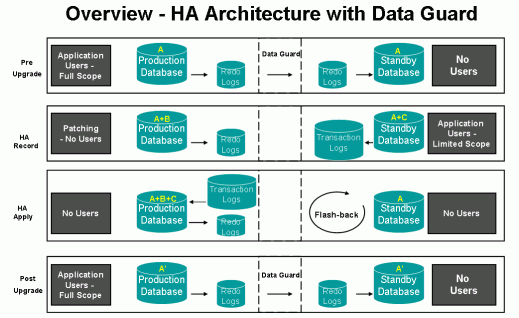
The diagram given below describes the four phases in High Availability.
-
Pre-Upgrade
The production instance is online and another standby database, a clone of the production instance, is created with Data Guard Flashback, a technology used to track and maintain historical changes to data.
The standby instance is configured to:
-
Disable responsibilities that are not used in the HA mode. The standby instance will contain only HA responsibilities.
-
Hide/disable fields and features not supported by HA via personalization.
-
Disable concurrent programs that are not used in the HA mode.
-
Disable all workflows and business events that are not used in the HA mode.
When the configuration is complete, the standby database is ready to act as the primary instance for the duration of the outage.
-
-
High Availability Record
The production instance is taken offline for patching and the standby high availability is put online. Users can connect to the high availability instance to perform critical business transactions, which are captured and can be replayed in the production instance.
Click Start HA Record on the HA Console to start the HA Record phase. Only one active HA Record session is allowed at any specific time and this phase must end before importing in the HA Apply phase. However, multiple HA Record sessions can be processed during a single HA Apply session.
Once the HA Record phase starts, users can connect to the HA instance.
-
High Availability Apply
The production instance and the high availability instance are brought down for a limited time and the log from the high availability instance is imported into the production instance.
Once the log is successfully replayed on the production instance, the HA database is refreshed from the production instance so that the HA instance and the production instance are synchronized.
Click the Apply button on the HA Console to initiate this phase. Before this phase is initiated, the transaction logs must be imported into the patched production instance. The HA Console lists all available HA Record sessions that are ready to be applied. If multiple HA Record sessions are pending they are uploaded in a sequential manner, starting with the oldest session to the latest session.
Caution: : The profile Task Manager: Enable Audit is automatically set to No during this phase and administrators must NOT set this profile option manually. This profile is used to enable audit of tasks. It is set to No during the HA Apply phase to switch off auditing of tasks. After the HA Apply phase is complete this profile is again automatically set to Yes.
-
Post Upgrade
The production instance is brought online and all users are allowed to connect back to this instance.
Critical Business Functions Available in High Availability
The following critical functions are required by Field Service providers to run their operations:
-
Create, update and search service requests
-
Dispatch and schedule Field Service technicians
-
Create and update service request tasks and personal tasks
-
Access task information and Debrief tasks by Field Service technicians
Assumptions
The High Availability solution assumes the following to support continuity of the above operations during planned downtimes.
-
The high availability instance is a clone of the production instance. The Data Guard technology provided by Oracle enables a standby database to serve as a clone of the production instance. The HA instance receives periodical updates from the production instance which enables it to serve as a backup during downtime.
-
A limited downtime is acceptable when users are switching from one instance to another. This is required for preparation of the HA instance and replaying the transactions back on the production instance.
Setting Up High Availability
You must set up High Availability with the Service High Availability Administrator responsibility. Setting up High Availability involves the HA Record and the HA Apply phases.
The HA Record phase comprises of three stages – Initiation, Record, and Termination. Before users can connect to the HA instance, the Service High Availability Administrator must map the responsibilities to the HA responsibilities. See Mapping Responsibilities for information on how to map the responsibilities.
The detailed setup procedure is given below:
Initiation
-
The production instance must be offline for patching.
-
Click Start Recording on the HA Console to :
-
Assign users to their appropriate HA responsibilities on the HA instance.
-
Inactivate all concurrent programs, workflows, and business events that are not used in HA mode.
-
The profile CSM: High Availability Mode is automatically set to HA_RECORD and administrators must NOT set this profile option manually. This profile value is used in CSM_HA_SERVICE_PUB PL/SQL package to allow other products to check if the system is in HA Record mode.
-
Record
All updates to Service/Field Service tables are monitored in this stage. Any insert or update on a service entity is recorded into the Payload table. In the same transaction, if there are any updates to auxiliary tables that are dependent on the entity then these are also tracked and recorded.
Termination
After patching of the production instance is complete the HA Record phase must be terminated.
-
Click End Recording on the HA Console to terminate this phase. This will:
-
Save the MFS Deferred INQ and Oracle Lite Mobile Admin data for mobile field service operations.
-
Set the CSM: High Availability Mode profile option to HA_STOP.
-
Save the final sequence values of business entities. The list of sequences to be checked is maintained in the CSM_HA_SEQ_MAPPINGS table.
-
Terminate the current session by updating the CSM_HA_SESSION_INFO table.
-
HA Apply
-
Import the transaction log to the production instance.
-
Bring up the production instance after the HA instance returns to the pre-HA mode.
-
Connect users back to the production instance.
Importing Transaction Logs
Transaction logs comprise several database tables containing all data captured in the HA Record phase. During the HA Record phase the transaction log is used to capture information on users' activities.
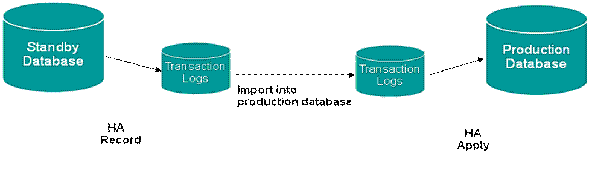
You can import the transaction logs using any of the following methods:
-
Database Links - This method is shipped out of the box with the High Availability feature and includes the script, csmhaimp.sql. This script is used to import data from the selected tables using SQL using database links. The basic assumption is that a database link must be present to import the transaction logs.
-
Transportable Tablespaces - You can use transportable tablespaces to import the transaction logs if it is not feasible for you to use the database links method. The transaction logs must be a part of a single schema, CSM_HA. The DBA must move these tables into the CSM_HA schema.
The CSM_HA schema must be created in a separate tablespace so that it can be configured to be a transportable tablespace. The tables to be included in the CSM_HA schema are as follows:
-
CSM_HA_SESSION_INFO
-
CSM_HA_PAYLOAD_DATA
-
CSM_HA_SESSION_SEQ_VALUES
-
CSM_HA_DEFERRED_INFO
-
CSM_HA_AUDIT
Note: If the database version has changed, then the Transportable Tablespaces option cannot be used.
-
-
Data Pump - A third option is to use Data Pump to import transaction logs.
The following scripts must be executed after connecting as an apps schema user, and can be run from any tier, which can be connected to the database.
Note: The SQL scripts complement the existing functionality in the UI.
Scripts to be run on the production database:
-
csmhasta.sql – A script to start HA Recording on the standby database. No parameters are required.
-
csmhaend.sql – A script to end HA Recording on the standby database. No parameters are required.
Scripts to be run on the standby database:
-
csmhaimp.sql – A script to import transaction logs from the standby database to the production database using the database link. This script must be run from the production database and prompts for the database link to connect to the standby database. The database link should be specified as a parameter and must connect to the apps schema user on the standby database. You can modify the script to hard code your db link name to avoid the prompt for the database link name.
-
csmhaapy.sql – A script to apply the imported transaction logs in the production database. A concurrent request is submitted to process the transactions. The Concurrent Manager must be running before this script is executed.
About Mapping Responsibilities
Responsibilities enable users to access different user interfaces on the high availability instance. During the HA Record phase, users are given access only to the HA equivalents of their standard production responsibilities. The HA responsibilities give access to a limited set of UIs and functions that are available on the HA instance. When the production instance is restored, users will resume with their regular responsibilities.
The Service High Availability Administrator must map the responsibilities on the production instance. Since the high availability instance is a clone of the production instance, the responsibility mapping performed on the production instance is available on the high availability instance when the production instance is brought offline. The fields on the High Availability Responsibility Mapping page display the list of active responsibilities in Service, Field Service, and Mobile Field service.
Seeded Responsibilities
The seeded responsibilities for TeleService are:
-
Customer Support Specialist HA
-
Service HA
Before the HA instance is made available,
-
Only the System Administrator responsibility is available
-
All responsibilities that are marked as HA responsibilities are available. Responsibilities on the production instance are mapped to responsibilities on the HA instance.
-
No other responsibilities are available on the HA instance.
-
These HA responsibilities are then assigned to users with corresponding normal responsibilities.
-
Barring few required programs for Service all other concurrent programs, workflows, and business events cannot be run on the HA instance. See Concurrent Requests Supported in TeleService in High Availability
-
Users have access to the regular responsibilities when they move back to the production environment.
Mapping Responsibilities
Use this procedure to map responsibilities on the production instance.
To map responsibilities:
-
On the High Availability Responsibility Mapping page, select the responsibility name from the Responsibility Name list. All responsibility mappings related to the selected responsibility are displayed in the Application Name, HA Application Name, and HA Responsibility Name fields.
-
Click Delete to delete a responsibility mapping. To delete multiple responsibility mappings select the check box next to the mapping and click Delete.
-
Click the Add icon to add a responsibility mapping.
-
Click Apply.
-
Click OK. The values in this setup are saved to the CSM_HA-RESP_MAPPINGS table that is used during the HA Record start phase.
Concurrent Program Supported in TeleService in High Availability
Automatic Assignment of Resource for Service Request is the only concurrent program that is supported on the high availability instance.
User Actions Supported in TeleService in High Availability
The following table lists the user actions/functionality that is supported in HA. Features that have the Capture Transaction in HA Mode column set to Y (Yes) are supported in HA mode. These functions/transactions will be captured and replayed in the production instance. Features that are set to N (No) in the Capture Transaction in HA Mode column must either be hidden, disabled or enabled in read-only mode so that the users cannot make updates that will not be captured. In OA HTML pages, you can do this through personalization.
Features that have the Enabled in UI in HA Mode column set to Y are displayed on the UI and can be accessed in the HA mode. For features that are marked as N, users cannot access them and the feature can either be disabled or is not shown on the UI.
| Module | Flow/Location | User Action | Capture Transaction in HA Mode | Show/Enable in UI in HA Mode |
|---|---|---|---|---|
| SR Form | Create SR - Header | Create one-time address | Y | Y |
| Select incident address | Y | Y | ||
| Select contact, contact phone, contact address, time zone | Y | Y | ||
| Select customer, customer account, customer address | Y | Y | ||
| Select item/instance/serial number | Y | Y | ||
| Select service request type | Y | Y | ||
| Select status | Y | Y | ||
| Select severity | Y | Y | ||
| Assign SR to group, owner manually | Y | Y | ||
| Assign SR to group, owner via assignment manager | Y | Y | ||
| Enter problem summary | Y | Y | ||
| Select problem code | Y | Y | ||
| Select urgency | Y | Y | ||
| Enter error code | Y | Y | ||
| Enter notes | Y | Y | ||
| Select note type | Y | Y | ||
| Select note visibility | Y | Y | ||
| Enter SR flexfields | Y | Y | ||
| Select tag number, system, item description | Y | Y | ||
| Select revision, contract number | Y | Y | ||
| Auto Assignment of Group/Owner | Y | Y | ||
| All search capabilities: Customer, item instance ,incident addresses, etc | N | Y | ||
| Create new contact | N | N | ||
| Create SR - Subject Tab | ||||
| Select covered site | Y | Y | ||
| Refresh site button | Y | Y | ||
| Instance configuration button | N | Y, but personalize pop-up OA UI to read-only | ||
| Instance Detail button | N | Y, but personalize pop-up OA UI to read-only | ||
| Register Instance | N | N | ||
| Get Contracts button | Y | Y | ||
| Select component | Y | Y | ||
| Select item instance | Y | Y | ||
| PLM Extensible Attributes (Customer Support) | N | N | ||
| Create SR - Workbench Tab | ||||
| Enter problem summary | Y | Y | ||
| CIC Extensible Attributes (SR Form) | Y | Y | ||
| Select problem code | Y | Y | ||
| Select urgency | Y | Y | ||
| Enter error code | Y | Y | ||
| Enter resolution summary | Y | Y | ||
| Enter resolution code | Y | Y | ||
| Enter resolve by date | Y | Y | ||
| Enter responded by date | Y | Y | ||
| Enter resolved by date | Y | Y | ||
| Search knowledge base button | N | Y | ||
| Link/Unlink Solution button | N | N | ||
| Refresh button | N | Y | ||
| View By LOV | N | Y | ||
| Print Friendly Button | N | Y | ||
| Enter View B From/To Dates | N | Y | ||
| Select note type | Y | Y | ||
| Enter note description | Y | Y | ||
| Select note visibility | Y | Y | ||
| Select Note Details button | Y | Y | ||
| Select Log and Notes button | Y | Y | ||
| New note button | Y | Y | ||
| Create SR - Contacts/Addresses Tab | ||||
| Associate contacts to SR (select from existing contacts, not create new contacts | Y | Y | ||
| Change primary contact | Y | Y | ||
| Select Bill-To Address | Y | Y | ||
| Select Bill-To Contact | Y | Y | ||
| Select Ship-To Address | Y | Y | ||
| Select Ship-To Contact | Y | Y | ||
| Create SR - Tasks Tab | ||||
| Select task type | Y | Y | ||
| Select task status | Y | Y | ||
| Select priority | Y | Y | ||
| Select owner type, owner manually | Y | Y | ||
| Select owner type, owner via assignment manager | Y | Y | ||
| Select assignee type, assignee | Y | Y | ||
| Enter subject | Y | Y | ||
| Enter description | Y | Y | ||
| Enter task flexfields | Y | Y | ||
| Select parent | Y | Y | ||
| Select/unselect restrict closure flag | Y | Y | ||
| Access to display time zone LOV (agent, corporate, incident) Y | Y | Y | ||
| Enter Planned, Scheduled, Actual Start Date | Y | Y | ||
| Enter Planned, Scheduled, Actual End Date | Y | Y | ||
| Enter Planned Effort, Actual Effort, Duration | Y | Y | ||
| Select Publish flag | Y | Y | ||
| Select Private flag | Y | Y | ||
| Copy Task button | Y | Y | ||
| Task notes button | Y | Y | ||
| Parts Search button (see details of UI below) | N | Y | ||
| Skills button | Y | Y | ||
| Access Hours button | Y | Y | ||
| Use Template button | Y | Y | ||
| Auto product skill requirement | Y | Y | ||
| Create SR - Interactions Tab | Display interactions | N | Y | |
| Create SR - Related Objects Tab | Enter related objects | Y | Y | |
| Create SR - Service History Tab | View Service History | N | Y | |
| Create SR – Misc | SR Duplicate Checking | N | N/A | |
| SR Audit | Y – rely on SR API to create audit records on the production instance | N/A | ||
| Auto task creation | Y | N/A | ||
| Update SR - Header | Create one-time address | Y | Y | |
| Change incident address | Y | Y | ||
| Select a different contact time zone | Y | Y | ||
| Select a different customer account, customer address | Y | Y | ||
| Select a different item/instance/serial number | Y | Y | ||
| Update SR Type | Y | Y | ||
| Update status | Y | Y | ||
| Update severity | Y | Y | ||
| Assign SR to different group, different owner manually | Y | Y | ||
| Assign SR to different group, different owner via assignment manager | Y | Y | ||
| Change problem summary | Y | Y | ||
| Update problem code | Y | Y | ||
| Update urgency | Y | Y | ||
| Update error code | Y | Y | ||
| Enter notes | Y | Y | ||
| Select note type | Y | Y | ||
| Select note visibility | Y | Y | ||
| Enter SR flexfields | Y | Y | ||
| Update notes | Y | Y | ||
| Update SR - Subject Tab | ||||
| Select different covered site | Y | Y | ||
| Refresh site button | N | Y | ||
| Instance configuration button | N | N | ||
| Instance Detail button | N | Y, but open up the page in read-only | ||
| Register Instance | N | N | ||
| Get Contracts button | Y | Y | ||
| Select component | Y | Y | ||
| Select item instance | Y | Y | ||
| Update SR - Workbench Tab | ||||
| Update problem summary | Y | Y | ||
| Update problem code | Y | Y | ||
| Change urgency | Y | Y | ||
| Change error code | Y | Y | ||
| Enter/update resolution summary | Y | Y | ||
| Enter/update resolution code | Y | Y | ||
| Update resolve by date | Y | Y | ||
| Enter/update responded by date | Y | Y | ||
| Enter/update resolved by date | Y | Y | ||
| Search knowledge base button | N | Y | ||
| Unlink Solution button | N | N | ||
| Refresh button | N | Y | ||
| View By LOV | N | Y | ||
| Print Friendly Button | N | Y | ||
| Enter View By From/To Dates | N | Y | ||
| Select note type | Y | Y | ||
| Enter note description | Y | Y | ||
| Select note visibility | Y | Y | ||
| Select Note Details button | Y | Y | ||
| Select Log and Notes button | Y | Y | ||
| New note button | Y | Y | ||
| Update SR - Contacts/Addresses Tab | ||||
| Add more contacts to SR | Y | Y | ||
| Change primary contact | Y | Y | ||
| Select Bill-To Address | Y | Y | ||
| Select Bill-To Contact | Y | Y | ||
| Select Ship-To Address | Y | Y | ||
| Select Ship-To Contact | Y | Y | ||
| Update SR - Tasks Tab | ||||
| Select/update task type | Y | Y | ||
| Select/update task status | Y | Y | ||
| Select/update priority | Y | Y | ||
| Select/update owner type, owner manually | Y | Y | ||
| Select/update owner type, owner via assignment manager | Y | Y | ||
| Select/update assignee type, assignee | Y | Y | ||
| Enter/update subject | Y | Y | ||
| Enter/update description | Y | Y | ||
| Enter/update task flexfields | Y | Y | ||
| Select/update parent | Y | Y | ||
| Select/unselect restrict closure flag | Y | Y | ||
| Access to display time zone LOV (agent, corporate, incident) Y | Y | Y | ||
| Enter Planned, Scheduled, Actual Start Date | Y | Y | ||
| Enter Planned, Scheduled, Actual End Date | Y | Y | ||
| Enter Planned Effort, Actual Effort, Duration | Y | Y | ||
| Select Publish flag | Y | Y | ||
| Select Private flag | Y | Y | ||
| Copy Task button | Y | Y | ||
| Task notes button | Y | Y | ||
| Parts Search button (see details of UI below) | N | Y | ||
| Skills button | Y | Y | ||
| Access Hours button | Y | Y | ||
| Use Template button | Y | Y | ||
| Launch Workflow button | Refer to workflow section – task notification workflow. Ensure that it does not get sent multiple times | Y | ||
| Updating task address | Y | Y | ||
| Adding task attachments | Y | Y | ||
| Enter resource requirements via Resource LOV (under More button) -- | N | N | ||
| Enter assignments | N | N | ||
| Enter schedules | N | N | ||
| Enter task dependencies | N | N | ||
| Enter reference types | N | N | ||
| Enter Date Types and Dates | N | N | ||
| Enter Task Contacts | N | N | ||
| Enter Task Contact Phones | N | N | ||
| Enter Task Recurrences | N | N | ||
| Enter Task currency | N | N | ||
| Select Billable, Holiday, Multibook, Milestone flags | N | N | ||
| View Task Audit | N | N | ||
| View Assignment Audit | N | N | ||
| Update SR - Interactions Tab | Display interactions | N | Y | |
| Update SR - Related Objects Tab | Enter related objects | Y | Y | |
| Update SR - Service History Tab | View Service History | N | Y | |
| Update SR - Charges Tab | Action Tab | N | Charges is read only for this release. Users are able to view charges but manual updates are not supported | |
| **Select/update Charge Line Type | N | N | ||
| **Select/update Operating Unit | N | N | ||
| **Select/update Business Process | N | N | ||
| **Select/update Service Activity | N | N | ||
| **Select/update Item | N | N | ||
| **Select/update UOM | N | N | ||
| **Enter/update qty | N | N | ||
| **Enter/update return reason | N | N | ||
| Item Instance Tab | N | N | ||
| ** Select/update item instance number | N | N | ||
| ** Select/update serial number | N | N | ||
| ** Enter/update return by date | N | N | ||
| Pricing Tab | N | N | ||
| ** Enter/update override unit price | N | N | ||
| Pricing Rules Tab | N | N | ||
| ** Select different contract number | N | N | ||
| ** Select different price list | N | N | ||
| ** Enter Customer Purchase Number | N | N | ||
| ** Select Rate Type | N | N | ||
| Bill To Tab | N | N | ||
| ** Select/update bill to party | N | N | ||
| ** Select/update bill to account | N | N | ||
| ** Select/update bill to address | N | N | ||
| ** Select/update bill to contact | N | N | ||
| Ship To Tab | N | N | ||
| ** Select/update ship to party | N | N | ||
| ** Select/update ship to account | N | N | ||
| ** Select/update ship to address | N | N | ||
| ** Select/update ship to contact | N | N | ||
| Order Details Tab | N | N | ||
| ** Select Shipping/Receiving Warehouse | N | N | ||
| ** Add to Order Number | N | N | ||
| ** OM Interface flag | N | N | ||
| ** Rollup flag | N | N | ||
| Order Status tab | N | N | ||
| ** All Display fields | N | N | ||
| Source tab | N | N | ||
| ** Drill into Source document | N | N | ||
| ** Everything else is read only | N | N | ||
| Creation of charge lines via Debrief Posting Program | Y | N/A | ||
| Update SR - Work Orders Tab | Y | Y | ||
| Header - View Customer Profile | N | Y | ||
| Header - View Log and Notes | N | Y | ||
| Menu Commands for Create/Update SR | Y | Y | ||
| Menu - Scripting | N | N | ||
| Menu - Call Parameters | Y | Y | ||
| Menu - Call Wrap Up | Y | Y | ||
| Menu - Start Interaction | Y | Y | ||
| Menu - End Interaction | Y | Y | ||
| Menu - Web Availability | N | N | ||
| Menu - Outbound Email | N | N | ||
| Menu - Next Work | Y | Y | ||
| Menu - Start Conference | N | N | ||
| Menu - Compose Email for Contact | N | N | ||
| Menu - Compose Email for Customer | N | N | ||
| Menu - Contact Phone | N | N | ||
| Menu - Customer Phone | N | N | ||
| Menu - Contact Center | N | N | ||
| Menu - Site Contact Points | N | N | ||
| Menu - Notes | Y | Y | ||
| Menu - Audit Report | N | Y | ||
| Menu - Request Escalation | N | N | ||
| Menu - Fulfillment Request | N | N | ||
| Menu - Task Escalation | N | N | ||
| Menu - Quick Menu | N | N | ||
| Menu - Copy Request | Y | Y | ||
| Menu - Print Request | N | Y | ||
| Menu - Print Margin Report | N | Y | ||
| Menu - Send Message | N | Y | ||
| Menu - View Message | N | Y | ||
| Menu - Search Item Instance | N | Y | ||
| Menu - Add attachments | Y | Y | ||
| Search SR | All search features | N | Y |