Payroll Earnings and Deductions
Payroll Earnings and Deductions Overview
Many earnings and deductions - such as salary, pension deductions, and taxes - are discussed under specific functional headings, such as Salary and Grade Related Pay, or Savings and Retirement, or Payroll Statutory Deductions. In this area, we look at payroll earnings and deductions, such as wage attachments, that have not already been covered under other functional headings.
We also focus on additional setup required by Oracle Payroll for processing earnings and deductions. This setup includes the creation of formulas and balances. In some localizations, and for certain types of earnings and deductions, you can select template elements in the Configuration Workbench, or you can use the Element Design Wizard or template windows to generate all the components required for payroll processing, including elements, formulas, balances, and formula result rules.
Certain types of earnings and deductions require additional setup to enable special processing such as net-to-gross and proration, where this is enabled for your localization. Such setup is also discussed in this section.
Note: Mexico only: Oracle HRMS for Mexico does not support net-to-gross processing.
Key Concepts
To get the most out of the earnings and deductions functionality of Oracle HRMS, you need to understand the following key concepts:
-
Pay values
-
Formulas
-
Frequency rules
-
Payroll balances
-
Earnings and deductions templates
-
Proration
-
Net-to-gross processing
-
Third party payments
Payroll Earnings and Deductions
Oracle HRMS provides an integrated solution for Human Resources and Payroll. Therefore your setup of compensation and benefits supports both compensation management and payroll management.
Can Oracle Payroll handle complex calculations?
Yes it can, through its use of formulas to specify calculations for each earnings or deduction. These formulas use values from the HRMS database and can include conditional logic to perform different calculations for different groups of employees. For example, they can check balances or employee status to control how to process the earning or deduction. Many of the formulas you need, for example for tax calculations, are supplied with Oracle Payroll.
How do you control when each earning or deduction is processed?
The sequence of processing in a payroll run is determined by classifications, such as Pre-tax Deductions and Tax Deductions. You can also prioritize the processing for an individual employee, for example to determine the order in which deductions are processed for wage attachments.
You control whether any value is processed just once, in every payroll run, or periodically (such as once a quarter). Your formulas can also change or stop the processing of an earning or deduction during a run, based on employee status.
How do you accumulate and review balances?
The system can accumulate balances of payroll run results or values entered before the run. You can accumulate a balance over different time dimensions such as current run, month, and year to date. You can review balances after payroll processing and use balances to control the processing performed in the payroll run.
Can I set up new balances, for the values that are important to my company?
Yes, you can define whatever additional balances your enterprise requires. For example, you may require a Pensionable Earnings balance for a defined benefit pension plan your enterprise offers employees.
How do you enter compensation values for the payroll run?
Some values, such as salary, can be entered once and used in every payroll run (or periodic runs) until you need to update them. Other values, such as hours worked, need to be entered or calculated fresh for each run.
You can do one of the following:
-
Use default values (which may be different for groups of employees)
-
Enter values employee-by-employee
-
Enter values in a batch
-
Leave it to the system to enter values based on calculations performed during the payroll run
You can define validation rules to minimize data entry errors.
Wage Attachments
What wage attachments can I process using Oracle Payroll?
The wage attachments that you can process depend on the specific payments that apply to your legislation. Examples of payments include child support payments, educational loans, taxes to local authorities, alimony, and bankruptcy orders.
See: Third Party Payments Overview
US Only:
When the court issues a release notice for a wage attachment, or if you receive a Form 668-D for a federal tax levy, you must end the employee's wage attachment. Oracle Payroll also stops processing wage attachments when the total owed is reached.
Oracle Payroll supports electronic funds transfer (EFT) of state child support garnishments for the state of Illinois. However, all states accept the Oracle EFT format, but normally require different data dependent upon individual state requirements. You can use the Illinois EFT format to send support payments electronically to all states. You need to include only the information required by the state in the file. You create a separate file for each state containing different routing and account numbers, so you need to set up a separate third party payment method for each state.
Can I recoup my enterprise's costs automatically?
Yes, if you operate in the US, you can use the Wage Attachment Fee Administration process to recoup costs. This process recoups costs in administering alimony, bankruptcy orders, employee requested attachments, and tax levies.
Can I determine the earnings types and amounts that are liable for wage attachment deductions?
Using Wage Attachment Earnings Rules you can determine which earnings types are considered disposable income and liable for wage attachment deductions.
Can I prioritize payment of wage attachments?
You can determine the overall priority of a wage attachment compared to other deductions, and you can also determine sub priorities. For example, if an employee has multiple court orders against them, you can ensure that Oracle Payroll deducts the most important order first.
The standard processing priority order for processing the various categories of attachment is the following:
-
Child Support orders
-
Bankruptcy orders
-
Federal tax levies
-
Debt Collection Improvement Act orders
-
Student loan garnishments
-
State tax levies (not supported by Oracle Payroll)
-
Local tax levies (not supported by Oracle Payroll)
-
Creditor garnishments
-
Employer deductions
Once deducted from an employee's wage, how is the wage attachment made?
If enabled for your localization, you can use Oracle Payroll's Cheque Writer features to produce cheques for either organizations or individuals. Localizations that do not have Oracle Payroll's Cheque Writer features available can make payments by credit transfer.
Can I use another system to manage the wage attachments?
You can use an external system to manage your wage attachments. If you want to make entries from that system into Oracle Payroll for payroll processing, you can use predefined deductions that come with Oracle Payroll.
Can Oracle properly calculate overtime according to FLSA guidelines?
Oracle Payroll fully supports the federal overtime calculation rule. The new functionality performs calculations for periods that are longer than a single workweek. You can configure the product to handle either Federal FLSA or State FLSA. You can also configure alternative overtime calculations as specified by selected states or by union contract.
Oracle Payroll uses the term Augments to refer to amounts paid which are in addition to the employee's regular rate of pay and which are considered to be non-discretionary, such as a commission or bonus. The new functionality prorates the augment across all periods during which it was earned.
Additional Element Setup for Payroll
Formulas and Payroll Run Results
Elements are processed during payroll runs according to the business rules for each element that you define at setup. Many of these rules are defined in formulas, written using Oracle FastFormula. Formulas specify how the payroll run should perform calculations for the element.
This is a basic formula for the calculation for the element Wages:
Wages = Hours Worked in Week * Wage Rate
The processed results for each element are called the run results. They become balance feeds for different balances. Some balance feeds are predefined to feed required statutory balances, and you can create your own balance feeds to your own user defined balances.
Formula Inputs from Input Values or Database Items
Formulas obtain some of the data they need from entries to their element's input values. The Wages formula above, for example, could locate each employee's hours worked as an entry to the input value Hours of the Wages element.
Formulas can also obtain information from database items. Much of the information in the Oracle HRMS database, including extensive information on employees and their assignments, is available to formulas as database items. For example, the Wages formula can locate each employee's wage rate as a database item.
Varying the Processing by Employee Group or Statuses
There are several ways to vary the processing performed by formulas:
-
You can use conditional logic (IF..THEN) within a formula to perform different calculations depending on any information taken from input values or database items (such as length of service).
-
You can associate more than one formula with an element, each triggered by a different assignment status (such as Active Assignment or On Sabbatical).
-
You can use one formula but associate different formula results with each assignment status.
-
You can associate a skip rule formula with an element. This formula can check balances, other element entries, the assignment status or any other database items to determine whether the payroll run should process the element for an assignment.
Mexico only: Mexican implementations do not support skip rules by default. They must be enabled manually.
Types of Formula Results
Formulas can produce different types of run results:
-
The direct result is the amount of an earnings or deduction, for example, the dollar amount of wages an employee has earned that week. As well as calculating the amount to be paid, direct results can be used for costing purposes and analysis (such as tracking hours of overtime).
-
Indirect results, updates, and stops. A formula result can make an entry to the input value of another element for its formula to use. An indirect result is an entry to a nonrecurring element. An update is an entry to a recurring element. A stop puts an end date on a recurring entry of another element, to prevent it being processed in the run.
-
Order indirect. This result updates the subpriority of an element that has not yet been processed.
-
Messages. For example, you can write a formula that checks the length of a text string, and have it issue a message for payroll users if the string is too short or too long.
You set up formula result rules to determine the type of each result, and the names and input values of any other elements the result may affect.
Formulas Included in Oracle Payroll Startup Data
Oracle Payroll comes with formulas specific to your legislation. Generally, you receive all the calculations required for employee tax withholding and employer taxes. When there are changes to taxes, you receive updates. You may also receive formulas for other earnings and deductions, depending on your legislation.
Pay Values
When you have occasion to look at the structure of an element online, you may see an input value named Pay Value at the top of its input value listing.
The Pay Value is different from other input values. Its purpose is to store an element's run result. For example, suppose the formula for the Wages element is:
Wages = Hours Worked * Wage Rate
If an employee whose wage rate is $10/hour works 40 hours in a week, the payroll run produces a run result of $400 for this assignment's Wages element. It stores this result in the element's Pay Value.
If you give an entry to a Pay Value before a run, this entry becomes the element's run result. For example, suppose you enter 40 in the Time Worked input value of the Wages element for an employee who earns $10/hour, but also enter $100 in the element's Pay Value. The run ignores the entry of hours worked and the Wages formula, and simply produces a run result of $100 for this employee.
You must define a Pay Value as one of the inputs for the element if you want Oracle Payroll to process an element for pay. You can have only one Pay Value for each element and it must have the name 'Pay Value'.
Proration
Oracle HRMS enables you to calculate proportionate earnings amounts whenever payroll-relevant data is changed during a payroll period, for example, if an employee joins or leaves the company during a payroll period or if an employee's pay grade changes during a payroll period. Oracle HRMS performs a proration calculation to ensure that the employees' earnings are calculated correctly after taking account of these changes.
If you want to prorate an earnings element, such as basic salary, assign an event group to it. An event group is a collection of proration points that share similar characteristics. You can create an event group to group together all proration points that affect an employee's salary, for example. This event group could contain proration points such as salary increases, assignment changes, and pay rate changes.
You then process the element using a formula that handles proration. You can either use a payroll formula that handles proration, or create a separate proration formula that runs after the main payroll formula only in payroll periods when a proration event occurs.
See: Sample Payroll Formulas Enabled for Proration (UK), Oracle HRMS FastFormula User Guide, Sample Proration Formula, Oracle HRMS FastFormula User Guide, and Writing Proration Formulas, Oracle HRMS FastFormula User Guide
When you define the event group, you select the events that will activate proration calculation, such as:
-
An employee joining or leaving the enterprise
-
Changes to pay grades or grade rates
-
Changes to pay scales and progression points
-
Changes to hourly or annual pay rates
-
Changes to working hours
-
Changes to allowances or deductions
Note: The proration unit can be periods, days, or hours. Proration can be applied to a monetary, time-based, or numeric amount.
Net-to-Gross Processing of Earnings
You can define a bonus or other payment, which is a fixed net amount, using Net-to-Gross Processing. Oracle Payroll calculates the gross amount needed to meet the net pay. You define which taxes and other deductions the employer is willing to pay by selecting the balances that can be used in the net-to-gross processing.
The following formulas are used in net-to-gross processing:
-
This iterative formula calculates the amount that the employer must pay in addition to the desired net amount.
-
This formula adds the additional amount returned by the iterative formula to the desired net amount to return the payment amount. Create a formula result rule to return this payment amount as a direct result to the element's pay value.
Net-to-gross elements always process separately, after you process the main payroll.
For details of how to set up a net-to-gross element, see Setting Up Elements for Net-to-Gross Processing
Balances for Net-to-Gross Processing
When you define the element for net-to-gross processing, you select which balances to exclude from the gross-up calculations. The employer pays all deductions except the ones you exclude.
Processing for Net-to-Gross Calculation
The formulas for net-to-gross processing do the following:
-
The iterative formula takes as input the desired net amount (Amount input value), the amount by which net can diverge from the desired amount (To Within input value), and the method of calculation (Method input value).
-
In the first run the formula sets the lower gross limit to the desired net amount, and the higher gross limit to twice the desired amount. Then it runs a function to provide the first guess of the gross. The formula returns three values--low gross, high gross, and additional amount--to the element's input values.
-
The element's payroll formula runs (CALC_GROSSUP_PAY_VALUE). It adds the additional amount to the desired amount to create the gross and returns this value to the element's pay value for the payroll run to process.
-
In the next iteration, the iterative formula compares the additional amount to the total value of the balances that are available for grossup for this element entry. The additional amount must not differ from this balance total by more than the amount you specified in To Within field.
-
If the additional amount equals the balance total, then the iterative processing ends.
-
If the additional amount is above or below the balance total by an acceptable margin, then the processing ends and the formula returns the remainder (additional amount - balance) to the element's Remainder input value.
-
Otherwise, the formula runs the function to generate a better estimate for gross, using the remainder to determine by how much to change the guess. The formula checks the results in another iteration.
-
Setting Up Total Compensation Elements for Payroll
Follow this process to set up earnings, deductions, and other items in the compensation package you offer to employees. This process assumes you are defining elements, formulas, balances, and other rules from scratch. However, you may be able to use template earnings and deductions that you select in the Configuration Workbench, or generate certain earnings and deductions using the Element Design Wizard or template windows, depending on your localization. You can then follow this process to configure the generated or template earnings and deductions, if required.
There are additional steps for setting up the following types of compensation and benefits:
-
Salaries for Salary Administration; see: Setting Up Salary Administration
-
Absence elements and PTO accrual plans
-
Benefits; see: Standard and Advanced Benefits Setup: Overview
-
Items subject to collective agreements; see: Setting Up a Collective Agreement, Oracle HRMS Enterprise and Workforce Management Guide
Compensation and Benefits Setup
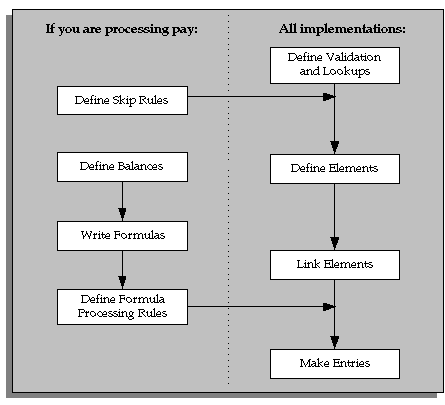
Define Validation and Lookups
Define validation for entries of any new elements you are creating.
-
To restrict compensation entries to a list of valid values, define a new Lookup Type and add Lookup Values for this new lookup.
See: Adding Lookup Types and Values, Oracle HRMS Configuring, Reporting, and System Administration.
-
To validate compensation entries using formulas, write a formula of type Element Input Validation.
See: Writing Formulas for Validation, Oracle HRMS FastFormula User Guide.
-
To create a matrix of values (such as bonus amount against years of service) for use in formulas or QuickPaint reports, set up user tables.
See: Setting Up User Tables, Columns, and Rows, Oracle HRMS Configuring, Reporting, and System Administration Guide.
Define Element Skip Rules
-
If some elements should not be processed in every payroll run, write formulas for element skip rules defining the conditions when the run should process these elements.
See: Writing Formulas for Element Skip Rules, Oracle HRMS Configuring, Reporting, and System Administration Guide.
Set Up Proration
-
If the Proration tab is available on the Element window for your localization, you can set up proration. For earnings or deductions that the payroll run should prorate when relevant factors (such as pay rates, grades, or working hours) change during a pay period, make sure you have completed the basic proration setup steps. See: Setting Up Proration.
Define Elements
-
Define elements and element input values:
-
To record information about employee compensation, benefits, and equipment
-
For processing earnings and deductions. (Note that some elements for legislative deductions are predefined.)
See: Defining an Element.
See: Defining an Element's Input Values.
See also: Deleting an Element.
-
-
Define frequency rules, if necessary, to determine the periods in which the element should be processed.
See: Defining Frequency Rules.
Define Links for Predefined and User-defined Elements
-
If the payroll costs of an element should be distributed over other elements, define a distribution set.
-
Define element links to identify one or more groups of employees who are eligible to receive an element.
See: Defining Element Links.
See also: Running the Element Link Details Report.
Define Balances
Oracle Payroll has many predefined balances installed with the system. You can define other balances.
-
Define secondary element classifications.
-
Create classes of balance feeds by entering or removing secondary classifications for your elements.
-
Define user balances and create balance feeds for individual elements.
See: Defining User Balances.
See: Creating Balance Feeds for Individual Elements.
For information on uploading initial balances, please refer to the appropriate Legislative Balance Initialization technical essay.
Write Payroll Formulas
-
Oracle Payroll provides formulas for processing legislative deductions. For other elements, you can write formulas to calculate element results and other processing outcomes in payroll runs.
See: Writing Payroll Formulas for Elements, Oracle HRMS FastFormula User Guide.
Define Formula Processing and Result Rules
-
To define which formula processes an element for Active assignments (and optionally for other assignment statuses), define processing rules for the element. To specify what happens to formula results (that is, the values you include in the formula's Return statement), define formula result rules.
See: Defining Formula Processing and Result Rules.
Define Rules for Net-to-Gross Processing
If your localization supports net-to-gross processing, you can define rules for iterative processing of earnings and for excluding balances.
-
Define rules for the processing of the iterative formula. See: Defining Iterative Processing Rules, Oracle HRMS Compensation and Benefits Management Guide.
-
Specify which balances to exclude from the net-to-gross calculation. See: Excluding Balances From an Element's Grossup Calculation, Oracle HRMS Compensation and Benefits Management Guide.
Make Entries
-
For elements without Standard links, make entries of your elements for all employee who should receive them.
Defining Frequency Rules
Recurring elements may require frequency rules to determine in which pay periods they should process. For example, a monthly deduction might be processed in the third period of the month for weekly-paid employees and in the second period of the month for employees paid on a semi-monthly basis.
It is possible to set frequency rules to process once- or twice-yearly deductions on monthly, quarterly, or semi-annual payrolls. These rules' periods then refer to periods within a year (months, quarters or half years) instead or periods within a month. However, for infrequent deductions, you may prefer to define them as nonrecurring and use BEE to make entries when required.
Use the Frequency Rules window to define or change an element's frequency rules at any time.
US and Canada Payroll only: Use the Deduction form to define or change a deduction's frequency rules.
Mexico only: Use the Element Design Wizard to define or change a deduction's frequency rules.
To define frequency rules
-
Select the name of the payroll for which you want to define frequency rules.
-
In the Date field, you can override the default date that the payroll run uses to assess the frequency rule, if required.
For example, suppose you are defining frequency rules for a monthly deduction. If you select Effective Date for a Weekly payroll and check Processing Period 1, the payroll run only takes the deduction if the run's effective date is in the first week of the month.
-
Check the boxes for the processing period or periods in which you want the element to process for each payroll.
For example, if you want a monthly deduction to process in the second week of the month for a weekly payroll, check the box under 2 for that payroll.
Notice that some periods are not available for all payrolls. For example, a bi-weekly payroll can only have, at most, three periods a month, so periods 4, 5, and 6 are not relevant to this payroll.
Defining Formula Processing and Result Rules
Use the Formula Result Rules window to associate one or more formula processing rules with an element.
At minimum, an element needs one standard processing rule. This identifies the formula the payroll run uses to process the element for employees with an Active assignment status (and a Payroll system status of Process). It is also the default formula for other assignment statuses. However, you can define other processing rules if you need to use different formulas for assignments at other statuses. For example, you could have two rules for a Wages element: Standard Wages and Paid Training Leave.
Also use this window to define how each formula result is used by the payroll run.
Correcting and Updating Processing Rules
When you add a formula result, it takes on the effective end date of its processing rule. Any date effective changes you make to existing processing rules can affect formula results as follows:
-
Update: If you update a processing rule or give it an effective end date, all the rule's currently effective and future-dated formula results automatically get identical end dates.
-
Correction: If you correct a processing rule, all its currently effective and future-dated formula results remain unchanged.
-
Future delete: If you delete all future changes scheduled for a processing rule, this also deletes any future changes scheduled for the rule's formula results.
To associate processing rules with elements
-
Set your effective date to the start date for the processing rule.
-
Select the element for which you are entering rules. The element's description and classification automatically display.
-
Click Find to display any existing processing rules for this element.
-
In the Processing Rules region, select Standard and the regular formula for the element. If you have other formulas for this element, select them and the assignment statuses you want to associate with them.
Note: If you select a formula with inputs that do not match the element, you will receive a warning message, but you can still save your rule. Remember to update the formula before running the payroll.
-
Save your entries.
To define formula result rules for each processing rule
-
Click on a processing rule to select it.
-
In the Formula Results region, select a formula result name from the list of results specified when the formula was written.
-
Select the appropriate formula result type. There are five possible types:
Direct result: This is the element's run result (if you send the result to the element's pay value), or a direct result updating another of the element's input values.
Indirect result: This result passes as an element entry to another nonrecurring element not yet processed.
Message: The formula issues messages under certain conditions. For example, a formula can check a loan repayment balance and, if the balance is zero, issue the message "Loan is repaid." You read formula messages using the View Run Messages window.
Order Indirect: This result updates the subpriority of the element you select in the Element field.
Stop: This formula result uses the Date Earned of the payroll run to put an end date on a recurring entry of this or another element (which must be defined with multiple entries not allowed.)
Update recurring entry: This result updates recurring entries of this or another element on the effective date of the payroll run. The receiving element must be defined with multiple entries not allowed unless you are passing a recurring element's entries to itself, that is updating another entry of the same element.
Important: If your result type is Update Recurring Entry, then the application inserts an entry and any future dated changes to the entry remain unchanged by the results of the current payroll run.
-
For all formula result types except Direct Result or Message, select the name of the element to which you want to pass the formula result. This element must have a processing priority causing it to process after the element sending the result.
-
For the formula result types Direct Result, Indirect Result, and Update Recurring Entry, select the input value to update.
-
If you select Message as the formula result type, select a message severity level. There are three choices:
Fatal: When a message with this severity results from your formula, the run rolls back all processing for the employee assignment.
Warning: A message with this level of severity does not affect payroll processing but warns the user of a possible problem.
Information: A message with this level of severity simply gives information.
Setting Up Elements for Net-to-Gross Processing
Follow these steps to set up elements for net-to-gross processing.
To set up elements for net-to-gross process
-
Define the elements, making sure you select the following rules:
-
On the Standard tab of the Element window:
-
Non-recurring
-
Final close for the termination rule
-
Multiple entries allowed
-
Skip rule of ONCE EACH PERIOD
Mexico only: Skip rules are not enabled by default.
-
-
On the Advanced tab of the Element window:
-
Check the Gross Up check box
-
Select DEFAULT_GROSSUP in the Iterative Formula field
-
-
-
Choose the Input Values button to define the input values for these elements, as follows:
Input Values for Net-to-Gross Earnings Types Input Value Name Purpose of Entry Checkbox: Required Checkbox: User Enterable Checkbox: Database Item Pay Value Oracle Payroll returns the gross pay to this input value when it has completed the net-to-gross calculations. No Yes Yes Amount Gives iterative formula the desired net pay. Yes Yes No Low Gross Used by the iterative formula to hold the lower gross pay guess, to feed into the next iteration of the formula. No No No High Gross Used by the iterative formula to hold the higher gross pay guess, to feed into the next iteration of the formula. No No No Remainder The amount by which the additional pay to be paid by the employer (gross minus desired net) differs from the total of the balances that are eligible for grossup processing. Returned by the iterative formula. No No No To Within The amount by which actual net can differ from desired net after normal processing. Must not be zero but can be a nominal amount such as 0.01. Yes Yes No Method The method of iterative calculation: binary or interpolation. This determines which function the iterative formula calls. Use the lookup type ITERATIVE_METHOD and select the default INTERPOLATION, since this is usually the more efficient method. Yes Yes No Additional Amount The amount to add to desired net to calculate gross pay. Returned by the iterative formula. No No No -
Click Balance Feeds to confirm which balances feed your net-to-gross element.
-
Click Balance Feeds Control to modify balance feeds that are not correct.
-
Click Iterative Rules to set up the processing rules for the iterative formula.
See: Defining Iterative Processing Rules, Oracle HRMS Compensation and Benefits Management Guide
-
Click Exclude Balances to select the deductions to be paid by the employer.
See: Excluding Balances From an Element's Grossup Calculation, Oracle HRMS Compensation and Benefits Management Guide
-
Define the formula result rules for your elements:
-
Select the CALC_GROSSUP_PAY_VALUE formula for the Standard processing rule.
-
Create a formula result rule to feed the PAYMENT_AMOUNT result as a direct result to the element's pay value.
-
-
Define element links for your elements.
Setting Up Proration and Retro-Notification
Setting Up Proration or Retro-Notification
Follow these steps if you want to set up your system for proration or retro-notification.
To complete basic setup for proration or retro-notification
-
In the Table Event Updates window, ensure that the events you want to use are already included in the required tables. Enter the table name. The lower half of the screen displays the fields that trigger proration or retro-notification if their values are changed.
If the table has already been defined but the required event is missing, create either an Update, Delete, or Insert event and enter the table row or column to which the event refers. You can only enter a column name if you are creating an Update event. Select the change type defined by the event.
Note: The Table Event Update window is not available in all localizations.
See: Making Table Event Updates, Oracle HRMS Payroll Processing Management Guide
-
If the events you require have not been defined in the Table Event Update window, set up the dynamic triggers for proration or retro-notification in the Dynamic Trigger Generation window. The triggers you need depend on the method you use to compensate your employees. For example, the tables required for compensation using Salary Administration are different from those required for compensation using pay grades. The tables you are likely to use are:
-
PER_ALL_ASSIGNMENTS_F
-
PER_ALL_PEOPLE_F
-
PAY_ELEMENT_ENTRIES_F
-
PAY_ELEMENT_ENTRY_VALUES_F
-
PER_SPINAL_POINT_PLACEMENTS_F
-
PER_GRADE_RULES_F
See: Defining Dynamic Triggers, Oracle HRMS Payroll Processing Management Guide
Note: French users: Ensure you enable the dynamic triggers for PAY_ELEMENT_ENTRIES_F and PER_ALL_ASSIGNMENTS_F.
-
-
Create an event group for your proration or retro-notification events. You must create the event groups before you can create your elements.
-
Select the Incident Register functional area in the Functional Area Maintenance window. Make sure that your triggers are included in this functional area. If your triggers are not included, insert them.
You must also activate the triggers according to legislation or business group. For more information, see: Grouping Dynamic Triggers into Legislative Functional Areas, Oracle HRMS Payroll Processing Management Guide
Setup for retro-notification should now be complete, meaning you can proceed to running the appropriate report. However, if you are setting up proration continue with the next steps.
See: Running the Retro-Notifications Report, Oracle HRMS Payroll Processing Management Guide
To set up the elements for proration
-
Create your proration element. US and Mexico users: Initiate the earnings type or deduction, then query the generated element in the Element window to add a proration group and, optionally, a proration formula.
-
Make sure that you select a proration group for each element
-
Select a proration formula if you are using a separate proration formula to handle proration events (rather than enabling your payroll formula to handle proration)
-
Select Actual Termination as the termination processing rule
-
-
Define the input values for the element. For example, if you were using the sample payroll formulas that are enabled for proration, you would create the following input values:
-
Amount for a salary management element
-
Date Worked for a spinal point/pay scale element
-
Annual Deduction for a deduction or allowance
-
-
Link the element to a specific payroll or payrolls. If you want the element to be used automatically each time the payroll is assigned, select the Standard check box. If you do not select this check box, you must enter the element for each assignment.
To create the formula
-
Check that the database items to be used in your formula are available. If the required database items are not available, create them.
-
Create the proration formula or write a payroll formula that is enabled for proration.
To create a proration formula, see: Writing Proration Formulas, Oracle HRMS FastFormula User Guide
UK users: For examples of payroll formulas enabled for proration, see: Sample Payroll Formulas Enabled for Proration, Oracle HRMS FastFormula User Guide
For more information on writing formulas, see: Writing or Editing a Formula, Oracle HRMS FastFormula User Guide and Writing Payroll Formulas for Elements, Oracle HRMS FastFormula User Guide
-
Link the formula to your element in the Formula Result Rules window.
-
Attach the element to the salary basis if the salary is relevant for proration. Select the input value you created (such as Amount) in the Input Value Name field of the Salary Basis window.
Defining Event Groups
You define an event group from the Table Event Group window. You use an event group to group together all proration or retro-notification points that affect an employee's salary, such as salary increases.
To define an event group
-
Enter a name for your event group.
-
Select one of the following event group types:
Proration for a proration event group
Retro for a retro-notification event group
-
Select the proration or retro period.
-
Save your entries.
-
Select the events that can trigger proration or retro-notification in the Datetracked Events region. To do this, select the update type, the table containing the data, and the table column.
-
Save your work.
Balances
Payroll Balances
Balances show the positive or negative accumulation of particular values over periods of time. They are fed either by the direct run results (that is, Pay Values) of elements processed in the payroll run, or by input values. For example, in North American installations, the input value Hours of the element Time Entry Wages feeds the balance Regular Hours Worked.
Balance Dimensions and Levels
Balances exist for various time dimensions, such as current run, period to date, month, quarter to date, and year to date.
Balances also exist at different levels, such as assignment level or person level. Balances for individual employee assignments are at the assignment level (in North America, they can be at the assignment level within a GRE). If your enterprise permits employees to hold more than one assignment at the same time, you can hold balances at the person level. For example, a person level Gross Earnings balance is the sum of an employee's assignment level Gross Earnings balances.
Choosing Elements To Feed a Balance
You can select elements to feed a balance in three ways:
-
Select a primary classification. The run results of all elements in the classification feed the balance. However, you must have an input value of Pay Value if you want to create a feed between an element and a balance.
-
Select a secondary classification. You choose which elements from a primary classification (such as Earnings) are to feed the balance by giving these elements a secondary classification. Again it is the run results of the elements that feed the balance.
Note: Secondary classifications are not used in the North American versions of Oracle Payroll at this time.
-
Select an individual element. You can select either the run result or an input value to feed the balance. The input value must have the same unit of measure (such as hours or number) as the balance.
You can choose any number of classifications or any number of elements to feed a balance. However you cannot use a mixture of classifications and individual elements to feed a balance. When you select an element or classification as a balance feed, you specify whether the run results (or input values) should add to or subtract from the balance.
Startup and User Defined Balances
The balances and balance feeds for the elements supplied with Oracle Payroll are present in the system when you receive it. For North American users, when you initiate earnings types, deductions and other items that process in the payroll run, the system generates the appropriate balances and balance feeds together with the necessary elements.
You can define any additional balances your enterprise requires. For example, you may require a Pensionable Earnings balance for a pension plan your enterprise offers employees.
Defining Secondary Element Classifications
Oracle Payroll users can define secondary classifications to create subsets within primary classifications. You decide which elements, from a primary classification, are in each secondary classification, then you use the secondary classification to feed balances.
Note: If you are an HR-only user, you cannot define secondary classifications. For more information on user types and the associated HR: User Type profile option, see: User Profiles, Oracle HRMS Configuring, Reporting, and System Administration Guide.
To create secondary element classifications
-
Query a primary element classification. The check box indicates whether it is for nonpayment elements. These are elements that do not feed the Payments balance.
On the Priority, and Costing tabs, you can view the following information about the classification:
Priority: The processing range displays together with the default priority.
Costable: If this check box is checked, you can select all costing options on the element link for elements of this classification, including Not Costed.
Distributable: If this check box is checked, you can create a distribution set from elements of this classification over which you can distribute costs.
Debit or Credit: These option buttons display the cost type for elements in the classification, that is, whether the accounts they feed are to be debited or credited.
On the Frequency Rules tab, you can view the following information about the classification:
Enabled: If this check box is checked, you can define frequency rules for elements of this classification. The payroll run uses a frequency rule to determine in which pay periods it processes a recurring element.
Date: The date the payroll run uses, by default, to assess frequency rules in your localization. You can select a different date when you define a frequency rule.
-
Enter a unique name for the secondary classification you want to associate with the displayed primary classification. You can also add a description.
-
Select the Default check box if you want all elements in the primary classification to be in the secondary classification by default. Then, if there are any exceptions, you must manually remove these elements from the secondary classification. You can do this at any time using the Balance Feed Control window, which opens from the Element window.
Note: For some legislations, Oracle Payroll has already defined a number of secondary classifications. Some of these are default classifications, but not all. You cannot delete these classifications, and you cannot delete them from the Balance Feed Control window for predefined elements.
Creating Balance Feeds for Individual Elements
Use the Balance Feeds window to select balances to be fed by the input values of an element. Balances are either fed by whole classifications of elements or by individual elements, but not by both. Therefore, in this window you cannot select balances that are fed by classifications. You can query a balance in the Balance window and choose the Classifications button to view the list of classifications that feed it.
You can use an element to feed as many balances as you require.
To create balance feeds for one element
-
Set your effective date to when you want the balance feed to start.
-
Enter or query the element in the Element window and choose the Balance Feeds button.
-
In the Balance Feeds window, select the input value that you want to feed the balance with.
The list displays all the input values defined for the element. These input values may have different units of measure. When you select an input value its unit of measure displays in the Units field. To feed a balance with the element's direct run result, select Pay Value.
-
Select the balance you want the input value to feed.
The list restricts your choice to balances having the same unit of measure as the input value you selected.
-
Select Add or Subtract for the balance feed.
Note: Secondary classifications and balance feed controls currently do not apply to the US version of Oracle Payroll.
Creating Classes of Balance Feeds
In the Balance Feed Control window, you can classify an element using secondary classifications. These determine the balances that the element feeds. You can query a balance in the Balance window and choose the Classifications button to view the list of classifications that feed it.
To select or remove secondary element classifications
-
Set your effective date to when you want the element to begin feeding the balances that the secondary classifications feed.
-
Enter or query the element in the Element window and choose the Balance Feed Control button.
-
In the Balance Feed Control window, delete any default secondary classifications you do not require for the element.
When this window opens, it displays any default secondary classifications for the element's primary classification. Unless they are predefined, you can delete any of these classifications, and you can change their effective start dates.
-
Select any non-default secondary classifications you require.
Defining User Balances
Defining a balance includes defining its feeds and dimensions. When selecting feeds for the balance you have to choose between specifying element input values directly, and selecting element classifications to determine the feeds. You cannot choose both methods together.
You can group similar balances - such as all earnings balances - in a single category for quicker and easier processing. Each localization has a defined set of categories. If there are no categories in the list of values, this means your legislation is not yet using the category functionality.
Balances often share a common relevancy to certain assignments. In some localizations, you can define base balances to imply a relationship between the balances that can be relied upon when processing and reporting. For example, "Loan Repayment" could be the base balance for "Loan Repayment Arrears".
You define balances in the Balance window.
To define a user balance
-
Do one of the following:
-
Enter a unique name and a reporting name for the new balance. If you do not provide a reporting name, the first seven characters of the balance name appear on reports.
-
Query any user balances you want to change.
-
-
Optionally, select a balance category in the Category field.
Australian Users: Attach all user-defined balances to the relevant balance category and to the _ASG_RUN and _ASG_YTD dimensions to populate the run balances. You must attach all user-defined allowance balances required to be reported individually on the Payment Summary to the Balance Category of Allowance and to the _ASG_LE_RUN and _ASG_LE_YTD dimensions.
New Zealand Users: You must assign a balance category for each element that you define.
-
Optionally, select a Base Balance.
-
Enter the unit of measure for the balance. The choices are days, hours (listed in different formats), integer, money and number. If you select money as the unit you must also select a currency.
Note: Do not select the Use for Remuneration check box. This displays the balance that has been predefined as the Remuneration balance. Only one balance within a legislation can have this value.
-
To define a primary balance - one fed by a single element - select an element and input value in the Primary Balance region (if this region is available for your localization).
-
Go to the Balance Feeds window or the Balance Classifications window.
In the Balance Feeds window:
-
Set your effective date to the start date for the balance feeds.
-
Select one or more elements to feed the balance. Only those elements whose input values have the same unit of measure as the balance are listed.
When you select an element, its classification is displayed. You can select elements with different classifications.
-
Select the input value that is to feed the balance.
For most payroll balances select Pay Value so that the element's run result feeds the balance.
-
Select Add or Subtract for the balance feed.
In the Balance Classifications window:
-
Select one or more element classifications and select Add or Subtract for each. The run results of all elements in the classification will feed the balance.
The list includes all the primary and secondary element classifications that are valid for this balance. If you select a secondary classification, you cannot also select its parent primary classification.
Note: Secondary classifications are not used in the North American or Singapore versions of Oracle Payroll at this time.
Balance Dimensions Window
-
-
Choose the Dimensions button.
-
Select the dimensions you require.
New Zealand Users: For each new balance, you must attach the balance dimension _ASG_RUN for it to generate run balances.
Australian Users: Select the _ASG_RUN and _ASG_YTD dimensions for all user-defined balances. You must attach the _ASG_LE_YTD and _ASG_LE_RUN dimensions to the allowance balances required in the Payment Summary reports.
You can remove any dimension previously selected for a user-defined balance. You can also add dimensions to the startup balances included with your system, and later remove these additional dimensions. However, you cannot remove the dimensions that were predefined for the startup balances.
Note: To hold balances for a fiscal year that is different from the calendar year, you must supply the fiscal year start date for your Business Group.
-
Optionally, select the Grossup Balance check box for one of the dimensions, to make the balance eligible for grossup.
UK users: If you want to make the balance eligible for grossup, you must select this check box for the _ASG_RUN dimension.
Initial Balance Feed Window
-
Choose the Initial Feed button.
-
In the Initial Balance Feed window you can see details of the element and input value used for the Initial Balance feed. This feed is defined by implementation consultants prior to performing an initial balance upload at implementation time.
Balance Attributes window
-
Choose the Attributes button.
-
Select an attribute definition and a dimension.
Balance attributes identify which balances can be used in which reports. Attributes can be predefined by localizations, created as a result of predefined defaults, or you can enter them in this window.
Note: For UK SOE Balances, ensure you attach the attribute to the Balances1 segment in the Business Group Information. Attach the attribute to each balance you want to display on the Online SOE. For every balance with an attached attribute, you must add individual balance to the SOE Details Information (in the Business Group Information).
The balances you attach to the SOE Details Information are defined at business group level, hence even if you change the user category profile it will not have any result on the data defined in the SOE Details Information.
Additional Information: Saudi Users: Oracle Payroll provides Saudi SOE Balance Attributes to view the SOE report. You can use the predefined balance attributes or create your own balance attributes.
Uploading Initial Balances
Setting initial values for balances is an essential task for new customers migrating from other systems.
Such balances typically consist of both legislative and customer defined balances. For example, a legislative balance could be the amount of tax deducted for each employee during the tax year. A customer defined balance could be the number of vacation days taken by each employee during the calendar year.
The correct initial setting of these balances is essential for subsequent processing to be valid.
The Initial Balance Upload process allows the specification and loading of initial balances into the system. System implementers use this process once only, on migration. After that, balance maintenance is carried out automatically by Oracle Payroll.
To load initial balances into Oracle Payroll
-
Define an element and input value for the initial balance feed. Select the classification Balance Initialization for this element.
-
Set up initial balance values in the tables
PAY_BALANCE_BATCH_HEADERS
PAY_BALANCE_BATCH_LINES
For more information, see the technical essay: Balances in Oracle Payroll, Oracle HRMS Implementation Guide.
-
In the Submit Requests window, select Initial Balance Upload.
-
Run one or more of the four modes as appropriate:
Validate: checks the details in the batch to be uploaded
Transfer: creates the balances in the batch
Undo transfer: reverses the effects of a transfer
Purge: removes the batch from the batch tables
-
Select the batch to be processed.
-
Choose the Submit button.
-
Continue to run the process for as many modes as you require.
Third Party Payments
Third Party Payments
Oracle Payroll enables you to make both single and recurring deductions from worker salary for third party payments, and to specify either corporate bodies or individuals as payees. The deductions you can make include third party payments and union dues.
You need to define payment methods for third party payments and enter these for your payrolls.
How you pay third parties is determined by the Third Party Payment check box on the Element window when you define the deduction. If this check box is unchecked, you must pay third parties outside Oracle Payroll through Accounts Payable. If it is checked, you can pay third parties through Oracle Payroll, using a third party payment method that you have defined.
Third Party Payments Overview
Third party payments is also known as Wage Attachments, Wage Garnishments, and Court Orders in different localizations, and your legislation may already have predefined elements to support each of these types of deduction.
Third party payments are deductions from earnings incurred by court debts or fines. For example, payments of maintenance, child support or other legally incurred obligations. Oracle Payroll enables you to process these deductions from worker wages. Third party payments in Oracle payroll are rule-driven, so you can tailor them to meet your business needs.
Oracle Payroll provides a robust answer to administering third party payments, a type of involuntary deduction. Like other features in Oracle HRMS, third party payments are rule-driven so that you can tailor the software to fit your business requirements.
Oracle Payroll features for third party payments enable you to:
-
Create third party payments
-
Determine which earnings are eligible for third party payments
-
Administer fees for recouping processing costs of third party payments (if administrative fees are payable for your legislation)
-
Establish the priority of payments if a worker has several third party payment obligations that cannot be met in a single pay period
-
Stop making third party payments when your worker has discharged the obligation
Handling third party payments
Oracle Payroll handles third party payments using:
-
Elements and input values
-
Formulas
-
Balances and balance feeds
Legislative Differences
Depending on the country in which you operate, third party payments are either provided for you, along with their associated elements, balances, balance feeds and formulas, or you can create your own. To create your own, enter some of the information you require into a template, and let Oracle Payroll generate the elements, balances and balance feeds for you. You create North American third party payments using this second method.
You can only use one of the two methods, depending on your legislation, and not a mixture of both.
Elements
Each third party payment is represented by one element. For example, the third party payment of Court Order is represented by the element called Court Order.
Once you have created a third party payment, or selected one of the third party payments provided, you record all changes by entering input values for the third party payment element.
Third Party Payment Processing Sequence
You determine when to deduct each third party payment from a worker's earnings using element classifications and processing sequences.
For example, you may need to ensure that Oracle Payroll always processes court orders before other deduction types. You may also need to prioritize the court orders further to ensure that Oracle Payroll always processes child support deductions before education loans. In this example, these third party payments belong to an element classification with a low-numbered processing sequence. This ensures that they are processed before all other deductions.
Then, to ensure that Oracle Payroll always processes your child support payments before education loans, you could determine a secondary processing sequence. You do this in the Element Entries window.
If you don't specify a secondary processing sequence, third party payments are processed in date order.
During payroll processing, the appropriate formula calculates the deduction from the worker's wages, and considers the correct percentage of the balance which stores the worker's net income.
Korea users only: While processing your third party payment, use only the KR Monthly Payroll, KR Bonus Payroll, and KR Separation Pay Payroll processes. If you use QuickPay Run, the third party payment will not be properly processed because you cannot specify its payout date.
Formulas
You can use the predefined formulas to determine how third party payments are processed in your organization. For example you can do the following:
-
Determine the amount of pay that is liable for third party payment deduction. For example, the worker's take home pay after tax and other deductions, and the amount that is protected or exempt from third party payment deductions. During payroll processing, a formula calculates the deduction from the worker's wages. During calculation, 50 percent of the Attachable Earnings balance is considered; this balance stores the worker's net income. Irrespective of the payroll run type, only 50 percent of Attachable Earnings will be considered.
-
Calculate the amount to withhold. The third party payment court order provides the amount to be withheld per pay period and a total amount due. If you do not enter a pay period, Oracle Payroll defaults to the maximum amount allowed by law. The amount withheld can also include any arrears owing or any fees payable to the employer for setup and administration of the deduction.
-
Verify the amounts withheld. After Oracle Payroll has calculated all third party payments for a worker, the relevant formula checks that all rules and limits applicable to these payments are accounted for. If it finds any violations, the formula makes adjustments to the previously calculated amounts, prorating them and creating arrears amounts if necessary.
See: Formulas and Payroll Run Results
Balances
Oracle Payroll uses balances to record the amount of third party payments paid or amount remaining. Depending on your legislation, Oracle Payroll either provides the balances and balance feeds that you need for predefined third party payment elements, or it generates them automatically.
The amount of court order debt paid at any time is held in an Inception-to-date (ITD) balance. For those elements that have multiple occurrences, this balance exists at element level, reflecting the need to keep track of how much has been paid for each separate occurrence. Otherwise the balance exists at assignment level.
The amount of the debt still outstanding is the difference between the amount in the ITD balance dimension and the Initial Debt input value.
For Assignment level ITD balance dimensions, you must ensure that, once the total debt has been repaid and the element has been given an end date for processing, that the balance is cleared back to 0.00. If you do not do this and a new element entry is given to the worker for the same court order type element, the formula finds the 'old' balance and the element is not processed correctly.
The attachable pay balances Run and Period balance are referenced within the formulas because of the possibility of there being more than one run in a period.
How Oracle Payroll Manages Deductions
You enter the initial debt. The system then manages the deductions automatically and ends the process when the debt is cleared. If you do not enter a value for the debt the system continues to process the deductions each pay period as ongoing maintenance payments.
Protected Earnings
Local legislation determines the amount and type of earnings from which third party payments can be deducted. Typically, there is a minimum amount of earnings below which you cannot deduct third party payments. Similarly, there is a proportion of a worker's earnings that are considered liable to third party payment deductions.
Managing Different Third Party Payments
You can use Oracle Payroll to manage both kinds of third party payment:
-
Where the total amount of the deduction is known in advance, for example, a fine.
-
Where the total amount is not fixed, but you must make a deduction from each salary payment, for example, child maintenance orders.
Ending Third Party Payments
Depending on the third party payment, and whether the deduction is ongoing or a diminishing balance, you can set a deduction end date. Alternatively you can set up the deduction so that Oracle Payroll stops processing it when the full balance has been paid.
You can also override these settings, for example, if you want to stop maintenance payments immediately before reaching the end date.
Preparing Third Party Payment Information at the End of Employment
If a worker's third party payment is still being processed after the worker has left the organization, then you must manually enter deposition-related information into the Deposition Info predefined element. This element is for informational purposes only. Your company will request the court that has mandated the third party payment to stop the process, and the court will be sent the information contained in the element.
Third Party Payment Deductions
The third party payments that you can process depend on the specific third party payments that apply to your legislation. Examples of third party payments include child support payments, educational loans, taxes to local authorities, alimony, and bankruptcy orders.
The following table lists the deductions you can make using Oracle Payroll.
| Third Party Payment | Legislation |
|---|---|
| Credit Debt/Garnishments | US |
| Bankruptcy Order | US |
| Federal Tax Levy (State and Local Tax Levies are not supported by Oracle Payroll) | US |
| Federal DCIA Order | US |
| Spousal Support Order, Child Support Order, and Alimony | US |
| Educational Loan | US |
| Employee Requested Payment | US |
| Court Orders and Arrestments | UK |
| Council Tax Attachments | UK |
| Court Orders | France |
| Maintenance Orders | Ireland |
| Variation Orders | Ireland |
| Interim Orders | Ireland |
| Compensation Orders | Ireland |
| Social Welfare Orders | Ireland |
Making Third Party Payments
Use this process to make third party payments through Oracle Payroll. Third party payments include
-
Wage Attachments
-
Wage Garnishments
-
Court Orders
In Australia, you can also use this process to set up employer superannuation contributions. After payroll processing takes place, the pay value of the deductions element is paid according to the third party payments method you selected.
To make third party deductions from individual assignments
-
Create the organization or person to receive the third party payment.
You create payee organizations in the Organization window, selecting the Payee Organization classification.
See: Creating an Organization, Oracle HRMS Enterprise and Workforce Management Guide
You create individual payees as contacts of the person making the deduction. In the Contacts window, check the Payments Recipient check box when you create the payee.
See: Entering Next of Kin and Other Contacts, Oracle HRMS Workforce Sourcing, Deployment, and Talent Management Guide
-
Link the third party element to your payroll.
-
In the Personal Payment Method window, select a third party payment method for the assignment. In the Payee region, select the payee you have created.
See: Entering Payment Methods for an Employee Assignment, Oracle HRMS Workforce Sourcing, Deployment, and Talent Management Guide
-
Create an element entry for the deduction.
See: Entering Third Party Payment Information
In the Entry Values window, you enter details of payment, payee and payment method. Required entry information varies according to the kind of deduction you are making.
When you have completed these setup steps you can run a payroll to process the third party payment that you have just defined.
Entering Third Party Payment Information
Information about each Third Party Payment that must be discharged against your worker is stored in a separate third party payment element.
Third party payments can include Wage Attachments, Wage Garnishments, and Court Orders and your legislation may already have predefined elements to support each of these types of deduction.
Use the Element Entries window to assign your worker a Third Party Payment element.
To enter Third Party Payment for a worker
-
Query your employee in the People window, and set your effective date to the day on which the third party payment should commence for your worker.
-
In the Element Entries window, select the third party payments element .
-
Enter costing information in the Cost Allocation KF window or choose Cancel.
-
Choose the Entry Values button to open the Entry Values window.
-
Enter the unique attachment sequence number of the third party payment.
You must supply a unique attachment sequence number for your third party payment; otherwise, your payroll run will fail. After your payroll run is successfully processed, in the Result Values window, you can identify the Results element created for your third party payment by its attachment sequence number.
-
Enter the time you received the third party payment and the unique case number assigned by the court administering the third party payment.
-
Select the third party payment's processing type.
-
Enter the third party payment's sub-processing type and administering court's name. The sub-processing type is used by the system only for information and is not considered during calculation or administration of the third party payment.
-
Enter the principal base and court fee base for the third party payment.
-
If the third party payment has an interest base, enter it. Enter the start and end dates for the interest base. The start and end dates for a third party payment that has an interest base are only for information and have no bearing on administration or calculation.
-
Indicate whether or not a judicial decision statement of the obligation-release processing type has been received for the third party payment and the date of such receipt. To set the Obligation Release field to Yes, you must update the field.
When the third party payment's processing type changes to obligation release from any other processing type, you must select Yes in the Obligation Release field. You do not need to assign a new third party payments element to the employee
-
Select the third party creditor for the court order from the list of values in the Payee Details field.
-
Save your work.
To enter interest bands
If the third party payment has interest bands, then you need to specify them in the Further Element Entry Information window:
-
Click in the Further Entry Information field to open the Further Element Entry Information window.
-
Specify the start date, end date, base, and rate of each interest band. You can specify a maximum of five interest bands. A interest band is invalid if it does not have a start date. If an end date is not specified, the system uses the next applicable payout date.
-
Save your work.
To change processing type from provisional attachment to actual seizure and collection, actual all attachment
Some localizations enable you to specify whether a third party payment is a provisional attachment, an actual seizure and collection, or an actual all attachment.
When the processing type of the third party payment changes from provisional attachment to actual seizure and collection or actual all attachment, you must assign a new third party payments element to the employee in the payroll-processing period in which the processing type changes.
-
In the Element Entries window, enter information pertaining to the new judicial decision statement.
-
If the third party payment uses an interest base, enter the same values for the principal base, court fee base, and interest base that you entered for the old third party payments element.
-
If the third party payment uses interest bands, enter the same values for the principal base and court fee base that you entered for the old third party payments element. While setting up interest bands, begin with the interest band within which the next payroll-processing date will fall. The start date of this band should be the last payout date for the old third party payments element.
-
Select the case number for the old judicial decision statement for the third party payment in the Further Element Entry Information window.
-
Save your work.
Historic Rates
Historic Rates
Historic rates is a function that retrieves a datetracked money value and recalculates it according to different time-dimensions (converting a daily wage to hourly). Historic rates is primarily for use in FastFormulas. You can use it to determine employee payments at the rate that existed when the work was done, rather than at the current rate. For example: If you pay your employees in arrears, you can calculate the value of the arrears payment.
Historic rates apply to notional rates only and not to actual rates
An employee may earn $50 an hour. Assuming a 40 hour work week, their notional rate would be $2000 a week. However, that employee might have only worked 10 hours during a particular week. Therefore, their actual rate for that week would be $500.
Historic rates are the values of a specific element or combination of elements, based on a specified time dimension, at a specified date. You can vary the rate according to different factors, such as:
-
Full Time Equivalent (FTE)
-
A percentage of another rate
Rate Type Information
For most rate calculations, a single element provides the pay rate. However, some rate calculations are the sum of multiple elements. For example: A holiday rate could be basic pay (held as a progression point) plus shift allowance (an input value) plus bonus (a global value). A rate type is a grouping of elements that comprise a single pay rate.
Different rate types can use the same element. For example: A rate type for holiday and another for sickness can both use the same basic pay element.
Use the Historic Rate - Rate Type element EIT to store the rate type name and description against each element. You create additional rate types by adding values to the lookup type PQP_RATE_TYPE.
Element and Contract Attribution
To calculate pay using historic rates, use the GET_HISTORIC_RATE function in your payroll formula. This function returns the rate. The parameters for the function are:
-
The element, or group of elements (a rate type)
-
The time dimension (such as hourly)
-
The effective date
For sample formulas using this function, see: Sample Rates History Formula, Oracle HRMS FastFormula User Guide
The function uses attribution at two levels to calculate the correct values:
-
Element
-
Contract
Note: The Contract level is available only if your localization has enabled it.
Element Attribution Information
Use the Historic Rate - Element Attribution (an element EIT) to store the following information against each element that has a historic rate:
-
Time dimension (hourly, daily, and so on)
-
Pay source value (input value, grade rate, and so on)
-
Name of the pay source
-
Full Time Equivalent indicator
-
Service history
-
Assignment association
-
Rate adjustment options
For example, assume an assignment has an element entry for a Salary element and the element has the following attribution:
Time dimension = Hourly, Source = Grade Rate, Qualifier = Grade Rate 1
The function can retrieve the salary from Grade Rate 1 at any time and convert the time dimension from hours to annual or another dimension.
If you store rates for this payment using more than one grade rate or scale rate, you can use wildcards to enable you to select the latest value in the Qualifier field. For example: If the rate for salary can be held in Sal Scale Rate 1 or Sal Scale Rate 2, you can make the wildcard entry Sal Scale Rate % in the Qualifier field. The historic rates function then retrieves the value with the latest effective date.
Contract Table
The Contract Table is available only to those localizations that have enabled it. The structure of this table is defined by the localization. The user must specify the values.
Mexico only: This table is defined and maintained by the localization. It is not available to users.
Use the PQP_CONTRACT_TYPES predefined user-defined table to store the following information about your employee contract details:
| Value | Definition |
|---|---|
| Annual Hours | Number of contract annual hours. Use this figure in the conversion of the derived rate to an output time dimension of "H" (Hourly Rate). Also use Annual Hours as a required figure when calculating Full Time Equivalent (FTE). |
| Days Divisor | Number of contract days in a year. This divisor is normally 365. Use it in the conversion of the derived rate to an output time dimension of "D" (Daily Rate). |
| Period Divisor | Number of periods per year used to calculate an output time dimension of "P" (Periodic Rate). Use a divisor that corresponds to the working hours shown on the Assignment window. For example: Weekly working hours have 52 as the Period Divisor. Also use Period Divisor as a required figure when calculating Full Time Equivalent (FTE). |
| Weekly Payroll Divisor | Number of periods per year, such as 52. Use the weekly payroll divisor to convert a periodic value into an annual value when Periodic - Payroll Frequency is the time dimension for the element, and the payroll is weekly or bi-weekly. |
| Monthly Payroll Divisor | Number of periods per year, such as 12. You use the monthly payroll divisor to convert a periodic value into an annual value when you select Periodic - Payroll Frequency as the time dimension for the element and the employee has a payroll frequency of Calendar Month, Lunar Month, Bi-Month, Quarter, Semi-Year, or Year. |
When you have entered the required information to the PQP_CONTRACT_TYPES table, you can also add the following:
| Value | Definition |
|---|---|
| Overtime Annual Hours | Number of annual hours used to calculate an output time dimension of "O" (Overtime Hourly Rate). |
| Annual Term Time Hours | Calculates the adjustment value for the derived rate. If you enter a value for this column, and for the Annual Hours column, this adjusts the derived rate by a factor of Annual Term time Hours divided by Annual Hours. |
| Employment History Factor | Value the function uses to adjust the historic rate for length of service. There are five bands within this category. For each of band you can define the following:
The historic rates function uses this information about each contract type to convert values held for one time dimension to another dimension. For example: If a rate is held hourly and needs to be returned as a daily rate, the function calculates an annual value by multiplying the rate by Annual Hours, then divides this by the Days Divisor. |
Time Dimensions
Time dimensions are closely tied to contracts. If you have a time dimension, you must use contract types. If you are doing a conversion between two time dimensions, you must refer to a contract.
You define source time dimensions in the PQP_TIME_DIMENSIONS extensible lookup type. Whenever you add a new dimension to this lookup, you must also make a corresponding entry in the PQP_TIME_DIMENSION_FACTORS lookup type. This corresponding entry ensures that your output time dimensions map correctly to the annualization factor in the PQP_CONTRACT_TYPE user table.
| Code | Meaning | Description |
|---|---|---|
| A | Annual | Annual |
| D | Daily | Daily |
| H | Hourly | Hourly |
| P | Periodic | Periodic |
| PAY | Periodic - Payroll Frequency | Periodic - Payroll Frequency |
| Code | Meaning | Description |
|---|---|---|
| A | Reserved Per Annum Frequency | Annual |
| D | DAYS DIVISOR | Daily |
| H | ANNUAL HOURS | Hourly |
| O | ANNUAL OVERTIME | Overtime Hourly |
| P | PERIOD DIVISOR | Periodic - Contract Period |
| PAY | Reserved Pay Period Frequency | Periodic - Pay Period Frequency. |
The GET_HISTORIC_RATE function converts the element rate into an annual rate before converting to the given output time dimension. Therefore, not all output time dimensions need a corresponding source time dimension. For example, you can retrieve the overtime hourly rate (time dimension "O") without defining a rate with a source frequency of Overtime Hourly.
See: Setting Up Custom Time Dimensions for Historic Rates, Oracle HRMS Compensation and Benefits Management Guide
Historic Rates Extra Information Types
Use the Historic Rate - Element Attribution element EIT to store the following information against each element that has a historic rate:
| Value | Description |
|---|---|
| Time-Dimension | Specifies if the value is an annual, periodic, daily, or hourly figure. If you select Periodic, the rates history function multiplies the value by the period divisor held on the Contract Table to convert it to an annual value. If you select Periodic - Payroll Frequency, the rates history function multiples the value by either the weekly or monthly payroll divisor held on the Contract Table to convert it to an annual value. The choice of divisor (weekly or monthly) depends on the payroll frequency. If you select Periodic or Periodic - Payroll Frequency, the Pay Source value must be Input Value. You can define your own source time dimensions and their corresponding conversion factors. |
| Pay Source Value | Specifies if the value is an input value, grade rate, spinal value (progression point), or global value, or whether the application calculates it as a percentage or factor of an element or rate type. |
| Qualifier | Holds the name of the source specified in Pay Source Value, such as the name of the grade rate or element. |
| Full Time Equivalent | Specifies whether the value is subject to FTE.
|
| Service History | Specifies whether the formula must adjust the rate dependent on length of service. |
| % or Factor Segments | These segments only apply for a pay source value of element name or rate type. The formula uses the rates history function to obtain the appropriate values for the element or rate type given in the Qualifier segment, then applies the appropriate percentage or factor.
|
| Linked to Assignment | When a formula calls the historic rate function for a rate type, this segment specifies whether it returns a value for this element only for assignments that are linked to the element. Select No to return the rate for all assignments. Select Yes to return the rate only for assignments linked to the element.
Note: This segment does not apply if the Pay Source Value is Input Value. In this case, the formula calculates the rate only for employees who are linked to the element. |
| Apply Term Time Factor | Specifies whether the formula adjusts rates by term time hours divided by annual hours. This factor applies to employees with annual term time hours defined on the Contract table.
Note: If you record term time hours in the Contracts table and set the Apply Term Time Factor segment to Yes, do not use FTE to prorate full time teachers' rates. Using FTE would compound the proration effects. |
| Sum Multiple Entries | This segment only applies if the Pay Source Value is Input Value. If you select No (the default) and an assignment has multiple entries of the element, the formula returns a rate based on one of these entries selected randomly. If you select Yes, the formula returns a rate based on the sum of these entries. |
| Lookup Input Values | This segment only applies if the Pay Source Value is Input Value. If you select No (the default), the formula returns a rate based on the lookup code for the input value. If you select Yes, the formula returns a rate based on the lookup meaning. |
Setting Up Historic Rates
Follow these steps to set up the Historic Rates function.
To set up Historic Rates
-
You (or your system administrator) register the following element EITs with your responsibility:
-
PQP_ELEMENT_ATTRIBUTION
-
PQP_RATE_TYPE
See: Setting Up Extra Information Types Against a Responsibility, Oracle HRMS Configuring, Reporting and System Administrators Guide
-
-
Create additional rate types by adding values to the lookup type PQP_RATE_TYPE.
-
Set up elements to represent the payments used in your enterprise.
Enter the following attribution:
-
Classification of earnings
-
Recurring processing type
-
Final close on termination
Note: To use proration with historic rates, choose actual termination.
-
Process each period
To use a formula calling a version of the historic rates function requiring date parameters, give each element an Input Value that has the same name as the formula input.
-
-
Enter extra information using the Historic Rate - Rate Types and Historic Rate - Element Attribution EITs for all elements with historic values.
-
Define element links for all the elements.
-
If your localization has enabled the Contracts Table:
-
Enter contract information in the pre-configured user-defined table PQP_CONTRACT_TYPES.
-
Add one row for each new contract type you want to set up.
If you hold rates on input values and use the Period Divisor on the Contract Types table to convert the period value to an annual value (such as, Time Dimension = Periodic on the Element Attribution Information for your elements), you must create at least one contract type for each payroll frequency. For example: You must assign employees on a weekly payroll to a separate contract type from employees on a monthly payroll. This requirement does not apply if you select the Periodic - Payroll Frequency time dimension, which uses the weekly or monthly payroll divisor held on the Contract Types table to convert period values to annual.
See: Entering Contract Types, Oracle HRMS Workforce Sourcing, Deployment and Talent Management Guide
-
Assign people to contract types by selecting contract type and start date in the Extra Details of Service window.
-
-
To make your rates subject to FTE, enter Working Hours and Frequency in the Assignment window.
See: Setting Up FTE, Oracle HRMS Workforce Sourcing, Deployment and Talent Management Guide
-
Write the payroll formula to derive the rate from the information you have set up (using the RATES_HISTORY function).
See: Sample Rates History Formula, Oracle HRMS FastFormula User Guide
-
In the Formula Result Rules window, associate each payroll formula with an element.
-
Create a Standard processing rule.
-
In the Formula Results region, select the Amount formula result as a direct result returning a pay value for the element.
-
Select the Message result as a message type delivering a fatal error.
-