Setting Up Subcontracting
This chapter covers the following topics:
- Overview of Setting Up Subcontracting
- Setting Profile Options
- Setting up OEM Organizations
- Setting Up Manufacturing Partner Organizations
- Defining Customers and Suppliers
- Associating Customers and Suppliers
- Setting Up Item Definitions
- Setting Up Bills of Material for Outsourced Assemblies
- Setting Up Specific Subcontracting Accounting for Chargeable Subcontracting
- Defining Specific Receivables Transaction Types for Chargeable Subcontracting
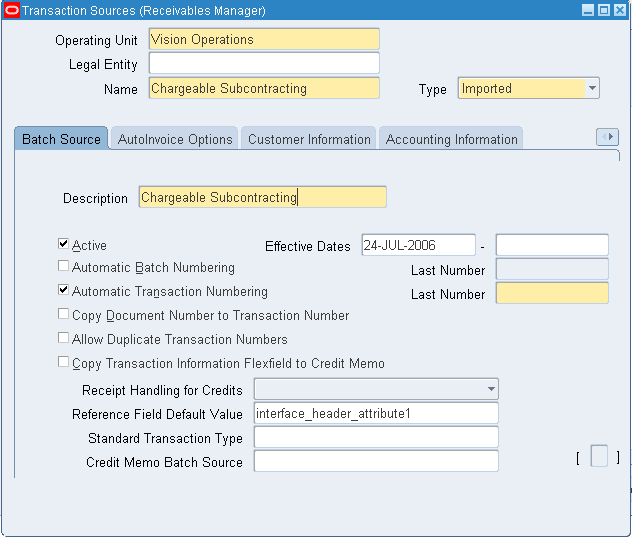
- Defining Specific Transaction Sources for Chargeable Subcontracting
- Setting Up Specific Order Management Transaction Types for Chargeable Subcontracting
- Setting Up Standard Costs of Components and Assemblies for Chargeable Subcontracting
- Defining Price Lists for Subcontracting Components
- Setting Up Purchase Price of an Outsourced Assembly
- Setting Up a Shipping Network
- Defining Sourcing Rules
- Defining Netting Agreements
Overview of Setting Up Subcontracting
The following sections describe the setup steps that are required for implementing Chargeable and Buy/Sell Subcontracting.
Setup Steps
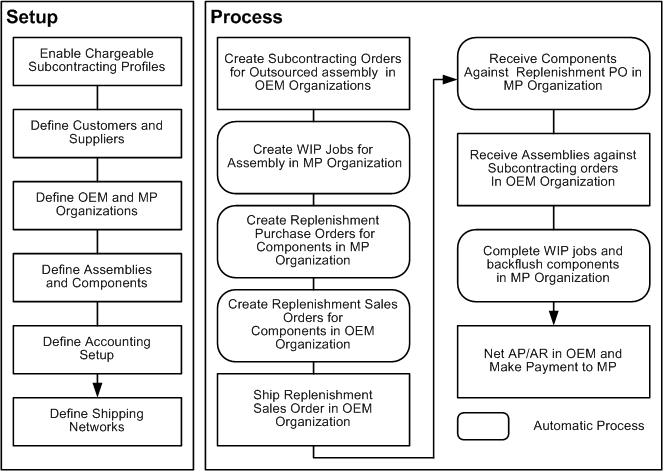
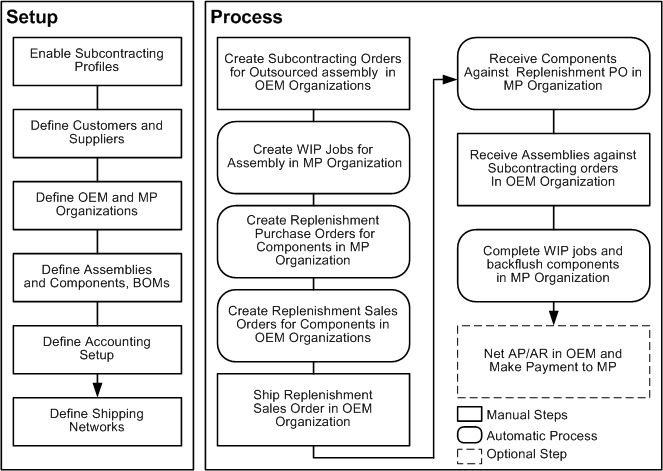
The key setup steps are:
-
Enable subcontracting profile options.
-
Define Customers and Suppliers.
-
Define OEM and MP Organizations, and associate customers and suppliers defined in the previous step.
-
Define components and assemblies in both the MP and OEM organizations.
-
Define specific accounts, AR, and OM transaction types for execution and accounting.
Note: This step is required only for Chargeable Subcontracting.
-
Define shipping networks between the OEM and MP, and enable subcontracting relationships.
-
Setup AP/AR Netting Agreements (mandatory for Chargeable Subcontracting and Optional for Buy/Sell).
Process Steps
The Subcontracting process includes these steps:
-
Creating a purchase order (referred to as Subcontracting Order) for buying the outsourced assembly from the MP.
-
Creating a Discrete Job in the MP Organization against the Subcontracting Order automatically, using the Interlock Manager.
-
Creating Replenishment Purchase Orders in the MP Organization for procuring components from the OEM automatically using the Interlock Manager.
-
Creating Replenishment Sales Orders in the OEM Organization for shipping components from OEM to MP automatically using the Interlock Manager.
-
Ship-Confirming Replenishment Sales Orders in the OEM Organization to ship components to MP.
-
Running the Auto Receive Components concurrent program to automatically receive the components in the MP.
-
Receiving the outsourced assemblies in the OEM Organization against subcontracting orders created in Step 1.
-
Running the Process Receiving Transactions concurrent program. This step completes the WIP job and backflushes the components and reduces the inventory of the outsourced assembly by an appropriate amount in the MP Organization.
-
Performing batch netting for AP and AR invoices, for paying the MP. This is an optional step for Buy and Sell Subcontracting.
This diagram illustrates the setup and process flow for Chargeable Subcontracting:
This diagram illustrates the setup and process flow for Buy and Sell Subcontracting:
Setting Profile Options
You must enable these profile options:
-
JMF: Enable Subcontracting
-
Subcontracting Enabled
You must enable both profile options simultaneously at the site level.
| User | Sys Admin | Sys Admin | Sys Admin | Sys Admin | |||
|---|---|---|---|---|---|---|---|
| Profile Option | User | User | Resp | App | Site | Required | Default Value |
| JMF: Enable Subcontracting | - | - | - | - | Yes | No | No |
| Subcontracting Enabled | - | - | - | - | Yes | No | No |
| Yes | You can update the profile option |
| - | You can view the profile option value but you cannot change it. |
| No | You cannot view or change the profile option value. |
JMF: Enable Subcontracting
This profile should be set to Yes to use the subcontracting features. You can update this profile option at the site level only.
Yes: Enables Subcontracting.
No: Disables Subcontracting.
Subcontracting Enabled
This profile should be set to Yes to consider outsourced assembly item invoices in AP and AR Netting. You can update this profile option at the site level only.
Yes: Enables Subcontracting AP/AR Netting
No: Disables Subcontracting AP/AR Netting
Related Topics
See: Profile Options, Oracle E-Business Suite System Administrator's Guide - Maintenance.
Setting up OEM Organizations
Define and set up the Original Equipment Manufacturer (OEM).
The OEM organization is the organization that buys an outsourced assembly, and ships subcontracting components to the manufacturing partners.
To set up OEM organizations
-
From the Inventory responsibility, navigate to the Organization window.
-
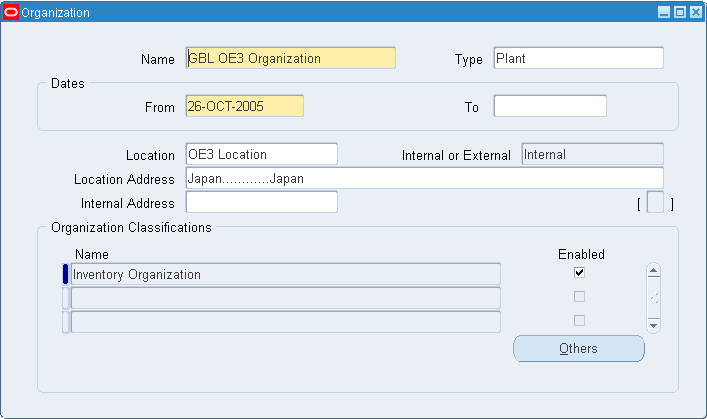
Define the OEM organization as an inventory organization. Select the Location Address of Japan, Korea, or Taiwan if you are setting up Chargeable Subcontracting. You can select any country if you are setting up Buy/Sell Subcontracting.
-
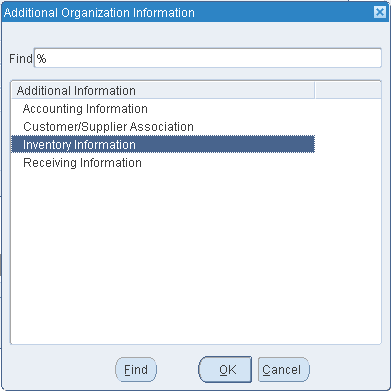
Select Others. The Additional Organization Information window appears.
-
Select Inventory Information to view the Organization Parameters window.
-
Select the Costing Information tab.
-
Set the Costing Method of the OEM Org as below:
-
For Chargeable Subcontracting, set the Costing to Standard.
-
For Buy/Sell Subcontracting, set the Costing Method to any of the following costing methods: Standard, Average, FIFO and LIFO.
-
-
Since the OEM is a regular inventory organization, select Yes for Transfer to GL to post all accounting transactions to the general ledger.
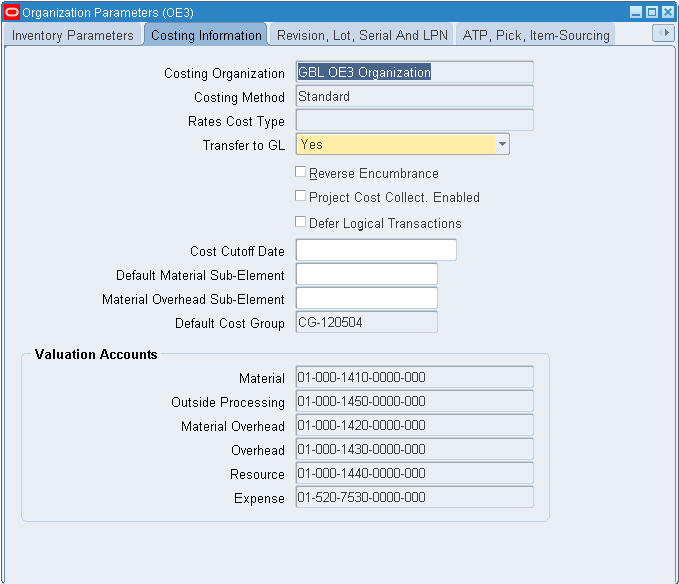
Note: Warehouse Management (WMS), Process, and EAM-enabled organizations are not supported as OEM organizations. If an organization is defined as WMS, EAM, or Process, then you cannot assign or define outsourced assemblies and subcontracting components to this organization.
-
Save your work.
For additional information about organization setup, see: Defining Inter-Organization Information, Oracle Inventory User's Guide and Organization Parameters Window, Oracle Inventory User's Guide.
Setting Up Manufacturing Partner Organizations
To use the Chargeable and Buy/Sell Subcontracting features, define Manufacturing Partner Organization.
To set up MP organizations
-
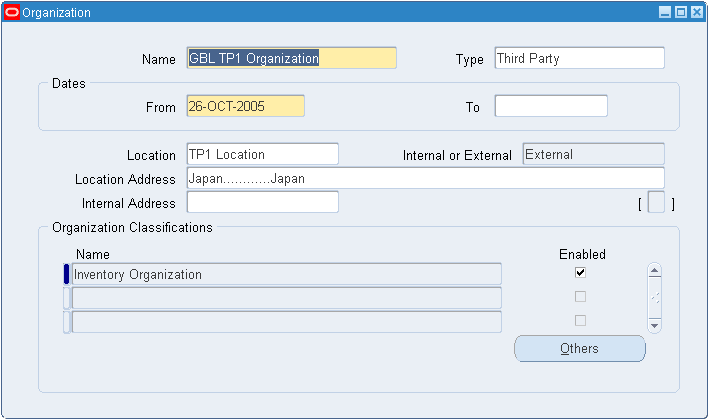
Navigate to the Organization window.
-
Define the MP organization as an inventory organization. Select the Location Address as Japan, Korea, or Taiwan for Chargeable Subcontracting. You can select any country for Buy/Sell Subcontracting.
-
Click Others. The Additional Organization Information window appears.

-
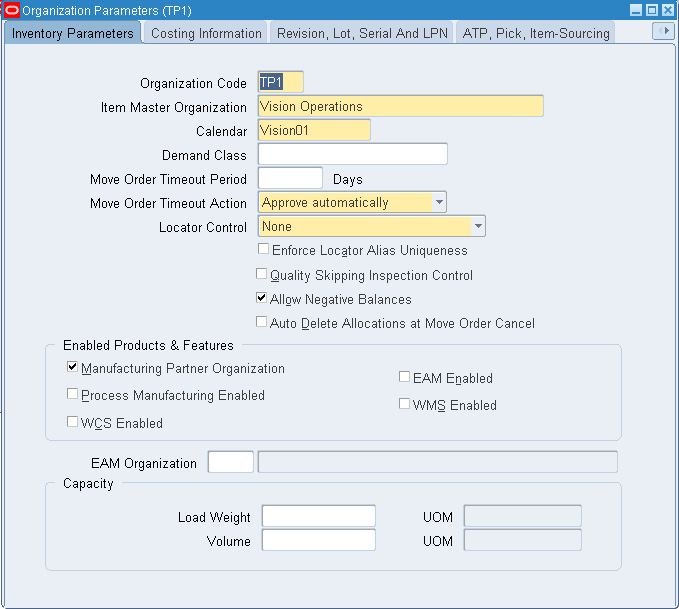
Select Inventory Information. The Organization Parameters window appears.
-
In the Organization Parameters window, select the Manufacturing Partner Organization indicator.
-
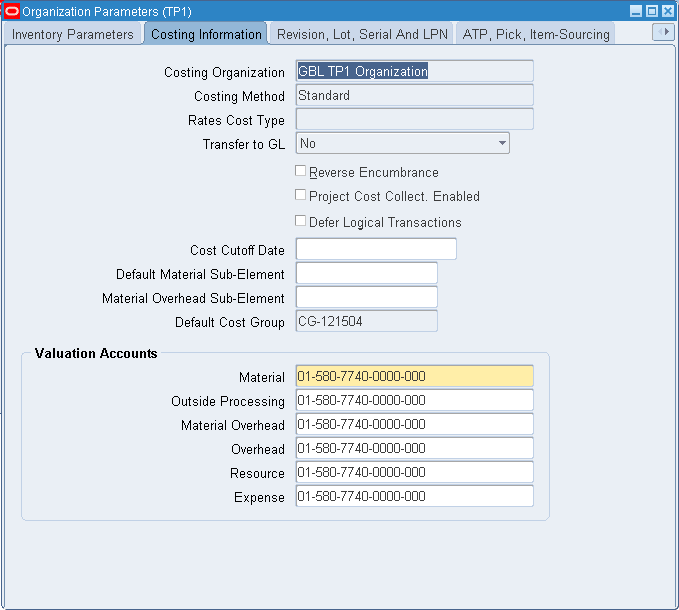
Select the Costing Information tab.
-
Select No for Transfer to GL as the MP organization is created for simulation and the accounting transactions for this organization should not be transferred to the general ledger.
-
Save your work.
For additional information about setting up an Organization, see: Defining Inter-Organization Information, Oracle Inventory User's Guide and Organization Parameters Window, Oracle Inventory User's Guide.
To set up receiving options for MP organizations
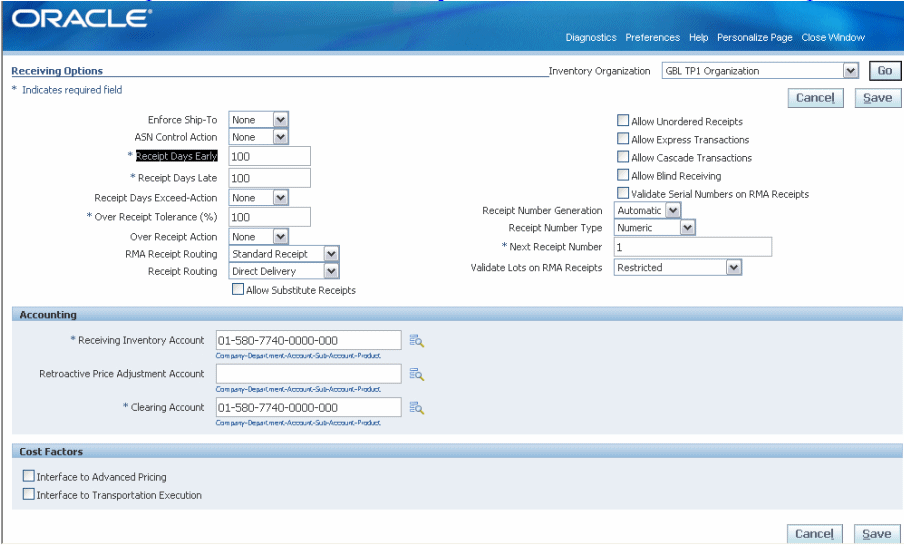
In both Chargeable and Buy/Sell Subcontracting practices, the MP procures subcontracting components from the OEM. To support this, the system automatically creates replenishment purchase orders and receives components in the MP organization. Set up the receiving options in the MP organization to enable this.
-
From the Purchasing responsibility, navigate to the Setup/Organizations/Receiving options page.
-
Select the MP Organization and click Go. The Receiving Options page appears.
-
Enter Receipt Days Early equals 100, Receipt days Late equals 100, and Receipt Days Exceeded Action equals none.
-
Enter Over Receipt Tolerance equals 100 and Over Receipt Action equals none.
-
Enter Receipt Routing equals Direct Delivery.
-
Set Mandatory Accounts as miscellaneous accounts and leave all others blank. This is because as the MP is created for simulation and the costs are not posted to the general ledger, the accounts are not significant.
-
Save your work.
To define WIP parameters
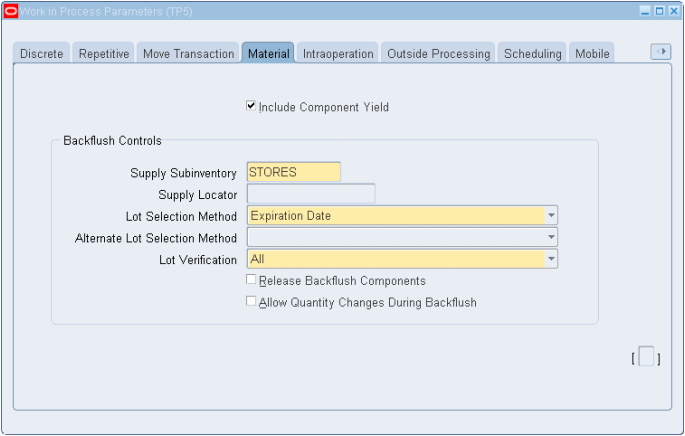
Define WIP Parameters for the MP organization. See: Defining WIP Parameters, Oracle Work in Process User's Guide. Accounts are not significant; therefore, you can set the WIP accounting class with miscellaneous accounts and then define it in the WIP Parameters window. The system uses the supply subinventory defined in the WIP Parameters window to receive the components when the replenishment purchase order is received in the MP organization. The system also uses it to backflush the inventory when the WIP job is completed for simulating the material consumption at the MP Organization after the outsourced assemblies are received against the subcontracting purchase orders in the OEM organization.
-
From the WIP responsibility, navigate to the Work in Process Parameters window.
-
Select the MP Organization.
-
Enter WIP parameters.
-
Save your work.
Defining Customers and Suppliers
When using the Subcontracting application, the MP acts as both supplier and customer, and the OEM acts as a supplier. Define the OEM as a supplier/site, and the MP as both a customer/site and a supplier, and associate these roles in the OEM and MP organizations, respectively.
For additional customer setup information, see: Adding Customers, Oracle Order Management User's Guide.
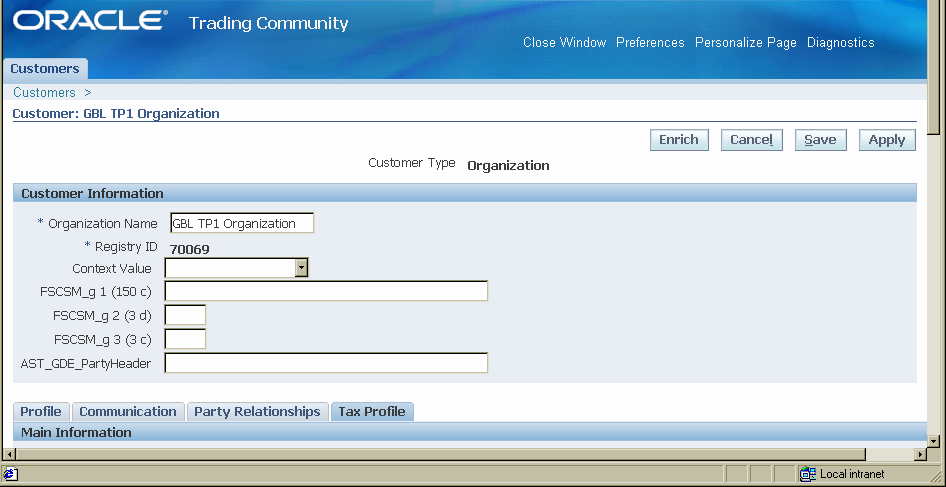
To define a customer/site
-
From the Order Management responsibility, navigate to the Customers page.
-
Add your Manufacturing Partner as a customer/site.
To define a supplier/site
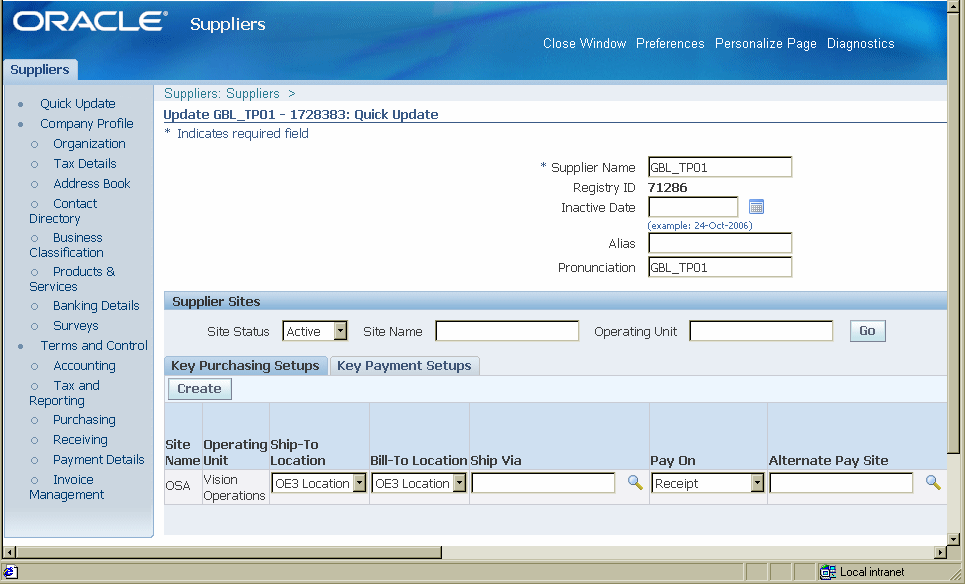
Set up both the MP and the OEM as suppliers.
For additional supplier setup information, see: Entering RFQ Supplier Information, Oracle Purchasing User's Guide.
-
From the Purchasing responsibility, navigate to the Suppliers page.
-
Enter supplier information.
-
Save your work.
Associating Customers and Suppliers
For the OEM Organization, you must associate the supplier and supplier site. For the MP Organization, you must associate the customer and customer site, as well as the supplier and supplier site. The Advanced Supply Chain Planning (ASCP) application uses this information to transfer the net demands of assemblies and components between the OEM and MP organizations.
To associate customers and suppliers
You must associate the supplier with the OEM. In this example, the OEM supplies components to the MP and maintains the role of a supplier.
-
From the Inventory responsibility, navigate to the Organization window.
-
Select your OEM organization.
-
Select Others. The Additional Organization Information window appears.
-
Select Customer/Supplier Association and click OK. The Customer/Supplier Association window appears.
-
Enter the Supplier that you are associating with the OEM.
-
Enter the Supplier Site.

-
Choose OK.
-
Save your work.
To associate customers and suppliers
In this example, the MP supplies assemblies, procures components from OEM, and maintains the role as both supplier and customer.
-
From the Inventory responsibility, navigate to the Organization window.
-
Choose the MP organization.
-
Select Others. The Additional Organization Information window appears.
-
Select Customer/Supplier Association and select OK. The Customer/Supplier Association window appears.
-
Enter Customer. This entry is the MP organization.
-
Enter the Customer Site to which to ship.
-
Enter the Supplier. This entry is the MP organization.
-
Enter the Supplier Site.

-
Click OK.
-
Save your work.
Setting Up Item Definitions
You must define items and bills in the OEM and the MP organizations. Define items as:
-
Outsourced Assemblies: Assembly items designed by the OEM and manufactured by the MP and the MP's site using components supplied by the OEM.
-
Subcontracting Components: Components sent by the OEM to the MP for the manufacturing of outsourced assemblies. The two types of subcontracting components supported are:
-
Pre-positioned - Components that are shipped to the MP without reference to any specific subcontracting order ahead of placement of such orders by the OEM. These components are typically low cost items and the OEM stores these components in larger quantities at Manufacturing Partner site well ahead of ordering outsourced assemblies.
-
Synchronized - Components that are shipped to the MP with reference to a specific subcontracting order along with the order. These components are generally high cost items and are shipped when the order is placed with the MP and in the quantities required to produce the outsourced assembly in the subcontracting order.
-
To define outsourced assemblies in the OEM organization
You can follow the standard item setup steps for defining outsourced assemblies and subcontracting components. The following key attributes and values are used for defining an item as an outsourced assembly or a subcontracting component:
-
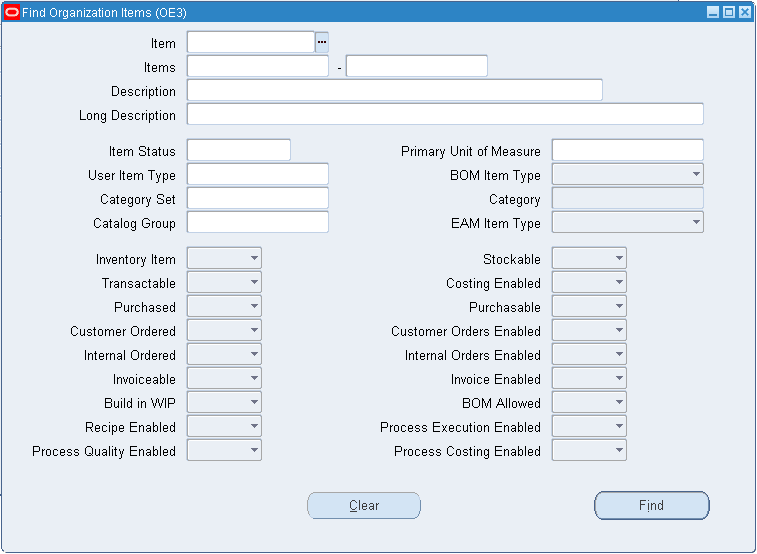
From the Inventory responsibility, navigate to the Organization Item window. The Find Organization Items window appears.
-
Enter Item search criteria for the OEM organization and click Find. The Organization Item window appears.
-
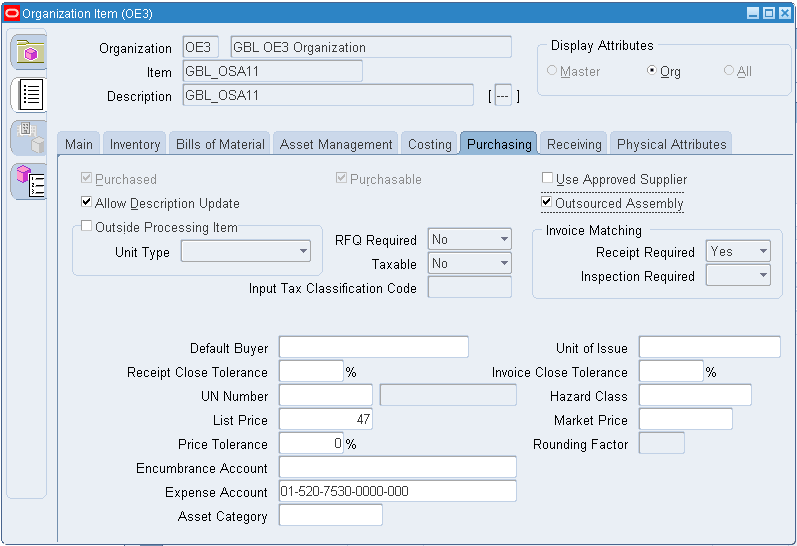
Select the Purchasing tab.
-
Define this item as an outsourced assembly by selecting the Outsourced Assembly checkbox.
Note: You must set the profile option JMF:Enable Subcontracting to Yes to enable the Outsourced Assembly checkbox.
-
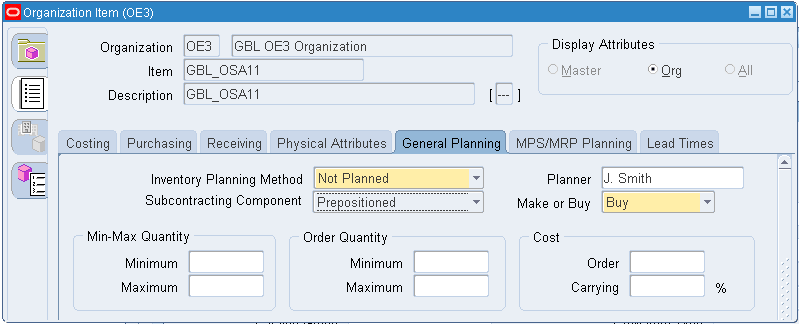
Select the General Planning tab and define the outsourced assembly as a Buy item for planning.
-
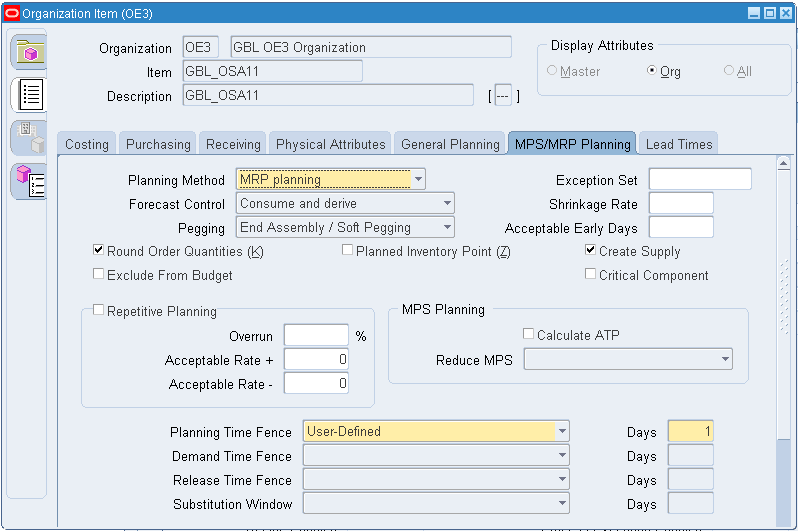
Select the MPS/MRP Planning tab and verify that Release Time Fence is empty (Null). This setting allows ASCP to release and transfer buy planned orders of assembly to purchasing as purchase orders or releases in the OEM organization.
Note: Outsourced Assemblies can have routings in OEM organizations and it is not necessary to change the existing routings while outsourcing the assembly to an MP.
-
Save your work.
To define outsourced assemblies in the MP organization
-
From the Inventory responsibility, navigate to the Organization Item window. The Find Organization Items window appears.
-
Enter Item search criteria for the MP organization and click Find. The Organization Item window appears.
-
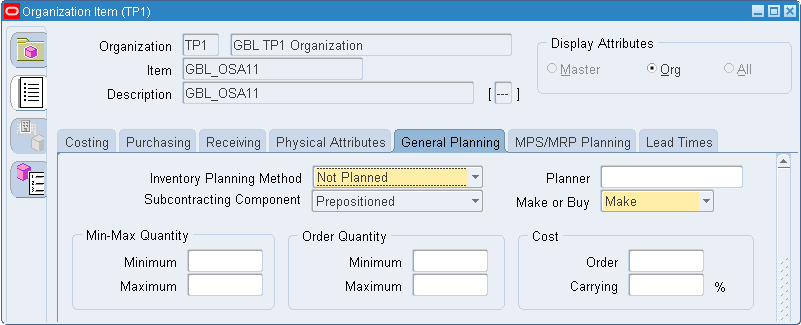
Select the General Planning tab and define the outsourced assembly as a Make item for planning. Production of this assembly is simulated in the MP organization.
-
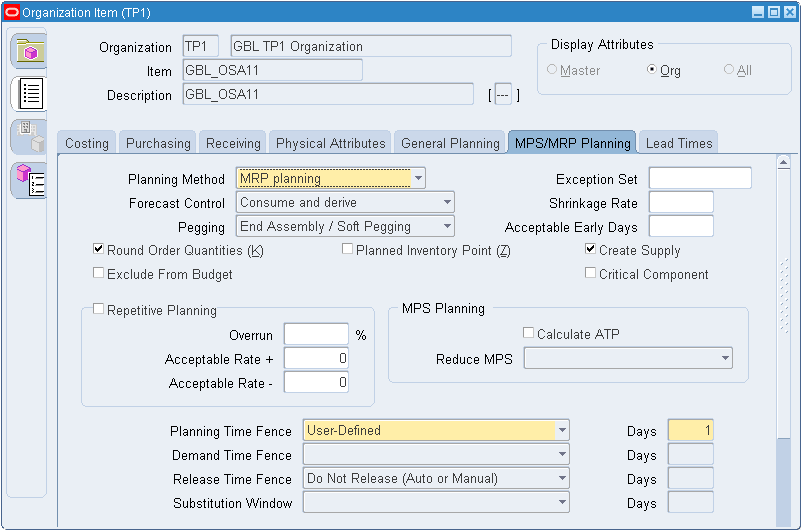
Select the MPS/MRP Planning tab and select Do Not Release (Auto or Manual) for Release Time Fence. This setting prevents Make planned orders of assembly from being transferred as discrete jobs in the MP organization.
Note: Outsourced assemblies cannot have routings in MP organizations.
-
Select the Purchasing tab.
-
Define this item as an outsourced assembly by selecting the Outsourced Assembly checkbox.
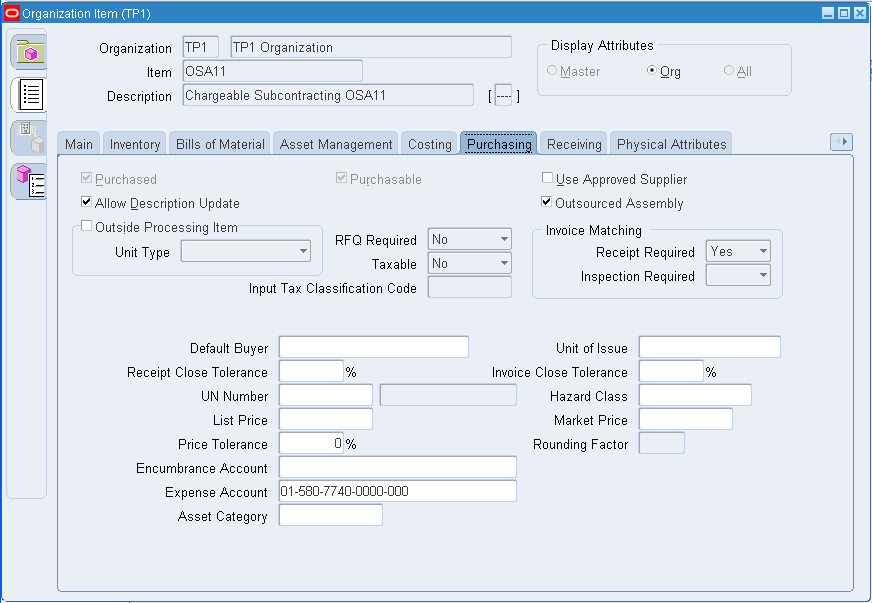
Note: Outsourced assemblies cannot have routings in MP organizations.
-
Save your work.
To define subcontracting components in the OEM organization
-
From the Inventory responsibility, navigate to the Organization Item window. The Find Organization Items window appears.
-
Enter Item search criteria for the OEM Organization and click Find. The Organization Item window appears.
-
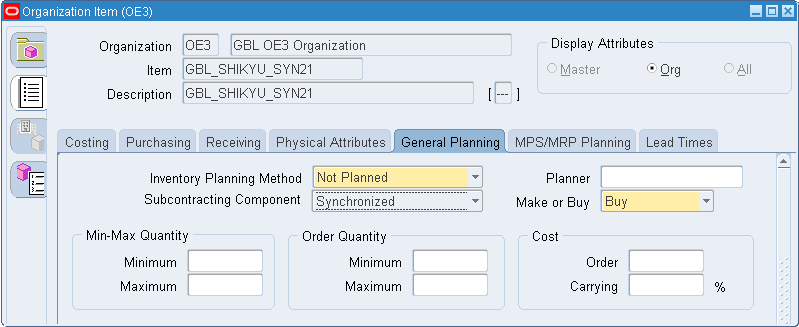
Select the General Planning tab and enter the Subcontracting Component. Valid values are Synchronized or Prepositioned based on the subcontracting process requirement.
-
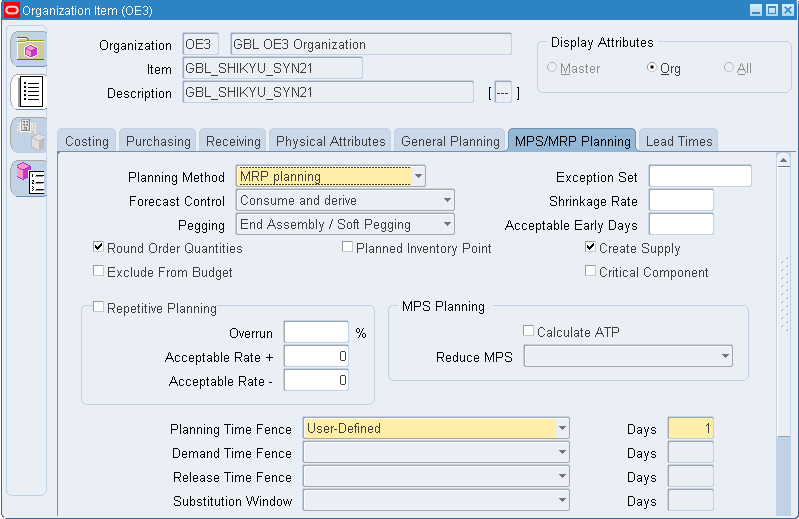
Select the MPS/MRP Planning tab and verify that Release Time Fence is empty (Null). This allows ASCP to release and transfer planned orders of components to purchasing as purchase orders or releases in the OEM organization.
-
Save your work.
To define subcontracting components in the MP organization
-
From the Inventory responsibility, navigate to the Organization Item window. The Find Organization Items window appears.
-
Enter Item search criteria for the MP Organization and click Find. The Organization Item window appears.
-
Select the General Planning tab and enter the Subcontracting Component. Valid values are Synchronized or Prepositioned based on the subcontracting process requirement.
-
Select the MPS/MRP Planning tab and enter Release Time Fence values:
Do not Release (Auto or Manual): Use this value when you use synchronized components. ASCP should not release planned orders of synchronized components in the MP organization.
Null: Leave this field empty when using pre-positioned components.
-
Save your work.
Setting Up Bills of Material for Outsourced Assemblies
Bills of Material (BOM) must be set up for outsourced assemblies in both the OEM and MP organizations. These two bills should be the same for proper planning and execution. If the BOM already exists for outsourced assembly in the OEM organization, then set up the same BOM in the MP organization. The prerequisites for outsourcing the assemblies are:
-
You must define all of the components of the outsourced assembly as Subcontracting Components, either pre-positioned or synchronized in both OEM and MP organizations.
-
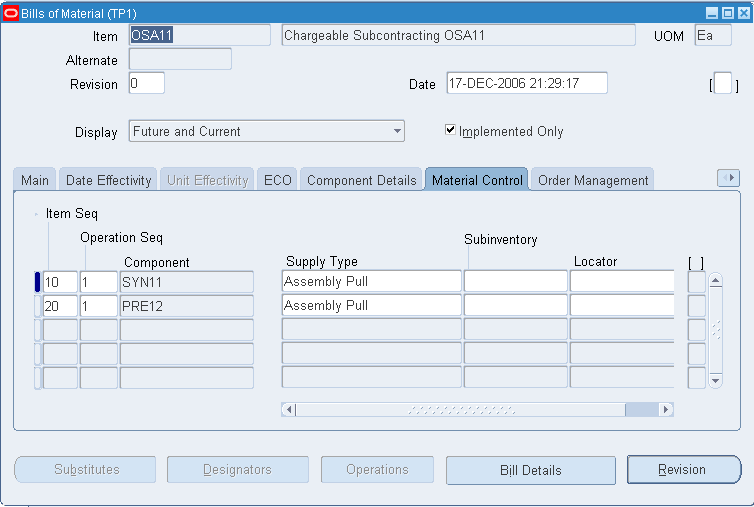
In the MP organization, select the Material Control tab and define BOM Component and Supply Type as Assembly Pull.
Setting Up Specific Subcontracting Accounting for Chargeable Subcontracting
Subcontracting Accounting Process
The OEM ships components to the MP using a replenishment sales order for the manufacturing of an assembly, but the revenue is not recognized as sales revenue. This revenue is tracked in a separate account for analysis at a later stage.
The MP is not liable for the payment of components, therefore the OEM cannot consider the receivables amount of the replenishment sales orders as actual receivables, and the amount is tracked in a separate receivables account. COGS of Subcontracting Components are also tracked in separate accounts. Purchase price of the assembly is set up to include sales price of the components and the added value, which is always different than the standard cost of the assembly. The Purchase Price Variance (PPV) at the time of receiving the subcontracting order in the OEM organization is not a real purchase price variance, and must be tracked in a separate account. You must set up following accounts to use the subcontracting process:
-
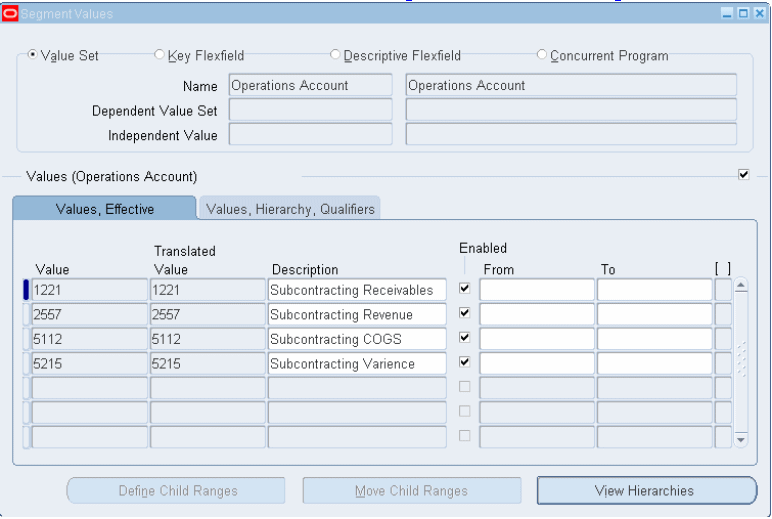
Subcontracting Receivables: Used to track the receivables from the sale of components to the MP.
-
Subcontracting Revenue: Used to track the revenue from the sale of components to the MP.
-
Subcontracting COGS: Used to track COGS from the sale of components to the MP.
-
Subcontracting Variance: Purchase price variance at the time of receiving assembly is posted to this account. This variance arises due to differences between the standard cost and purchase price of the assembly.
See: Updating Balancing Segment Values, Oracle General Ledger User's Guide.
To define subcontracting accounts
-
From the General Ledger responsibility, navigate to the Segment Value window. The Find Key Flexfield Segment window appears.
-
Select the Value Set indicator and select the Value Set Name.
-
Click Find. The Segment Values displays all Values (Value Set).
-
Enter account details for the four Subcontracting accounts described previously.
-
Save your work.
Related Topics
Transaction Batch Sources, Oracle Receivables User's Guide
Defining Specific Receivables Transaction Types for Chargeable Subcontracting
Define a separate receivable transaction type and associate:
-
Subcontracting receivables
-
Subcontracting revenue accounts (from the previous step). See: Setting Up Subcontracting Accounting.
To define a receivables transaction type and associate it to Subcontracting receivables
-
From the Receivables responsibility, navigate to the Transaction Types window.
-
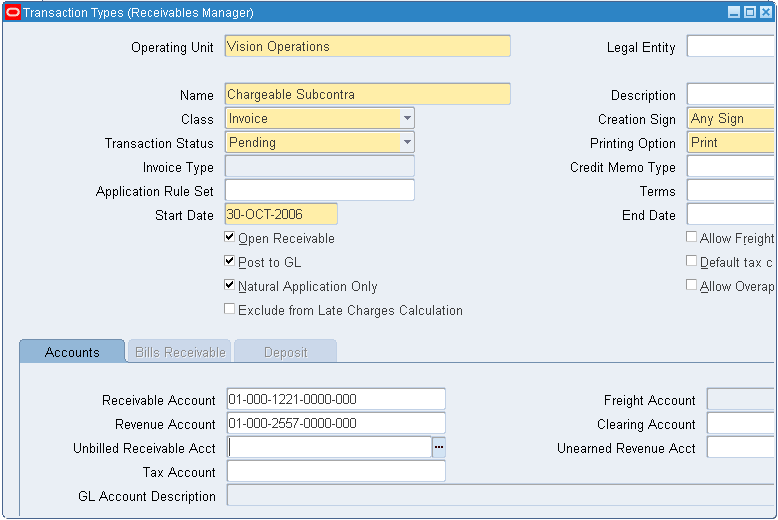
Enter the receivables transaction type details.
-
In the Name field, enter the transaction type of Subcontracting.
-
For the Receivable Account, enter the subcontracting receivables account for tracking the subcontracting component receivable amount.
-
For the Revenue Account, enter the Subcontracting Revenue Account for tracking subcontracting component revenue.
-
Save your work.
Related Topics
Transaction Types, Oracle Receivables User's Guide
Defining Specific Transaction Sources for Chargeable Subcontracting
Batch sources control the standard transaction type assigned to a transaction and determine whether the Receivables application automatically numbers your transactions and transaction batches.
To associate a subcontracting receivables transaction type with an order management order type and line type, you must define a receivables transaction source. This step is referred to when receivables invoices are imported from order management to accounts receivable.
For transaction batch source setup information, see: Transaction Batch Sources, Oracle Receivables User's Guide.
To define a subcontracting transaction source
-
From the Receivables responsibility, navigate to the Transaction Sources window.
-
Enter the Transaction Source: Subcontracting.
-
Save your work.
Setting Up Specific Order Management Transaction Types for Chargeable Subcontracting
You must set up a separate order type for creating replenishment sales orders for component shipments to the MP.
Receivables Transaction Type, Receivables Transaction Source, and Subcontracting COGS accounts created in previous steps must be associated with this Order Management transaction type. When the replenishment sales order for the subcontracting component is shipped and invoiced, COGS, revenue, and receivables are posted to subcontracting COGS, subcontracting revenue, and subcontracting receivables, respectively.
See: Accounting Setup.
To define Order Management transaction types
-
From the Order Management responsibility, navigate to the Transaction Types window.
-
Select an Operating Unit (required).
-
Enter a Description
-
Select an Order Category (required).
-
Select a Fulfillment Flow.
-
Enter Effective Dates (required).
-
Enter a Transaction Type (required).
-
Select a Sales Document Type.
-
Select a Transaction Type Code (required).
-
Select the Finance tab and enter an Invoice Source and a Receivables Transaction Type and COGS account defined in the previous setup for subcontracting process.
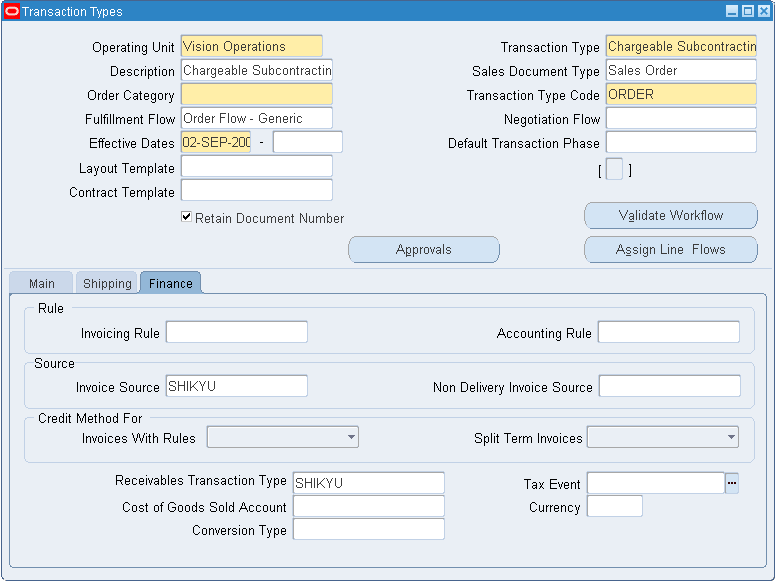
Note: To associate a subcontracting AR transaction type with an OM order type and line type, you must define a separate invoice source and AR transaction type, and attach them to the OM transaction type. This invoice source and transaction type are referred to when an AR invoice is imported from OM to AR. See: Transaction Types, Oracle Receivables User's Guide and Setting Up Subcontracting Accounting.
-
Save your work.
Setting Up Standard Costs of Components and Assemblies for Chargeable Subcontracting
Set up the standard costs of subcontracting components and outsourced assembly in the OEM organization. The MP organization is a simulation organization, and accounting transactions are not transferred to GL. Therefore, no costing setup is required in the MP organization.
Standard Cost of Subcontracting Components in the OEM Organization
Subcontracting components can be purchase items or assembly items. The cost is set up like any standard component.
Standard Cost of Outsourced Assemblies in the OEM Organization
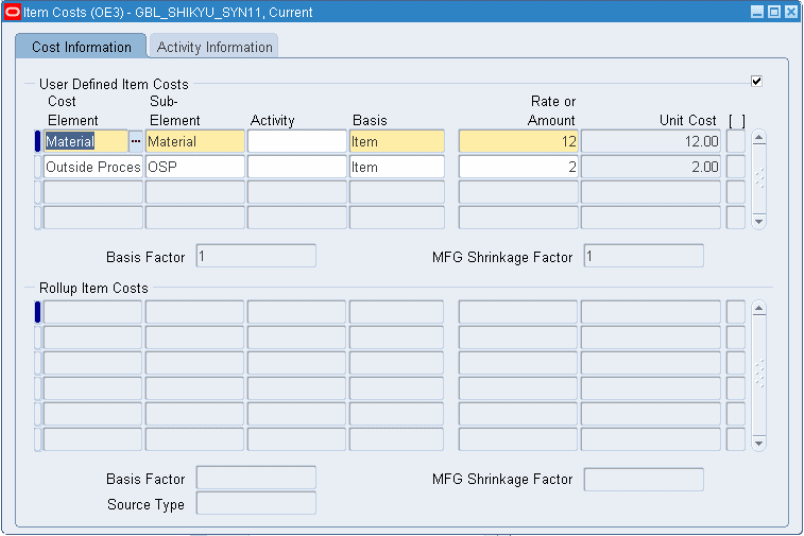
Standard cost of the outsourced assembly must include material cost and the added value. While setting up the cost, include component cost as material cost and added value as OSP (define an OSP resourced in the OEM organization and define an OSP charge as added value) charges and run cost update.
To set up a standard cost of an outsourced assembly
-
From the Costing responsibility, navigate to the Item Costs window and select an OEM Organization. The Find Item/Cost Type window appears.
-
Click Find to open an existing assembly item and cost type, or click New to create a new item cost. The Item Costs Summary window appears.
-
Fill Component costs as Material cost and Value addition as OSP (define OSP resource before creating the cost).
-
Save your work.
-
Run Standard Cost Update to update the Frozen cost type with the Current cost type.
Defining Price Lists for Subcontracting Components
Define Price Lists for Subcontracting Components for both Chargeable and Buy/Sell Subcontracting. Sales price of the components are defined in the price lists and are associated with Customer Ship To and Bill To sites of the MP organization (customer sites represents the MP organization).
Sales Price of Pre-positioned Components
These components are shipped to the MP in bulk quantities in advance of the subcontracting order requirements. You can create the replenishment purchase order for these components in the primary UOM, or in a secondary UOM. Replenishment sales orders are created based on its replenishment purchase orders. Therefore, the sales order UOM is always the same as its corresponding replenishment purchase order UOM. You can define price lists in either the primary UOM, or in the secondary UOM, but only one UOM is effective at any point in time.
Sales Price of Synchronized Components
These components are shipped along with the subcontracting order. The Interlock Manager creates replenishment sales orders of these components always in the primary UOM of the component based on subcontracting order requirements. Since only shipping of the components is always supported in the primary UOM, price lists are always created in the primary UOM for synchronized components.
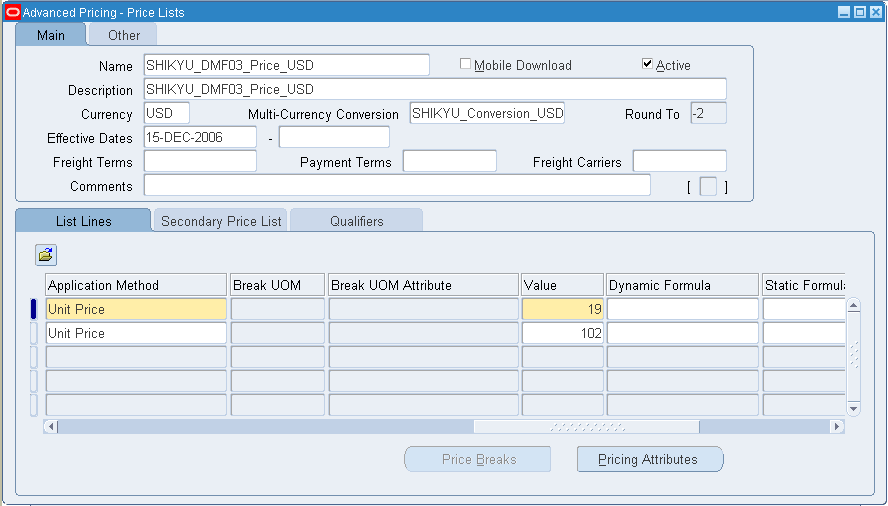
To define price lists
-
From the Order Management responsibility, navigate to the Pricing, Price Lists, Price List Setup, and Open Price List window.
-
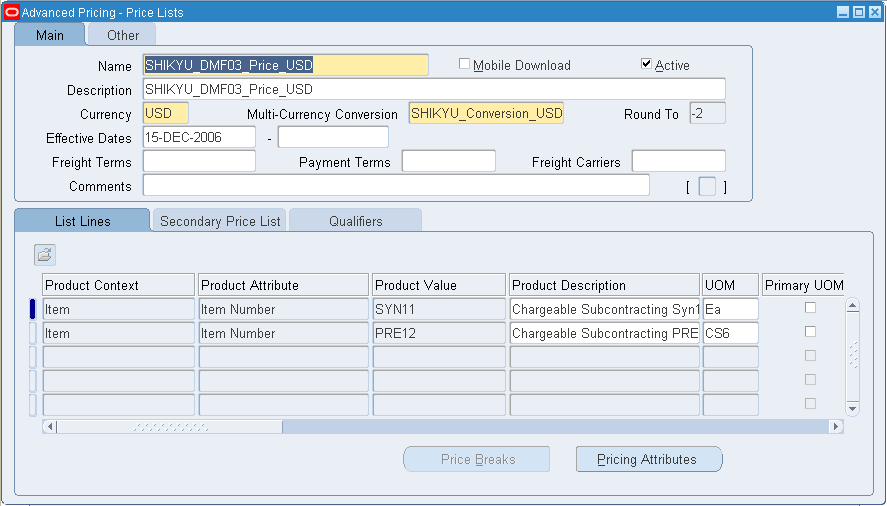
Define price lists in the transaction currency of the MP.
-
In the List Lines tab, enter a subcontracting component code for defining the price.
-
UOM should be the primary UOM for synchronized components. UOM for pre-positioned components can be either the primary or secondary UOM, however, only one UOM is effective at any time.
-
Enter Values (prices) in the UOM.
-
Save your work.
Important: Do not define modifiers for subcontracting components. The Subcontracting process does not work correctly if modifiers are implemented.
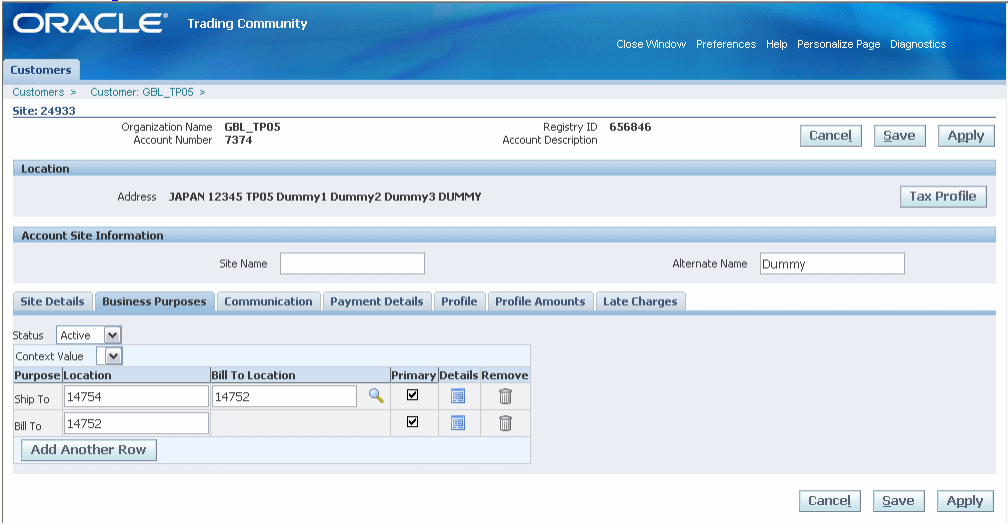
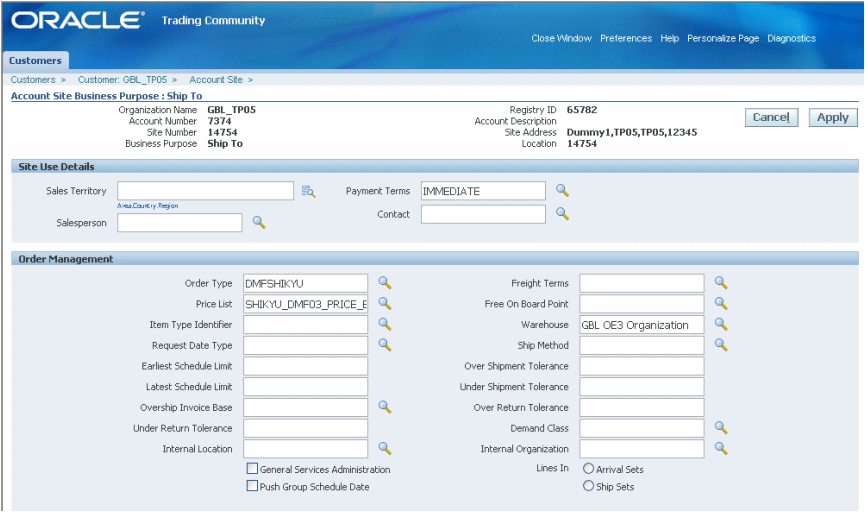
To associate price lists with a customer site (MP)
-
From the Order Management responsibility, navigate to the Customers page.
-
Select the Business Purpose tab.
-
Navigate to the Ship-To Details page and associate the price lists defined in the previous step.
-
Associate the price list to the Bill-to details.
-
Save your work.
Setting Up Purchase Price of an Outsourced Assembly
In Chargeable Subcontracting, the OEM ships components to the MP, but retains the ownership of the components. When the OEM receives the assembly, the assumption is that the components were returned from the MP and the inventory was adjusted accordingly. The OEM makes payment to the MP for the added value after netting the receivables invoices of the components shipped and receiving the payables invoices of the outsourced assemblies. This requires that the purchase price of the assembly is defined to include the components sales price and the added value in the manufacturing process..
Assembly Purchase Price = [ ( Component quantity based on the Bills * Component Sales price defined in the Price lists) + Value added during manufacturing of the Assembly at the MP].
For example:
Net Value Add per unit of Assembly A at Partner’s site = $5
Selling Price per unit of Component B on Price List=$4
Selling Price per unit of Component C on Price List =$6
Component usage per unit of Assembly A = 2 units of Component B, 1 unit of Component C
Purchase Price per unit of A = [(2*$4 + 1*$6) + $5} = $19
Once the purchase price of assembly is calculated based on the bills and price lists, setup should be:
-
If the standard purchase order is used for procuring the assembly, then define the calculated assembly price in the Organization Items window.
-
If a blanket release is used, then define a blanket agreement with the assembly price calculated as described previously.
The same reasoning can be applied to determine the purchase price of the outsourced assembly for Buy/Sell Subcontracting.
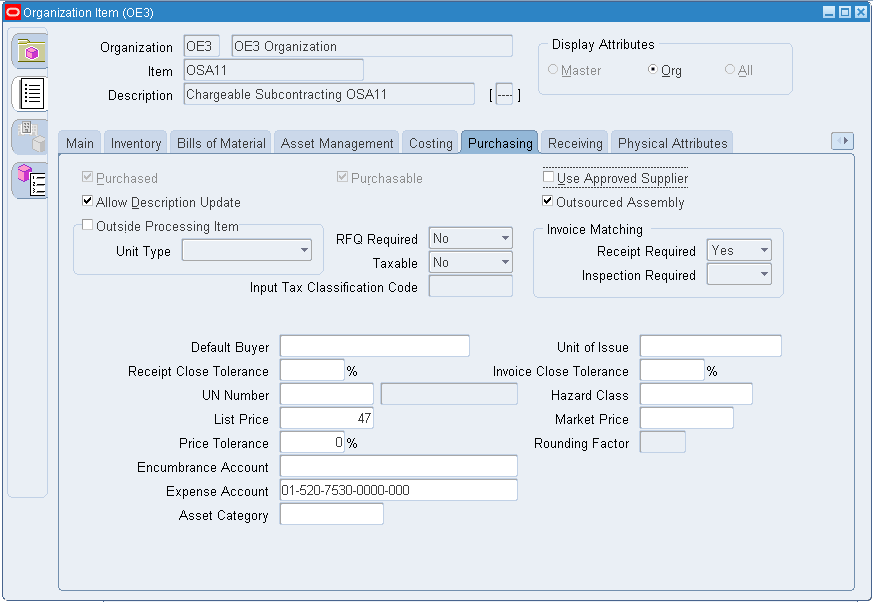
To set the purchase price of an outsourced assembly
-
From the Inventory responsibility, navigate to the Organization Item window.
-
Enter an Organization and Item.
-
Select the Purchasing tab.
-
Enter the List Price.
-
Save your work.
Setting Up a Shipping Network
In both Chargeable and Buy/Sell subcontracting, components move from OEM organizations to MP organizations, and outsourced assemblies move from MP organizations to OEM organizations. To define inventory shipping networks between the OEM and the MP:
-
Define a shipping network to enable material flow from OEM to MP, selecting the desired subcontracting relationship. Select either Chargeable or Buy/Sell from the Subcontracting Type.
-
Define a shipping network to enable material flow from MP to OEM. Select blank from the Subcontracting Type LOV.
For additional information, see: Inter-Organization Shipping Networks, Oracle Inventory User's Guide.
To set up a subcontracting shipping network
-
From the Inventory responsibility, navigate to the Shipping Networks window.
-
Select the OEM Organization, and the Shipping Networks window Appears.
-
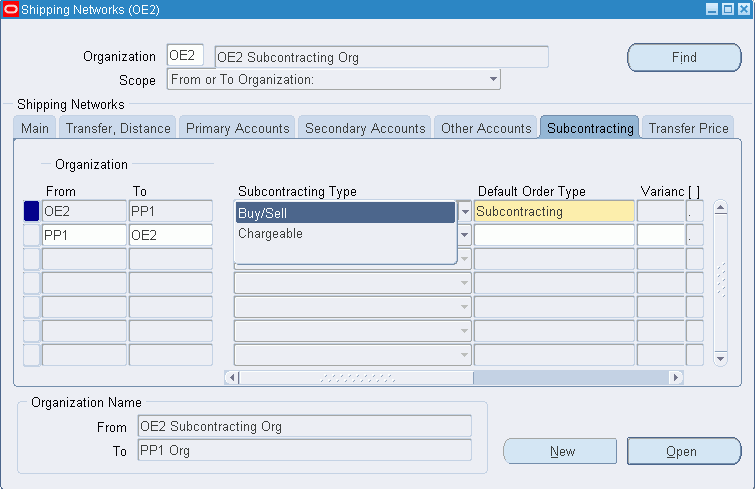
Choose Find to open existing networks, or choose New to set up a new shipping network. Select the Subcontracting tab.
-
In the Subcontracting Type field, select either Chargeable or Buy/Sell to define the subcontracting relationship between the OEM and the MP.
-
Specify the Default Order Type to be used for creating replenishment sales orders, and to ship components to the MP.
Note: For Chargeable Subcontracting, specify the default order type as the Order Management transaction type defined in the previous steps using subcontracting specific accounts. The Order Management transaction type is used when the Interlock Manager concurrent program in subcontracting creates replenishment sales orders. For Buy/Sell Subcontracting, it can be a generic.
-
Select a Variance account for a Chargeable Subcontracting relationship to capture and track Purchase Price Variance of outsourced assembly receipts separately. Subcontracting Variance account set up on the Shipping Networks form will not be applicable for Buy/Sell.
-
Select an Offset account that is used for reducing the outsourced assembly on-hand quantity by miscellaneous issues, and is part of simulation. See the Subcontracting Process chapter for additional details.
-
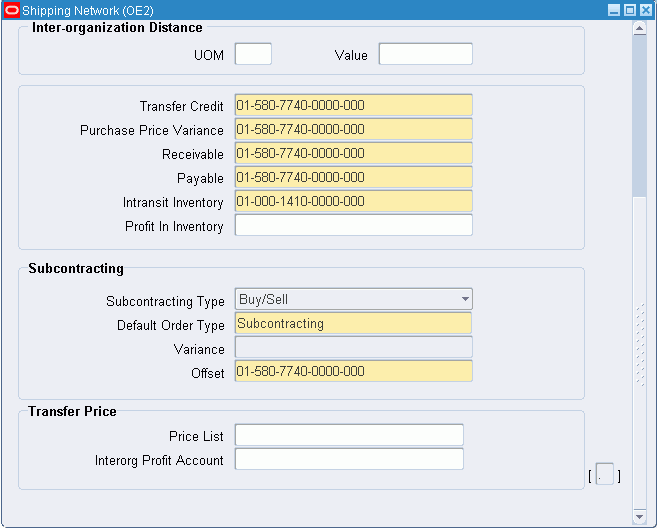
Choose Open to view details in the Shipping Network window for a selected line.
-
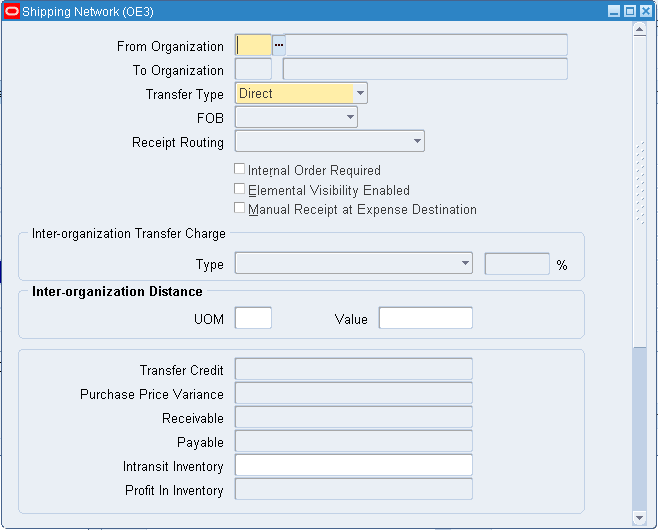
If you choose New, then the Shipping Network window appears and you can enter additional network details.
-
Save your work.
Note: At any point of time, an OEM can either have a Buy/Sell or a Chargeable Subcontracting relationship with a particular MP. However, on the other hand, an OEM can outsource the same assembly to multiple Manufacturing Partners by having either Chargeable or Buy/Sell relationship
Defining Sourcing Rules
Sourcing rules and bills of distribution determine the movement of material between organizations. These organizations include suppliers, manufacturers, and distribution facilities. You must define sourcing rules and assignments for the OEM and the MP organizations for planning purposes:
-
In the OEM organization, define the sourcing rules to Buy components from the RMS, if the OEM procures components from an external supplier, and to Buy outsourced assemblies from the MP
-
In the MP Organization, define the sourcing rules to Buy components from the OEM, and Make assembly at the MP
Advanced Supply Chain Planning (ASCP) creates Make or Buy planned orders based on the sourcing rules.
For additional sourcing rules setup information, see: Defining Sourcing Rules, Oracle Purchasing User's Guide and the Oracle Master Scheduling/MRP and Oracle Supply Chain Planning User's Guide.
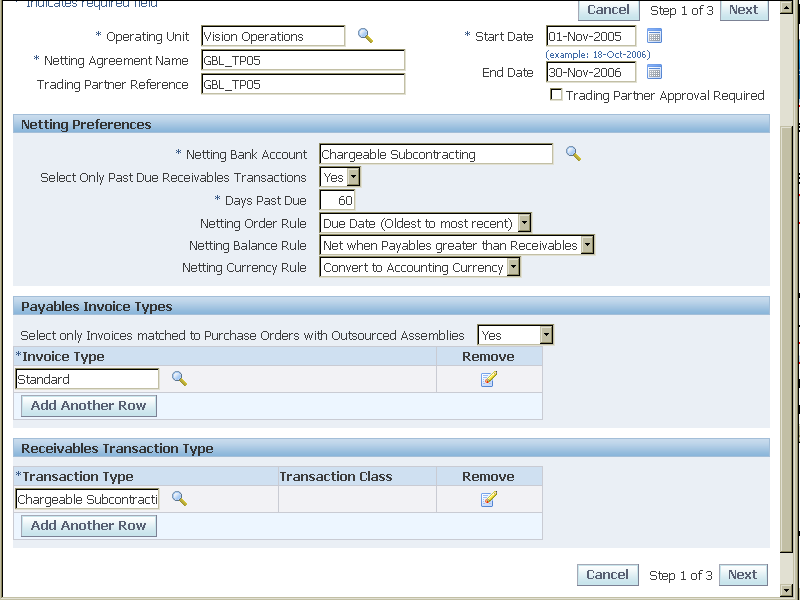
Defining Netting Agreements
Netting agreements control how trading partners calculate net payables and receivables transactions. You must set up netting agreements to enable netting calculations for receivables invoices for components and for payables invoices for assemblies.
Note that while defining netting agreements is mandatory for Chargeable Subcontracting, it is optional for Buy/Sell Subcontracting.
For additional Subcontracting Netting Agreement information, see: Netting Agreement, Oracle Payables User's Guide.
To define netting agreements
-
From the Payables responsibility, navigate to the Netting page.
-
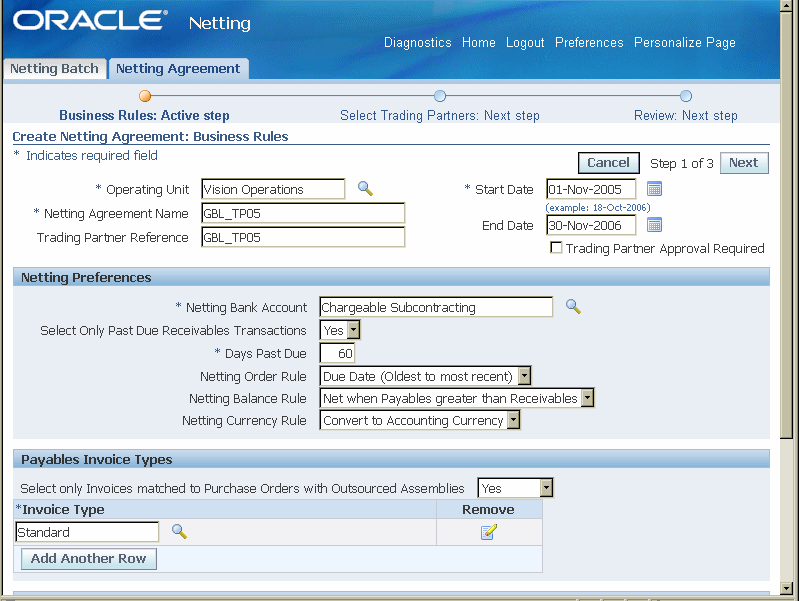
Define the netting balance rule as Net When Payables Greater than Receivables. This setting ensures that the OEM always pays the added value to the MP.
-
In the Payable invoice type, set the option Select only Invoices matched to Purchase Orders with Outsourced Assemblies to Yes. This setting ensures that only payable invoices of outsourced assembles are included in the netting process. This option is available only when the Enable Subcontracting profile is set to Yes.
-
Set the Receivables Transaction type to be the same as the invoice source in the Order Management transaction type. Receivable transactions stamped with source are considered for netting.
-
Under Trading partners, enter the MP as both customer and supplier.
-
Save your work.