Selecting Measures to Submit or Upload
This chapter covers the following topics:
- About Scenarios
- Demand Planner: Selecting Measures to Submit
- Demand Plan Manager: Selecting Measures to Upload
- Automating the Submissions Process
- Viewing Scenario Properties
About Scenarios
A scenario is a repository for maintaining, archiving, and viewing the forecasts that are submitted for a demand plan. Scenarios are defined in the Demand Planning Server and linked to demand plans. A plan might have one scenario or multiple scenarios. For example a plan with multiple scenarios might include an "optimistic" scenario, a "pessimistic" scenario, and a "realistic" scenario.
If your responsibility is Demand Planner, you can select a measure to submit as your final forecast for each scenario. If Oracle Demand Planning is integrated with Oracle Inventory Optimization (IO), you can also select a measure of statistical accuracy to submit with the forecast. Selecting a measure to submit marks the data for consolidation in the shared database where it will be reviewed by the Demand Plan Manager.
If your responsibility is Demand Plan Manager, you can select a measure to upload as the final forecast for each scenario. If Oracle Demand Planning is integrated with Oracle Inventory Optimization (IO), you can also select a measure of statistical accuracy to upload with the forecast. Selecting a measure to upload marks the data for writing to the Demand Planning Server. You also have the option to initiate the process that runs the upload.
Demand Planner: Selecting Measures to Submit
When you are satisfied with your forecast for a scenario, you can choose the measure that contains the forecast data and mark it for submission to the shared database.
Selecting measures to submit is not mandatory. If you do not select a specific measure to submit for a scenario, then Oracle Demand Planning will use the default submissions measure for the portion of the data that you are responsible for forecasting.
Note that when you select a measure to submit, you are choosing to submit all data for all dimensions of the measure; that is, data for all time periods, all geographies, all locations, and all products.
If you select the wrong measure, if you discover that a measure that you previously selected does not include the correct values, or if the Demand Plan Manager requests that you edit your data, you can resubmit the same measure or an alternate measure. Your selections are valid until data collection is terminated.
When data collection runs, data will be submitted at the lowest available level for the values in your assignment scope. When the data is collected into the shared database during the data collection process, it will be aggregated up using the aggregation method of the submissions measure in the shared database. Thus, formula measures or measures that have non-standard aggregation methods may show different results at aggregate levels in the shared database.
How data is submitted for dependent demand
If you submit a measure that has a dependent association with other products, then the current values for the related planning percentages will be automatically submitted with the measure. If you have edited data for dependent demand or planning percentages, ensure that the appropriate planning percentage object is associated with the measure that you submit. For example, if you used the Planning Percentages worksheet to modify planning percentages for MyPlanningPercentage which is associated with MyMeasure but then you do not submit MyMeasure or another measure associated with MyPlanningPercentage, the submission will use the existing planning percentage object.
Before you proceed: Check scenario time horizon and output level
When the submission runs, Oracle Demand Planning runs a validation check to ensure that at least one Time dimension value has data at the top level for all other dimensions. If the measure is NA (unavailable) for all time values at the specified output level for the scenario, then a warning message will appear.
For example, if a scenario has been defined in the Demand Planning Server with a time horizon range of 01/01/2003 through 12/31/2003 and an output level of Month for the Time dimension, the validation will ensure that at least one Time value in the measure selected for submission has data for the top level for all other dimensions. Even if there is only data for one out of the twelve months, the submission will succeed. However, if none of the twelve months has data, then a warning message will appear.
Before you select a measure to submit for a scenario, you might want to check the time horizon and output level that are defined for the scenario in the Demand Planning Server. This can help you to avoid an unsuccessful submission. To see scenario time horizon and output levels, you can check the properties of the scenario. For more information, see "Viewing Scenario Properties".
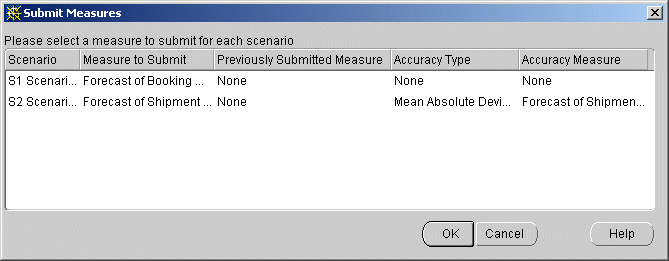
Selecting measures to submit
To select a measure to submit for a scenario, you choose the measure from the list of available measures. If the scenario for requires an accuracy measure, you can also choose an accuracy measure.
To submit a measure for a scenario:
-
Access Oracle Demand Planning as a Demand Planner.
-
On the Navigation toolbar, choose the Tools button.

-
From the submenu, choose Submit Measures.
Result: The Submit Measures dialog box opens, displaying submission information for each scenario in the demand plan. If a measure has not yet been submitted for a scenario, the Measure to Submit column shows the default submissions measure for the scenario if a default measure has been set; otherwise, it shows "None." If a measure has previously been submitted for the scenario, the Previously Submitted column displays the name of this measure; otherwise it displays "None."
-
To select an alternate measure (or to select a measure if "None" is the current selection), in the Measure to Submit column, choose the measure that you want to submit.
Note: Do not select a measure that has been limited by a qualifying value such as a single geography. If you do so, then the qualifying value will be used to generate uploaded values for all dimension values at this level.
-
If an accuracy measure is required for the scenario, you can select a measure from the Accuracy Measure column. It will display all measures that are not dimensioned by Time, including those you have created, either by creating a formula, or by calculating a new one based on other accuracy measures.
-
To select a measure to submit a measure for another scenario, repeat Steps 4 and 5.
Note: It is not necessary to select measures for all scenarios at the same time. However, if you have previously selected a measure for one scenario and you are satisfied with your choice, choose "None" as the measure to submit for that scenario when you select a measure to submit for another scenario.
-
Choose OK.
Example: Selecting measures to submit
For example, the planner can select measures to submit for two scenarios. The planner can also submit accuracy measures for one of the scenarios.
Demand Plan Manager: Selecting Measures to Upload
As a Demand Plan Manager, you review and edit the consolidated forecast for each scenario after the Collect Data from Planners stage runs. When you are satisfied with the final forecast numbers for a scenario, you can select the measure that contains the data for uploading to the Demand Planning Server. You also have the option to run the upload immediately.
Selecting measures to upload is not mandatory. If you do not select a measure to upload for a scenario, then Oracle Demand Planning will upload the consolidated submissions measure along with related objects such as accuracy measure and planning percentages for that scenario when the Upload to Planning Server stage runs. The system will name the forecast and assign a version number. If the measure has been previously uploaded, it will increment the version.
You will want to select a measure to upload for a scenario in the following circumstances:
-
You want to explicitly specify which measure will be written back to the Demand Planning Server for the scenario. You do not want to write back the consolidated submissions measure.
-
You want to overwrite a previous submission.
-
You want to use the use the option to upload selections immediately. You do not want to wait until the administrator runs the upload.
Note that when you select a measure to upload, you are choosing to upload all data for all dimensions in the forecast. You are uploading quantity and amount for all time periods, all geographies, all locations, and all products.
What data is uploaded for dependent demand
If you upload a measure that has a dependent association with other products, then the planning percentages that are associated with the measure will be automatically uploaded with the measure. Therefore it is important to choose a measure that is associated with the consolidated planning percentage object.
Uploading a version or overwriting a forecast
Oracle Demand Planning maintains multiple versions of a measure. Thus, you might have Optimistic Scenario Version #1, uploaded on February 1, 2003, Optimistic Scenario Version #2, uploaded on March 1, 2003, and so forth.
The first time that you upload a measure for a scenario, the system stamps the forecast with the current date and assigns it a version number of 1. The next time that you attempt to upload a measure for the same scenario, the system default is to stamp the measure with the new date and increment the version number.
However, in certain cases, you might want to overwrite the measure rather than upload a new version. For example, if you uploaded a submission measure on February 1 and suddenly heard about an upcoming sales promotion that will have a major impact on sales, you might want planners to rework and resubmit their forecasts. In this case, you could then upload the consolidated submission measure and overwrite the February 1 forecast rather than submit a new forecast version.
Before you proceed: Check scenario time horizon and output level
When the upload runs, Oracle Demand Planning performs a validation check to ensure that at least one time dimension value has data at the top level for all other dimensions. If the measure is NA (unavailable) for all Time dimension values at the specified output level for the scenario, then a warning message will appear.
For example, if a scenario has been defined in the Planning Server with a time horizon range of 01/01/2003 through 12/31/2003 and an output level of Month for the Time dimension, the validation will ensure that at least one Time value in the measure selected for submission has data for the top level for all other dimensions. Even if there is only data for one out of the twelve months, the submission will succeed. However, if none of the twelve months has data, then a warning message will appear.
Before you select a measure to upload for a scenario, you might want to check the time horizon and output level that are defined for the scenario in the Planning Server. This can help you to avoid an unsuccessful upload.
To see scenario time horizon and output levels, you can check the properties of the scenario. For more information, see "Viewing Scenario Properties".
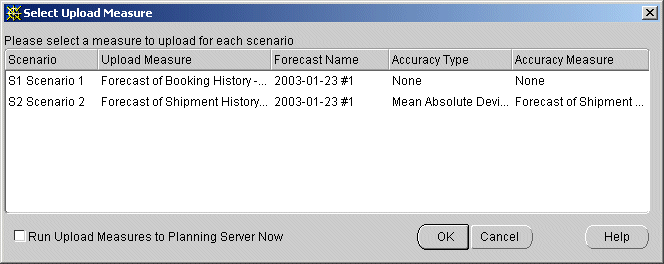
Selecting measures to upload
To select a measure to upload for a scenario, you choose the measure from the list of available measures. If the scenario requires an accuracy measure, you can also choose an accuracy measure. You also have the option to run the stage that uploads data from the shared database to the Demand Planning Server.
To select measures to upload for a scenario:
-
Access Oracle Demand Planning as a Demand Plan Manager.
-
On the Navigation toolbar, choose the Tools button.
-
From the submenu, choose Select Upload Measure.
Result: The Select Upload Measure dialog box opens. If a measure has not yet been uploaded for a scenario, the Measure to Upload column shows the consolidated submissions measure as the default measure to upload for the scenario. If a measure has previously been uploaded for the scenario, the Previously Submitted column displays the name of this measure.
-
To select an alternate measure, in the Measure to Upload column choose the measure that you want to upload.
Note: Do not select a measure that has been limited by a qualifying value such as a single geography. If you do so, then the qualifying value will be used to generate uploaded values for all dimension values at this level.
-
The Forecast Name column displays a default name. You can accept this information, or you can take one of the following actions:
-
Type a new name in the Forecast Name box, up to 70 characters long.
-
Click in the column to view a list of forecast names and select a name from the list (overwrite the forecast).
-
-
If an accuracy measure is required for the scenario, the Type column displays the type of accuracy statistic specified for the scenario in the Demand Planning Server. The Accuracy Measure column displays the default accuracy measure for the scenario. You can choose an alternate measure.
-
Repeat Steps 4 through 6 for each scenario for which you want to select a measure to upload.
Note: If there are multiple scenarios in the demand plan, it is not necessary to select measures to upload for all scenarios at the same time. However, if you have previously uploaded a measure for one scenario and you are satisfied with the data, choose "None" as the measure to upload for that scenario when you upload the final forecast for another scenario.
-
Choose OK.
To run the upload immediately:
-
In the Select Upload Measure dialog box, check the Upload Measures to Planning Server Now box.
-
Choose OK.
Note: Consult with the Demand Planning System Administrator before you choose this option. Running the upload might duplicate an automated program or an administrative action.
Example: Selecting measures to upload
The Demand Plan Manager can select measures to upload for two scenarios. The manager can also upload an accuracy measure for one of the scenarios. He or she may not choose to run the upload immediately, though.
Automating the Submissions Process
You can collect and consolidate forecasts submitted by demand planners into the same measure in every planning cycle. Reusing the same submissions measure allows you to automate the demand planning process.
Introduction
Once a demand plan is built, the System Administrator runs the five stages in the planning cycle. During that cycle, after the data is downloaded and measures populated, the Distribute to Planners stage distributes data in the shared database to authorized demand planners. Submissions measures are created during theDistribute to Assignments stage.
The Benefits of Automatic Submissions
During each distribution, a new submission measure is created for each scenario. The number of submission measures can increase dramatically over time, depending upon the number of scenarios and how often they are distributed.
For example, if you create three scenarios and then, for whatever reason, redistribute twice, you have three distributions of three scenarios, producing 9 submission measures.
The proliferation of submission measures does provide a useful purpose by enabling the Demand Planning Manager to keep track of data changes and forecast versions.
The downside of the proliferation of submission measures is that record-keeping problems and resource allocation shortages may eventually result.
Administrator Options for Configuring Submissions Measures
Your System Administrator has the option of reusing submission measures. The Administrator may stipulate that the submission measure created during the first Distribute to Assignments stage will be used with every subsequent redistribution.
Your Demand Planning System Administrator has the options described below.
-
To allow users to create only one set of Submission measures -- one for each scenario. (Measures are reused automatically.)
-
To allow users to create new sets of Submission measures with each Distribute to Assignments process. (Measures not reused.)
-
To allow users to switch from reusable to non-reusable Submission measures and vice versa.
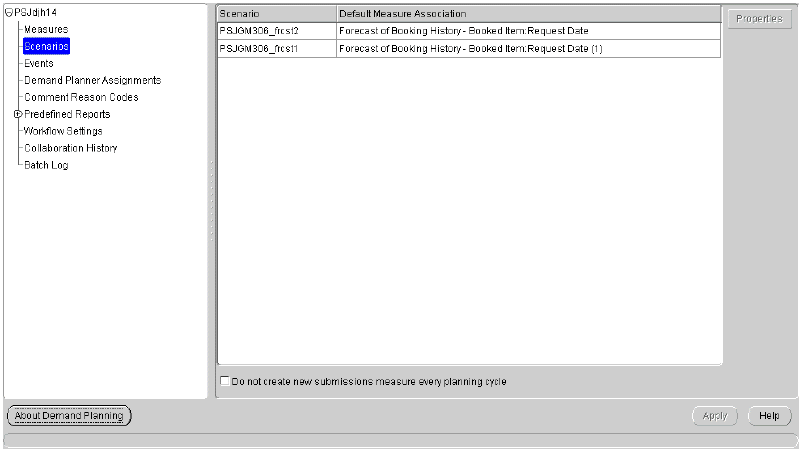
The System Administrator sets the appropriate option for the creation of Submission measures by using a checkbox in the Scenarios page.
Procedure: Setting Up Automatic Submissions Measures
The procedure described below enables the use of a submission measure that is used with every redistribution.
-
In the System Administrator's interface, select Scenarios from the Navigation List.
-
Go to the Scenarios page. This page has columns for scenarios and corresponding default measures.
-
The Do not create new submissions measure every planning cycle box is available and unchecked.
-
The Apply button is disabled.
-
-
Check the box to create a reusable submissions measures.
When the box is checked, the Apply button is enabled.
-
Choose Apply.
-
Further consequences of using or not using the Do not create new submissions measure every planning cycle box are discussed below.
-
If the you leave the checkbox blank, a new set of Submission measures will be created with each Distribute to Assignments process.
-
If Submission measures have already been created and the System Administrator chooses Do not create new submissions measure every planning cycle, the most-recently created Submission measures are used automatically. The conditions below also apply.
-
No new Submission measures will be created.
-
Existing sets of submission measures (previous versions) remain in the system; they are not automatically be deleted.
-
-
If Do not create new submissions measure every planning cycle is checked before the first "Distribute to Assignments" process and has never been changed , only one set of Submission measures will exist, with one Submission measure per scenario.
-
If this checkbox is unchecked after being checked, new sets of Submission measures are added to existing list after each Distribute to Assignments process.
-
Viewing Scenario Properties
Before you submit or upload measures, you might want to view the properties of a scenario. The following information is available.
-
Name
-
Horizon Range
-
Default Measure Association
-
Submitted Measure (if a measure for this scenario has been previously submitted)
-
Uploaded Measure (if a measure for this scenario has been previously uploaded)
-
Output Levels
-
Accuracy Measure Type (if an accuracy measure has been associated with the scenario in the Demand Planning Server)
-
To view scenario properties:
-
Access Oracle Demand Planning as a Demand Planner or Planning Manager.
-
In the Navigation list, locate the scenario whose properties you want to view.
-
Click the right mouse button on the object and choose Properties from the popup menu.