Oracle E-Records Setup and Process Exceptions in Discrete Manufacturing
This chapter provides an example of how to set up a transaction to capture e-records and e-signatures. It also discusses exceptions to the standard setup steps and setup process.
This chapter covers the following topics:
Setting Up E-Records: A Discrete Manufacturing Example
Implementing E-records, Oracle E-Records Implementation Guide provides detailed instructions on how to set up any transaction for use with Oracle E-Records. In many discrete manufacturing business scenarios, much of the transactional data used in these setup steps has been seeded for you. The exceptions to the standard Oracle E-Records setup steps and process flow (see: Online Flow, Oracle E-Records Implementation Guide and Deferred Flow, Oracle E-Records Implementation Guide) include:
-
Nonconformance, Disposition, and Corrective Actions (Oracle Quality)
-
All transactions performed using the Oracle Applications (OA) Framework.
The following example uses the Bills of Material Creation transaction (see: Creating a Bill of Material, Oracle Bills of Material User's Guide) to demonstrate how to enable a discrete manufacturing transaction for use with Oracle E-Records.
Example: Implementing Oracle E-Records for a Medical Device Manufacturer
A medical device manufacturer plans to implement Oracle E-Records for their manufacturing process. They decide to use the Bills of Material Creation transaction as a model to describe the setup steps required. Other business events in their manufacturing process require similar setup steps.
Requirements
-
Collect an e-record and e-signatures when creating a new bill of material in manufacturing organization M1.
-
Collect an e-record only for new bills of material created in all other organizations.
-
Representatives from marketing, manufacturing, and product development must approve a new bill of material created in organization M1. The system must allow signers to be added or deleted when submitting the document for signatures. (see: Setting Up Ad Hoc Signers, Oracle E-Records Implementation Guide).
How to enable the Oracle E-Records profile options
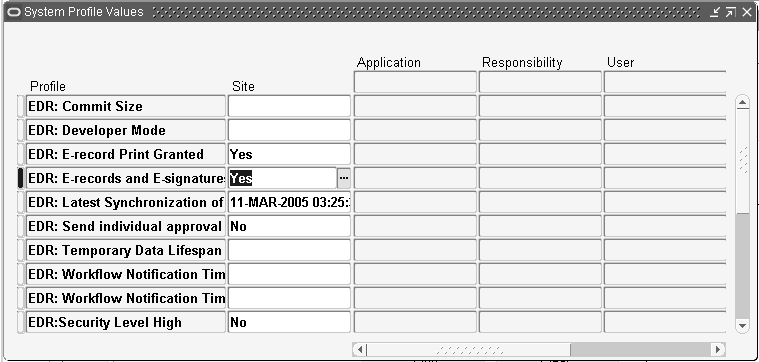
Before enabling a specific transaction for Oracle E-Records, decide how to set the profile options described in Enabling Profile Options, Oracle E-Records Implementation Guide. The following steps show how to define one of the profile options, EDR: E-records and E-signatures.
-
Navigate to the Find System Profile Values window (see: System Adminstrator Windows and Navigation Paths).
-
Find and select the profile EDR: E-records and E-signatures.
-
Enter Yes for the appropriate level (Site, Application, or Responsibility).
Tip: Oracle recommends setting the profile option value at the Site level.
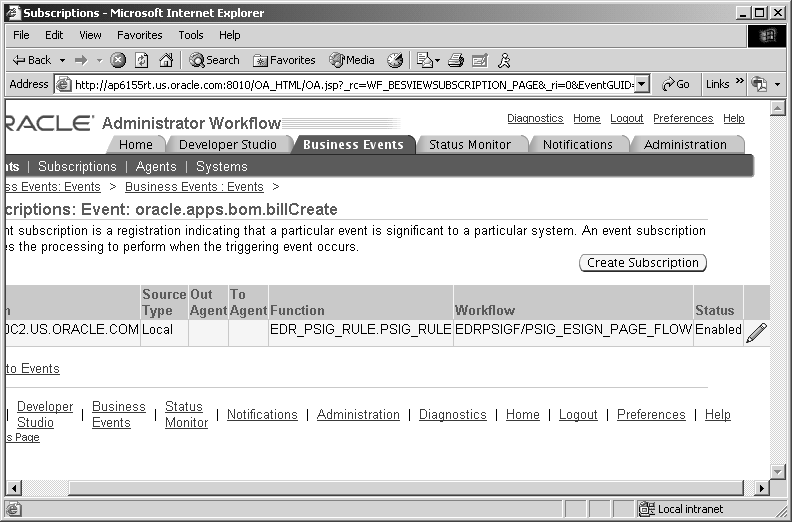
How to Enable the Workflow Business Event Subscription
Enabling the subscription lets users receive workflow notifications related to a business event. For this scenario, enable the business event BOM Bill of Materials Create so users can receive a workflow notification requesting an e-signature.
-
Navigate to the Business Events page (see: Workflow Administrator Pages and Navigation Paths).
-
Search for the business event that you want to enable. Refer to Oracle E-Records Event Data for Discrete Manufacturing, for a listing of seeded business events.
-
Enable the business events that you plan to use by choosing Update (the pencil icon) for each business event.
Tip: If you do not see the Update button, then you do not have administrative privileges and the system administrator needs to enable the business events. To verify this, select the Administration tab. An asterisk (*) in the Workflow System Administrator field indicates that all users have been granted administrative privileges.
-
Enable the subscription for each business event that you plan to use by choosing the Subscription button for each business event.
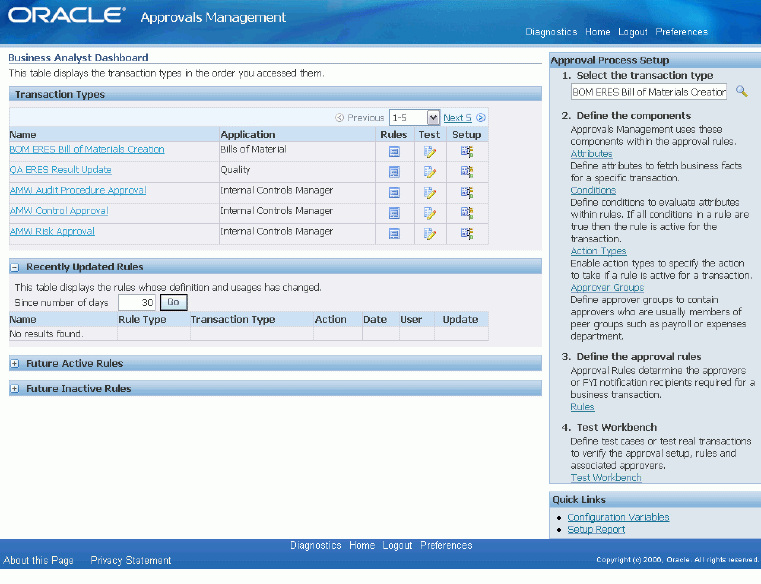
How to Set Up Oracle Approvals Management
Use Oracle Approvals Management to define the rules for when to require e-records and e-signatures.
This example follows the setup steps explained in Setting Up Approvals Management, Oracle E-Records Implementation Guide. Refer to these steps as well as Implementing Oracle Approvals Management for more information about setting up Oracle Approvals Management.
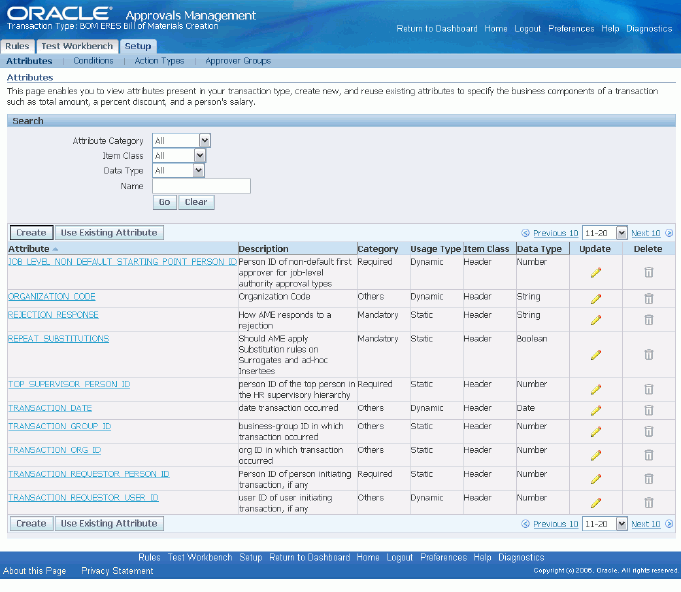
Creating Transaction Attributes
Use transaction attributes to define your rule criteria. In this example, verify that an organization attribute exists (so you can define a condition stating that the organization equals M1 later).
-
Navigate to Oracle Approvals Management (see: Approvals Management Application Administrator Windows and Navigation Paths.
-
In the Transaction Type field, select BOM ERES Bill of Materials Creation from the list of values.
-
Under Define Components, click on Attributes to review the list of seeded attributes for the transaction.
Notice the ORGANIZATION_CODE attribute. Use this attribute later to build a condition.
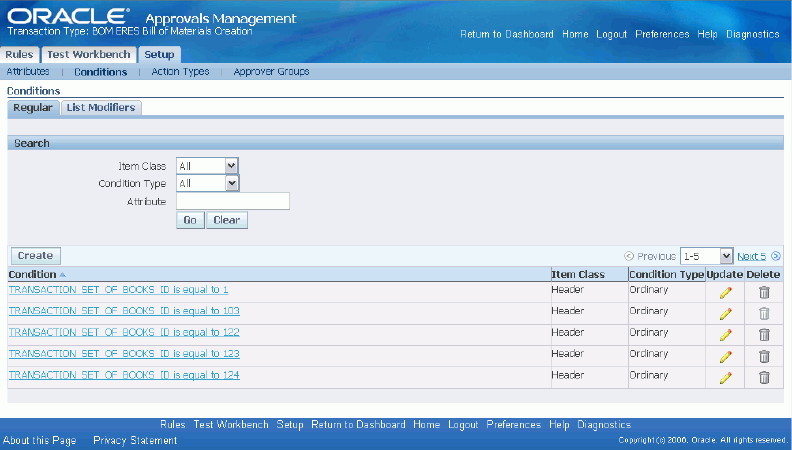
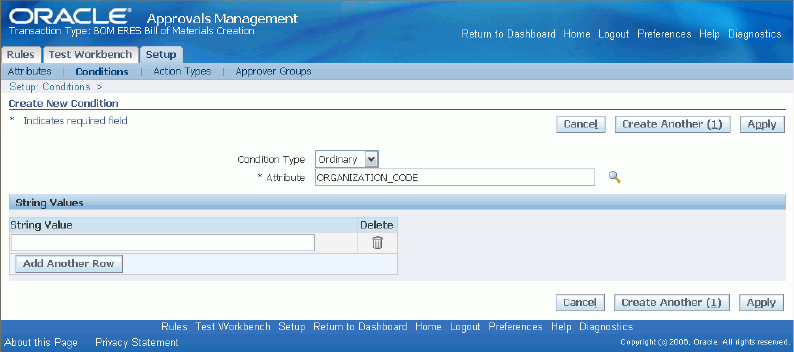
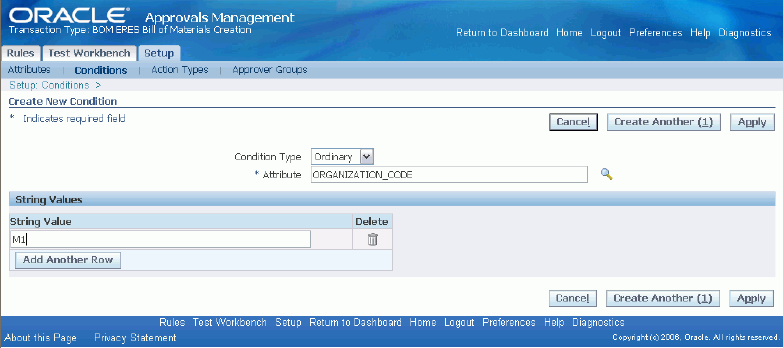
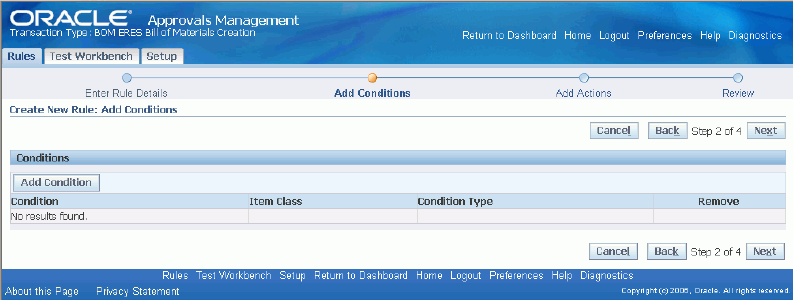
Creating Conditions
When you create a condition, you define when an action can occur. For this example, collect an e-record and e-signature when the condition of a new bill of material created within organization M1 is met.
-
Select the Conditions tab, then click on Create to add a Condition.
-
Select a Condition Type.
For more information about Condition Types, see: Condition Types, Implementing Oracle Approvals Management.
-
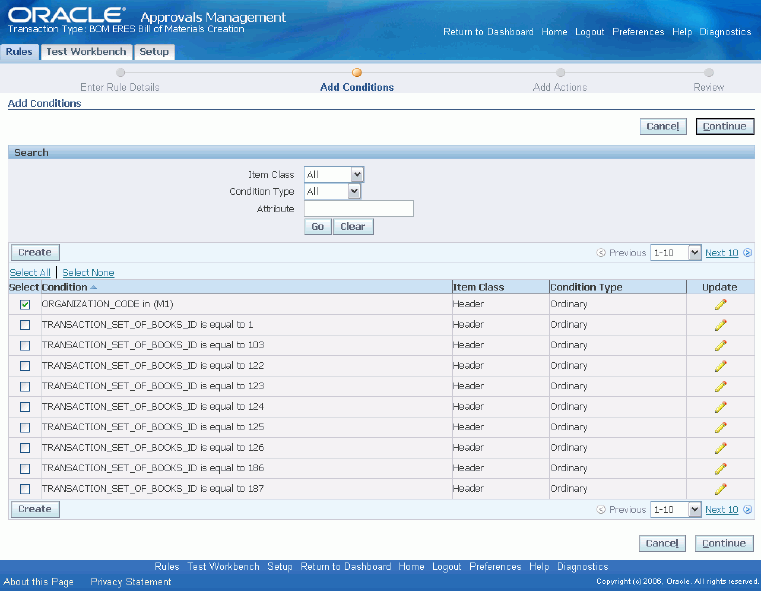
Select ORGANIZATION_CODE from the Attribute list of values.
-
Enter the organization code M1 in the String Value field.
-
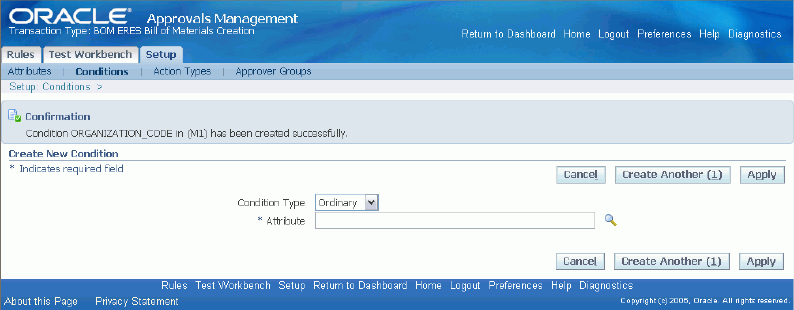
Click on Create Another.
You receive a confirmation message stating that the condition was created.
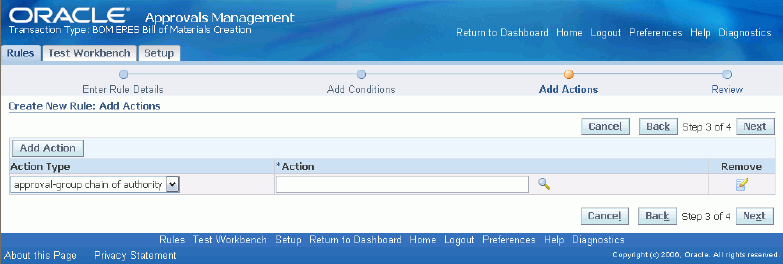
Selecting Action Types
-
Select the Action Type tab.
-
You will see that action type Approval-group chain of authority is selected and the Approver Group, BOM Creation Approver Group is displayed. You can now select on the Rules tab to create a Rule.
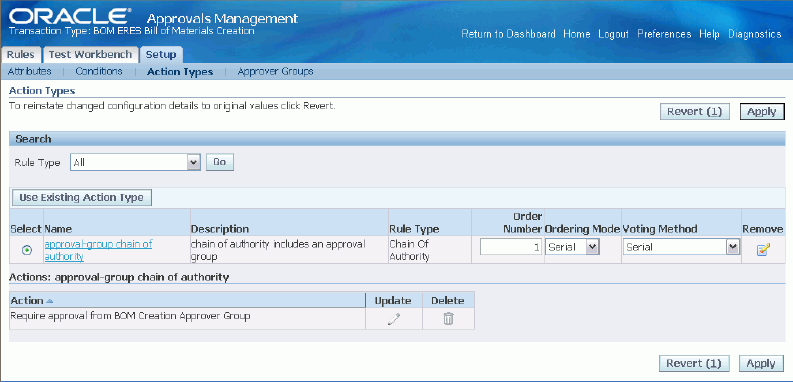
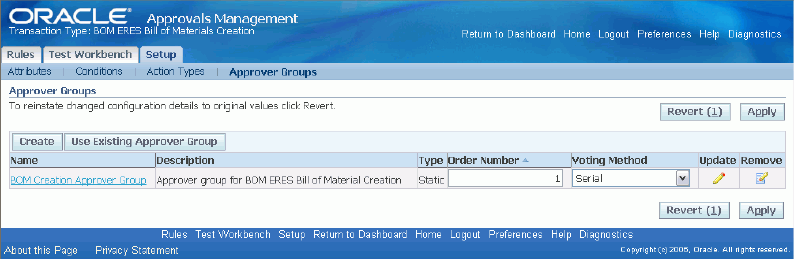
Creating Approval Groups
-
For this example, use a previously defined Approval Group named BOM Creation Approval Group.
For more information about creating Approval Groups, see: Approval Groups, Implementing Oracle Approvals Management.
Defining Approval Rules
Rules associate one or more conditions with an approval in an if-then statement. The rule is the culmination of all the previous Oracle Approval Management setup steps.
For more information about creating rules, see: Rules, Implementing Oracle Approvals Management.
-
Select the Rules tab, and click on Create.
-
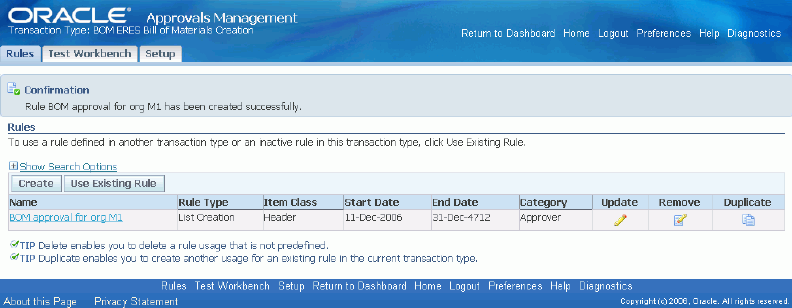
Enter the Name of the Rule you want to create. This example uses: BOM Approval for Org M1.
-
Name: BOM approval for org M1
-
Rule Type: list-creation
-
Start Date: today's date
-
-
Click on Next.
-
Click on Add Condition.
-
Select the Organization Code M1 as condition type from the list. Click on Continue.
-
Click on Next.

-
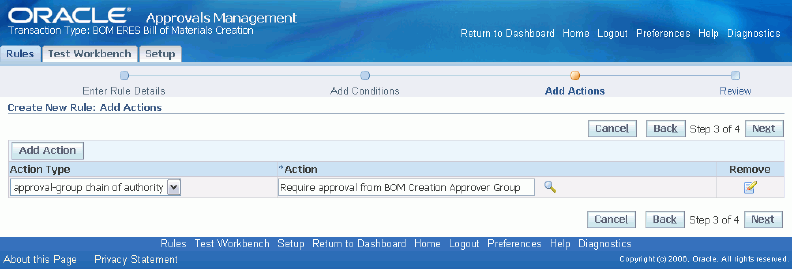
In the Action field, select the approval group by clicking on the list of values.
-
For this example, select Require approval from BOM Creation Approver Group.
Click on Next.
-
Review the new rules you want to create.

-
Click on Finish to create the new rule.
You will receive a confirmation message stating that the new rules has been created.
How to Set Up the Configuration Variables
Use configuration variables to define the variables for each transaction enabled for use with Oracle E-Records. Oracle E-Records requires a minimum of the following variables for each transaction:
-
EREC_REQUIRED
-
EREC_STYLE_SHEET
-
EREC_STYLE_SHEET_VER
-
ESIG_REQUIRED
Add additional variables, such as CHANGE_SIGNERS (see: Setting Up Ad Hoc Signers, Oracle E-Records Implementation Guide), if desired.
Configuration variables consist of two parts:
-
Transaction variables
-
Rule variables
Transaction variables contain the default variables for a transaction. Rule variables override the transaction variables for a transaction that meets the rule criteria defined in Oracle Approvals Management.
You only need to define those rule variables that are necessary to override default transaction variables. For example, there is no need to define a rule variable for EREC_REQUIRED when the value equals Y for both the transaction and the rule.
For detailed information regarding configuration variables, refer to Setting Up the Configuration Variables, Oracle E-Records Implementation Guide.
-
Navigate to the Configuration Variables page (see: ERES Administrator Windows and Navigation Paths).
-
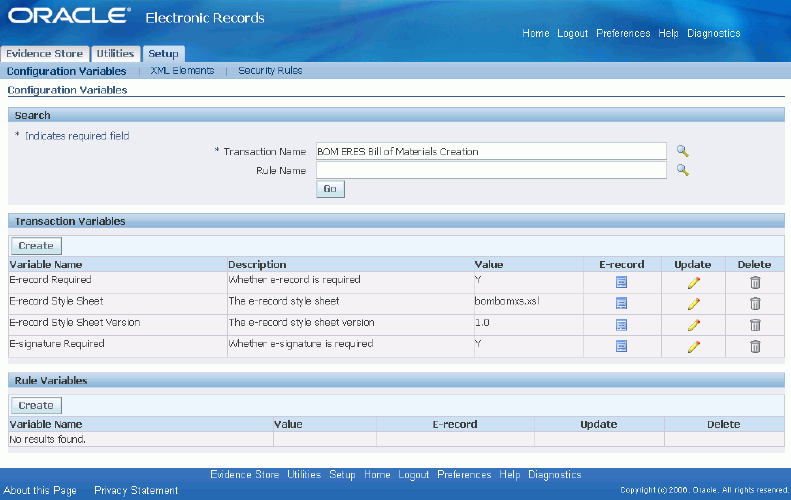
Search for the Transaction Name BOM ERES Bill of Materials Creation.
Review the Default Values for the transaction and modify them if necessary.
For this example, set the variable default values as follows:
-
EREC_REQUIRED = Y
-
EREC_STYLE_SHEET = bombomxs.xsl
-
EREC_STYLE_SHEET_VER = 1.0
-
ESIG_REQUIRED = N
-
-
Add additional variables as needed.
In this example, add CHANGE_SIGNERS = NONE (see: Setting Up Ad Hoc Signers, Oracle E-Records Implementation Guide). Add this variable to meet the requirement for M1 of allowing signers to be added or deleted prior to submitting the document for approval.. The default value of NONE does not allow signers to be added or deleted. You can add a rule variable with CHANGE_SIGNERS = ALL to override the default value.
How to Set Up a Rule Variable
The requirements for organization M1 differ from the other manufacturing organizations. M1 requires e-signatures for each new bill of material created. Define a rule variable to meet these requirements.
-
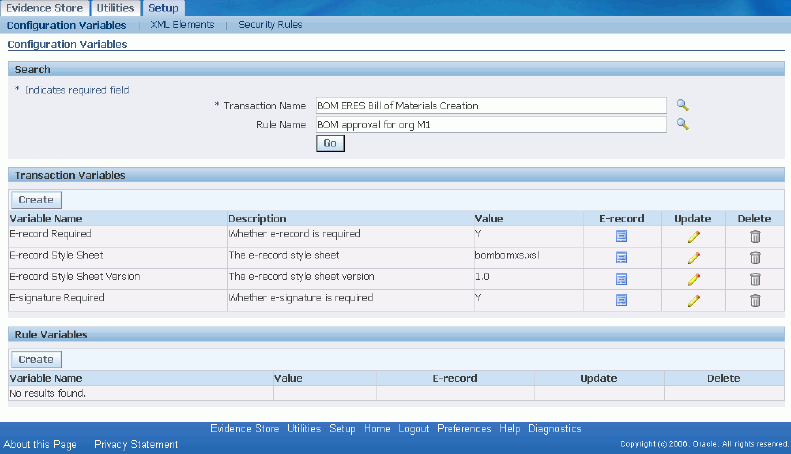
Enter BOM ERES Bill of Materials Creation in the Transaction Name field. Leave the Rule Name field blank. Choose Go.
This shows all rules associated with the transaction. Currently, there are no rules associated with the BOM ERES Bill of Materials Creation transaction.
If no rules are defined, then the default transaction variables apply to all transactions.
-
Choose Search (flashlight icon) for the Rule Name field.
In the Search and Select: Rule Name page, choose Go. The rule you defined earlier, BOM approval for org M1, appears. Select this rule.
-
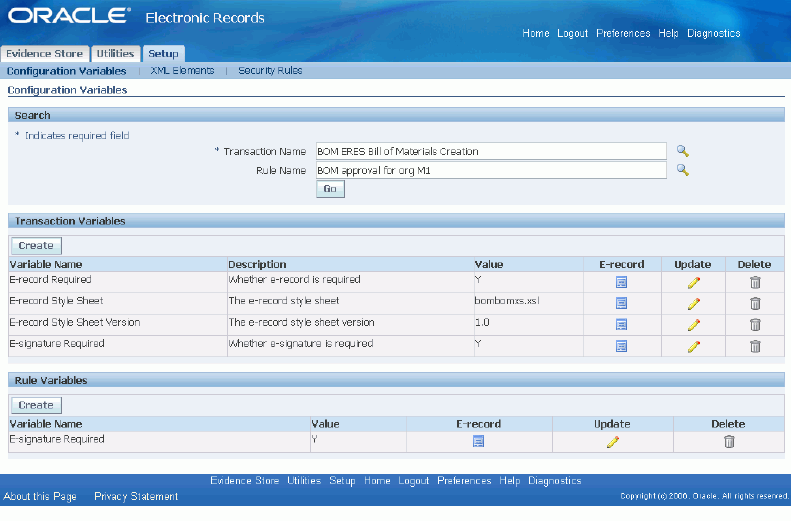
Underneath the Rule Variables title, choose Create.
-
Search for and select the following input variables individually:
-
E-Signature Required. Enter Y in the Variable Value field.
-
CHANGE_SIGNERS. Enter ALL in the Variable Value field.
Now, when a BOM ERES Bill of Materials Creation transaction is entered for organization M1, the system requires an e-signature and allows a list of signers to be modified before submitting the document for signatures.
-
Setup and Process Exceptions
The following discrete manufacturing transactions require setup and process steps that differ from those listed in Implementing E-records, Oracle E-Records Implementation Guide and discussed throughout the Oracle E-Records Implementation Guide.
-
ECO Approval (Oracle Engineering)
(see: Creating an ECO, Oracle Engineering User's Guide)
-
All Nonconformance, Disposition, and Corrective Action Approvals (Oracle Quality)
(see: Oracle Quality Implementation Guide)
-
Delivery Shipment (Oracle Shipping)
(see: Closing a Delivery, Oracle Shipping Execution User's Guide)
-
Miscellaneous Transactions (Oracle Inventory)
(see: Performing Miscellaneous Transactions, Oracle Inventory User's Guide)
-
Enter or Update Quality Results (Oracle Quality)
(see: Entering Quality Results Directly, Oracle Quality User's Guide)
All discrete manufacturing transactions only integrate with Oracle E-Records when the transaction is entered using Oracle Forms. Oracle E-Records cannot create e-records or e-signatures when discrete manufacturing transactions or data are entered using the Oracle Applications (OA) Framework or a mobile application such as Oracle Mobile Supply Chain Applications (MSCA) or Oracle Warehouse Management System (WMS).
Tip: This tip is for Oracle Quality users who use the Copy Collection Plan program (An OA Framework program. See: Collection Plan Templates, Oracle Quality User's Guide for more information.). When copying a parent-child collection plan structure, check the Create Plans as Disabled box. Enable the new plan structure using the Collection Plan window. This ensures that Oracle E-Records can create e-records and e-signatures for the new plan structure.
Setting up the ECO Approval transaction
The ECO Approval process requires an additional setup step in Oracle Engineering because this process is not defined in Oracle Approvals Management. You must associate the Change Type and Priority used by the ECO with the ERES Approval Process in Oracle Workflow. See Defining ECO Types, Oracle Engineering User's Guide for more information about how to associate a Change Type and Priority with an Oracle Workflow process. The following example explains the setup and process steps required to:
-
Generate an e-record when an engineering change order (ECO) is created.
-
Generate an e-record that requires an e-signature when an ECO is submitted for approval.
Example: Approving an ECO for Manufacturing Using Oracle E-Records
A medical device manufacturer requires e-records each time a new ECO is created and e-signatures once the new ECO is submitted for approval in organization M1. The following steps explain how to accomplish this.
-
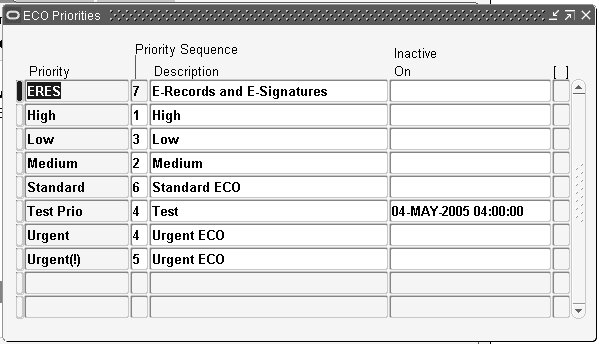
Navigate to the ECO Priorities window (see: Manufacturing and Distribution Manager Windows and Navigation Paths).
Enter a priority to use for those ECOs requiring e-signatures. See: Defining ECO Priorities, Oracle Engineering User's Guide.
-
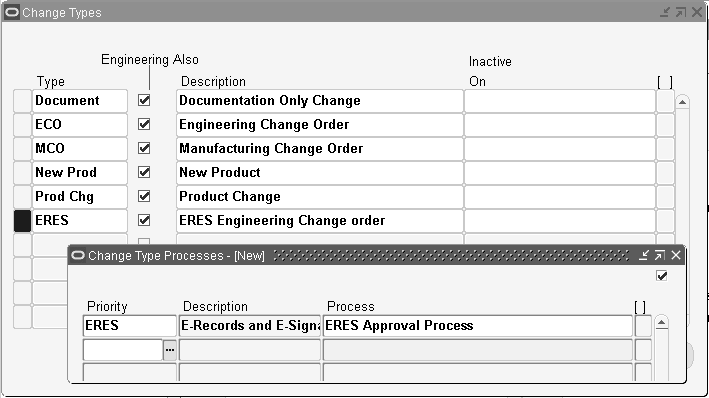
Navigate to the Change Types window (see: Manufacturing and Distribution Manager Windows and Navigation Paths).
Enter a change type for those ECOs requiring e-signatures. See: Defining ECO Types, Oracle Engineering User's Guide.
In this example, enter ERES in the Change Type field.
-
Navigate to the Change Type Processes window (see: Manufacturing and Distribution Manager Windows and Navigation Paths).
Link the change type and the priority you defined in the previous steps to the ERES Approval Process workflow.
-
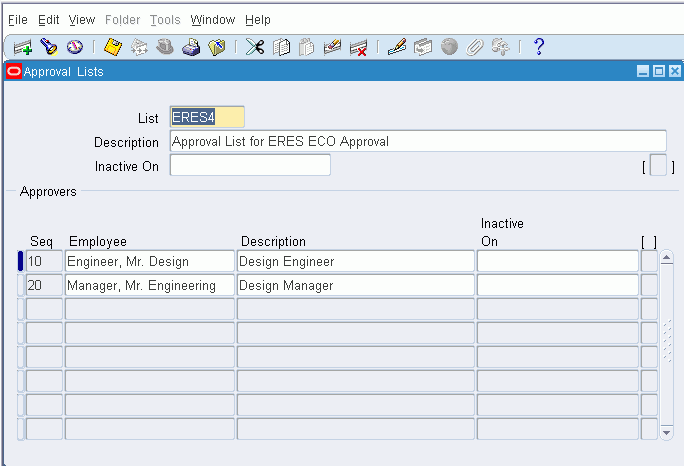
Navigate to the Approval Lists window (see: Manufacturing and Distribution Manager Windows and Navigation Paths).
Create a list of the employees responsible for approving new and updated engineering change orders (see: Defining ECO Approval Lists, Oracle Engineering User's Guide).
In this example, create a list named ERES4.
Set Up the ENG ERES ECO Creation Transaction in Oracle Approvals Management
Note: The setup necessary to generate an e-record and request an e-signature when approving an ECO is complete. The remaining steps in Set Up the ENG ERES ECO Creation Transaction in Oracle Approvals Management and Dene the Conguration Variables for the ENG ERES ECO Creation Transaction complete the setup necessary to generate an e-record when creating a new ECO.
-
Navigate to the Oracle Approvals Management page (see: Approvals Management Application Administrator Windows and Navigation Paths).
-
Set the transaction type to ENG ERES ECO Creation.
-
Verify that the following attributes exist:
-
ECO TYPE
-
ORGANIZATION_CODE
-
-
Add the following conditions:
-
ECO TYPE = ERES
-
ORGANIZATION_CODE = M1
-
-
Add an approval group.
For this example, use an existing approval group, Engineering Approval Group.
For more information about creating Approval Groups, see: Approval Groups, Implementing Oracle Approvals Management.
-
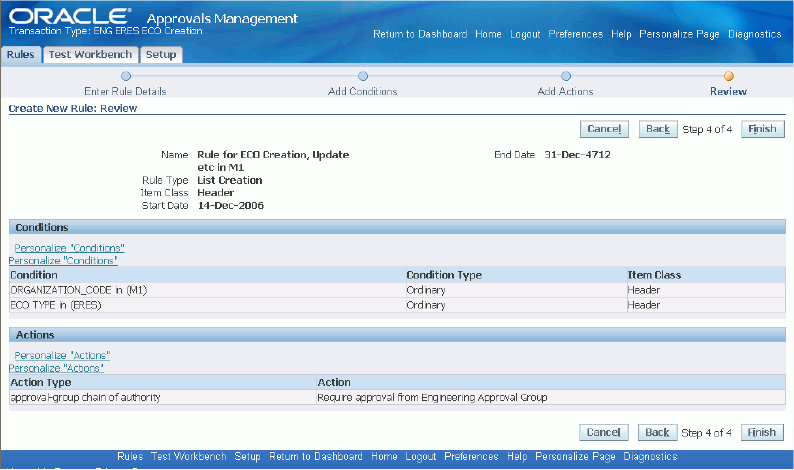
Add an approval rule.
For this example, enter the following information:
-
Description = Rule for ECO Creation, Update, etc. in M1
-
Require approval from the Engineering Approval Group
Note: The default transaction variables for the ECO Creation transaction include ESIG_REQUIRED equal to N. Therefore, no approval request for e-signatures is made.
-
Select the following header conditions:
-
ECO TYPE in {ERES}
-
ORGANIZATION_CODE in {M1}
-
-
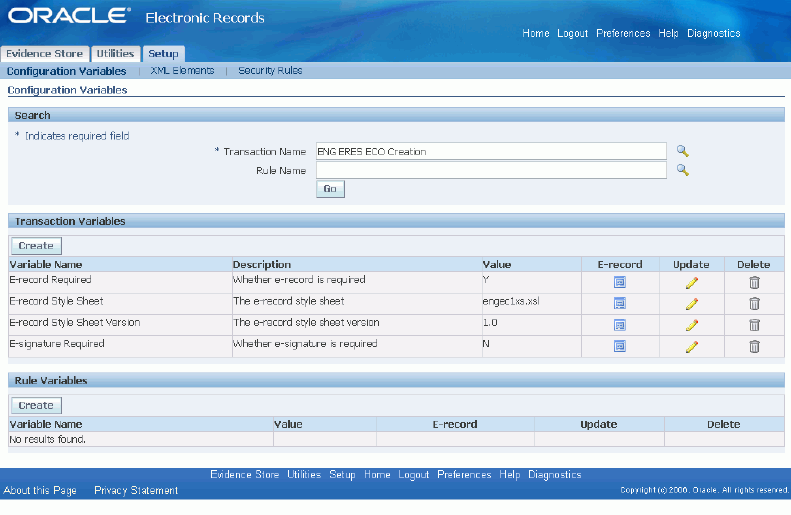
Define the Configuration Variables for the ENG ERES ECO Creation Transaction
-
Navigate to the Configuration Variables page (see: ERES Administrator Windows and Navigation Paths). Search for and select the transaction name ENG ERES ECO Creation, then choose Go.
The transaction variables with their default values appear.
-
Add, change, or delete the transaction and rule variables as needed.
Use the transaction variable default values for this example.
Enter and submit an ECO for approval
The remaining steps test the scenario set up in the previous steps. The following should occur:
-
An e-record generates when an engineering change order (ECO) is created.
-
An e-record requiring an e-signature is created when an ECO is submitted for approval.
-
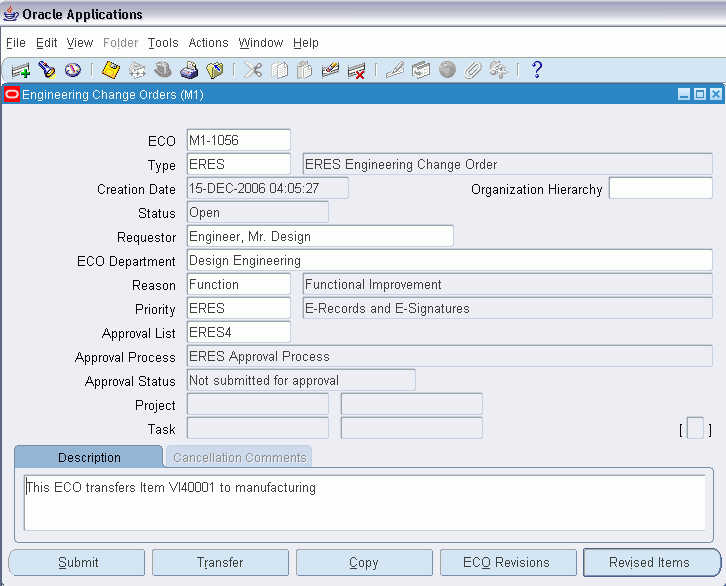
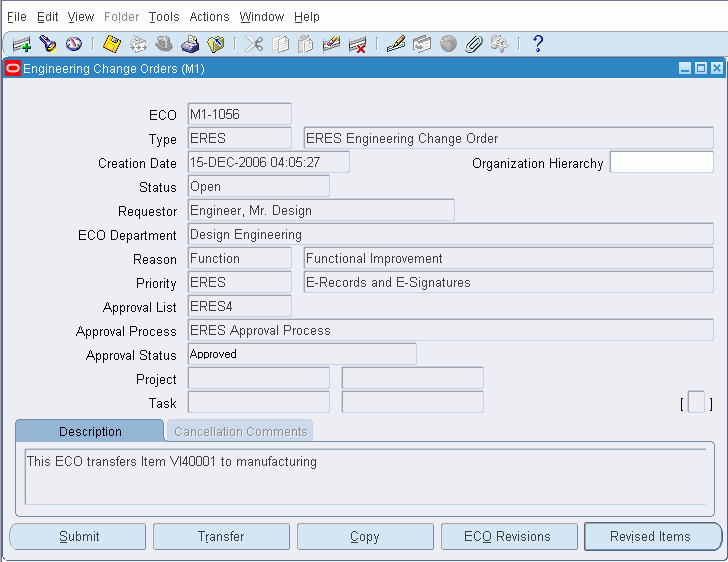
Navigate to the Engineering Change Orders window (see: Manufacturing and Distribution Manager Windows and Navigation Paths) and enter an ECO (see: Creating an ECO, Oracle Engineering User's Guide).
For this example, enter the following:
-
ECO = M1-1056
-
Type = ERES
-
Requestor = Design Engineer
-
Priority = ERES
-
Approval List = ERES4
Notice that the Type and Priority values default the Approval Process of ERES Approval Process. The Approval List is chosen by the requestor of the ECO. For all other transactions, the approval group is automatically applied according to the transaction's applicable rule variables.
-
-
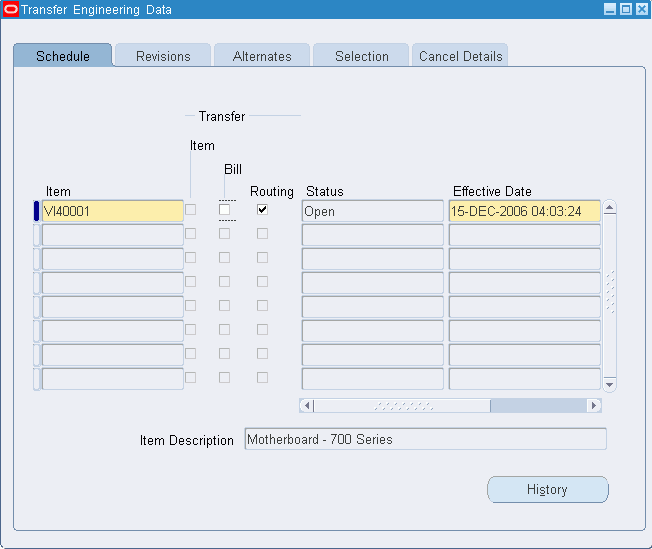
For this example, choose Transfer.
This ECO transfers the item VI40001 to manufacturing.
Save your work.
-
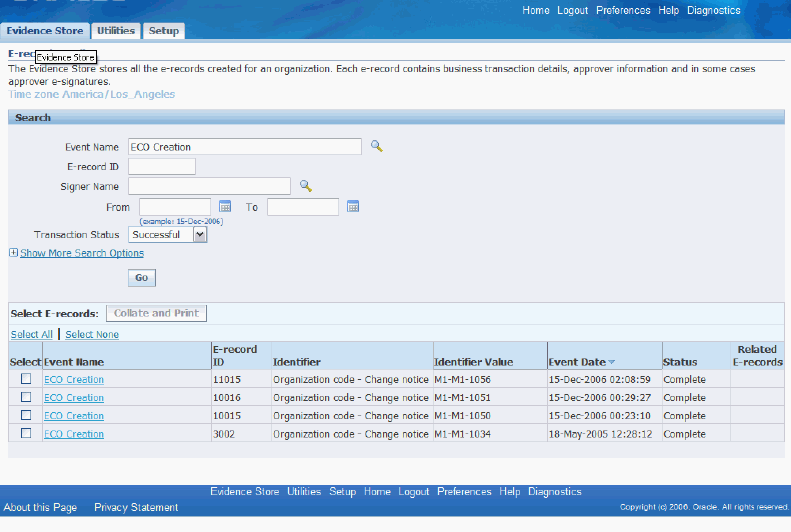
Optional. Navigate to the Evidence Store. Search for and view the ECO Creation e-record you created.
-
Navigate to the ECO window (see: Manufacturing and Distribution Manager Windows and Navigation Paths) and find ECO M1-1030.
Choose Submit.
This submits the ECO for approval. Notice that the Approval Status changes to Approval requested.
Approve the ECO in Oracle Workflow
-
Navigate to the Worklist page (see: Workflow Administrator Pages and Navigation Paths) . Select the approval notification.
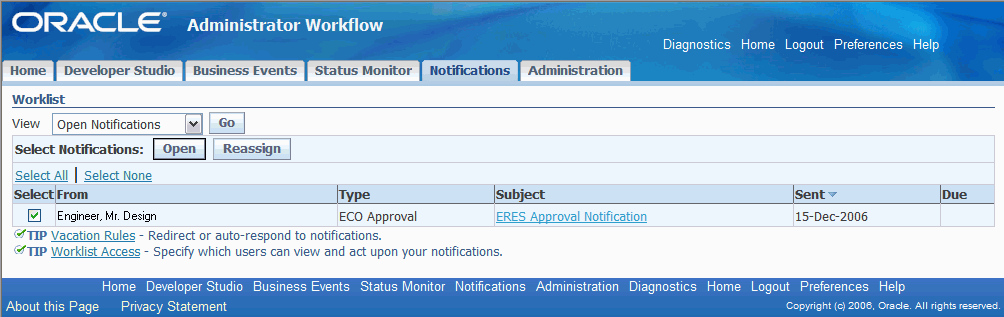
-
Review the approval notification and choose Approve, Reject, or Request Information after entering your response.
-
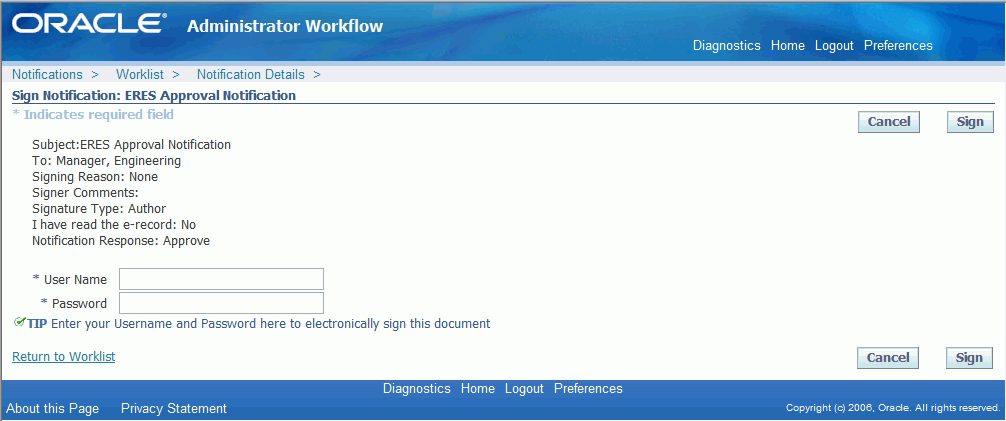
Sign the approval notification.

-
Navigate to the Evidence Store page (see: ERES Administrator Windows and Navigation Paths). View the e-record once all approvals are obtained (see: Evidence Store, Oracle E-Records Implementation Guide).
-
Navigate to the ECO window (see: Manufacturing and Distribution Manager Windows and Navigation Paths) and find ECO M1-1056.
Notice that the Approval Status is now Approved.
Setting Up and Processing Nonconformances, Dispositions, and Corrective Actions
Nonconformance, disposition, and corrective action collection plans (see: Oracle Quality Implementation Guide) require one additional setup step if you intend to collect e-signatures and two exceptions to the standard process of collecting e-records and e-signatures.
Setup Exception - Setting the eSignature Required Collection Element to Yes
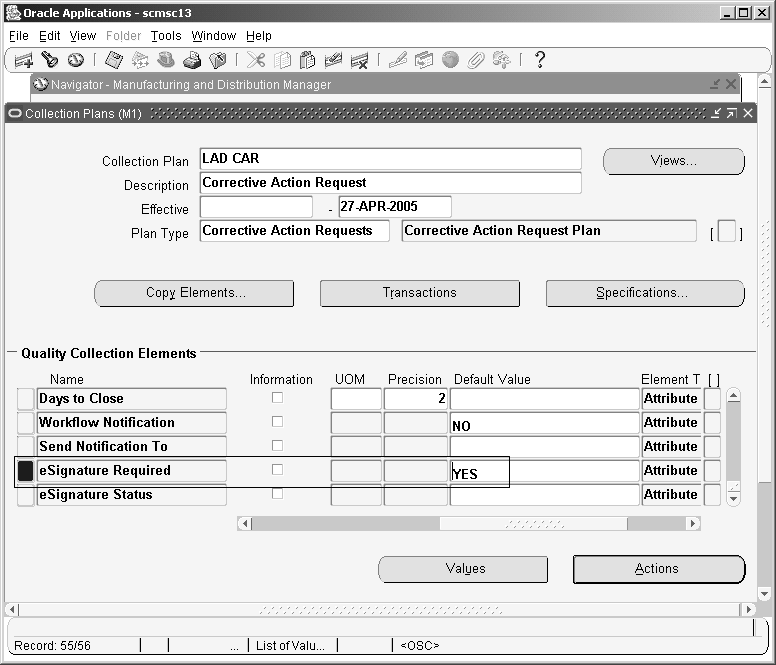
If you intend to collect deferred e-signatures for nonconformance, disposition, or corrective action collection plans, enable, display, and set the eSignature Required collection element to Yes. For information on how to require e-signatures for nonconformance, disposition, and corrective action requests under certain conditions, see: Enforcing Nonconformance, Disposition, and Corrective Action Request Approvals.
-
Navigate to the Collection Plans window (see: Manufacturing and Distribution Manager Windows and Navigation Paths).
-
Find the collection plan you want to enable for e-signatures.
-
Scroll down to the eSignature Required and eSignature Status collection elements.
-
Check the Enabled and Displayed boxes for each element.
-
For the eSignature Required element, enter Yes in the Default Value field.
Enter Yes in the Default Value field only if you always want someone to sign the respective nonconformance, disposition or corrective action record. Otherwise, leave the Default Value field blank.
Process Exception - Capturing an E-Record for Nonconformance, Disposition, and Corrective Action Plans
When the system captures an e-record for a nonconformance, disposition, or corrective action collection plan, the e-record includes information from all of the associated child plans, too. Refer to Parent-Child Collection Plans, Oracle Quality User's Guide for more information.
Process Exception - No E-Record Signing Option for Nonconformance, Disposition, and Corrective Action Plans
For nonconformance, disposition, and corrective action request collection plans, you can only enter your e-signature by row, not by collection. For other collection plans, you have the option of signing by row or by collection.
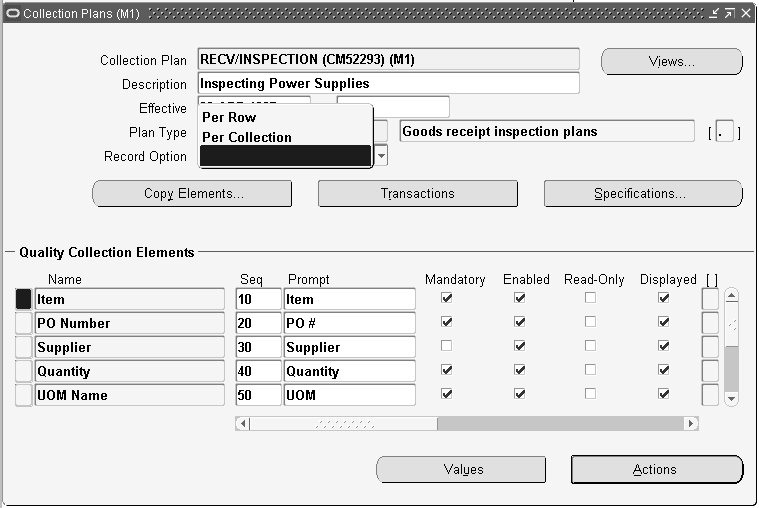
The following picture of the Collection Plans window shows a collection plan with the Record Option field selected:
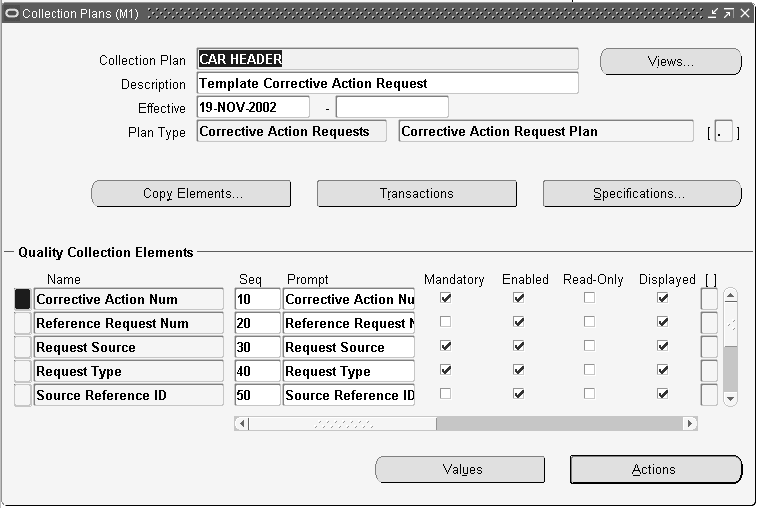
The following picture of the Collection Plans window shows a corrective action collection plan. Notice that the Record Option field is not visible. The Record Option field is not visible for nonconformance, disposition, and corrective action request collection plans.
Capturing E-Records for Shipments
Oracle Shipping generates e-records using a concurrent program. This concurrent program, Quality Shipping ERES Collector, generates e-records for all outbound deliveries with a status of Closed (see: Closing a Delivery, Oracle Shipping Execution User's Guide). You can run this program as needed or your system administrator can set it up to run on a periodic basis (for example, nightly). Generate e-records for a delivery date range by entering dates into the program’s parameters. You can view the e-record in the Evidence Store.
Approving and Rejecting Miscellaneous Transactions
The Oracle Inventory Miscellaneous Transactions window (see: Performing Miscellaneous Transactions, Oracle Inventory User's Guide) can contain many line items. If you approve (or reject) all line items during the e-signature process, you can save all line items at once. However, if you want to reject some line items and approve the rest, you must perform the rejection and the approval in separate actions. For example, approve some of the line items, then open the Miscellaneous Transactions window again, search for the line items to reject, and reject them.
Deferring E-signatures when Entering or Updating Quality Results Directly and for Certain Transactions
To enable deferred e-signatures when entering or updating quality results for the plan, choose Enable Deferred Signature when creating a plan. This button only enables deferred e-signatures when entering or updating quality results directly or when entering or updating quality results during the following transactions:
-
Depot Repair Task Transactions (Depot Repair)
-
Process Nonconformance (Oracle Process Manufacturing)
-
Service Requests (Oracle Service)
Collecting E-records by Collection Plan versus Row when Entering or Updating Quality Results
When entering quality results directly, you can choose whether to create an e-record and e-signature for each quality result row entered or one e-record and e-signature for all rows entered per collection. You make this choice in the Record Option field when you enter or update a collection plan (see: Creating Collection Plans, Oracle Quality User's Guide).
Related Topics
Setting Up Oracle Approvals Management, Oracle E-Records Implementation Guide
Setting Up the Configuration Variables, Oracle E-Records Implementation Guide