User Role
Overview of the User Role
The Manufacturing Operations Center (MOC) User role is used to integrate shop floor devices in manufacturing plants to the Manufacturing Operations Center for the purpose of data collection and reporting. The MOC User role consists of three functional areas - Tag Data Workbench, Extensible Attributes Data, and Manufacturing Operations Center Analytics.
-
Tag Data Workbench includes:
-
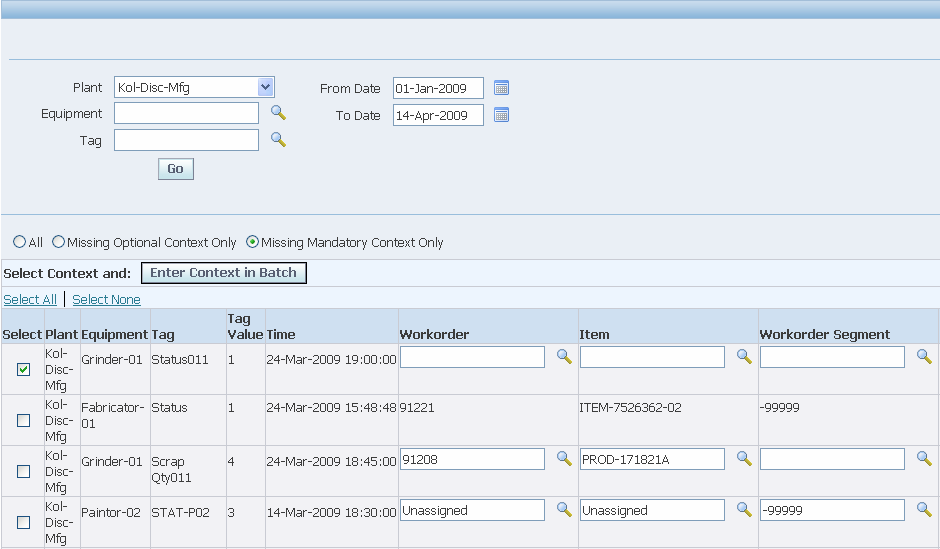
Manual Contextualization page - use this page to view or update business context for data that has the context method as Manual Contextualization.
-
Equipment Downtime Reason page - use this page to provide Downtime Reasons for the downtime event.
-
Equipment Scrap Reasons page - use this page to provide scrap reasons for the scrap event.
-
-
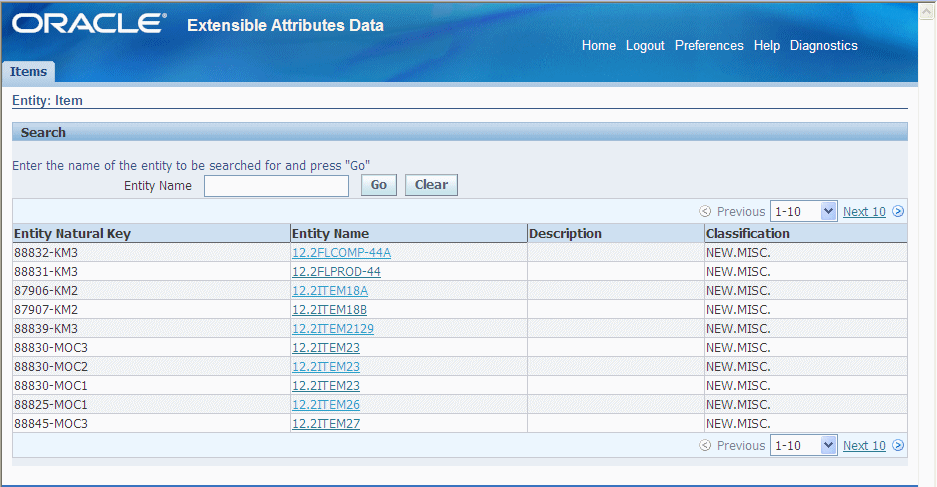
Extensible Attributes Data - used to view and add data to entities such as Items, Equipment, Work Orders, Batch Operations, and miscellaneous custom entities.
-
Manufacturing Operations Center Analytics - provides analytical tools and reporting using the Manufacturing Operations Center Catalog and the Plant Manager, Facilities Manager, and Adhoc Dashboards.
-
Shift Exceptions - use this page to edit shifts for exceptions. Refer to the topic "Editing Shifts for Exceptions" in the Setting Up Time Dimension Hierarchies chapter of the Oracle Manufacturing Operations Center Implementation Guide for more information.
-
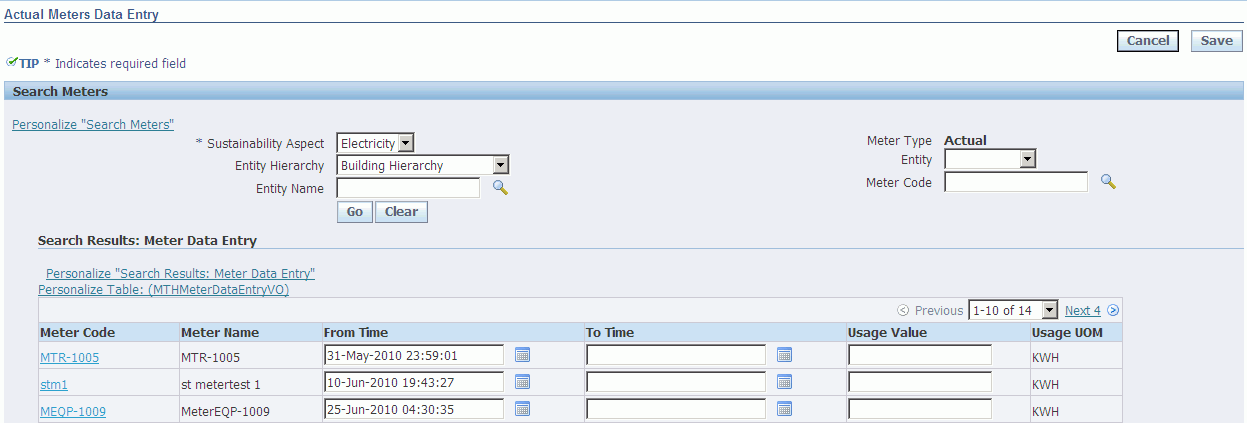
Actual Meters Data Entry- Use this page to enter meter readings manually using the Actual Meters Data Entry page and also view the history of readings for a meter.
Related Topics
Viewing and Adding Reason Codes
Extensible Attributes Data for Entities
Performing Actual Meters Data Entry
Using the Manual Contextualization Method
Use the Manual Contextualization page to manually enter and edit context for all active tags that have not been summarized to the equipment summary tables, and whose contextualization method is either schedule-based or manual-based. If you use the manual contextualization method, then the application will not apply any logic to get the context, other than equipment and shift, and you can manually enter the work order, segment, or item context in the Manual Contextualization page.
For the schedule-based contextualization method, you must update the Equipment Production Schedule to get the context of shift, work order, segment, and item. Using Manual Contextualization page, mark the rows for reprocessing to get the updated context for the tag from Equipment Production Schedule.
To manually enter and edit context
-
Navigate to the Manual Contextualization page.
-
Select a Plant. You can refine your search further by selecting a value in the Equipment field and Tag field.
-
Enter From and To Dates to refine your search to a specific date range.
-
Click Go.
-
You can display your search results by Missing Mandatory Context Only, Missing Optional Context Only, or All Context. The Missing Mandatory Context Only option displays tag rows that do not have the context, but were set as mandatory context for the equipment. The Missing Optional Context Only option displays tag rows which do not have the context but were set as optional context for the equipment. All context displays rows from both Missing Mandatory and Optional Context options.

To update context detail
You can update context detail for each row, or update context detail for multiple rows in a batch.
-
To update context within a single row, click the search icon for a context field. The Search and Select window appears.
-
Enter your search criteria and click Go. A list of results displays. Select a value and click Select.
-
To update context for multiple rows in a batch, select rows that you want to update and click the Enter Context in Batch button. The Batch Contextualization Update page appears.

-
Enter each context and click the Enter in Batch button. Each context field for the selected rows are updated.
-
Save your work.
Related Topics
Creating Equipment Contextualization Information
Viewing and Adding Reason Codes
From the Tag Data Workbench, you can add or view reasons for equipment downtime or equipment scrap quantity.
To view and add reason codes from the Tag Data Workbench
-
Navigate to the Equipment Downtime Reason page or the Scrap Reason page. The Tag Data Workbench appears.
Note: The following steps apply to both Equipment Downtime Reasons and Equipment Scrap Reasons.
-
Select a Plant from the List of Values (LOV).
-
Enter a valid value for Equipment, or search for a value.
-
Specify a date range for viewing or adding equipment downtime or scrap reason.
-
Click Go. The page displays the equipment downtime or scrap reading.

-
Select rows to view and add one or more reasons.
-
Click the View Reason button to view existing reasons for the date range specified.

-
Click the Enter Downtime Reason button to add a downtime reason to your equipment. The Downtime Reasons Entry page appears.
Note: If you are adding Equipment Scrap Reasons, then the Equipment Scrap Reasons page appears.
-
In the Downtime Reason field or Scrap Reason field, enter a value, or search for a valid reason. You can add multiple reasons to selected equipment downtime or scrap reading rows.

-
Save your work. You can now click the View Reason button to verify that the reason code is now attached to the selected downtime or scrap reading rows.

Extensible Attributes Data for Entities
Equipment and other manufacturing entities are business objects in the shop floor with unique characteristics and processes. MOC supports the collection of attributes for item, equipment, work order, batch operation, and miscellaneous custom entities. You can update or view attributes for manufacturing entities from the Manufacturing Operations Center User responsibility.
To view extensible attributes data for entities
-
Navigate to the entity-specific page. The entity-specific attributes display.

-
You can further refine your display by searching on the Entity Name.
-
Click on an Entity Name link to view details. The Overview page appears and displays entity-specific details.

Note: The MOC User Role allows you to enter the values for the attributes. A typical example would be defining specification attributes and comparing with actual attribute values for the entities.
The Entity Instance Attribute Details page of the MOC Administrator Role appears in the MOC User Role for the entity, and allows you to enter or view the attribute values.
Actual Meters Data Entry
You can enter meter readings manually using the Actual Meters Data Entry page and also view the history of readings for a meter.
To enter meter readings manually
-
Navigate to the Actual Meter Data Entry page.
-
Enter Sustainability Aspect to find a meter using its sustainability aspect.
-
Enter the following criteria to search for a meter:
-
Meter Type to find a meter using its type.
-
Entity Hierarchy to find a meter using its entity hierarchy
-
Entity and Entity Name to find a meter by its entity.
-
-
Click Go. The page displays a list of all the actual meters for which you can enter data readings.
-
The following fields display for each meter:
-
Meter Code
-
Meter Name
-
-
Enter the time period for which you want to enter the readings in the From Time and To Time fields.
-
Enter the value of the sustainability aspect usage in the Usage Value field. Usage UOM is the unit of measure in which the sustainability aspect usage is expressed.
