
 Read more...
Then work in JDeveloper's Java visual editor to easily assemble the elements of a user interface (UI) using Swing components and
the Java source editor to finish coding. Use additional IDE features to compile and run your application.
When you test run the application, it will look like this:
| Purpose | Duration | Application |
|---|---|---|
This tutorial shows you how to build and run a Java Swing application in
JDeveloper's IDE. To see the complete application you will create, click the Download button to download a zip of the final application, and then unzip it in your JDeveloper mywork folder. |
20 minutes |  |
-
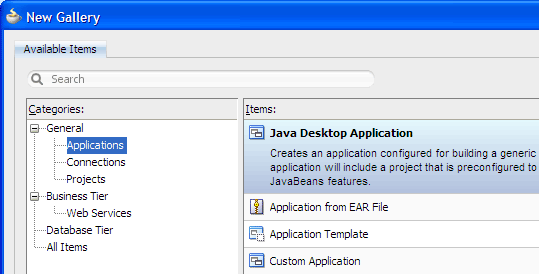
From the main menu, choose File > New. In the New Gallery, expand the General category and select Applications. Then in the Items list, select Java Desktop Application and click OK.
-
To follow along with the example, enter
MySwingApplicationas the application name.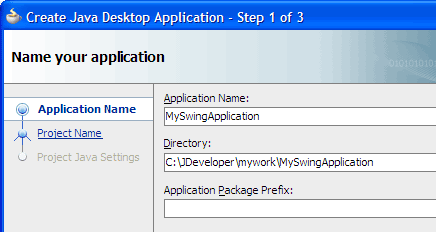
Accept the defaults and click Finish.
The Projects panel in the Application Navigator should look like this: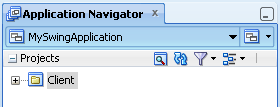
Read more...
At the same time, it keeps track of your projects and all
environment settings.Based on prebuilt templates, a JDeveloper application allows you to specify a predefined type of environment, depending on the type of application you want to create (web application, Java application, and so on). Application templates provide you with a quick way to create the project structure for standard applications with the appropriate combination of features already specified. The application template also filters the work you do in JDeveloper such that the choices available are focused only on the features you are working with.
In this tutorial, you will use the Java Desktop Application template, which makes available objects associated with all the features that JDeveloper supports in a single project.
Once you have created an application using a suitable template, you can still add new projects to the application and specify what features are to be included. To do this, in the Application Navigator, right-click the application name and choose New Project. In the New Gallery, you can select any type of project in the Items list.
Read more...
The project or projects in the application define the associated features.
A JDeveloper project, which is used to logically group files that are related, keeps track of the source files, packages, classes, images, and other elements that your program may need. Projects manage environment variables such as the source and output paths used for compiling and running your program. Projects also maintain compiler, runtime, and debugging options so that you can customize the behavior of those tools per project.
You can add multiple projects to your application to easily access, modify, and reuse your source code. Different projects might contain files representing different tiers of a multi-tier application, for instance, or different subsystems of a complex application. These files can reside in any directory and still be contained within a single project.
Read more...
Projects are displayed as the top level in the hierarchy in the
Application Navigator. The Java Desktop Application template that you used for your application creates one project using a
default project name of Client.
In the Application Navigator you can collapse and expand any panel. You adjust the size of panels by dragging the splitter between two panels. To group and sort items in the Projects panel, use the
JDeveloper has the capability of recognizing many different file types, displaying each in its appropriate viewer or editor when you double-click the file in the Application Navigator. Closing an application or project closes all open editors or viewers for files in that application or project and unloads the files from memory.
Note: Nodes in italics in the Application Navigator mean that the elements have not yet been saved. A project node is bold when a file in the project is selected.
From the main menu, choose Application > Show Overview. The Application Overview window opens in the editor window area. For example:
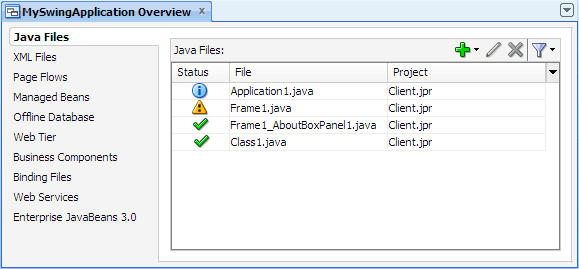
All objects that you create within JDeveloper appear in the Application Overview file summary pages, arranged by object type. As you create new files and artifacts, you can view them filtered by status and project.
You can optionally close the Application Overview window, since you will not be using it to create objects for this application.
-
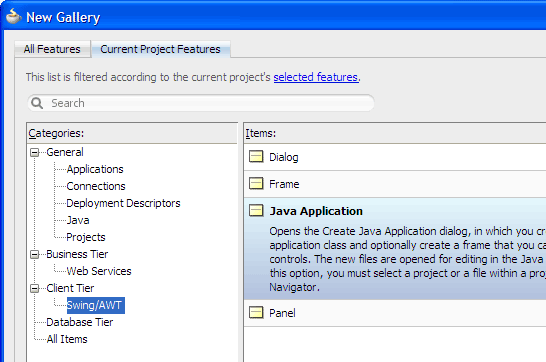
In the Application Navigator, right-click the project you just created and choose New. In the New Gallery, under the Client Tier category select Swing/AWT, and in the Items list, select Java Application. Then click OK.
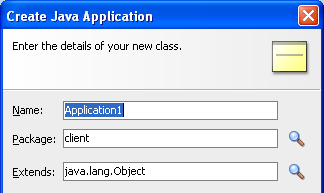
Accept the default name and package for the class.
-
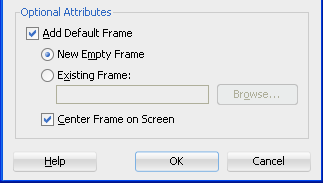
Under Optional Attributes, accept the default values to create a new frame and click OK.
-
In the Create Frame dialog, accept the default name and package for the class.
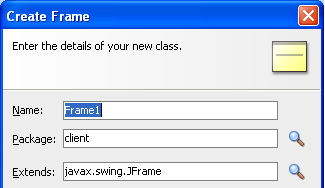
-
Under Optional Attributes, enter
My Java Swing Applicationas the title for the frame. Then select Menu Bar, Status Bar, and About Box to create those items for this first frame.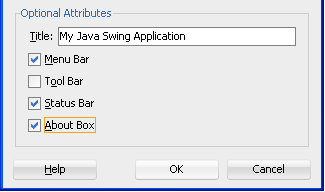
-
Click OK.
Read more...
When you use the Create Java Application dialog and the subsequent Create Frame dialog, JDeveloper adds a skeleton application file and a frame file to your project, which by default are named Application1.java and Frame1.java.
jbInit() method in Frame1.java,
which sets properties and other initialization code used by the Java visual editor.
Read more...
After creating the application, you will use the Java visual editor to develop the UI and the Java source editor to develop your application class.
Read more...
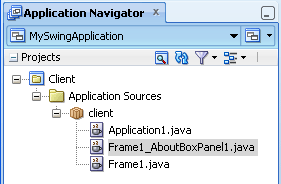
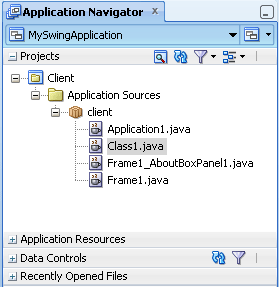
Notice that if you accepted the default file names, a skeleton Application1.java file and a Frame1.java file have been added to the Client project, as well as the Frame1_AboutBoxPanel.java file, based on the options you selected in the dialogs.
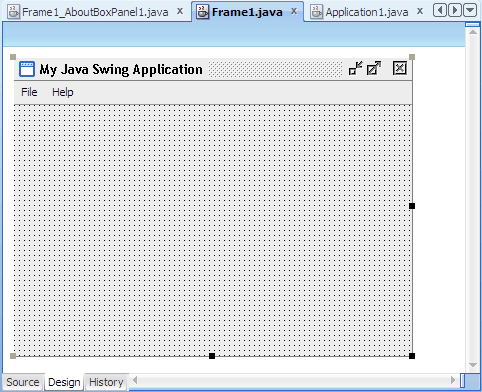
The file Frame1.java is open in the design view of the editor window, in the middle of the JDeveloper IDE. The tabs at the top of the editor window (the document tabs) let you select a different file; the tabs at the bottom (the editor tabs) let you select a different view.
On the Swing page of the Component Palette, Components panel, select the
 JButton component
and then drag and drop it in the frame in the visual editor.
JButton component
and then drag and drop it in the frame in the visual editor.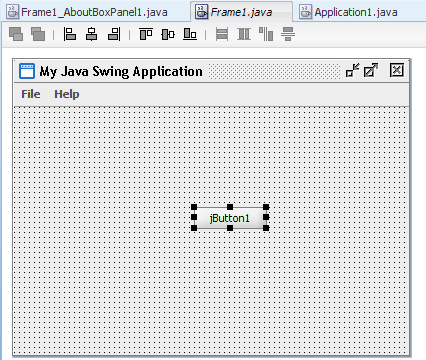
The Java visual editor, which displays the visual components of a user interface in editing mode. Use the Java visual editor to create and arrange panels and other UI components inside a frame or other UI container.
A Menu Editor in which you create and edit a menu bar, menus, menu items, and popup menu components. You access the Menu Editor when you have the Java visual editor open by dropping a menu component into your UI container from the Component Palette.
-
A Component Palette containing visual and nonvisual components.

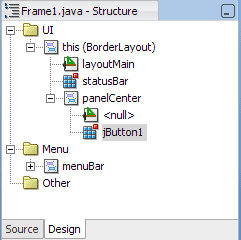
A Structure window that displays a hierarchical view of all the components in your source file, and their relationships.
The Property Inspector in which you inspect and set component properties and attach methods to component events. Changes made in the Property Inspector are reflected in the Java visual editor and source code.

Resize the component by clicking to display its grab bars and then dragging the bars.
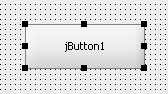
Modify the position of the component by clicking and dragging it in the frame.
In the Property Inspector expand the Visual section, then change the default text that displays on the button by entering
Click herein the text field.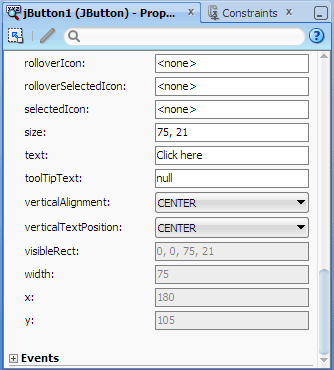
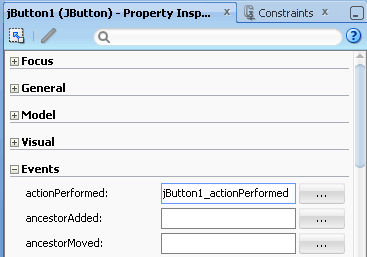
With the button still selected, expand the Events section in the Property Inspector, then click the actionPerformed
 browse button to open the Edit Property dialog.
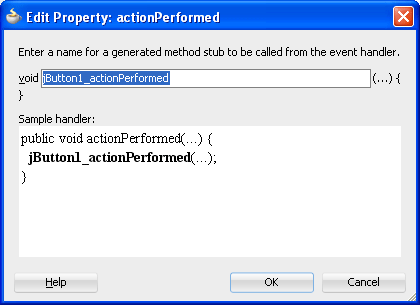
Click OK to accept jButton1_actionPerformed as the name for a generated method stub to be called from the event handler.
-
Click
 Save All to save your work.
 -
Edit your code immediately in the Java source editor and then add components from the Swing page of the Component Palette, or
-
Continue adding components from the Swing page of the Component Palette, modify the components' properties, and then edit the source code.
Read more...
You construct the UI with JavaBeans (such as buttons, text areas, lists, dialogs, and menus) selected from the Component Palette. Then, you set the values of the component properties and attach event-handler code to the component events.
JDeveloper UI design tools include the following:
Read more...
Changes made in the Property Inspector are reflected in the Java visual editor and source code. The Property Inspector displays the properties of the component selections you make in the Java visual editor. The components are organized by categories, and can be easily located with the Find field on the toolbar.
 Read more...
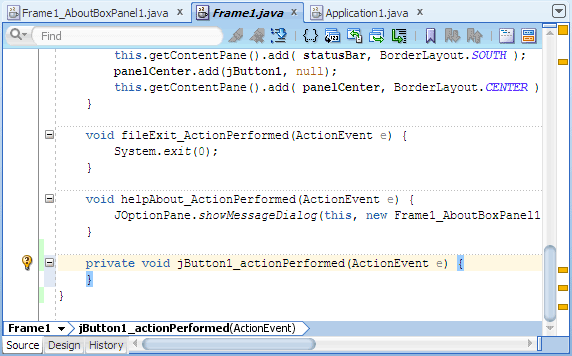
The cursor is in the correct location to add code between the curly braces of the method.
Depending on your preferred style of working, to complete the UI, you can either:
In the source editor, add sample code to the JDeveloper-generated code, to add an action-performed event for the button.
Replace the code that was added automatically in theFrame1.javafile when you added theactionPerformedevent:
private void jButton1_actionPerformed(ActionEvent e) {
}
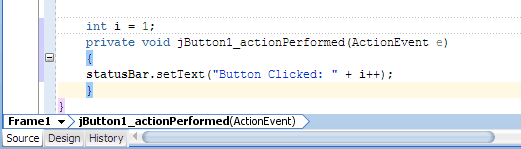
with this sample code, to create a Java application that counts the number of times you click the button you added, and displays that number in the status bar:-
Java Code Insight, the Java-specific implementation of completion insight
-
Code Assist to fix common problems
-
Import statement assistance and sorting
-
Automatic doc comment templates
-
Customizable sorting and expansion for the Structure window
-
Distinctive highlighting for syntax and semantic errors
-
Customizable code separators
-
To (optionally) add your own code, start typing to activate Java Code Insight.
To (optionally) add an import statement when you reference a class, select the name of the statement that appears below the ragged line.
-
To (optionally) see Code Assist's suggested fixes for specific problems in your code, click the
 Code Assist icon in the left margin.
{
statusBar.setText("Button Clicked: " + i++);
}
When you add the code sample, the code at the bottom of the Java source editor should look like this:
When you run your application in the next step, you'll see the new dialog and button that you created.
Read more...
System. to begin the Java statement System.out.println("Hello world");
the Java source editor will look like this:
Read more...
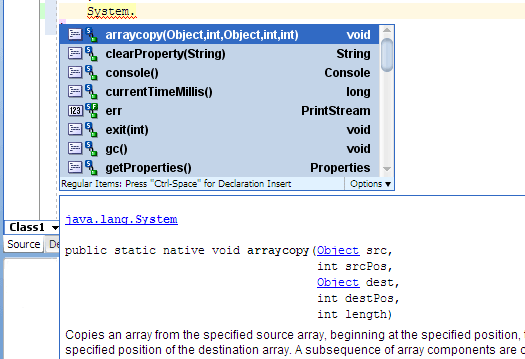
With Java Code Insight, you can filter out information not likely to be as useful to you (such as top-level packages, imported classes, default object methods, deprecated items) and emphasize the information that you'll want to focus on (local variables, locally declared members, overloaded methods). You can configure member insight, the Java-specific implementation of Code Insight's completion insight, and you can choose to display deprecated members or not in Code Insight's parameter insight window. Member insight provides you with a list of which instance and static members (fields, methods, inner classes) are accessible from a given statement context. From any given method, in other words, it tells you which methods you can call.
Read more...
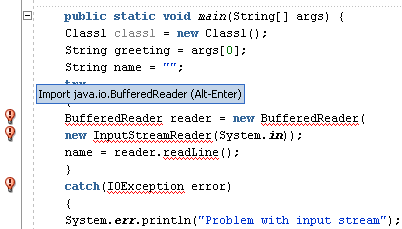
As you are typing in the source editor, if you reference a class that has not yet been imported, a ragged line will appear below it. If import assistance is enabled, a popup will appear with the name of the statement to be added. To manually add each missing statement, place the cursor over the ragged line, and then press Alt+Enter.
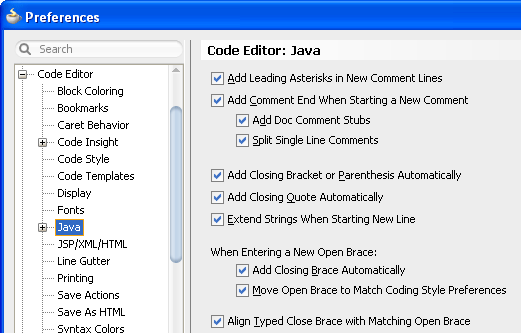
By default, JDeveloper automatically inserts the import statements. To change this behavior, choose Tools > Preferences > Code Editor > Java > Imports to open the Preferences dialog, Imports page. Then deselect the Automatically Add Unambiguous Imports option.
Read more...
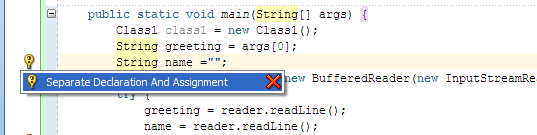
A
Code Assist icon appears in the editor margin when JDeveloper has a suggestion for a code change. To invoke Code Assist manually, press Ctrl+Alt+Enter. To select an action listed in Code Assist, press Alt+ the underlined key.
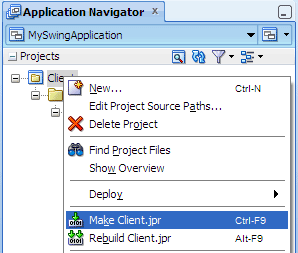
In the Application Navigator, right-click the project and choose Make Client.jpr.
-
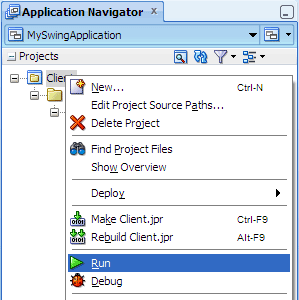
Once the project is compiled, in the Application Navigator, right-click the project and choose Run.
-
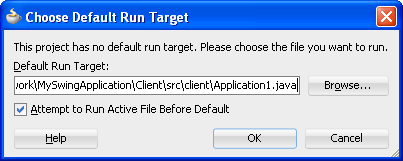
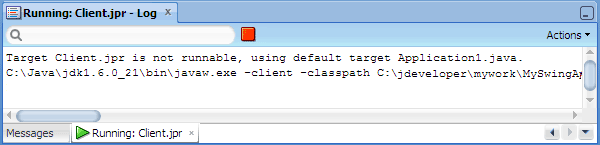
In the Choose Default Run Target dialog, browse the client folder and select Application1.java, which contains a main method, as the default run target. Then click OK.
Read more...
You can customize various compiler settings, including specifying the default compiler, by choosing Application >
Project Properties > Compiler.
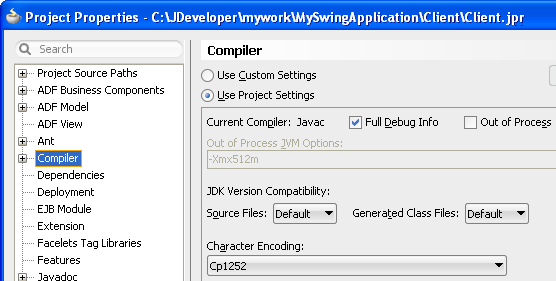
JDeveloper uses the powerful, full-featured Java compiler (Javac) to build your projects or parts of your projects. Javac fully supports the Java language. Details of a compile are displayed in the Log window. JDeveloper allows you to control how your files are compiled, including which warnings to show, in the Project Properties dialog, Compiler page.
For a Java source (
.java) file, both the Make and the Rebuild commands cause a compile.
You can optionally run your application without compiling it first by choosing the Run command, since the source files will always be saved and compiled prior to running.
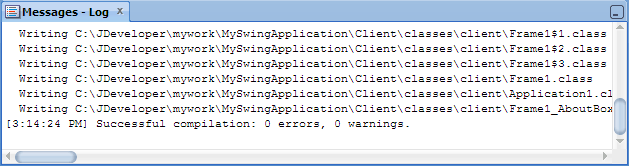
Details of the compile are displayed in the Messages Log window.
Read more...
The run target for this Java Swing application must be a Java class that includes a main method. When developing with other technologies, a run target might be a Java servlet, a Java Server Page (JSP), an EJB, an HTML file, an XSQL file, or a JDeveloper extension. After you specify the default run target, you can run the application again later by selecting any file in the project, and clicking
 Run in the main toolbar.
When you run your application, the Log window opens and displays details about the running process.
Run in the main toolbar.
When you run your application, the Log window opens and displays details about the running process.
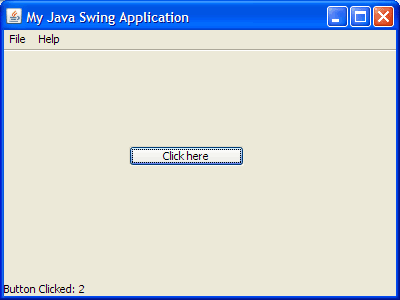
Then you will see the application UI you've coded:

Each time you click the button, a message displays on the status bar, showing the number of times the button has been clicked:
To exit the application, from the menu bar on the application UI, choose File > Exit.
Using the Create Java Class dialog, new classes can be created and added to your project after you build the initial set of project files.
-
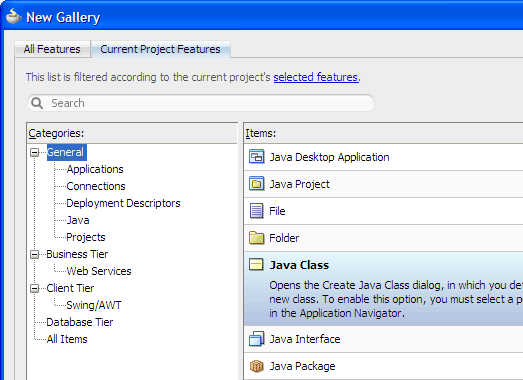
In the Application Navigator, select the Client project and choose File > New > General > Java Class and click OK.
-
In the Create Java Class dialog, enter
Class1as the class name if you are using the sample code. Accept the default package name.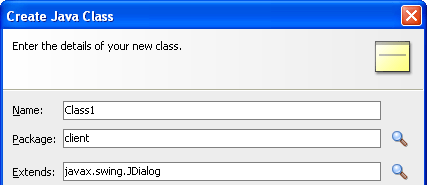
If working with the sample code, enter
javax.swing.JDialogin the Extends field, by clicking Browse and using the Class Browser.
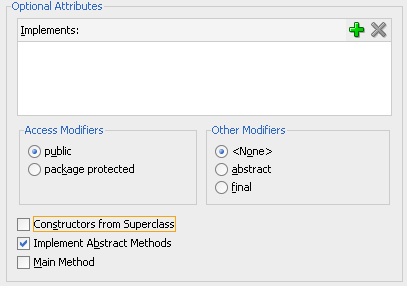
Under Optional Attributes, deselect Constructors from Superclass, and confirm that Main Method is not selected. Then click OK.
In the editor window, select the Frame1.java tab at the top, and then the Source tab at the bottom, to view the Frame1.java file in the source editor. Then add code to include this new Java class file in your application.
After this line of code you previously added in theFrame1.javafile:
statusBar.setText("Button Clicked: " + i++);
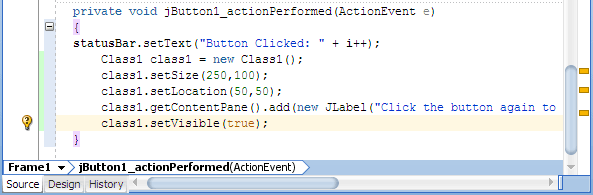
add the following sample code to enhance your application so that it also displays the new dialog when you click the button:-
When your changes are complete, in the Application Navigator, right-click the Client project and choose Run.
In the application UI, each time you click the button, you'll see the new dialog that you created:
To stop the application, from the menu bar on the application UI, choose File > Exit.
Read more...
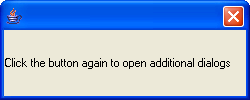
class1.setLocation(50,50);
class1.getContentPane().add(new JLabel("Click the button again to open additional dialogs"));
class1.setVisible(true);
Read more...
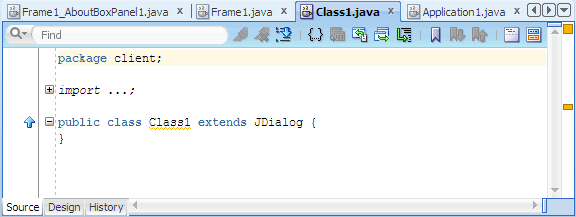
Notice that a skeleton Class1.java file has been added to the client tier of your project.
If you added the code sample, the code at the bottom of the source editor should look like this:
- Use the Create Java Application dialog to create the skeleton files for your application.
- Use the Java visual editor to easily assemble the elements of a user interface (UI) for your Java application using Swing components.
- Use the Java source editor, which provides functionality such as Java Code Insight and import statement assistance as you edit your source files.
- Build your project utilizing the speed and advanced functionality of the Java Compiler (Javac).
- Run the application file or project from the Application Navigator and optionally specify its main method.
- Building a Java Swing Application with Oracle ADF
- Getting Started with the JDeveloper IDE
- User's Guide for Oracle JDeveloper