
 Part 2: Using JUNIT and Ant to Compile and Deploy your Application
This tutorial shows you how to configure your environment and use testing tools for continuous integration development management.
Hudson is a continuous integration server. It can be connected to JDeveloper and use JUnit and Ant for implementing your testing process. You commit your changes to your versioning repository, and Hudson pulls out your code from the repository, builds it, deploys it, and runs any tests or other QA analysis that you specify.
Before starting this tutorial, you should:
-
Have access to or have installed Oracle JDeveloper 11.1.2.x. You can download it from Oracle Technology Network. Install it into a directory of your choice. In this tutorial, the installation directory is referred to as JDEVELOPER_HOME.
-
Have access to, or have installed an Oracle 11g database, including the HR schema. (Note that the schema may be locked for security purposes. If this is the case you will need to log in to sqlplus using the system user, and unlock it).
-
Have downloaded Team Productivity Center Server from OTN and installed it.
-
Have downloaded Team Productivity Center Connectors (the Task Connector) from OTN.
-
Have created a Team Productivity Center (TPC) user in your database (with tpc/tpc for the username/password) granted with admin rights.
 Read more...
Before the introduction of continuous integration (CI) tools, development teams all had to stop work while the 'release' manager or perhaps the 'deployment manager' tested jobs manually. With CI, testing is done automatically and often, and the testing occurs on a schedule that suits the entire team. With this approach, the QA team gets access to the code sooner, bugs are found more quickly, and the whole turnaround and feedback to engineers is improved.
| Purpose | Duration | Application |
|---|---|---|
| The application that you create uses information based on departments and employees entity objects. Using several additional tools like Subversion, WebLogic Server, TPC, Ant, JUnit and Hudson, you see the how each piece can contribute in the whole process of continuous integration. To see the complete application you will create, click the Download button to download a zip of the final application, and then unzip it in your JDeveloper mywork folder. |
2 hours |  |
In the first part of this tutorial, you configure and start WebLogic Server (WLS). You then deploy TPC to WebLogic Server. Then you create a new Fusion web application and build reusable business components that will access the database. Finally, you version your application and define team rules.
To configure and start WebLogic Server, perform the following steps:-
From the start menu, select Programs > Oracle Fusion Middleware 11.1.2.x > WebLogic Server 11gR1 > Tools > Configuration Wizard.

Wait for the configuration wizard to appear.
-
In the Fusion Middleware Configuration Wizard, select the Create a new WebLogic domain option.
Click Next.
-
Click Next on the Select Domain Source step to accept the default values.
-
Click Next again to leave the base_domain default name.
-
In the Configure Administrator User Name and Password step, enter weblogic/Welcome1 as the username/password combination.
Confirm the user password, and click Next.
-
Click Next again on the Configure Server Start Mode and JDK step.
Click Next again to skip the Select Optional Configuration step.
-
On the Configuration Summary, click Create.
-
When the installation is done, select the Start Admin Server check box. Another way to start the Admin Server is to launch the file startWebLogic.cmd that is created during the WLS installation. This file is located in the JDEV_HOME/user_projects/domains/base_domain directory.
Click Done.
-
A command window displays the startup process log. Wait until the startup process finishes and WebLogic Server is running.
-
To access the WebLogic Administration Console, open a browser window and type http://localhost:7001/console.
-
Wait for console portal to deploy, and then enter weblogic/Welcome1 as your username/password to log in to WebLogic Server.
-
The WebLogic Server Administrator Console is displayed.
-
In the left hand side, in the Domain Structure pane, click the base_domain | Deployments link.
-
You can see that no applications have been deployed yet.
-
If you need to restart WebLogic Server at any time, you can restart it by running the startWebLogic.cmd file in JDEVELOPER_HOME/user_projects/domains/base_domain.
-
You must have a JAVA_HOME environment variable defined that points to JDK 1.6.0_21 (or higher). In a Microsoft Windows environment, open the System Properties dialog box. In the Advanced tab, click the Environment Variable button. If no JAVA_HOME environment variable is defined, add a new one that points to the correct JDK. Note that directory names must not contain spaces.
 You can also set the JAVA_HOME environment variable from the command line.
Read more...
You can also set the JAVA_HOME environment variable from the command line.
Read more...
Navigate to the directory that contains the Oracle Team Productivity Center installation file, tpcinstaller.jar.
From the command line (that is, a Linux or DOS command shell), type the following command, substituting the installation system's JAVA_HOME directory with no space in the directory names:
set JAVA_HOME=location of java_home
For example, on a Windows system with JDK 1.6.0_21 installed in the 'Java' directory on the C:\ drive, the command would be:
set JAVA_HOME=C:\Java\jdk1.6.0_21
When the preceding command completes and the system command-line prompt is once again visible, type the following command:
set PATH=%JAVA_HOME%\bin;%PATH%
Then to install TPC, type the following command and skip the next action:
java -jar tpcinstaller.jar
-
Open a Windows Explorer window and locate the folder where you downloaded the tpcinstaller.jar file. Double click the tpcinstaller.jar file to launch the installer.
In future releases of JDeveloper, you should be able to find the JAR file in the Extensions folder of the JDEVELOPER_HOME.
-
Click Next to skip the Welcome page of the Oracle Team Productivity Center Installer.
-
Select the Team Productivity Center Server and Connectors options, and then click Next.
-
To complete this step, you need to have created a TPC user in your database. (Refer to the Prerequisites section at the beginning of the tutorial for details.) Enter your TPC username/password combination, and click the Test Connection button to test your connection. The installer connects to the database and detects whether the installation is new.
Click Next.
-
Enter a username/password combination for the TPC Administrator Account (for example, tpcadmin/Welcome1).

Click Next.
-
In the Application Server Location step, select WebLogic and click the Browse button to specify the path where the TCP deployed application will be hosted. For this tutorial, the location is [JDEVELOPER_HOME]\user_projects\domains\base_domain\autodeploy.
Click Next. If you see an Unable to Connect dialog box, then click Cancel to continue.
-
In the Connector Source step, select the Install From Local File option, and click the Browse button to locate the tpc-connector-task_bundle.zip file that you downloaded from Oracle Technology Network.
Click Next.
-
Click Install in the Installation Summary step.
-
In the Installation Complete step, click Close.
-
In the WLS command window, you can see that TPC is running.
-
When the installation is complete, in a Windows Explorer window, open the [JDEV_HOME]\user_projects\domains\base_domain\autodeploy folder. You should see the otpc.war file, which was created during the installation process.

-
Refresh the WLS console page in your browser. The _appsdir_otpc_war application should be up and running.
Make sure the state of the deployed application is Active.
You can now start creating an ADF Application in JDeveloper.
When you work in JDeveloper, you organize your work in projects within an application. JDeveloper provides several application templates that you can use when creating an application and projects. The application templates are pre-configured with a basic set of technologies that are needed for developing the various types of applications. You create your working environment by selecting the template that best fits your needs. You can then modify the application to add any other technologies you plan to use.
-
Start JDeveloper by selecting Start > Programs > Oracle Fusion Middleware 11.1.2.x. > JDeveloper Studio 11.1.2.x..
In the Select Role dialog box, choose Studio Developer and click OK.
 Shaping, which is based on the role of the user, allows the JDeveloper environment to tailor itself.
Read more...
Shaping, which is based on the role of the user, allows the JDeveloper environment to tailor itself.
Read more...
It does this by removing unneeded items from the menus, preferences, new gallery, and even individual fields on dialog boxes.
Shaping can even control the default values for fields on dialog boxes within the tool. When you first start JDeveloper, you are prompted to choose a role that describes how you are going to use JDeveloper.
If you choose a role of "Java Developer" versus "Database Developer " versus "Customization Developer " you will get a totally different experience!If a dialog box opens asking if you would like to import preferences from a previous JDeveloper installation, click NO. Close the Tip of the Day window.
-
Once loaded, the JDeveloper IDE appears. The very first time you open JDeveloper, the Start Page displays. You can re-invoke the Start Page later by choosing Help > Start Page.
 Notice the various options available to help you learn about JDeveloper.
Read more...
Notice the various options available to help you learn about JDeveloper.
Read more...
After exploring some of these options, close the Start Page by clicking the X on its tab (the X appears when you mouse over the tab).
-
Click the New Application link in the Application Navigator.
-
In the New Gallery, choose Fusion Web Application (ADF) and click OK.
JDeveloper loads the required features for a Fusion web application, and the Create Fusion Web Application (ADF) Wizard launches.
-
In the Name your application page of the wizard, type Hudson as the name. If required, you can change the directory path to create your files in another location.
Click Next.
-
In the Name your project page ensure that the project name is Model (the default). Notice that ADF Business Components and Java are listed as the project features of a Fusion web application.
Click Next.
-
The Configure Java settings page allows you to define a default package, a Java source path, and an output directory. Click Next to accept the default values.
-
In the second Name your project page, ensure that the Project Name is ViewController. Scroll through the list of project features to discover the types of technologies that can be used with a Fusion web application.
Click Next.
-
In the Configure Java settings page accept the defaults and click Finish to create your Fusion web application and projects.
-
The Hudson application and the two projects (Model and ViewController) are displayed in the Application Navigator in the left pane.
 Notice also the Checklist within the Hudson Overview tab in the editor screen.Read more...
This checklist is displayed by default when a Fusion web application is created. It is designed as a guide to lead you through the tasks involved in building this type of application.
You can close the Hudson Overview page.
-
In the Application Navigator, collapse the ViewController node, then right-click the Model node and select New.
-
In the New Gallery, select the Business Tier | ADF Business Components category and choose the Business Components from tables item.
Click OK.
-
In the Initialize Business Components Project dialog box, click the Create a new database connection
 icon next to the Connection field.
-
In the Create a Database Connection dialog box, specify the following properties for the new connection:
Connection Name HRConn UserName hr Password hr Enter the appropriate Oracle JDBC Settings to point to the host, port, and SID for your database. Click the Test Connection button to verify that you can connect successfully.
Click OK.
-
Back in the Initialize Business Components Project dialog box, click OK
.
-
The Create Business Components from Tables Wizard launches. In the Entity Objects page, click the Query button to query the data dictionary and see available tables.
-
Enter model.entities as the package name. Select the DEPARTMENTS and EMPLOYEES tables in the Available list, and click the right arrow
 to move your selection to the Selected list. This step creates updatable entity objects based on the tables selected.
Click Next to continue.
-
In the Entity-based View Objects page of the wizard, enter model.viewobjects as the Package name, then move Departments (HR.DEPARTMENTS) and Employees (HR.EMPLOYEES) to the Selected pane. This step creates view objects, DepartmentsView and EmployeesView, for performing queries on the entity objects you just created.
Click Next to continue.
-
In the Query-based View Objects page, click Next to skip the step.
-
In the Application Module page, type model.services as the package name, then click Finish to create the business components in the Model project.
-
In the Application Navigator, expand the model.services node, then double-click AppModule to open it in the editor. Select the Data Model tab.
-
Under Data Model in the right pane, select EmployeesView1 and click the left arrow
 to remove the selected component (and its children) from the list.
-
The data model is now reduced to a simple model. The Data Model list should look like the following:
-
Click the Save All
 icon on the JDeveloper menu bar, or select File > Save All from the main menu.
-
In the main menu in JDeveloper, select Versioning > Create Local Repository. (Note: If the Versioning menu does not include the same options as the menu in the following sreenshot, then select Tools > Preferences, and select the Versioning node. In the Versioning node, click Load Extension, then click the Subversion sub-node and click Load Extension. Now, when you select Versioning from the main menu, the full versioning menu is displayed.)
-
In the Create Subversion Repository dialog box, enter D:\repository as the new repository path (avoid using spaces in the path), and specify a connection name: MyRepository.
Click OK.
-
Notice that the Versioning Navigator opens (by default, in the lower left corner of the IDE). Expand the Subversion node to see the repository you just created.
-
Right-click MyRepository and select New Remote Directory.
-
In the Create Remote Directory dialog box, enter trunk as the directory name and main root folder for applications as the comment.
Click OK.
-
A new entry is created in the Versioning Navigator. The SVN Console Log shows the statement issued for this command.

-
From the main menu, select Versioning > Version Application.
-
In the Import to Subversion Wizard, click Next to skip the Welcome page, and in Step 2 select MyRepository as the repository connection and trunk as the path.
Click Next.
-
In Step 3, the source directory is set to the location of the current workspace. Accept this default, and type Versioned Business Components as a comment.
Click Next.
-
Notice the list of default exclusion filters on the right. The filters in the list are applied when you import an application. Any files that match the filters are not imported. For example, the '**/classes/**' entry specifies that compiled classes are not imported.
Click Next again in Step 4.
-
In the Options page, select Perform Checkout.
Click Next, and then Finish. The process of importing files to Subversion starts.
-
The Application Navigator should now look like the following:
-
In the Versioning Navigator, right-click the MyRepository node and select Copy URL. You need this URL later in the tutorial when you specify the location of your repository to TPC.

-
Click the Save All
icon on the JDeveloper menu bar, or select File > Save All from the main menu.
Now that TPC is up and running in WebLogic Server and JDeveloper is loaded, you can start creating users, team rules, roles, and other team related definitions.
-
From the main menu in JDeveloper, select View > Team > Team Navigator.
-
In the Team Navigator tab, click the Connect to Team Server link.
-
In the Connect to Team Server dialog box, specify the following connection details:
Team Server localhost Port 7001 Use SSL Connection not selected Username tpcadmin Password Welcome1 
Click Connect.
-
When you first connect, there are no existing team members. To set up a new team member, click the Team icon and select Team Administration.
-
In the Team Administration dialog box, click the Teams tab, and then click the New
icon next to Teams. 
-
Type Development Team to name the new team. Type Development project I as the description.
-
Click the Users tab and notice the information that appears for the Administrator TPC user.
-
In the Users tab, click the New
 icon to add a new user.
Enter the following properties for the new user:
icon to add a new user.
Enter the following properties for the new user: First Name Nat Last Name Adderley Login nadderley Status Active Email nat.adderley@example.com Password Welcome1 Create new teams selected Create new users selected 
-
Click the New
icon again to add another new user. Enter the following
properties for the new user: First Name John Last Name Coltrane Login jcoltrane Status Active Email john.coltrane@example.com Password Welcome1 Create new teams selected Create new users selected 
-
Click the New
icon again to add another new user. Enter the following properties for the new user: First Name Miles Last Name Davis Login mdavis Status Active Email miles.davis@example.com Password Welcome1 Create new teams selected Create new users selected Administrator selected 
-
Click the Teams tab again. In the Team Details tab, click the Add Team Member
icon. 
-
In the Select Team Members dialog box, select the three users that you just created, and shuttle them to the Selected Users list.

Click OK.
-
In the Team Members list, notice that the Status for all team members is set to Active. In the Role column, change the role for Miles Davis to Team Administrator.
-
Next, you need to specify to TPC the location of your Subversion repository. Specifying the location of the Subversion repository enables commit actions to include TPC information. Click the Repositories tab, and select the Versioning node. Click the New
icon to create a new connection to the repository. 
-
In the Connector list, select Subversion as the repository tool, and specify whatever name you want for the repository (for example, file_based_repository).
Now you have specified to TPC that you are using a Subversion repository. Next, you need to specify the team that will use this repository. Click the Teams tab.
-
In the left pane, select your team, Development Team. Click the Team Repositories tab, and select the file_based_repository name. For the Server URL, in the Value field, paste the Subversion repository URL that you copied earlier (for example, file:///home/oracle/repository).
-
Next, you build a Task repository. While still in the Team Administration dialog box, click the Repositories tab, and select the Work Item node. Click the New
icon. 
-
For the new repository, from the Connector list, select Task, and then enter the name teamTasks. In the Description field, enter local server.
-
In the Repository Servers area, click the Add
icon. The default name New Repository Server is generated. 
-
Click the Teams tab and then the Team Repositories tab. Select the teamTasks name so that the teamTasks repository is also available to the team.
Click OK.
-
Now you must disconnect the current tpcadmin user from the Team Server, and reconnect as one of the team members. In the Team Navigator, click the down arrow next to the Team icon, and select Disconnect.
Now that TPC members are created, you can connect as one of the team members and start defining tasks.
-
Click the Connect to Team Server link to reconnect as a new team member.
-
In the Connect to Team Server dialog box, enter mdavis for the username and Welcome1 for the password. Click Connect.
-
You should see the list of the team members for the Development Team. Notice the icon indicating that Miles Davis is the connected user.
-
Expand the Work Items panel of the Team Navigator, and expand the teamTasks repository.
-
Because you are accessing the task repository for the first time, you see an error message indicating that you failed to log in to the teamTasks repository. Click Yes to access the Account Manager.
-
In the Manage Accounts dialog box, enter your username/password combination (mdavis/Welcome1), if necessary, and click the Test Connection button.
If the connection is successful, click OK. Otherwise, you can refer to the command window where WebLogic is running and examine the reason for the connection failure.
-
In the Work Items panel, right-click the teamTasks node, and select New Task.
Wait for the New Task pane to load.
-
In the New Task pane, type End-2-End demo as the task name.
-
Click the Save All
icon on the JDeveloper menu bar, or select File > Save All from the main menu. -
In the Work Items panel, right-click Team Queries, and select New Query.

-
In the New Task Query tab, select Team from the first drop-down list, select Like as the operator, and then click the Browse for Team
 icon. In the Select Team dialog box, select DevelopmentTeam.
Click OK.
-
Click the More Actions button (on the right side of the screen), and select Save As to save the query.
-
In the Save Query dialog box, enter team tasks in the Name field. Because you are the Administrator team user, select the Team Query button, and then click OK to make this query available to team users.
The query that you have created, team tasks, searches for tasks that are assigned to the Development Team.
-
Notice that the query, team tasks, appears in the Work Items panel of the Team Navigator under the Team Queries group. The <Empty> status next to Active Work Item indicates that no active task is currently defined.
-
In the team tasks tab, select the task 1 row in the Result list. Right-click within row, and select Make Active.

-
In the Work Items panel, the new active task is displayed.
Now you can start assigning team members to specific tasks.
-
To assign someone to a task, select the End-2-End demo tab, then click the Search
 icon next to the Assigned to field.
Remove Miles.Davis from the search field, and click the Search button. From the list of people in the team, choose John Coltrane and click OK.

-
The task is now assigned to John Coltrane. In the Description field for the task, type Define the Model Components.
-
In the Work Items panel of the Team Navigator, right click teamTasks and select New Task.
-
In the New Task tab, type Second task as the task name. Click the Browse
 icon next to the Assigned to field, and assign the task to John
Coltrane.
icon next to the Assigned to field, and assign the task to John
Coltrane. 
-
Type Create the Database components in the description field.
-
Click the Save All
icon on the JDeveloper menu bar, or select File > Save All from the main menu. -
Back in the team tasks tab, click the Search button. The second task is now displayed.
Every time you commit work to the Subversion repository, you can associate the files included in the checkin with the associated task in the team repository.
-
Switch back to the Application Navigator tab. Every time you make changes to your application, you need to save the changes to your repository. Right-click in the Hudson application name and select Versioning > Commit Working Copy.
Note that if you select a project (instead of an application) and version it, you restrict the versioning action to the components of the selected project.
-
When you check in to the SVN repository, a checkin to the TPC task (teamTasks 1 End-2-End demo) is automatically added.
Notice that you can click the Add work items
icon to associate this checkin with additional TPC
tasks, and thereby associate one checkin with multiple TPC tasks.
The versioning needs to be done early to keep track of all the
changes. Click OK.
-
In the Projects panel of the Application Navigator, expand Model > Application Sources > model.viewobjects, and double-click the DepartmentsView.xml node to open it.
-
In the DepartmentsView view object, click the Attributes tab. Select the DepartmentId attribute, and type the following text in the Description field: Department identification value.
-
Click the Save All
icon on the JDeveloper menu bar, or select File > Save All from the main menu. -
In the Projects panel of the Application Navigator, right-click the DepartmentsView node, and select Versioning > Commit.
-
The Commit Resources dialog box shows the resources that are impacted by this commit action. In the Comments area, type Adding comments to the model view to keep track of the nature of the change.
Click OK.
-
Click the End-2-End demo tab, and then select the Changes tab. Notice that the changes are recorded in the Revision section. Select the revision '3' row to show the list of updated files that are included in the revision.
-
In the Projects panel of the Application Navigator, under the model.viewobjects node, you should see a new version number (3) for the DepartmentsView view object.
Notice that the Versioning Navigator and the SVN Console log show the same information.
-
Add a validation rule that requires a minimum of 4 characters for the department name. In the Projects panel of the Application Navigator, expand the model.entities node, and double-click the Departments entity node. In the editor, click the Attributes tab.
-
Select the DepartmentName attribute, and click the Validation Rules tab. Click the Add Validation Rule
icon.
-
In the Add Validation Rule dialog box, set the following values:
Property Value Rule Type Length Operator GreaterOrEqualTo Comparison Type Character Value 4 
-
Click the Failure Handling tab and verify that Error is selected for the Validation Failure Severity. In the Message Text field, type Department Name must be at least 4 characters.
Click OK.
-
Click the Save All
icon on the JDeveloper menu bar, or select File > Save All from the main menu. -
Next, test the validation rule. In the Application Navigator under model.services, right-click the AppModule node and select Run.
Wait for the Oracle ADF Model Tester to load.
-
In the Oracle ADF Model Tester, double-click DepartmentsView1. Click the Insert a new row
icon to create a new department. 
-
Enter a department Id value (530) and a 3 characters long department name (ABC).
Click the Save changes to the database
 icon to save your changes.
 -
An error window appears stating that the DepartmentName attribute is required. Click OK to dismiss it. A second error window appears showing the error message that you just specified.
Click OK.
-
Close the Oracle ADF Model Tester window. In JDeveloper, click the Save All
icon on the JDeveloper menu bar, or select File > Save All from the main menu. -
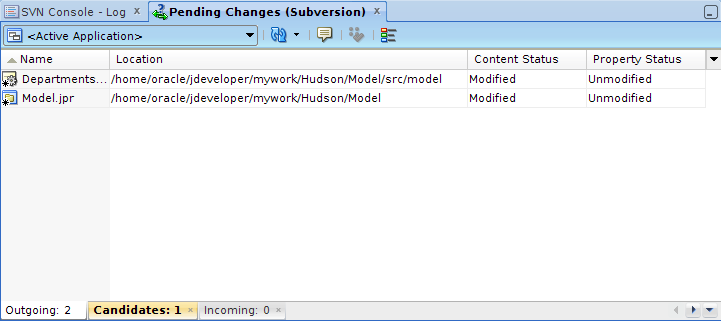
From the main menu, select View > Team > Pending Changes.
Notice that the Pending Changes tab appears in the Log window. The Outgoing tab shows the name, location, and source control status of the files that have been modified.
-
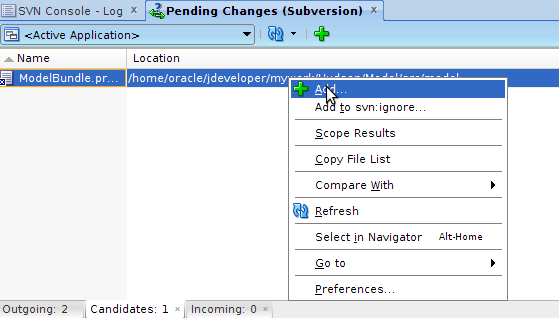
At the bottom of the Pending Changes tab, click the Candidates tab. The Candidates tab shows files that have been created locally, but have not yet been added to source control. In the list of candidates, right-click the unversioned element, and select Add to add it to the Outgoing list.
-
In the Projects panel of the Application Navigator, right-click the Model node, and select Versioning > Commit Working Copy.
-
In the Commit Working Copy dialog box, type Adding Entity validation rule for department name in the comments section.
Click OK.
-
A new version number is generated for the newly versioned elements.
This concludes the introduction to Subversion. Next, you learn how to use JUnit and Ant to test and build your application.