| C H A P T E R 3 |
|
Using the Command-Line Interface |
This chapter describes how to use the ILOM's command-line interface (CLI). The sections include:
To connect to the CLI, see Section 2.1, Connecting to the ILOM
This section describes how to use CLI commands. CLI commands are case-sensitive.
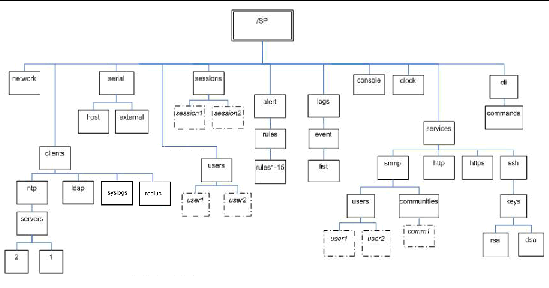
The CLI architecture is based on a hierarchical namespace, which is a predefined tree that contains every managed object in the system. This namespace defines the targets for each command verb.
The ILOM includes two namespaces: the /SP namespace and the /SYS namespace.
You can view your /SYS namespace by typing the show /SYS command from the command line. FIGURE 3-1 shows the /SP namespace. The /SYS namespace is unique to each platform.
FIGURE 3-1 Typical SP Namespace

The CLI provides two privilege levels: administrator and operator. Administrators have full access to ILOM functionality and operators have read-only access to ILOM information.
|
Note - The default user, root, has administrator privileges. To create a user account with operator privileges, see Chapter 5. |
The syntax of a command is: verb options target properties
The following sections describe each of these.
The CLI supports the following command verbs.
|
Transfers a file from an indicated source to an indicated target. |
|
The CLI supports the options listed in TABLE 3-2. Not all options are supported for all commands. See a specific command section for the options that are valid with that command. The help option can be used with any command.
|
Executes the command for the current target and all targets contained through the level specified. |
||
|
Skips warnings or prompts normally associated with the command. |
||
Every object in your namespace is a target. Not all targets are supported for all commands. Section A.2, CLI Command Reference lists each command, with its targets and properties.
Properties are the configurable attributes specific to each object. An object can have one or more properties. Section A.2, CLI Command Reference lists each command, with its targets and properties.
To execute most commands, you need to specify the location of the target, then enter the command. You can execute commands individually, or you can combine them on the same command line.
1. To execute commands individually:
a. Navigate to the namespace using the CD command.
b. Enter the verb, target, and value.
2. To combine commands, use the form verb path/target=value.
The following display shows both methods:
Copyright © 2007, Sun Microsystems, Inc. All Rights Reserved.