Administrative Access Rules
You use the Administrative Access Rules tab to:
-
Provide access to the Screen from additional remote Administration Stations
-
Provide access from the administration GUI for Local Administration.
You can add new users that you have created, re-add users for whom new passwords have been defined, or SecurID assigned names on this page. You add user, create and change passwords, and change SecurID names. Also, you can add an Access Rule for users, and change the encryption parameters.
You must activate a new policy for any changes to take effect.
The fields of the Administrative Access Rules tab are described in the SunScreen Reference Manual.
The following information describes using the administration GUI. Appendix A contains information about the command line interface.
To Add an Administrative Access Rule for Local Administration
-
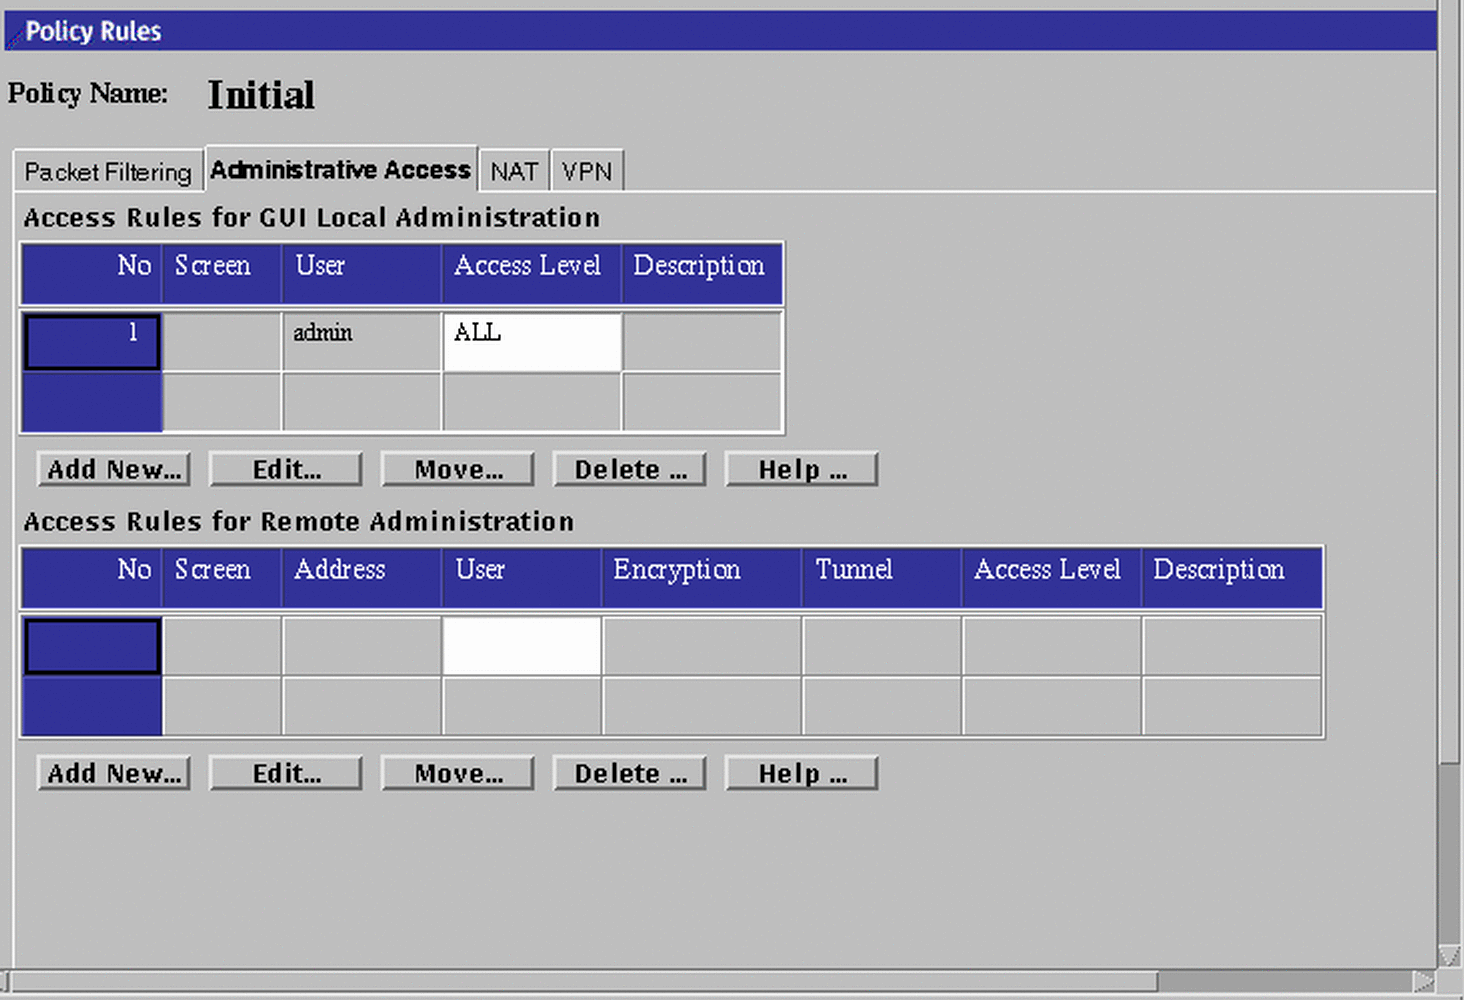
Click the Administrative Access tab in the Policy Rules area of the Policy Rules page to move to the Administrative Access area.
Figure 4-6 Administrative Access Area

-
Click the Add New... button, or Edit button, below the Access Rules for GUI Local Administration area.
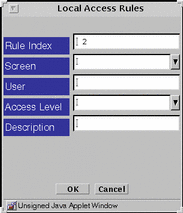
The Local Access Rules dialog window appears.
Figure 4-7 Local Access Rules Dialog Window

In the Administrative Access definition dialog window, there are different fields for local and remote administration.
The fields for Local Administration are:
-
Rule Index, the order in which access is checked. If a user is included in multiple Access Rules (explicitly or as a member of a Group), the first entry will be the one to determine the user's Access Level.
-
Screen entry limits application of the Access Rule to only the named Screen.
-
User is the user or group of administration users to which this Access Rule applies.
-
Administrative Access Level:
-
Status Administrators, who have the access level STATUS can only monitor SunScreens, but cannot view the policies.
-
Local Administrators, who have the access level READ, are users responsible for reviewing their individual Screen's policy. Local Administrators are allowed to read policies, but cannot change policies, so they must make a request for changes to Executive or Master Administrators.
-
Executive Administrators, who have the access level WRITE, can define and change policies.
-
Master Administrators, who have the access level ALL, grant the various access levels to the other administrators.
-
-
Description field entry is useful for notes
To Add an Administrative Access Rule for Remote Administration
If you are adding an additional remote Administration Station, you must add a rule for it. Make a note of the encryption parameters you are using, these parameters have to match the encryption parameters on the remote Administration Station.
-
Click the Administrative Access Rules tab in the Policy Rules area.
-
Click the Add New... button in the Access Rules for Remote Administration area.
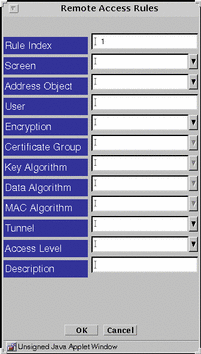
The Remote Access Rule dialog window appears.
Figure 4-8 Remote Access Rules Dialog Window

Encryption can have two values: SKIP_VERSION_1, and SKIP_Version_2.
-
Click the down arrow on the Screen field to display the choice list of Screens.
Perform this step only if you want to associate this entry with a specific screen.
Note -If you are using the Centralized Management Group feature, and this field is left blank, or with a "*" in it, the Access Rule being defined will allow, by default, access to all of the Screens in the cluster.
-
Click the down arrow on the Address Object field to display the choice list of addresses.
-
Click and highlight the address that you want to use.
Type the authorized user name in the User field.
-
Click the down arrow on the Encryption field to display the choice list of the versions of SKIP and highlight the version of SKIP that you want to use.
SKIP_VERSION_1 is used for communicating with an SPF-100.
-
Click the down arrow on the Certificate Group field to display the choice list of certificate groups and highlight the certificate group that you want to use.
Specify the Screen's certificate or certificate group (in this case, the Certificate or Certificate Group that includes the Remote Administration Station's certificate) and Administration IP address in the Screen's Administration Certificate field.
-
Click the down arrow on the Key Algorithm field to display the choice list of key algorithms and highlight the key algorithm that you want to use.
-
Click the down arrow on the Data Algorithm field to display the choice list of data algorithms and highlight the data algorithm that you want to use.
-
If you are using SKIP_VERSION_2 only, click the down arrow on the MAC Algorithm field to display the choice list of MAC algorithms and highlight the MAC algorithm that you want to use.
-
Click the down arrow on the Tunnel field to display the choice list of tunnel addresses and highlight the tunnel address of the Remote Administration Station.
-
Enter a description in the Description field.
-
Click the down arrow on the Access Level field to display the choice list of the access levels and highlight the level of access that you want this user to have.
There are four access levels for remote administrators:
ALL STATUS READ WRITE NONE (Default)
-
Click the OK button.
-
Repeat the previous steps until you have added all the access rules for remote administration through the administration GUI, as required.
-
Click the Save Changes button.
-
Add the Screen's certificate MKID in the SKIP database of the Remote Administration Station and configure it to use SKIP to communicate with the Screen.
To Edit an Administrative Access Rule for Remote Administration
If you change the encryption parameters, make a note of them before the changes because they have to match the encryption parameters on the remote Administration Station.
Perform the following steps to make any changes through the administration GUI:
-
Click the Administrative Access tab in the Policy Rules panel to display the Access Rules page.
-
Click and highlight the rule that you want to edit in the Access Rules for Remote Administration panel then click the Edit button.
The Access Rules applet window appears with the values for that rule.
-
Click the down arrow on the Address field,to display the choice list of addresses and highlight the address you want to use.
-
Type the Authorized User in the User field.
-
Click the down arrow on the SKIP Version field to display the choice list of the versions of SKIP and highlight the version of SKIP you want to use.
-
Click the down arrow on the Certificate Group field to display the choice list of certificate groups and highlight the Certificate Group that you want to use.
Choose the Certificate Group containing the Remote Administration station's Certificate, not the Group that contains the Screen's certificate.
-
Click the down arrow on the Key Algorithm field to display the choice list of key algorithms and highlight the algorithm you want to use.
-
Click the down arrow on the Data Algorithm field to display the choice list of data algorithm and highlight the algorithm you want to use.
-
Click the Save button
- © 2010, Oracle Corporation and/or its affiliates
