| C H A P T E R 3 |
|
UNIX File Utilities |
Use the UNIX File Utilities Menu to perform operations on files from within the Sun MTP environment. Utilities that use a default editor invoke vi. Refer to your UNIX documentation for instructions on using the vi editor. To change the default editor, refer to the Sun Mainframe Transaction Processing Software Administrator's Guide.
This chapter contains the following topics:
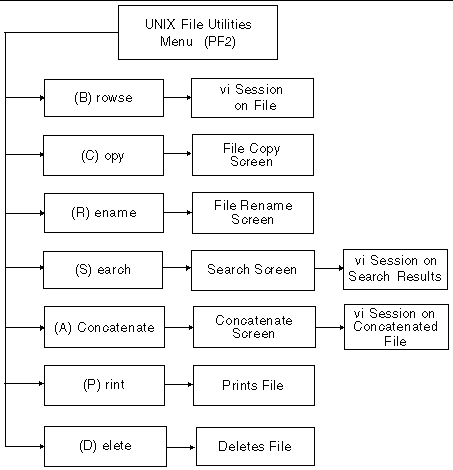
FIGURE 3-1 illustrates the menu structure.

|
 Press the PF2 key on the Development System main menu.
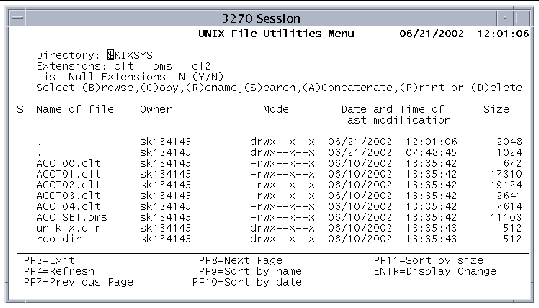
The menu (FIGURE 3-2) is a variation of the Sun MTP standard file selection screen.

The three display criteria fields at the top of the screen are described in the first three rows of TABLE 2-1. The Select field lists the options you can apply to the listed files. The file display area contains the same fields described in TABLE 2-2.
|
 Type the option letter (the letter in parentheses) in the selection column next to the desired file.
You can only apply one option to each file, but you can apply the same option to multiple files. You can also specify different options on the same screen. After you press Enter, the options execute sequentially.
The following function keys are active on the UNIX File Utilities Menu.
This section describes how to use the file utilities.
The Browse option runs the kixbrw shell script, which opens the selected file in the specified editor as a read-only file.
Use the Copy option to copy a single file. When you select a file to copy and press Enter, the screen in FIGURE 3-3 is displayed.

The File Copy screen has two sections:
After you finish data entry and press Enter, the kixcopy shell script is run to perform the copy.
Use the Rename option to rename a single file. When you select a file to rename and press Enter, the following screen is displayed.

The File Rename screen is similar to the File Copy screen and is divided into two sections:

|
Caution - When renaming with the replace option set to Y, no confirmation prompt is displayed. If you later realize that you renamed the file by mistake, you can only restore the file from a backup. |
After you finish data entry and press Enter, the kixrnm shell script is run to rename the file.
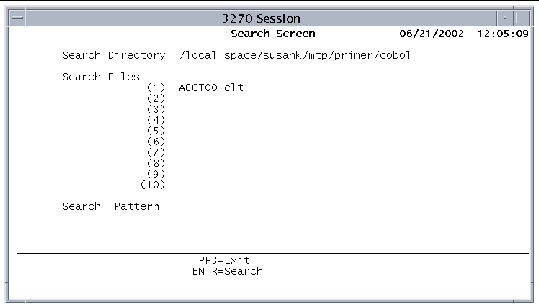
The Search screen is displayed when you select one or more files to search and then press Enter. Use this option to search the selected files for an occurrence of the search pattern.
 [ D ]
[ D ]
The only option on the Search screen is the search pattern, and it is required. If you do not enter a pattern, an error message is displayed prompting for a search pattern.
The Search option runs the kixgrep shell script to search the selected files for the search pattern. The output of the search is written to a temporary file that is displayed on your screen in the default editor.
|
Note - The search is case-sensitive, so you must type the search pattern exactly as it appears in the file. |
You can change the search utility and the editor used to display the results of the search by modifying the kixgrep shell script. Refer to the Sun Mainframe Transaction Processing Software Administrator's Guide for more information about customizing shell scripts.
The Concatenate option joins multiple files into one file. FIGURE 3-6 shows the Concatenate screen, which is displayed when you select multiple files to concatenate and then press Enter.

The fields on the Concatenate screen are listed in the following table:
Press Enter to run the kixcat shell script to concatenate the files. The results of the concatenation are displayed, by default, in the editor specified in the kixcat shell script.
If any errors occur during the concatenation procedure, the error messages are displayed and the Concatenate Screen is redisplayed.
The Print option runs the kixprt shell script to perform printing. The files are printed as soon as you press Enter. No further action is required. You can modify this shell script to select a certain printer or printer options. Refer to the Sun Mainframe Transaction Processing Software Administrator's Guide for more information about customizing shell scripts.
The Delete option runs the kixdlt shell script. The files are deleted as soon as you press Enter on the UNIX File Utilities Menu. No further action is required.

|
Caution - There is no confirmation with the Delete option. If you select a file to delete and press Enter, the file is immediately deleted. You can only restore it from a backup. |
Copyright © 2004, Sun Microsystems, Inc. All rights reserved.