| C H A P T E R 1 |
|
Installation and Setup |
This chapter describes how to install, set up, uninstall, and update Sun Management Center 3.5 add-software for Sun Enterprise 6500/5500/4500/3500 systems.
The Sun Management Center software is divided into:
Sun Enterprise 6500/5500/4500/3500 support requires the Sun Management Center 3.5 base packages and the add-on Sun Enterprise 6500/5500/4500/3500 packages.
The Sun Management Center 3.5 Software Installation and Configuration Guide describes basic information about installing and setting up the Sun Management Center 3.5 base packages and starting and stopping the software. This chapter describes the processes specifically related to the Sun Enterprise 6500/5500/4500/3500 systems.

|
Caution - Use the installation scripts and the setup scripts provided with the Sun Management Center 3.5 software. Do not manually add packages or manually change configuration files. |
Your Sun Management Center 3.5 installation and setup scripts or GUI panels may not display exactly the same messages in exactly the same sequence as the examples shown in this chapter. However, these examples show the basic messages you will receive in approximately the sequence you will receive them. Your actual installation and setup scripts depend on the add-on components you choose to install and other choices you make.
The Sun Enterprise 6500/5500/4500/3500 system-specific packages received with the Sun Management Center 3.5 basic functionality are listed in TABLE 1-1. Refer to the Sun Management Center 3.5 Software Installation and Configuration Guide for information about general Sun Management Center prerequisites.
Chapter 6, "Installation and Setup" of the Sun Management Center 3.5 Installation and Configuration Guide, describes in detail how to install all the software. An overview of the process follows.
1. As superuser, run the Sun Management Center 3.5 Installation Wizard, es-guiinst, as described in Chapter 6, "Installation and Setup," of the Sun Management Center 3.5 Installation and Configuration Guide.
2. After the base software is installed, the Select Add-on Product screen provides a selectable list of add-on products that you can install. Select those add-ons that apply to Sun Enterprise systems, and click Next.
3. The Sun Management Center Setup Wizard starts automatically after all the software is installed.
This section describes how to set up the Sun Enterprise add-on software using the Sun Management Center 3.5 Setup Wizard.
|
|
 On any host where you want to set up the add-on software, type es-guisetup to start the Sun Management Center 3.5 Setup Wizard.
The add-on software is automatically set up.
This section describes how to update multiple hosts at once using Agent Update. The Agent Update process itself must be run on the Sun Management Center server machine. You also need to ensure that Sun Management Center 3.5 agents are running on all the target hosts.
To use Agent Update to fully install and set up the Sun Enterprise platform agent modules, you must create an Agent Update configuration file for the module on the target hosts, before you run the Agent Update Process on the Sun Management Center server machine.
|
|
1. Ensure the Sun Enterprise platform agent modules are installed on the target hosts.
2. Ensure that the Sun Enterprise platform agent modules are set up on the target hosts using either the es-setup script or the es-guisetup Wizard.
After this has been done, subsequent platform agent setup operations using Agent Update will work automatically, using the host-specific information provided initially.
Using the Agent Update process, create an Image File of the add-on components to be distributed to the target machines, and then add a New Job to Manage Jobs Task list to be run when you specify.
Using Agent Update you can update the following configurations:
This procedure applies only to updating from Sun Management Center 3.5 add-on software.
1. Create an Image File of the desired Sun Enterprise add-on components to be distributed to the desired agent machines using one of the base Sun Management Center scripts es-gui-imagetool or es-imagetool.
Refer to Chapter 8, "Post-Installation Tasks," in the Sun Management Center 3.5 Installation and Configuration Guide for detailed instructions about using either the Wizard or the CLI Image Tool.
2. From your main Sun Management Center console window, select the Manage Jobs... option from the Tools menu.
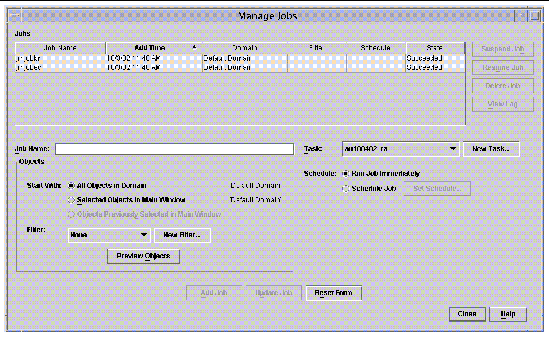
The system displays the Manage Jobs panel (FIGURE 1-1), which allows you to distribute the Image File.

3. In the Manage Jobs panel, select the New Task... button.
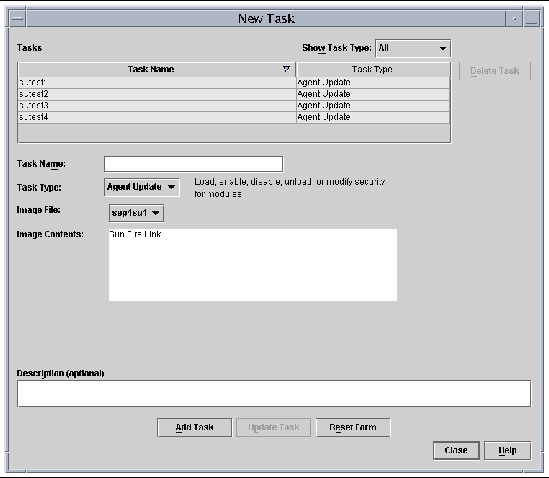
The system displays the New Task panel (FIGURE 1-2), which allows you to specify the Agent Update Image File to distribute.

4. In the New Task panel (FIGURE 1-2), do the following:
a. Select Agent Update for the Task Type.
b. Select the Image File you created in Step 1.
5. In the Manage Jobs panel (FIGURE 1-1), do the following:
b. Select the Task you created in Step 4.
c. Do one of the following to schedule when you want the Task to run.
d. Do one of the following to select the objects (agent machines) to which you want to distribute the Image File.
e. Preview the objects (agent machines) you have selected and redo your selections if necessary.
The job starts and distributes the Image File to the objects (agent machines) you selected. When the job is running, it appears in the Job list of the Manage Jobs panel. The panel shows the status of the job when running and when complete.
|
|
This procedure applies to either:
1. Log in as root on the Sun Management Center server machine.
2. Create an agent-update image using either of the image tools.
3. Download the file /opt/SUNWsymon/base/bin/agent-update.bin to each target machine's root directory.
If you installed Sun Management Center in a different directory than /opt, download /installdir/SUNWsymon/base/bin/agent-update.bin, where installdir is the install directory you specified.
4. Log in as root on the target machine.
5. Go to the directory where you downloaded agent-update.bin.
6. Type ./agent-update.bin -s server -r http-port -p image-name, where
7. Provide the security seed and the SNMPv1 community string.
The agent-update process prompts you for the security seed and the SNMPv1 community string.
The update process applies the update to the machine without prompting for further information.
When the update process completes, check the update status by viewing the log file /var/opt/SUNWsymon/log/agent-update.log on the server host.
# ./es-uninst |
The system displays this message.
2. Type y to uninstall Production Environment, which uninstalls all Sun Management Center software.
The system displays this message.
This will uninstall ALL Sun Management Center Products. !!! Do you want to change selection? [y|n|q] |
The system displays your selection; go to the beginning of Step 2.
The system displays this message.
Do you want to preserve database? [y|n|q] |
4. Type y to keep any existing topology and event data; or type n to discard the data.
The system displays this message.
Proceed with uninstall? [y|n|q] |
5. Type y to proceed with the uninstall; or type n to not proceed with the uninstall.
If you type y to proceed, the system displays the list of packages to be uninstalled, the packages as they are uninstalled, the status of the uninstallation, and the location of the log file.
# ./es-uninst |
The system displays this message.
2. Type n to not uninstall the Production Environment; in other words, type n to uninstall individual modules.
The system displays this message.
Do you want to uninstall Sun Enterprise 6500-3500 Servers/sun4d DR [y|n|q] Do you want to uninstall Sun Enterprise 6500-3500 Servers/sun4d Config Reader [y|n|q] |
3. Type y beside Sun Enterprise 6500-3500 Servers/sun45d DR or Config Reader if you do want to uninstall them, or n beside them if you do not want to uninstall them.
The system displays the module that will be uninstalled and this message.
Do you want to change selection? [y|n|q] |
The system displays your selections; go to the beginning of Step 3.
The system displays this message.
Proceed with uninstall? [y|n|q] |
5. Type y to proceed with the uninstall; or type n to not proceed with the uninstall.
If you type y to proceed, the system displays the list of packages to be uninstalled, the packages as they are uninstalled, the status of the uninstallation, and the location of the log file.
Copyright © 2003, Sun Microsystems, Inc. All rights reserved.