Front Panel
The Trusted Solaris Front Panel is very similar to the one used in standard CDE. It is more limited in that it provides access to only those applications, files, and utilities permitted that you are allowed to use. Clicking mouse button 3 anywhere in the workspace switch area causes a special pop-up menu called the Trusted Path (TP) menu to be displayed.
Before you can access a device through the Removable Media Manager, that device must be allocated using the Device Allocation Manager. The Device Allocation Manager is accessed from the Tools subpanel, which is above the Style Manager icon in the Front Panel.
If you minimize the Front Panel, you can restore it by clicking anywhere in the Trusted Stripe, double-clicking the minimized Front Panel icon, or selecting Minimize/Restore Front Panel from the Workspace menu.
In the Trusted Solaris environment, Install Icon dropsites are limited to applications and files permitted in your user account and subject to any limitations on the particular application. For example, an application may not be operational below a set label.
For more information on standard CDE, see the Common Desktop Environment User's Guide.
Workspace Switch Area
In the Trusted Solaris environment, the workspace buttons not only define separate workspaces but let you work at different labels if you are conducting a multi-level session (in a single-level session, you can only operate at one label). When you begin a multi-level session, each workspace is set to the lowest label assigned to you. If your administrator has color-coded workspace buttons by classification, the workspace buttons will appear in the appropriate color.
To Change to a Workspace at a Different Label
-
Click mouse button 3 over the workspace button and choose Change Workspace Label from the menu.
A label builder is displayed.
-
Type the new label.
You can then click the workspace button to work at the new label.
Note that the Occupy Workspace and Occupy All Workspaces selections in the window menus let you display windows with different labels in the same workspace.
Clock
The clock works exactly the same as in the standard CDE environment. In the Trusted Solaris environment, however, only an administrator can change the date and time for your workstation.
Calendar
The calendar shows the appointments for you at the label of your current workspace only. To view appointments at a different label, you need to change to a workspace at that label if you are in a multi-level session or log out and back in if you are in a single-level session.
File Manager
In the Trusted Solaris environment, File Manager has certain limitations on the files (and folders) that it can display. File Manager displays files at the label of the current workspace. To operate on (or view) files at more than one label at a time, you run File Manager from workspaces at different labels and then use the Occupy Workspace command to display the different File Managers in the same workspace.
File Manager enables you to change a file or folder's basic permissions, access control list (ACL), and information. You can also move, copy, or link files between File Managers at different labels. For more information on File Manager and its capabilities, see Chapter 5, Managing Labels on Files and Directories.
You can view (but not write to) files and directories that are not at your current workspace label by specifying a path name with adornments, as in /.MLD.myHomeDir/.SLD.0. However, you can only write to files and directories dominated by your current workspace label.
Text Editor
The Text Editor can edit files at the label of the current workspace only. If you need to move data from a Text Editor to a file at a different label, you change a workspace label, open the Text Editor at the second label, and copy the text in one Text Editor and paste it in the other.
Personal Applications Subpanel
The default applications in the personal applications operate basically the same as in the standard CDE environment. The Terminal icon launches the default shell assigned to you by your administrator. When you use a web browser, the label of the browser must be the same as the label of the web server.
Mailer
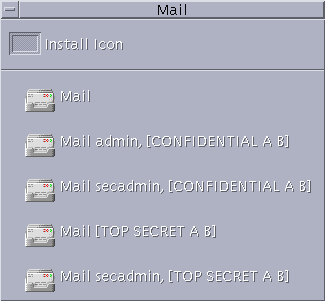
In the Trusted Solaris environment, all mail messages are assigned a label. The Mailer sorts incoming mail by label and role and displays separate mail notifier icons in its subpanel (see Figure 4-4). This feature enables you to focus on mail at labels of interest to you and defer reading mail at other labels. The Mailer operates at one label at a time only. Clicking the Mailer icon in the Front Panel opens the Mailer at the label of the current workspace; clicking a Mailer icon with a label in the subpanel opens the Mailer at that label.
Figure 4-4 Mail Notifier Icons in the Mail Subpanel

When you send a message, it will go out at the label of the mail tool in which you compose it. Only hosts and users that are cleared for that label will receive the message.
If you need to use the vacation message option in the Mailer, you must explicitly enable vacation message replies for each label at which you typically receive mail. Check with your security administrator for your site's security policy for vacation messages.
The CDE Mailer is supplied by default. If you prefer a different mail application, contact your administrator to ensure that your preferred mail application is installed properly. Although you can install a different mail application by dropping its icon on the Install Icon dropsite in the subpanel, you will lose the notification-by-label feature.
Printer
The Print Manager in the Personal Printers subpanel displays icons for all printers accredited up to your clearance. However, you can use only those printers accredited to print documents at the label of the current workspace.
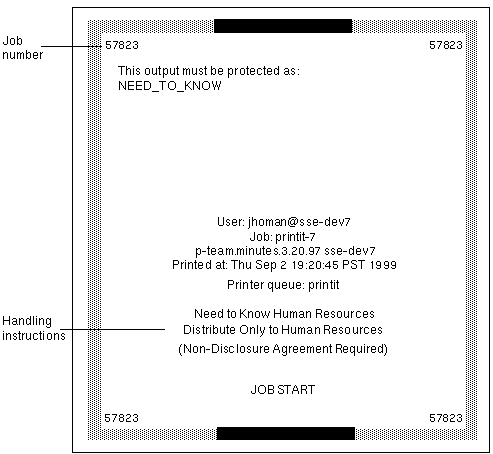
A typical print job in the Trusted Solaris environment includes:
-
A banner page at the beginning of the print job that identifies the print job, handling instructions and labels appropriate to the site
-
Labeled pages with labels in the heading and footer
-
A trailer page at the end of the print job signalling the end of the job
A typical banner page appears in the following figure. The words "JOB START" indicate the banner page.
Figure 4-5 Typical Print Banner Page

For the exact security information regarding printing at your site, please see your administrator.
Desktop Style Manager
The Desktop Style Manager operates in the same manner as in the standard Solaris environment with two exceptions:
-
The Screen Blanker and Screen Lock options are limited. Your administrator specifies the maximum amount of time that your system can be idle prior to being secured. You can reduce the idle time but cannot increase it above the maximum. You can still choose a pattern for when the screen is locked. See your administrator if you are not familiar with the policy at your site.
-
The Startup control sets your startup session settings according to the label or clearance that you specify at login. Thus, you can have a different session defined for each label in your account label range.
Application Manager
The Application Manager provides access to only those applications and utilities that have been assigned to you by your administrator. If you can assume a role, you will have access to a different set of applications and capabilities. Remember that the ability of a function to operate on a file depends on the label of the current workspace.
Similarly, although you can add applications to the Personal Application submenu by dropping icons onto the Install Icon dropsite, you can only run them if your administrator has assigned these applications to you.
Trash Can
In the Trusted Solaris environment, the trash can stores files to be deleted by label. Although you can drop files at any label in the trash can, it displays files at the current label only. You cannot view files that are in the trash can at other labels. Use the Shred selection from the File menu in the trash can window to delete sensitive information as soon as you put it in the trash can.
- © 2010, Oracle Corporation and/or its affiliates
