| C H A P T E R 5 |
|
Configuring and Managing the Server System Using the Web-Based Interface |
This chapter provides information about configuring and managing local server systems using a web browser and the embedded lights out manager (ELOM). For initial ELOM configuration information, see Chapter 3.
The chapter includes the following sections:
This chapter addresses your local system. To redirect your commands to a remote system, see Chapter 6.
The embedded lights out manager Configuration screens provide access to the system administrative functions associated with configuring and customizing the system. The Configuration tab consists of six screens:
| Note - This section contains advanced information about configuring and customizing ELOM services for your server. For information about the initial server configuration using the web-based interface, see Chapter 3. For information about configuring your server using the command-line interface (CLI), see Chapter 8. |
This section contains the following:
This section describes how to access the Network Settings Configuration screen, and how to use it to configure and change the network parameters. You can configure the network settings manually, or by using Dynamic Host Configuration Protocol (DHCP).
|
1. Start your web browser, and enter the IP address of the server.
2. Enter a user name and password that has Administrator privileges.
The default login account has Administrator privileges. To use the default login, enter the following information:
The Sun embedded Lights Out Manager web-based interface appears.
4. Click the Configuration tab to access the Configuration submenu screens.
5. Click the Network Settings tab.
The Network Settings screen appears (see FIGURE 5-1).
FIGURE 5-1 The Network Settings screen
|
The Network Settings screen has input fields for the server IP address, the net mask, the gateway address, and the address for the DNS server. The fields are open for input allowing you to manually configure the server.
1. Enter the IP address, the net mask, the gateway address, and the address for the DNS server in the appropriate fields.
2. Click Submit to save your changes.
|
The Network Settings screen also has an Enable DHCP (Dynamic Host Configuration Protocol) check box. If you enable DHCP, the IP address, the gateway, the subnet mask, and the DNS Server address will be supplied by the server.
1. Select the Enable DHCP check box.
Notice that the IP Address, Gateway, Subnet Mask, and DNS Server fields are now closed for manual input. The server will supply this information.
2. Click Submit to enable DHCP.
The E-Mail Notification screen is a useful configuration and server management tool that allows you to designate email recipients for notification of trapped system event messages and alerts. You can designate up to ten email address recipients. When trapped events and alerts occur, the system will send an email containing the details of the traps to the designated addresses. The email will contain the server name, the IP address of the server, the date and time of the occurrence, the severity of the event, and a description of the event. By configuring email notification, you can set up a level of accountability and redundancy for the management and maintenance of a server.
| Note - System event traps are defined in the Platform Event Filter screen, see Defining Traps with the Platform Event Filter) |
|
1. Click Configuration, from the main menu.
2. Select the E-mail Notification submenu tab.
The E-mail Notification screen appears (see FIGURE 5-2)
FIGURE 5-2 The E-mail Notification Screen
The E-Mail Notification Screen has twelve input fields, one field for the SMTP Server name, one field for the Sender name, and ten fields for the Receiver E-mail Addresses.
3. Fill in the name of the SMTP server in the SMTP Server field.
This is the name of the server used to send the email.
4. Fill in the name of the user or script that is sending the email in the Sender field.
5. Fill in the receiver e-mail addresses in the Receiver E-mail Address fields.
The system provides for up to ten receiver e-mail addresses.
| Tip - Press the Tab key to advance to the next field to enter each address. |
6. Click Submit to save your changes, and initiate email notification.
To capture the event messages for the system logs and email notification, you must define the system generated events that you want to trap and the actions you want to allow. The Platform Event Filter (PEF) screen allows you to activate this feature, configure PEF parameters, and define traps by creating event filters.
|
1. Click the Configuration tab.
2. Click the Platform Event Filter tab.
The Platform Event Filter screen appears (see FIGURE 5-3).
FIGURE 5-3 The Platform Event Filter screen
The PEF screen is divided into Four sections:
3. Click the Enable PEF radio button in the Platform Event Filter section (see FIGURE 5-4).
FIGURE 5-4 The Platform Event Filter Section
4. Enter the IP of the servers receiving the trapped system event messages in the Trap Receiver Destination Address section (see FIGURE 5-5).
You can designate up to four servers.
FIGURE 5-5 The Platform Event Filter and Trap Receiver Destination Address sections of the Platform Event Filter screen.
5. Select the PEF Global Actions by clicking the check box for each of the actions you want to enable (see FIGURE 5-5).
There are six possible PEF Actions. TABLE 5-1 lists and describes the actions.
When you select an action you are enabling that function globally. For example, if you select all three power-related actions, you are enabling the functionality of those actions, and you will be able to select them in the Configure Event Filter section.
6. Select the sensor you want to filter from the Configure Event Filter drop-down list (see FIGURE 5-6).
FIGURE 5-6 The Event Filter and Event Action Configuration Sections
The drop-down list has the following six sensor options:
Each option corresponds to the sensors associated with that component/subsystem. The Event Filter Configuration and Event Action Configuration sections allow you to configure each of these six options separately.
7. Select all the actions that apply for the sensor by clicking the corresponding check boxes in the Event Action Configuration section (see FIGURE 5-6). The four check box options are:
The Power Control option has a drop-down list with three power-related actions: Power Cycle, Power Off, and Power Reset. If you select the Power Control action, you must also select one of the three actions.
8. Repeat step 6 and step 7 for each sensor you want to configure.
9. Click the Submit button to save your settings.
The System Time screen allows you to see the date and time for the system. The system date and time is referenced in the Event Logs and in the E-Mail Notification function, and it is an important part of diagnostics and troubleshooting procedures. For proper server management always make sure the correct date and time are set for the system.
| Note - Set the system time using the system BIOS setup. |
|
1. Click the Configuration tab.
The Time screen appears (see FIGURE 5-7).
| Note - The time is displayed using the 24-hour format. |
The Syslog screen allows you to enable the Syslog protocol for the server.
|
1. Click the Configuration tab.
The Syslogd screen appears (see FIGURE 5-8).
The current status is shown as either Yes (enabled) or No (disabled).
3. Click either the Enable Syslogd or Disable Syslogd radio button.
If you are enabling syslog, enter the server IP address and the port.
4. Click Submit to save your changes.
System Management Access is composed of two screens:
1. Click the Configuration tab.
2. Select the System Management Access tab.
The SSL Certificate screen appears, and the SNMP tab is available (see FIGURE 5-9).
FIGURE 5-9 The SSL Certificate screen
The SSL Certificate screen allows you to create the certificate required for the Certificate Signing Request (CSR). This is necessary when using a browser to access a secure (HTTPS) site. HTTPS requires that a digitally signed certificate is installed at the applicant’s site.
|
1. Browse for the SSL Certificate on your local system.
3. Enter the information for the following fields:
4. Click Generate to create an SSL Certificate.
|
1. Select the System Management Access tab.
The SNMP screen appears (see FIGURE 5-10).
The SNMP screen is composed of three screens:
Use the drop-down list to access the three screens (see FIGURE 5-11).
FIGURE 5-11 The SNMP drop-down List
The SNMP Settings screen allows you to configure the SNMP Port and the SNMP Permit (see FIGURE 5-12).
FIGURE 5-12 The SNMP Settings Screen
1. Select SNMP Settings from the SNMP drop-down list, and click Select.
3. Select the Permit check boxes that apply.
The Permit check box options are:
4. Click Submit to save your changes.
The SNMP Communities screen allows you to Add, Modify, or Delete communities (see FIGURE 5-13).
FIGURE 5-13 The SNMP Communities Screen
1. Select Communities Settings from the SNMP drop-down list, and click Select.
2. Click the radio button next to a vacant field in the Community Name column.
3. Click the Add button in the Operation column.
The Community Setting Screen appears (see FIGURE 5-14).
FIGURE 5-14 Community Setting Screen
4. Enter a the new name in the Community field.
5. Select the permission level from the Permissions drop-down list.
6. Click Submit to save your changes and add a new Community.
1. Click the radio button next to the name of the Community you want to modify (see FIGURE 5-13 ).
2. Click the Modify button in the same row in the Operation column.
The Community Setting screen appears (see FIGURE 5-14). You can change the Community Name and the Permission.
3. Click Submit to save your changes, or click Reset and Submit to exit the User Setting screen without modifying the settings.
1. Click the radio button next to the name of the Community you want to delete (see FIGURE 5-13).
2. Click the Delete button in the same row in the Operation column.
The SNMP User Settings screen summarizes the current SNMP users, and allows you to Add, Modify or Delete Users (see FIGURE 5-15).
FIGURE 5-15 The SNPMP User Setting Screen
1. Select SNMP User Settings from the SNMP drop-down list, and click Select.
2. Click the radio button next to a vacant field in the User Name column.
3. Click the Add button in the same row in the Operation column.
The User Setting screen appears (see FIGURE 5-16).
FIGURE 5-16 The SNMP User Setting Screen
4. Enter the required information to create a new User. The User Setting fields and applicable options are defined in TABLE 5-2.
5. Click Submit to create a new user, or click Reset and Submit to exit the User Setting screen without creating a new User.
1. Click the radio button next to a User name in the User Name column (see FIGURE 5-15).
2. Click the Edit button in the same row in the Operations column.
3. The User Setting screen appears (see FIGURE 5-16).
Edit the User Setting fields (see TABLE 5-2).
4. Click Submit to save your edit, or click Reset and Submit to exit the User Setting screen without changing the settings.
1. Click the radio button next to a User name in the User Name column (see FIGURE 5-15).
2. Click the Delete button in the same row in the Operation column.
The ELOM User Management screens provide access to the system administrative functions associated with the management of users. The User Management tab consists of two screens:
The User Account screen allows users with Administrator privileges to manage user access to the ELOM. Administrators can add users, change user passwords and privileges, and enable, disable and delete users.
This section contains the following:
|
1. Log in to the ELOM using root or another account with Administrator privileges.
2. Click the User Management tab on the main menu.
The User Management submenu screen appears.
3. Click the User Account submenu tab.
The User Account screen appears (see FIGURE 5-17).
FIGURE 5-17 The User Account Screen
The User Account screen summarizes the current user accounts for the ELOM. The ELOM allows up to nine users, eight user accounts and the root account. The root account is the default account. Root has permanent Administrator privileges. The root account cannot be deleted, nor can it be disabled. However, additional user accounts with Administrator privileges can be added.
The User Account screen allows an Administrator to perform the following functions:
|
The ELOM allows for a total of nine user accounts, including the root account. When adding users, Administrators must enter values for the following settings: the Username, the Password, and the Privilege. TABLE 5-3 lists the three User variables and the value limitations or options for each.
The privilege setting determines user access to the ELOM.
FIGURE 5-18 The User and Callback Screen Limitation
FIGURE 5-19 The Operator System Screen Limitation
1. Click on the Add button (see FIGURE 5-17).
The Add User screen appears (see FIGURE 5-20).
FIGURE 5-20 The Add User Screen

2. Enter the values for each field, based on the limitations listed in TABLE 5-3.
Use the Privilege drop-down list to set privilege level.
3. Click Submit to save your changes and add the user.
|
1. Click the Change Password button for the User (see FIGURE 5-17).
The Change User Password screen appears (see FIGURE 5-21).
FIGURE 5-21 The Change User Password Screen
2. Enter the original password in the Old Password field.
3. Enter the new password in both the Password and the Confirm field.
| Note - Passwords can be any character, but must be between 8 - 16 characters in length (see TABLE 5-3). |
4. Click the Submit button to change the password.
1. Click the Change User Privilege button in the User Account screen (see FIGURE 5-17).
The Change User Privilege screen appears (see FIGURE 5-22).
FIGURE 5-22 The Change User Privilege Screen
2. Select the new privilege from the Privilege drop-down list. For information about the Privilege setting, see The Privilege Setting.
3. Click Submit to save your changes.
Disabling a user allows you to remove a User’s access to the ELOM, without deleting the user entirely.
 Click the Disable button for the User in the User Account screen.
The system disables the user without requesting confirmation.
 Click the Enable button for the User in the User Account screen.
1. Click the Delete button for the User in the User Account screen.
The system prompts you for confirmation in a pop-up window.
2. Click OK in the Confirmation pop-up window to delete the user.
The ADS Configuration screen allows you to set up Active Directory Service (ADS).
|
1. Click the ADS Configuration tab from the User Management submenu.
The ADS Configuration screen appears (see FIGURE 5-23).
FIGURE 5-23 The ADS Configuration Screen
2. Browse for the Certificate on your local machine, and click Upload.
3. Provide the Primary and Secondary DNS addresses.
4. Enter the root_domain name.
5. Click Submit to save your settings.
The ADS Configuration screen enables you to browse and upload a certificate from Active Directory Service (ADS) for a Microsoft Windows environment. Administrators can simplify their tasks by monitoring multiple machines in one node using ADS.
|
1. Install Windows 2003 and make it the Domain Controller in an Active Directory environment.
2. Create and configure the DNS server.
3. Add a new user and set privilege level (administrator or user) in AD server.
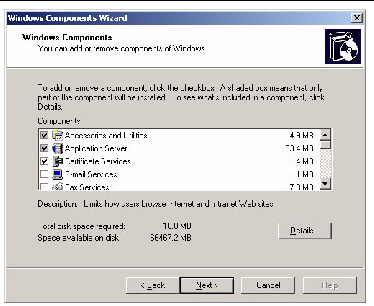
4. Use Control Panel to access Add or Remove Programs, and click Add/Remove Windows Components.
The Windows Components Wizard appears.
5. In the list of components, in the Windows Components screen, click the check box to enable Certificate Services (see FIGURE 5-24).
FIGURE 5-24 Windows Components Screen
6. Click Next to begin the Create CA Root Domain Certificate process.
This will requre IIS to be installed also.
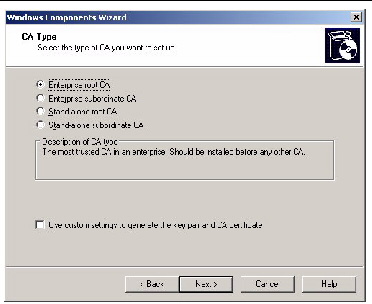
7. In the CA Type screen of the Windows Components Wizard, select the type of CA you want to set up (see FIGURE 5-25).
FIGURE 5-25 CA Type Windows Components Wizard Screen
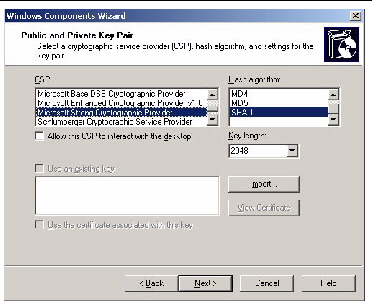
8. In the Public and Private Key Pair screen, select a cryptographic service provider (CSP), a hash algorithm, and settings for the key pair (see FIGURE 5-26).
FIGURE 5-26 Public and Private Key Pair Windows Components Wizard Screen
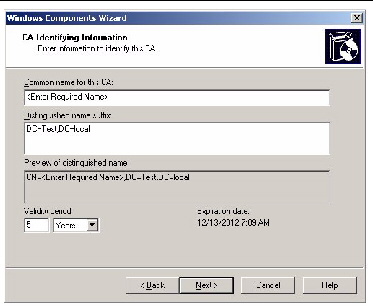
10. In the CA Identifying Information screen, enter the necessary information to indentify this CA (FIGURE 5-27), and click Next.
FIGURE 5-27 CA Identifying Information Windows Components Wizard Screen
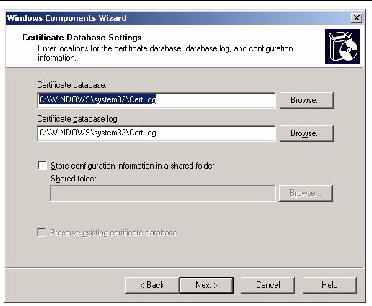
11. In the Certificate Database Settings screen, enter the locations for the certificate database, database log, and configuration information (see FIGURE 5-28).
FIGURE 5-28 Certificate Database Settings Windows Components Wizard Screen
12. To finish the Create CA Root Domain Certificate process, click Next.
13. To export the AD certificate, locate the net certificate for your Domain.
You will see a certificate called, C:/xxx.crt.
14. Double-click the Certificate.
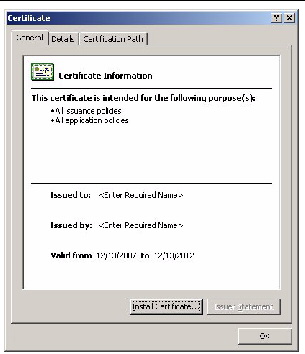
The certificate screen appears.
FIGURE 5-29 The Certificate Information Screen
The Certificate Details screen appears (see FIGURE 5-30).
FIGURE 5-30 The Certificate Details Screen
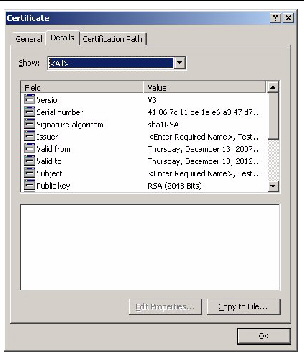
16. Click the Copy to File... button.
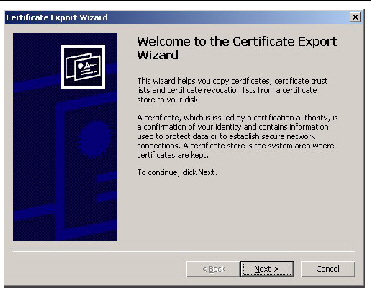
The Certificate Export Wizard screen appears (see FIGURE 5-31).
FIGURE 5-31 The Certificate Export Wizard Screen
The Export File Format screen appears.
FIGURE 5-32 The Export File Format
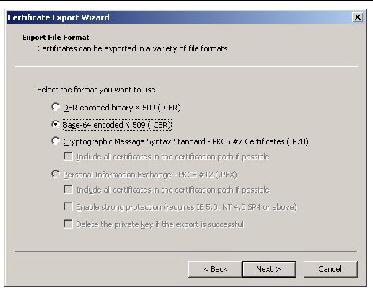
18. Under the heading Select the format that you want to use:, click the radio button for the second option, Base-64 Encoded X.509 (.CER).
The File to Export screen appears (see FIGURE 5-33)
FIGURE 5-33 The File to Export Screen
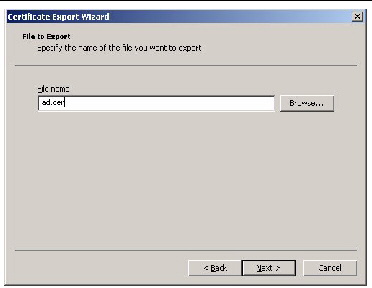
| Note - DNS resolution issues might occur if the filename is incorrect. |
Store this exported certificate in a shared folder of your choice.
The ad.cer file is exported to the shared folder.
22. To set the Certificate server to respond to the CA request automatically, open Default Domain Controller Security Settings.
23. Expand Public Key Policies, and in the Automatic Certificate Request Settings, create a new Computer entry from the supplied entry list.
24. Use a web browser to connect to an SP ELOM web GUI.
Enter the URL of the SP in the address bar.
25. Log in as root, or as a user with administrator privileges.
26. Click the User Management tab, and click the ADS Configuration submenu tab.
The ADS Configuration screen appears.
27. Upload the ad.cer file from the share network folder.
28. Enter the Primary, Secondary DNS and the Root Domain addresses.
29. Click Submit to save the configuration.
31. To test your configuration, log in as the new user created in the Active Directory structure.
This section contains information about the ELOM Maintenance menu. The ELOM Maintenance menu allows you to perform basic service processor-related tasks. The Maintenance submenu consists of two screens:
This section contains the following sub-sections:
|
1. Login in to the ELOM using root, or another account that has Administrator privileges.
The Maintenance submenu appears (see FIGURE 5-34).
FIGURE 5-34 The Firmware Upgrade Screen
|
1. Click the Firmware Upgrade tab.
The Firmware Upgrade screen appears (see FIGURE 5-35).
FIGURE 5-35 The Firmware Upgrade Screen
The screen contains an Enter Upgrade Mode Button, and displays the following informational message regarding the upgrade process:
2. Click the Enter Upgrade Mode button.
An Upgrade Mode confirmation screen appears.

|
Caution - You will not be able to perform any tasks until the upgrade is complete and the Service Processor is rebooted. |
3. Click OK at the Confirmation screen.
The Firmware Upgrade screen appears (see FIGURE 5-36).
FIGURE 5-36 The Firmware Upgrade Mode Screen: Method A Selected
The Firmware Upgrade Mode Screen presents you with two upgrade options:
4. Click the radio button for the update option that you prefer.
5. Click Browse, and point to the file located on the Tools and Drivers CD/DVD in: /remoteflash/fwrev/filename
fwrev The directory of the firmware revision.
filename The name of the firmware update file.
The update process begins. After the upgrade process is complete, you will have to log out and log back in to the ELOM web-based interface.
|
The Reset SP screen appears (see FIGURE 5-37).
FIGURE 5-37 The Reset SP Screen
The SP begins the reset process (see FIGURE 5-38).
FIGURE 5-38 The SP Reset Screen During Reset
3. Wait for the SP to reset, and then reconnect to the ELOM.
Copyright © 2009 Sun Microsystems, Inc. All rights reserved.