| C H A P T E R 6 |
|
OpenSolaris Installation |
This chapter provides information about installing the OpenSolaris 2009.06 Operating System (OpenSolaris OS) on the Sun Fire X4140, X4240 and X4440 servers.
This chapter includes the following topics:
For information describing how to configure the preinstalled OpenSolaris OS image, see your server installation guide for setup instructions.
| Note - Before you begin to install the OS you must have already configured the BIOS for your controller card (see Configuring LSI RAID for Any Operating System from the BIOS). |
The procedures in this chapter cover the installation of the OpenSolaris OS and supported drivers for a new installation. See TABLE 6-1 for the OpenSolaris installation task map
|
Install your server hardware and configure the service processor. |
||
|
Set the display environment.If necessary, erase the primary boot disk. |
||
|
Set up your system for a RAID or non-RAID configuration based on the SAS controller card. |
Your server supports two SAS controller cards. RAID set up is different for each card. |
Configuring LSI RAID for Any Operating System from the BIOS -A P P E N D I X |
|
The product notes contain late-breaking news about the OpenSolaris OS software and patches. |
||
|
Choose an installation method and locate the installation instructions. |
||
|
Patches are available from the SunSolve Patch Portal at: http://www.sunsolve.sun.com |
See TABLE 6-1 for installation methods.
This installation method requires access to the local server on which you want to install OpenSolaris.
Requirements for remote console installation:
For installation procedures, see Installing OpenSolaris OS Using Local or Remote Media.
This installation method includes directing the server output to the local console or to a remote console (RVKM) when the local CD/DVD drive is used.
This method includes using a remote networked server to install the OS onto your server. The CD/DVD drive of the remote system (virtual CDROM) is used to access the OS media, and all output of the server is displayed on the remote system (remote console).
Information about the using keyboard, mouse, video, storage (KVMS) over IP can be found in the ELOM or ILOM documentation.
Requirements for remote console installation:
|
1. On a remote system, open a browser, and enter the IP address of the service processor of the server on which you want to install the OS.
2. Enter a user name and password that has administrator privileges.
The web GUI main screen appears.
3. Disable the session timeout.
a. To access the Session Time-Out screen, click the System Information tab, and then click the Session Time-Out submenu tab.
The Session Time-Out screen appears.
b. Click the Disable Timeout radio button, and then click Submit.
4. From the main menu, click the Remote Control tab and select Redirection.
The Redirection screen appears with a Launch Redirection button.
5. Click the Launch Redirection button to open a remote console window.
A screen appears with a Launch button. It also identifies your current host name, IP address, and user name.
7. Insert the OS CD/DVD to be installed on the server into the local CD/DVD drive.
8. In the remote console window, select Storage, and then select Mount devices.
The Device Configuration window appears.
9. In the Storage 1 Source field, from the drop-down list, select the CD/DVD drive that you are using to install the OS.
11. The instructions for installing the OS are the same as the instructions for using a local CD/DVD drive and monitor. See Installing OpenSolaris OS Using Local or Remote Media.
The following procedure describes how to boot the OpenSolaris 2009.06 Operating System installation from local or remote media. It assumes that you are booting the installation media from one of the following sources:
Prior to performing the installation, the following requirements must be met:
Note that the following procedure explains the initial steps for booting the installation media and launching the OpenSolaris installation program.
After completing this procedure, you should review and perform the required post installation tasks described later in this chapter. For more details, see Post OpenSolaris Installation Tasks.
|
1. Ensure that the installation media is available to boot.
For additional information about how to set up the installation media, see Installation Methods.
2. Reset the power on the server.
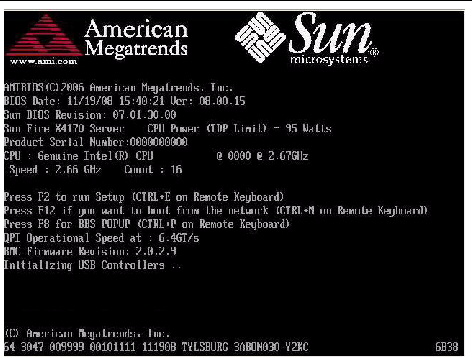
3. In the BIOS power-on self-test screen, press F8 to specify a temporary boot device for the OpenSolaris installation.
The Please Select Boot Device menu appears.
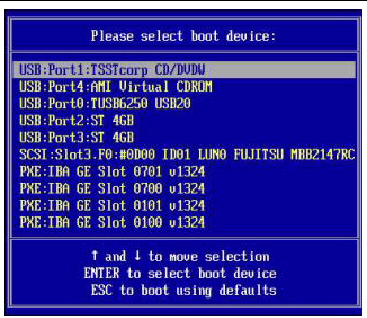
4. In the Boot Device menu, select either the external or virtual CD/DVD device as the first (temporary) boot device, then press Enter.
In the sample Boot Device menu shown in Step 3, the CD/DVDW device is specified as the first boot device.
The device strings listed on the Boot Device menu are in the format of:
device type: slot indicator: product ID string
| Note - If you are performing the OpenSolaris installation from the Sun ILOM Remote Console application, select the AMI Virtual CDROM, or CDROM image as the first boot device. |
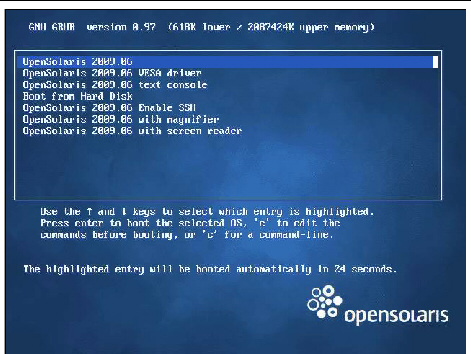
5. In the GRUB menu, select OpenSolaris 2009.06, then press Enter.
| Note - In the GRUB menu, if you want to redirect the installation output to a serial console, press “e” to edit the GRUB menu to support a serial console (-B console = ttya). |
The system loads the OpenSolaris disk image into memory. This process can take several minutes.
The system discovers and configures the devices and interfaces. If the system discovers a keyboard, the Configure Keyboard Layout menu appears.
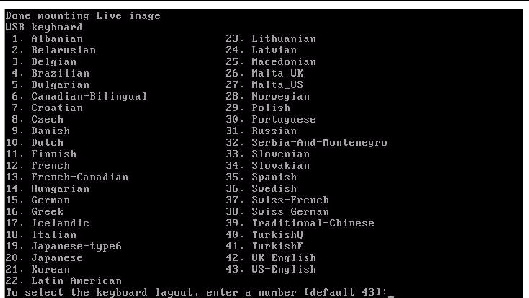
6. In the Configure Keyboard Layout menu, select the appropriate keyboard layout, then press Enter to continue.
The system configures the keyboard layout selection and searches for configuration files. The Select Desktop Language menu appears.
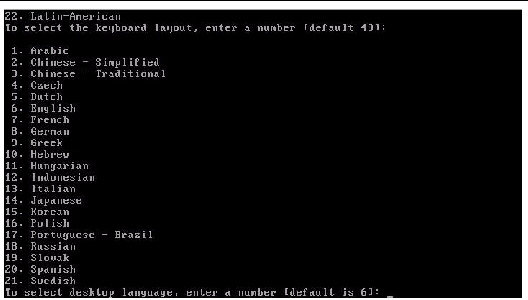
7. In the Select Desktop Language menu, select the appropriate desktop language, then press Enter to continue.
After a few moments the OpenSolaris 2009.06 desktop appears.
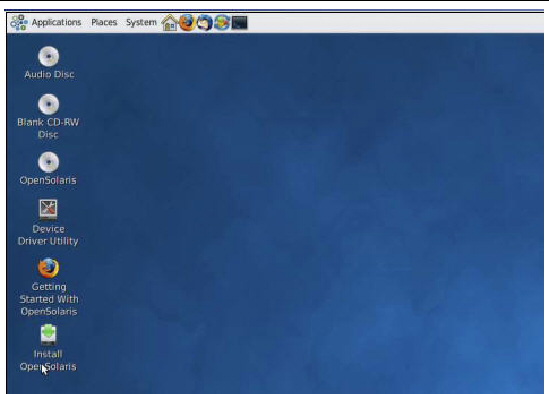
8. In the OpenSolaris desktop, double-click the Install OpenSolaris icon to begin the OS installation.
The OpenSolaris Installer Welcome screen appears.
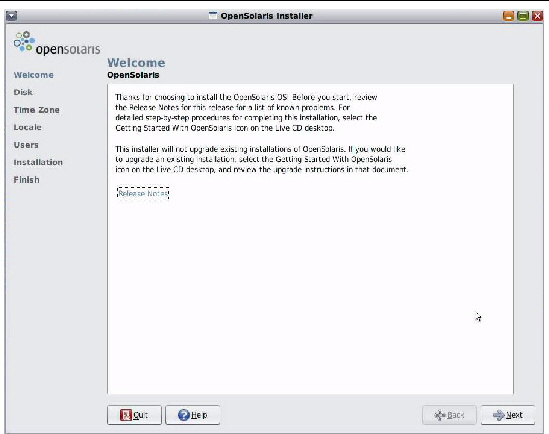
9. In the Welcome screen, click Next to begin the installation.
The OpenSolaris installation program will display several configuration screens.
10. Follow the on-screen instructions to complete the OpenSolaris installation.
For additional information, refer to the Getting Started with OpenSolaris 2009.06 web site at:
http://dlc.sun.com/osol/docs/content/2009.06/getstart
| Note - If you did not configure the system to automatically reboot when the installation completes, you must manually reboot the system. |
11. Proceed to the section Post OpenSolaris Installation Tasks to perform the post OpenSolaris configuration tasks.
After completing the OpenSolaris installation and rebooting the Operating System, review the following post installation tasks and, if necessary, perform the tasks that are applicable to your system.
The Device Driver Utility enables you to connect to the Image Packaging System (IPS) and use it to search for device drivers for the devices on your system that do not have a driver attached with them.
To start the Device Driver Utility, click the Device Driver Utility icon on the OpenSolaris desktop.
A Support Repository Update (SRU) contains the latest released bug fixes for your OpenSolaris release.
Directions for accessing and installing SRUs can be found at:
http://sunsolve.sun.com/show.do?target=opensolaris
After installing the operating system, you might want to consider enabling the Wake On LAN (WOL) option in the BIOS Setup utility. This features enables you to power on the server from another location over the network.
Copyright © 2009 Sun Microsystems, Inc. All rights reserved.