| Sun Fire X4500/X4540 Server Service Manual |
| C H A P T E R 2 |
|
Powering On and Configuring BIOS Settings |
This chapter contains the following procedures and information.
Before powering on your server for the first time, follow the installation and cabling instructions provided in the Sun Fire X4540 Installation Guide, available online at the URL described in Related Documentation.
To power on main power for all server components:
1. Verify that power cords have been connected and that standby power is on.
In standby power mode, the Power/OK LED (3) on the front panel flashes.
FIGURE 2-1 Front Panel Controls and Indicators
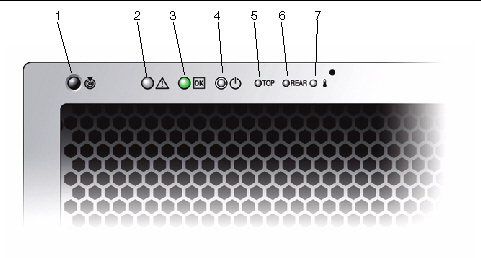
2. Use a nonconducting stylus to press and release the recessed Power button on the server front panel. See FIGURE 2-1.
When main power is applied to the full server, the Power/OK LED next to the Power button lights and remains lit.
To power off the server from main power mode, use one of the following two methods:
When main power is off, the Power/OK LED on the front panel will begin blinking, indicating that the server is in standby power mode.

|
Caution - To power off the server completely, you must disconnect the AC power cords from the back panel of the server. |
The service processor shuts down the system if it detects an overtemperature condition.
The hardware shuts down the system immediately if any voltage is out of spec, or if the last working power supply fails.
See Section E.2, Power-Off Sequence for a diagram of the power-off sequence and its timing parameters.
This section describes how to view and modify the BIOS settings.
The Basic Input/Output System (BIOS) has a Setup utility stored in the BIOS flash memory. The Setup utility reports system information and can be used to configure the BIOS settings. The configured data is provided with context-sensitive Help and is stored in the system's battery-backed CMOS RAM. If the configuration stored in the CMOS RAM is invalid, the BIOS settings default to the original state specified at the factory.
When the BIOS is started, the first BIOS Setup menu screen is displayed. The BIOS Setup utility contains seven menu screens, which are displayed in this order: Main, Advanced, PCI/PnP, Boot, Security, Chipset, and Exit.
You can change the BIOS configuration in several different interfaces:
To change the system’s parameters:
1. Enter the BIOS Setup utility by pressing the F2 key while the system is performing the power-on self-test (POST).
2. Highlight the field to be modified using the arrow and Tab keys.
3. Press Enter to select the field.
A dialog box appears. The box presents you with the options available for the setup field that you have chosen.
4. Modify the setup field and close the screen.
5. If you need to modify other setup parameters, use the arrow and Tab keys to navigate to the desired screen and menu item, then repeat Steps 1 through 3. Otherwise, go to Step 5.
6. Press and release the right arrow key until the Exit menu screen is displayed.
7. Follow the instructions on the Exit menu screen to save your changes and exit the Setup utility.
These servers each have four 10/100/1000BASE-T Gigabit Ethernet ports connected to individual Network Interface Cards (NICs). The chassis labeling of the physical ports is shown in FIGURE 1.
FIGURE 1 Ethernet Port Chassis Labeling Designations
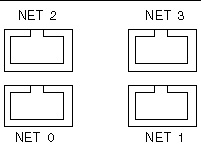
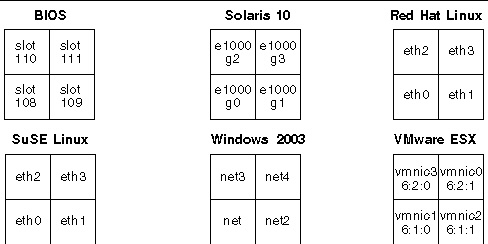
The logical device naming for the NICs is reported differently by different interfaces and operating systems.
See FIGURE 2 for a diagram that explains how operating systems and interfaces name the four NICs shown in FIGURE 1.
FIGURE 2 Sun Fire X4500 NIC Naming Conventions
For information about BIOS POST testing, POST codes, POST code checkpoints, and console redirection, see Appendix B.
Perform the following steps during the BIOS/Power-On Self Test (POST):
After some screen messages, the BIOS setup utility appears.
2. Press F9, or use the arrow keys to scroll to the Exit -> Load Optimal Defaults.
A dialog asks “Load Optimal Defaults [OK].”
4. Press F10 or use the arrow keys to scroll to Exit -> Save Changes and Exit.
A dialog asks if you want to save your changes and exit.
5. Press Enter to save your changes and exit the BIOS utility.
The BIOS Option ROM is 128 KB. Of these 128 KB, approximately 86 KB are used by the VGA controller, the LSI controller, and the on-board NIC. Approximately 42KB remain for the Option ROM.
The AMD PowerNow! feature, which is accessed from the BIOS Setup utility Advanced menu, is disabled by default on this server. Some problems have been observed when using this feature on certain operating systems. If you want to enable this feature, first check the Sun Fire X4500 Server Product Notes for any outstanding known issues for your operating system.
TABLE 2-1 contains summary descriptions of the seven top-level BIOS setup screens.
FIGURE 2-2 summarizes the BIOS menu tree. See Section 2.12, BIOS Setup Menu Screens (X4500) for examples of each of these screens.
See Section t, To Install a PCI-X or PCIe Card (FRU) for the locations of the PCI slots.
FIGURE 2-2 BIOS Utility Menu Tree (X4500)
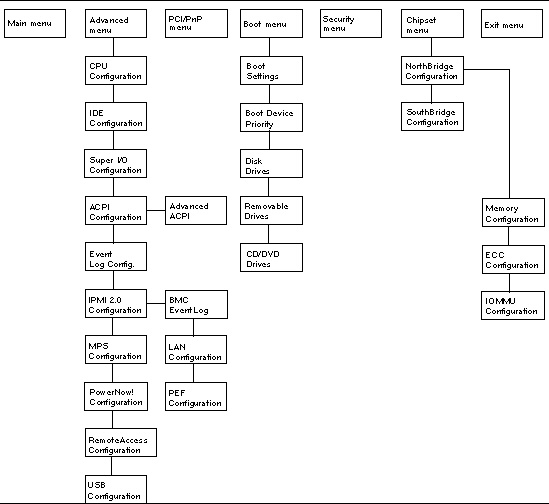
TABLE 2-2 shows the devices and PCI slots, and the order that the BIOS detects them. See To Install a PCI-X or PCIe Card (FRU) for the locations of the PCI slots.
The following graphic shows the drives mapping scheme of the system. The boot drives are 0 or 1. (Default boot drive is in slot 0 and the default mirrored drive is in slot 8.) It is required to use one of these drives from which to boot the system.
FIGURE 2-3 Sun Fire X4500 Drives Map

The following figures show sample BIOS setup menu screens.
| Note - The screens shown are examples. The version numbers and the screen items and selections shown are subject to change over the life of the product. |
Main    Advanced    PCIPnP    Boot    Security    Chipset    Exit
********************************************************************************
* System Overview                                    ** Use [ENTER], [TAB]     *
* ***************************************************** or [SHIFT-TAB] to      *
* AMIBIOS                                            ** select a field.        *
* Version   : 08.00.10                               **                        *
* Build Date: 04/12/06                               ** Use [+] or [-] to      *
* ID        : 0ABIG014                               ** configure system Time. *
*                                                    **                        *
* Product Name          : Sun Fire X4500             **                        *
* System Serial Number  : Not Available              **                        *
* BMC Firmware Revision : 1.00                       **                        *
*                                                    **                        *
* Processor                                          **                        *
* Dual Core AMD Opteron(tm) Processor 285            ** **    Select Screen    *
* Speed :2.6 GHz                                     ** **    Select Item      *
* Count :4                                           ** +-    Change Field     *
*                                                    ** Tab   Select Field     *
* System Memory                                      ** F1    General Help     *
* Size      : 15.9 GB                                ** F10   Save and Exit    *
*                                                    ** ESC   Exit             *
* System Time                    [16:59:00]          **                        *
* System Date                    [Thu 07/20/2006]    **                        *
********************************************************************************
Main    Advanced    PCIPnP    Boot    Security    Chipset    Exit
********************************************************************************
* Advanced Settings                                   * Options for CPU        *
* *************************************************** *                        *
* WARNING: Setting wrong values in below sections     *                        *
*          may cause system to malfunction.           *                        *
*                                                     *                        *
* * CPU Configuration                                 *                        *
* * IDE Configuration                                 *                        *
* * SuperIO Configuration                             *                        *
* * ACPI Configuration                                *                        *
* * Event Log Configuration                           *                        *
* * Hyper Transport Configuration                     *                        *
* * IPMI 2.0 Configuration                            *                        *
* * MPS Configuration                                 * **    Select Screen    *
* * Remote Access Configuration                       * **    Select Item      *
* * Trusted Computing                                 * Enter Go to Sub Screen *
* * USB Configuration                                 * F1    General Help     *
*                                                     * F10   Save and Exit    *
*                                                     * ESC   Exit             *
*                                                     *                        *
*                                                     *                        *
********************************************************************************
Advanced
********************************************************************************
* CPU Configuration                                   * This option should     *
* Module Version: 14.09                               * remain disabled for    *
* Physical Count: 2                                   * the normal operation.  *
* Logical Count : 4                                   * The driver developer   *
* *************************************************** * may enable it for      *
* Dual Core AMD Opteron(tm) Processor 285             * testing purpose.       *
* Revision: E6                                        *                        *
* Cache L1: 256KB                                     *                        *
* Cache L2: 2048KB                                    *                        *
* Speed   : 2600MHz                                   *                        *
* Current FSB Multiplier: 13x                         *                        *
* Maximum FSB Multiplier: 13x                         *                        *
* Able to Change Freq.  : Yes                         * **    Select Screen    *
* uCode Patch Level     : 0x0                         * **    Select Item      *
*                                                     * +-    Change Option    *
* GART Error Reporting           [Disabled]           * F1    General Help     *
* MTRR Mapping                   [Continuous]         * F10   Save and Exit    *
* Speculative TLB Reload         [Enabled]            * ESC   Exit             *
*                                                     *                        *
********************************************************************************
Advanced
********************************************************************************
* IDE Configuration                                   * DISABLED: disables the *
* *************************************************** * integrated IDE         *
* OnBoard PCI IDE Controller     [Primary]            * Controller.            *
*                                                     * PRIMARY: enables only  *
* * Primary IDE Master              : [Not Detected]  * the Primary IDE        *
* * Primary IDE Slave               : [Not Detected]  * Controller.            *
* * Secondary IDE Master            : [Not Detected]  * SECONDARY: enables     *
* * Secondary IDE Slave             : [Not Detected]  * only the Secondary IDE *
*                                                     * Controller.            *
* Hard Disk Write Protect        [Disabled]           * BOTH: enables both IDE *
* IDE Detect Time Out (Sec)      [5]                  * Controllers.           *
*                                                     *                        *
*                                                     * **    Select Screen    *
*                                                     * **    Select Item      *
*                                                     * +-    Change Option    *
*                                                     * F1    General Help     *
*                                                     * F10   Save and Exit    *
*                                                     * ESC   Exit             *
*                                                     *                        *
********************************************************************************
          Advanced
********************************************************************************
* Configure Smc27X Super IO Chipset                   * Allows BIOS to Select  *
* *************************************************** * Serial Port1 Base      *
* Serial Port1 Address           [3F8/IRQ4]           * Addresses.             *
*                                                     *                        *
*                                                     *                        *
*                                                     *                        *
*                                                     *                        *
*                                                     *                        *
*                                                     *                        *
*                                                     *                        *
*                                                     *                        *
*                                                     *                        *
*                                                     * **    Select Screen    *
*                                                     * **    Select Item      *
*                                                     * +-    Change Option    *
*                                                     * F1    General Help     *
*                                                     * F10   Save and Exit    *
*                                                     * ESC   Exit             *
*                                                     *                        *
*                                                     *                        *
********************************************************************************
Advanced
********************************************************************************
* ACPI Settings                                       * Enable / Disable       *
* *************************************************** * ACPI support for       *
* ACPI Aware O/S                 [Yes]                * Operating System.      *
*                                                     *                        *
* * Advanced ACPI Configuration                       * ENABLE: If OS          *
*                                                     * supports ACPI.         *
*                                                     *                        *
*                                                     * DISABLE: If OS         *
*                                                     * does not support       *
*                                                     * ACPI.                  *
*                                                     *                        *
*                                                     *                        *
*                                                     * **    Select Screen    *
*                                                     * **    Select Item      *
*                                                     * +-    Change Option    *
*                                                     * F1    General Help     *
*                                                     * F10   Save and Exit    *
*                                                     * ESC   Exit             *
*                                                     *                        *
*                                                     *                        *
********************************************************************************
Advanced
********************************************************************************
* Advanced ACPI Configuration                         * Enable RSDP pointers   *
* *************************************************** * to 64-bit Fixed System *
* ACPI 2.0 Features              [Yes]                * Description Tables.    *
* ACPI APIC support              [Enabled]            *                        *
* ACPI SRAT Table                [Enabled]            *                        *
* AMI OEMB table                 [Enabled]            *                        *
* Headless mode                  [Enabled]            *                        *
* Remote Access                  [Enabled]            *                        *
*                                                     * **    Select Screen    *
*                                                     * **    Select Item      *
*                                                     * +-    Change Option    *
*                                                     * F1    General Help     *
*                                                     * F10   Save and Exit    *
*                                                     * ESC   Exit             *
*                                                     *                        *
*                                                     *                        *
********************************************************************************
          Advanced
********************************************************************************
* Event Logging details                               * View all unread events *
* *************************************************** * on the Event Log.      *
* View Event Log                                      *                        *
* Mark all events as read                             *                        *
* Clear Event Log                                     *                        *
*                                                     *                        *
*                                                     *                        *
*                                                     *                        *
*                                                     *                        *
*                                                     *                        *
*                                                     *                        *
*                                                     *                        *
*                                                     * **    Select Screen    *
*                                                     * **    Select Item      *
*                                                     * Enter Go to Sub Screen *
*                                                     * F1    General Help     *
*                                                     * F10   Save and Exit    *
*                                                     * ESC   Exit             *
********************************************************************************
Advanced
********************************************************************************
* Hyper Transport Configuration                       * The HyperTransport     *
* *************************************************** * link will run at this  *
*                                                     * speed if it is slower  *
* CPU0:CPU1 HT Link Speed        [Auto]               * than or equal to the   *
* CPU0:CPU1 HT Link Width        [Auto]               * system clock and the   *
*                                                     * board is capable.      *
* CPU0:PCI-X0 HT Link Speed      [Auto]               *                        *
* CPU0:PCI-X0 HT Link Width      [Auto]               *                        *
*                                                     *                        *
* CPU0:PCI-X1 HT Link Speed      [Auto]               *                        *
* CPU0:PCI-X1 HT Link Width      [Auto]               *                        *
*                                                     *                        *
* PCI-X1:PCI-X2 HT Link Speed    [Auto]               * **    Select Screen    *
* PCI-X1:PCI-X2 HT Link Width    [Auto]               * **    Select Item      *
*                                                     * +-    Change Option    *
* CPU1:PCI-X3 HT Link Speed      [Auto]               * F1    General Help     *
* CPU1:PCI-X3 HT Link Width      [Auto]               * F10   Save and Exit    *
*                                                     * ESC   Exit             *
* CPU1:PCI-X4 HT Link Speed      [Auto]               *                        *
* CPU1:PCI-X4 HT Link Width      [Auto]               *                        *
*                                                     *                        *
*                                                     *                        *
********************************************************************************
Advanced
********************************************************************************
* IPMI 2.0 Configuration                              * View all events in the *
* *************************************************** * BMC Event Log.         *
* Status Of BMC                   Not Working         * It will take a max. of *
* * View BMC System Event Log                         * 15 seconds to read all *
* Clear BMC System Event Log                          * BMC SEL records.       *
* * Set LAN Configuration                             *                        *
* * Set PEF Configuration                             *                        *
* BMC Watch Dog Timer Action     [Disabled]           *                        *
*                                                     *                        *
*                                                     *                        *
*                                                     *                        *
*                                                     *                        *
*                                                     * **    Select Screen    *
*                                                     * **    Select Item      *
*                                                     * Enter Go to Sub Screen *
*                                                     * F1    General Help     *
*                                                     * F10   Save and Exit    *
*                                                     * ESC   Exit             *
*                                                     *                        *
*                                                     *                        *
********************************************************************************
         Advanced
*******************************************************************************
* Total Number Of Entries:         36                 * Use +/- to traverse    *
* *************************************************** * the event log.         *
* SEL Entry Number:              [ 1]                 *                        *
* SEL Record ID:               0100                   *                        *
* SEL Record Type:             02 (System Event)      *                        *
* Event Timestamp:             1166s from SEL init    *                        *
* Generator ID:                0020                   *                        *
* Event Message Format Ver:    04 (IPMI ver 1.5)      *                        *
* Event Sensor Type:           25 (Entity Presence)   *                        *
* Event Sensor Number:         1F                     *                        *
* Event Dir Type:              08                     *                        *
* Event Data:                  00 FF FF               *                        *
*                                                     * **    Select Screen    *
*                                                     * **    Select Item      *
*                                                     * +-    Change Option    *
*                                                     * F1    General Help     *
*                                                     * F10   Save and Exit    *
*                                                     * ESC   Exit             *
*                                                     *                        *
*                                                     *                        *
*******************************************************************************
Advanced
********************************************************************************
* LAN Configuration.                                  * Enter channel number   *
* *************************************************** * for LAN Configuration  *
* Channel Number                 [01]                 * Command.               *
* Channel Number Status:         Channel number is OK *                        *
*                                                     * Proper value below 16. *
*                                                     *                        *
* IP Assignment                  [DHCP]               *                        *
*                                                     *                        *
* Current IP address in BMC:      010.006.042.175     *                        *
* Current MAC address in BMC:     00.03.BA.F2.09.66   *                        *
* Current Subnet Mask in BMC:     255.255.255.000     *                        *
* Current Gateway in BMC:         010.006.042.001     *                        *
*                                                     * **    Select Screen    *
* Refresh                                             * **    Select Item      *
*                                                     * Enter Update           *
* IP Address                      010.006.042.174     * F1    General Help     *
* Subnet Mask                     255.255.255.000     * F10   Save and Exit    *
* Default Gateway                 010.006.042.001     * ESC   Exit             *
*                                                     *                        *
* Commit                                              *                        *
*********************************************************************************
          Advanced
*******************************************************************************
* Set PEF Configuration Parameters Command.           * Enable or Disable PEF  *
* *************************************************** * Support.               *
* PEF SUPPORT                    [Enabled]            * Refer Table 24.6 of    *
* * PEF Action Global Control                         * IPMI Specification 1.5 *
* Alert Startup Delay            [Disabled]           *                        *
* Startup Delay                  [Disabled]           *                        *
* Event Message For PEF Action   [Disabled]           *                        *
*                                                     *                        *
*                                                     *                        *
*                                                     *                        *
*                                                     *                        *
*                                                     *                        *
*                                                     * **    Select Screen    *
*                                                     * **    Select Item      *
*                                                     * +-    Change Option    *
*                                                     * F1    General Help     *
*                                                     * F10   Save and Exit    *
*                                                     * ESC   Exit             *
*                                                     *                        *
*                                                     *                        *
*******************************************************************************
          Advanced
********************************************************************************
* MPS Configuration                                   * MPS Revision           *
* *************************************************** *                        *
* MPS Revision                   [1.4]                *                        *
*                                                     *                        *
*                                                     *                        *
*                                                     *                        *
*                                                     *                        *
*                                                     *                        *
*                                                     *                        *
*                                                     *                        *
*                                                     *                        *
*                                                     *                        *
*                                                     * **    Select Screen    *
*                                                     * **    Select Item      *
*                                                     * +-    Change Option    *
*                                                     * F1    General Help     *
*                                                     * F10   Save and Exit    *
*                                                     * ESC   Exit             *
*                                                     *                        *
*                                                     *                        *
********************************************************************************
Advanced
********************************************************************************
* AMD PowerNow Configuration                          * Enabled/Disabled       *
* *************************************************** * PowerNow               *
* PowerNow                       [Disabled]           *                        *
*                                                     *                        *
*                                                     *                        *
*                                                     *                        *
*                                                     *                        *
*                                                     *                        *
*                                                     *                        *
*                                                     *                        *
*                                                     *                        *
*                                                     *                        *
*                                                     * **    Select Screen    *
*                                                     * **    Select Item      *
*                                                     * +-    Change Option    *
*                                                     * F1    General Help     *
*                                                     * F10   Save and Exit    *
*                                                     * ESC   Exit             *
*                                                     *                        *
*                                                     *                        *
********************************************************************************
Advanced
********************************************************************************
* Configure Remote Access type and parameters         * Select Remote Access   *
* *************************************************** * type.                  *
* Remote Access                  [Enabled]            *                        *
*                                                     *                        *
* Serial port number             [COM1]               *                        *
*      Base Address, IRQ         [3F8h, 4]            *                        *
* Serial Port Mode               [09600 8,n,1]        *                        *
* Flow Control                   [None]               *                        *
* Redirection After BIOS POST    [Always]             *                        *
* Terminal Type                  [ANSI]               *                        *
* VT-UTF8 Combo Key Support      [Enabled]            *                        *
* Sredir Memory Display Delay    [No Delay]           *                        *
*                                                     * **    Select Screen    *
*                                                     * **    Select Item      *
*                                                     * +-    Change Option    *
*                                                     * F1    General Help     *
*                                                     * F10   Save and Exit    *
*                                                     * ESC   Exit             *
*                                                     *                        *
*                                                     *                        *
********************************************************************************
           Advanced
********************************************************************************
* USB Configuration                                   * Enables support for    *
* *************************************************** * legacy USB. AUTO       *
* Module Version - 2.24.0-11.4                        * option disables        *
*                                                     * legacy support if      *
* USB Devices Enabled :                               * no USB devices are     *
*   2 Keyboards, 2 Mice, 1 Hub, 2 Drives              * connected.             *
*                                                     *                        *
* Legacy USB Support             [Enabled]            *                        *
* USB 2.0 Controller Mode        [FullSpeed]          *                        *
* BIOS EHCI Hand-Off             [Enabled]            *                        *
* Hotplug USB FDD Support        [Auto]               *                        *
* Hotplug USB CDROM Support      [Auto]               *                        *
*                                                     * **    Select Screen    *
* * USB Mass Storage Device Configuration             * **    Select Item      *
*                                                     * +-    Change Option    *
*                                                     * F1    General Help     *
*                                                     * F10   Save and Exit    *
*                                                     * ESC   Exit             *
*                                                     *                        *
*                                                     *                        *
********************************************************************************
Main    Advanced    PCIPnP    Boot    Security    Chipset    Exit
********************************************************************************
* Advanced PCI/PnP Settings                          ** NO: lets the BIOS      *
* ***************************************************** configure all the      *
* WARNING: Setting wrong values in below sections    ** devices in the system. *
*          may cause system to malfunction.          ** YES: lets the          *
*                                                    ** operating system       *
* Plug & Play O/S                [No]                ** configure Plug and     *
* PCI Latency Timer              [64]                ** Play (PnP) devices not *
* Allocate IRQ to PCI VGA        [Yes]               ** required for boot if   *
* Palette Snooping               [Disabled]          ** your system has a Plug *
* PCI IDE BusMaster              [Disabled]          ** and Play operating     *
* OffBoard PCI/ISA IDE Card      [Auto]              ** system.                *
* Scanning onboard Marvell ROM   [Enabled]           **                        *
* Scanning onboard NIC-0 OPROM   [Enabled]           ** **    Select Screen    *
* Scanning onboard NIC-1 OPROM   [Enabled]           ** **    Select Item      *
* Scanning onboard NIC-2 OPROM   [Enabled]           ** +-    Change Option    *
* Scanning onboard NIC-3 OPROM   [Enabled]           ** Available: Specified   *
* Scanning OPROM on PCIX SLOT0   [Enabled]           ** DMA is available to be *
* Scanning OPROM on PCIX SLOT1   [Enabled]           ** used by PCI/PnP        *
* Onboard PCI NIC MAC Address                        ** devices.               *
*   GE NIC 1 : 00 14 4F 20 DA FC                     ** Reserved: Specified    *
*   GE NIC 2 : 00 14 4F 20 DA FD                     ** DMA is reserved for    *
*   GE NIC 3 : 00 14 4F 20 DA FE                     ** use by legacy ISA      *
*   GE NIC 4 : 00 14 4F 20 DA FF                     ** devices.               *
*                                                    **                        *
* IRQ3                           [Available]         **                        *
* IRQ4                           [Reserved]          **                        *
* IRQ5                           [Available]         **                        *
* IRQ7                           [Available]         ** **    Select Screen    *
* IRQ9                           [Available]         ** **    Select Item      *
* IRQ10                          [Available]         ** +-    Change Option    *
* IRQ11                          [Available]         ** F1    General Help     *
* IRQ14                          [Available]         ** F10   Save and Exit    *
* IRQ15                          [Available]         ** ESC   Exit             *
*                                                    **                        *
* DMA Channel 0                  [Available]         ** **    Select Screen    *
* DMA Channel 1                  [Available]         ** **    Select Item      *
* DMA Channel 3                  [Available]         ** +-    Change Option    *
* DMA Channel 5                  [Available]         ** F1    General Help     *
* DMA Channel 6                  [Available]         ** F10   Save and Exit    *
* DMA Channel 7                  [Available]         ** ESC   Exit             *
*                                                    **                        *
* Reserved Memory Size           [Disabled]          **                        *
********************************************************************************
Main    Advanced    PCIPnP    Boot    Security    Chipset    Exit
********************************************************************************
* Boot Settings                                       * Configure Settings     *
* *************************************************** * during System Boot.    *
* * Boot Settings Configuration                       *                        *
*                                                     *                        *
* * Boot Device Priority                              *                        *
* * Hard Disk Drives                                  *                        *
* * Removable Drives                                  *                        *
* * ATAPI CDROM Drives                                *                        *
*                                                     *                        *
*                                                     *                        *
*                                                     *                        *
*                                                     *                        *
*                                                     * **    Select Screen    *
*                                                     * **    Select Item      *
*                                                     * Enter Go to Sub Screen *
*                                                     * F1    General Help     *
*                                                     * F10   Save and Exit    *
*                                                     * ESC   Exit             *
*                                                     *                        *
*                                                     *                        *
********************************************************************************
                                Boot
********************************************************************************
* Boot Settings Configuration                         * Allows BIOS to skip    *
* *************************************************** * certain tests while    *
* Quick Boot                     [Disabled]           * interrupt 19           *
* System Configuration Display   [Disabled]           *                        *
* Quiet Boot                     [Disabled]           * messages.              *
* AddOn ROM Display Mode         [Force BIOS]         *                        *
* Bootup Num-Lock                [On]                 *                        *
* Wait For 'F1' If Error         [Disabled]           *                        *
* Interrupt 19 Capture           [Disabled]           *                        *
*                                                     *                        *
*                                                     *                        *
*                                                     *                        *
*                                                     * **    Select Screen    *
*                                                     * **    Select Item      *
*                                                     * +-    Change Option    *
*                                                     * F1    General Help     *
*                                                     * F10   Save and Exit    *
*                                                     * ESC   Exit             *
*                                                     *                        *
*                                                     *                        *
********************************************************************************
                                Boot
********************************************************************************
* Boot Device Priority                                * Specifies the boot     *
* *************************************************** * sequence from the      *
*                                                     * available devices.     *
* 1st Boot Device                [ATAPI CDROM]        *                        *
* 2nd Boot Device                [Removable Dev.]     * A device enclosed in   *
* 3rd Boot Device                [Hard Drive]         * parenthesis has been   *
* 4th Boot Device                [IBA GE Slot 0708 v] * disabled in the        *
* 5th Boot Device                [IBA GE Slot 0709 v] * corresponding type     *
* 6th Boot Device                [IBA GE Slot 0808 v] * menu.                  *
* 7th Boot Device                [IBA GE Slot 0809 v] *                        *
*                                                     *                        *
*                                                     *                        *
*                                                     * **    Select Screen    *
*                                                     * **    Select Item      *
*                                                     * +-    Change Option    *
*                                                     * F1    General Help     *
*                                                     * F10   Save and Exit    *
*                                                     * ESC   Exit             *
*                                                     *                        *
*                                                     *                        *
********************************************************************************
                                Boot
********************************************************************************
* Hard Disk Drives                                    * Specifies the boot     *
* *************************************************** * sequence from the      *
* 1st Drive                      [SATA 06C0 S00]      * available devices.     *
* 2nd Drive                      [SATA 06C4 S01]      *                        *
*                                                     *                        *
*                                                     *                        *
*                                                     *                        *
*                                                     *                        *
*                                                     *                        *
*                                                     *                        *
*                                                     *                        *
*                                                     *                        *
*                                                     * **    Select Screen    *
*                                                     * **    Select Item      *
*                                                     * +-    Change Option    *
*                                                     * F1    General Help     *
*                                                     * F10   Save and Exit    *
*                                                     * ESC   Exit             *
*                                                     *                        *
********************************************************************************
Boot
********************************************************************************
* Removable Drives                                    * Specifies the boot     *
* *************************************************** * sequence from the      *
* 1st Drive                      [AMI Virtual Floppy] * available devices.     *
*                                                     *                        *
*                                                     *                        *
*                                                     *                        *
*                                                     *                        *
*                                                     *                        *
*                                                     *                        *
*                                                     *                        *
*                                                     *                        *
*                                                     *                        *
*                                                     * **    Select Screen    *
*                                                     * **    Select Item      *
*                                                     * +-    Change Option    *
*                                                     * F1    General Help     *
*                                                     * F10   Save and Exit    *
*                                                     * ESC   Exit             *
*                                                     *                        *
*                                                     *                        *
********************************************************************************
Boot
*******************************************************************************
* ATAPI CDROM Drives                                  * Specifies the boot    *
* *************************************************** * sequence from the     *
* 1st Drive                      [IOMEGA CDRW64892EX] * available devices.    *
*                                                     *                       *
*                                                     *                       *
*                                                     *                       *
*                                                     *                       *
*                                                     *                       *
*                                                     *                       *
*                                                     *                       *
*                                                     *                       *
*                                                     *                       *
*                                                     * **    Select Screen   *
*                                                     * **    Select Item     *
*                                                     * +-    Change Option   *
*                                                     * F1    General Help    *
*                                                     * F10   Save and Exit   *
*                                                     * ESC   Exit            *
*                                                     *                       *
*                                                     *                       *
*******************************************************************************
Main    Advanced    PCIPnP    Boot    Security    Chipset    Exit
********************************************************************************
* Security Settings                                   * Install or Change the  *
* *************************************************** * password.              *
* Supervisor Password :Not Installed                  *                        *
* User Password       :Not Installed                  *                        *
*                                                     *                        *
* Change Supervisor Password                          *                        *
* Change User Password                                *                        *
* Clear User Password                                 *                        *
*                                                     *                        *
* Boot Sector Virus Protection   [Disabled]           *                        *
*                                                     *                        *
*                                                     *                        *
*                                                     * **    Select Screen    *
*                                                     * **    Select Item      *
*                                                     * Enter Change           *
*                                                     * F1    General Help     *
*                                                     * F10   Save and Exit    *
*                                                     * ESC   Exit             *
*                                                     *                        *
*                                                     *                        *
********************************************************************************
Main    Advanced    PCIPnP    Boot    Security    Chipset    Exit
********************************************************************************
*                                                     * Options for NB         *
* * NorthBridge Configuration                         *                        *
* * SouthBridge Configuration                         *                        *
*                                                     *                        *
*                                                     *                        *
*                                                     *                        *
*                                                     *                        *
*                                                     *                        *
*                                                     *                        *
*                                                     *                        *
*                                                     *                        *
*                                                     * **    Select Screen    *
*                                                     * **    Select Item      *
*                                                     * Enter Go to Sub Screen *
*                                                     * F1    General Help     *
*                                                     * F10   Save and Exit    *
*                                                     * ESC   Exit             *
*                                                     *                        *
*                                                     *                        *
********************************************************************************
Chipset
*******************************************************************************
* NorthBridge Chipset Configuration                  *                        *
******************************************************                        *
* * Memory Configuration                             *                        *
* * ECC Configuration                                *                        *
* * IOMMU Option Menu                                *                        *
* Power Down Control             [Auto]              *                        *
* ****************************************************                        *
* Memory Timing Parameters       [CPU Node 0]        *                        *
*   Memory CLK             :200 MHz                  *                        *
*   CAS Latency(Tcl)       :3.0                      *                        *
*   RAS/CAS Delay(Trcd)    :3 CLK                    *                        *
*   Min Active RAS(Tras)   :8 CLK                    *                        *
*   Row Precharge Time(Trp):3 CLK                    * **    Select Screen    *
*   RAS/RAS Delay(Trrd)    :2 CLK                    * **    Select Item      *
*   Row Cycle (Trc)        :11 CLK                   * Enter Go to Sub Screen *
*   Row Refresh Cycle(Trfc):13 CLK                   * F1    General Help     *
*   Read Write Delay(Trwt) :3 CLK                    * F10   Save and Exit    *
*   Read Preamble          :7.0 ns                   * ESC   Exit             *
*   Asynchronous Latency   :8 ns                     *                        *
*                                                    *                        *
*******************************************************************************
Chipset
********************************************************************************
* Memory Configuration                                * MEMCLK can be set      *
* *************************************************** * by the code using      *
* Memclock Mode                  [Auto]               * AUTO, or if you use    *
* MCT Timing Mode                [Auto]               * LIMIT, you can set     *
* User Config Mode               [Auto]               * one of the standard    *
* Bank Interleaving              [Auto]               * values.                *
* Burst Length                   [4 Beats]            *                        *
* Enable Clock to All DIMMs      [Disabled]           *                        *
* SoftWare Memory Hole           [Disabled]           *                        *
* HardWare Memory Hole           [Disabled]           *                        *
* Node Interleaving              [Disabled]           *                        *
*                                                     *                        *
*                                                     * **    Select Screen    *
*                                                     * **    Select Item      *
*                                                     * +-    Change Option    *
*                                                     * F1    General Help     *
*                                                     * F10   Save and Exit    *
*                                                     * ESC   Exit             *
*                                                     *                        *
*                                                     *                        *
********************************************************************************
                                                    Chipset
********************************************************************************
* ECC Configuration                                   * DRAM ECC allows        *
* *************************************************** * hardware to report     *
* DRAM ECC Enable                [Enabled]            * and correct memory     *
*   MCA DRAM ECC Logging         [Enabled]            * errors automatically   *
*   ECC Chip Kill                [Enabled]            * maintaining system     *
*   DRAM SCRUB REDIRECT          [Disabled]           * integrity.             *
*   DRAM BG Scrub                [327.7us]            *                        *
* L2 Cache BG Scrub              [ 10.2us]            *                        *
* Data Cache BG Scrub            [ 5.12us]            *                        *
*                                                     *                        *
*                                                     *                        *
*                                                     *                        *
*                                                     * **    Select Screen    *
*                                                     * **    Select Item      *
*                                                     * +-    Change Option    *
*                                                     * F1    General Help     *
*                                                     * F10   Save and Exit    *
*                                                     * ESC   Exit             *
*                                                     *                        *
*                                                     *                        *
********************************************************************************
                                                   Chipset
********************************************************************************
* IOMMU MODE          [AGP Present]                   * Set GART size in,      *
*                                                     * systems without AGP,   *
*                                                     * or disable altogether. *
*                                                     * Some OSes require      *
*                                                     * valid GART for proper  *
*                                                     * operation.  If AGP is  *
*                                                     * present, select        *
*                                                     * appropriate option to  *
*                                                     * ensure proper AGP      *
*                                                     * operation.             *
*                                                     *                        *
*                                                     *                        *
*                                                     * **    Select Screen    *
*                                                     * **    Select Item      *
*                                                     * +-    Change Option    *
*                                                     * F1    General Help     *
*                                                     * F10   Save and Exit    *
*                                                     * ESC   Exit             *
*                                                     *                        *
*                                                     *                        *
********************************************************************************
                                                   Chipset
********************************************************************************
* South Bridge Chipset Configuration                  * Enable/disable         *
* *************************************************** * SMBUS 2.0 Controller   *
* 2.0 SM Bus Controller          [Enabled]            * in South Bridge        *
* Restore on AC/Power Loss       [Last State]         *                        *
* Power Button Behavior          [Instant Off]        *                        *
*                                                     *                        *
* HT Link 0 P-Comp Mode          [Auto]               *                        *
* HT Link 0 N-Comp Mode          [Auto]               *                        *
* HT Link 0 RZ-Comp Mode         [Auto]               *                        *
*                                                     *                        *
*                                                     *                        *
*                                                     *                        *
*                                                     * **    Select Screen    *
*                                                     * **    Select Item      *
*                                                     * +-    Change Option    *
*                                                     * F1    General Help     *
*                                                     * F10   Save and Exit    *
*                                                     * ESC   Exit             *
*                                                     *                        *
*                                                     *                        *
********************************************************************************
  Main    Advanced    PCIPnP    Boot    Security    Chipset    Exit
*******************************************************************************
* Exit Options                                        * Exit system setup     *
* *************************************************** * after saving the      *
* Save Changes and Exit                               * changes.              *
* Discard Changes and Exit                            *                       *
* Discard Changes                                     * F10 key can be used   *
*                                                     * for this operation.   *
* Load Optimal Defaults                               *                       *
*                                                     *                       *
*                                                     *                       *
*                                                     *                       *
*                                                     *                       *
*                                                     * **    Select Screen   *
*                                                     * **    Select Item     *
*                                                     * Enter Go to Sub Screen*
*                                                     * F1    General Help    *
*                                                     * F10   Save and Exit   *
*                                                     * ESC   Exit            *
*                                                     *                       *
*                                                     *                       *
*******************************************************************************
TABLE 2-3 contains summary descriptions of the seven top-level BIOS setup screens for the Sun Fire X4540.
FIGURE 2-4 summarizes the BIOS menu tree. See Section 2.16, BIOS Setup Menu Screens (X4540) for examples of each of these screens.
FIGURE 2-4 BIOS Utility Menu Tree for Sun Fire X4540

BIOS Setup Utility screens, summarized as a menu tree with the 7 top-level screens listed horizontally and their sub-screens listed vertically.
TABLE 2-4 shows the devices of the X4540 server in order of boot detection.
There are six on-board LSI controllers with each controller connecting to eight drives.
BIOS shows the drives in F2 Setup as follows (this information is obtained from the LSI BIOS option ROM):
SCSI: #0200 ID00
SCSI: #0300 ID01
This means the SCSI controller is on bus 02h, device 0, function 0, drive ID 0, or the SCSI controller is on bus 03h, device 0, function 0, drive ID 1.
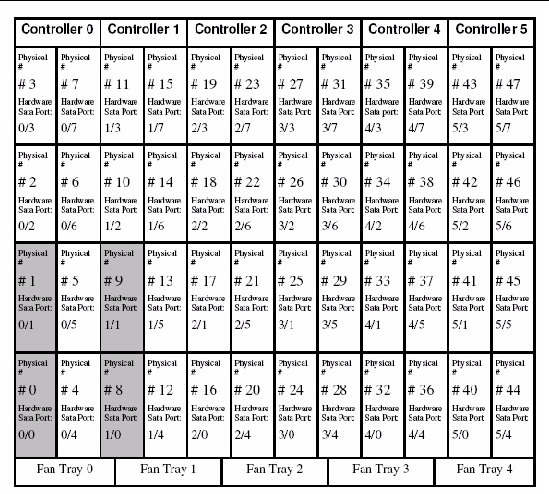
The following graphic shows the drives mapping scheme of the system. The boot disks are 0, 1, 8, and 9. (Default boot drive is in slot 0 and the default mirrored drive is in slot 8.) It is required to use one of these disks from which to boot the system.
FIGURE 2-5 Sun Fire X4540 Drives Map
The following figures show sample BIOS setup menu screens.
| Note - The screens shown are examples. The version numbers and the screen items and selections shown are subject to change over the life of the product. |
Main    Advanced    PCIPnP    Boot    Security    Chipset    Exit
********************************************************************************
* BIOS Build Version : 0ABNF010 ** or [SHIFT-TAB] to                           *
* Build Date   : 04/04/08                            ** select a field.        *
* Core Version : 08.00.14                            **                        *
*                                                    ** Use [+] or [-] to      *
* Product Name          : Sun Fire X4540             ** configure system Date. *
* Board Serial Number   : Not Available              **                        *
* BMC Firmware Revision : 2.0.2.3                    ** Date Format:           *
* CPLD Revision : 2.0                                ** MM/DD/YYYY             *
*                                                    **                        *
* Processor                                          **                        *
* Quad-Core AMD Opteron(tm) Processor 2356           **                        *
* Speed :2300MHz                                     ** *    Select Screen     *
* Count :8                                           ** **    Select Item      *
*                                                    ** +-    Change Field     *
* System Memory                                      ** Tab   Select Field     *
* Size      :64.0 GB                                 ** F1    General Help     *
*                                                    ** F10   Save and Exit    *
* System Time                    [11:55:58]          ** ESC   Exit             *
* System Date                    [Wed 05/05/2008]                              *
********************************************************************************
Main    Advanced    PCIPnP    Boot    Security    Chipset    Exit
********************************************************************************
* Advanced Settings                                   * Configure CPU.         *
* *************************************************** *                        *
* WARNING: Setting wrong values in below sections     *                        *
*          may cause system to malfunction.           *                        *
*                                                     *                        *
* * CPU Configuration                                 *                        *
* * IDE Configuration                                 *                        *
* * Hyper Transport Configuration                     *                        *
* * ACPI Configuration                                *                        *
* * Event Log Configuration                           *                        *
* * IPMI 2.0 Configuration                            *                        *
* * MPS Configuration                                 *                        *
* * PCI Express Configuration                         * *    Select Screen     *
* * Remote Access Configuration                       * **    Select Item      *
*	* Enter Go to Sub Screen                                                     *
* * USB Configuration                                 * F1    General Help     *
*                                                     * F10   Save and Exit    *
*                                                     * ESC   Exit             *
*                                                     *                        *
*                                                     *                        *
********************************************************************************
                                  Advanced
********************************************************************************
* CPU Configuration                                   * This option should     *
* Module Version: 13.26                               * remain disabled for    *
* AGESA Version: 3.1.8.0                              * the normal operation.  *
* Physical Count: 2                                   * The driver developer   *
* Logical Count : 8                                   * may enable it for      *
* *************************************************** * testing purpose.       *
* Quad-Core AMD Opteron(tm) Processor 2356            *                        *
* Revision: B3                                        *                        *
* Cache L1: 512KB                                     *                        *
* Cache L2: 2048KB                                    *                        *
* Cache L3: 2MB                                       *                        *
* Speed   : 2300MHz,    NB Clk: 2000MHz               *                        *
* Able to Change Freq.  : Yes                         * *    Select Screen     *
* uCode Patch Level     : 0x1000065                   * **    Select Item      *
* GART Error Reporting           [Disabled]           * +-    Change Option    *
* Microcode Update               [Enabled]            * F1    General Help     *
* Secure Virtual Machine Mode    [Enabled]            * F10   Save and Exit    *
* PowerNow                       [Disabled]           * ESC   Exit             *
* ACPI SRAT Table                [Enabled]            *                        *
********************************************************************************
                                  Advanced
********************************************************************************
* IDE Configuration                                   * DISABLED: disables the *
* *************************************************** * integrated IDE         *
* OnBoard IDE Controller         [Enabled]            * Controller.            *
*                                                     * PRIMARY: enables only  *
*                                                     * the Primary IDE        *
* * Primary IDE Master              : [Not Detected]  * Controller.            *
* * Primary IDE Slave               : [Not Detected]  * SECONDARY: enables     *
*                                                     * only the Secondary IDE *
* Hard Disk Write Protect        [Disabled]           * Controller.            *
* IDE Detect Time Out (Sec)      [5]                  * BOTH: enables both IDE *
*                                                     * Controllers.           *
*                                                     *                        *
*                                                     * *    Select Screen     *
*                                                     * **    Select Item      *
*                                                     * +-    Change Option    *
*                                                     * F1    General Help     *
*                                                     * F10   Save and Exit    *
*                                                     * ESC   Exit             *
*                                                     *                        *
*                                                     *                        *
********************************************************************************
********************************************************************************
* Hyper Transport Configuration                       * The HyperTransport     *
* *************************************************** * link will run at this  *
*                                                     * speed if it is slower  *
* HT Link Speed Configuration                         * than or equal to the   *
* NODE0:NODE1 HT Link Speed      [Auto]               * system clock and the   *
*                                                     * board is capable.      *
* NODE0:MCP55 HT Link Speed      [Auto]               *                        *
* NODE1:IO55A HT Link Speed      [Auto]               *                        *
* NODE1:IO55B HT Link Speed      [Auto]               *                        *
*                                                     *                        *
* HT Link Width Configuration                         *                        *
* NODE0:NODE1 HT Link Width      [Auto]               *                        *
*                                                     * *    Select Screen     *
* NODE0:MCP55 HT Link Width      [Auto]               * **    Select Item      *
* NODE1:IO55A HT Link Width      [Auto]               * +-    Change Option    *
* NODE1:IO55B HT Link Width      [Auto]               * F1    General Help     *
*                                                     * F10   Save and Exit    *
*                                                     * ESC   Exit             *
********************************************************************************
********************************************************************************
* ACPI Settings                                       * Advanced ACPI          *
* *************************************************** * Configuration settings *
* * Advanced ACPI Configuration                       *                        *
* * Chipset ACPI Configuration                        * Use this section to    *
* * General WHEA Configuration                        * configure additional   *
*                                                     * ACPI options.          *
*                                                     *                        *
*                                                     *                        *
*                                                     *                        *
*                                                     *                        *
*                                                     *                        *
*                                                     *                        *
*                                                     * *    Select Screen     *
*                                                     * **    Select Item      *
*                                                     * Enter Go to Sub Screen *
*                                                     * F1    General Help     *
*                                                     * F10   Save and Exit    *
*                                                     * ESC   Exit             *
*                                                     *                        *
*                                                     *                        *
********************************************************************************
********************************************************************************
* Advanced ACPI Configuration                         * Enable RSDP pointers   *
* *************************************************** * to 64-bit Fixed System *
* ACPI Version Features          [ACPI v1.0]          * Description Tables. Di *
* ACPI APIC support              [Enabled]            * ACPI version has some  *
* AMI OEMB table                 [Enabled]            *                        *
* Headless mode                  [Disabled]           *                        *
* EMS support(SPCR)              [Enabled]            *                        *
*                                                     *                        *
*                                                     * *    Select Screen     *
*                                                     * **    Select Item      *
*                                                     * +-    Change Option    *
*                                                     * F1    General Help     *
*                                                     * F10   Save and Exit    *
*                                                     * ESC   Exit             *
********************************************************************************
********************************************************************************
* Chipset ACPI Configuration                          *        Options         *
* *************************************************** *                        *
* MCP55 ACPI HPET TABLE          [Enabled]            * Disabled               *
*                                                     * Enabled                *
*                                                     *                        *
*                                                     *                        *
*                                                     *                        *
*                                                     *                        *
*                                                     *                        *
*                                                     *                        *
*                                                     *                        *
*                                                     *                        *
*                                                     * *    Select Screen     *
*                                                     * **    Select Item      *
*                                                     * +-    Change Option    *
*                                                     * F1    General Help     *
*                                                     * F10   Save and Exit    *
*                                                     * ESC   Exit             *
*                                                     *                        *
*                                                     *                        *
********************************************************************************
********************************************************************************
* General WHEA Configuration                          * Enable or disable      *
* *************************************************** * Windows Hardware       *
* WHEA Support                   [Enabled]            * Error Architecture.    *
*                                                     *                        *
*                                                     *                        *
*                                                     *                        *
*                                                     *                        *
*                                                     *                        *
*                                                     * *    Select Screen     *
*                                                     * **    Select Item      *
*                                                     * +-    Change Option    *
*                                                     * F1    General Help     *
*                                                     * F10   Save and Exit    *
*                                                     * ESC   Exit             *
*                                                     *                        *
*                                                     *                        *
********************************************************************************
********************************************************************************
* Event Logging details                               * View all unread events *
* *************************************************** * on the Event Log.      *
* View Event Log                                      *                        *
* Mark all events as read                             *                        *
* Clear Event Log                                     *                        *
*                                                     *                        *
*                                                     *                        *
*                                                     *                        *
*                                                     *                        *
*                                                     *                        *
*                                                     *                        *
*                                                     *                        *
*                                                     * *    Select Screen     *
*                                                     * **    Select Item      *
*                                                     * Enter Go to Sub Screen *
*                                                     * F1    General Help     *
*                                                     * F10   Save and Exit    *
*                                                     * ESC   Exit             *
*                                                     *                        *
*                                                     *                        *
********************************************************************************
                                  Advanced
********************************************************************************
* IPMI 2.0 Configuration                              * View all events in the *
* *************************************************** * BMC Event Log.         *
* Status Of BMC                   Working             *                        *
* * View BMC System Event Log                         * It will take up to     *
* Reload BMC System Event Log                         * 60 Seconds approx.     *
* Clear BMC System Event Log                          * to read all            *
* * LAN Configuration                                 * BMC SEL records.       *
* * PEF Configuration                                 *                        *
* BMC Watch Dog Timer Action     [Disabled]           *                        *
*                                                     *                        *
*                                                     *                        *
*                                                     *                        *
*                                                     * *    Select Screen     *
*                                                     * **    Select Item      *
*                                                     * Enter Go to Sub Screen *
*                                                     * F1    General Help     *
*                                                     * F10   Save and Exit    *
*                                                     * ESC   Exit             *
*                                                     *                        *
*                                                     *                        *
********************************************************************************
********************************************************************************
* LAN Configuration.                                  * Enter channel number   *
* *************************************************** * for LAN Configuration  *
* Channel Number                 [01]                 * Command.               *
* Channel Number Status:         Channel number is OK *                        *
*                                                     * Proper value below 16. *
*                                                     *                        *
* IP Assignment                  [DHCP]               *                        *
*                                                     *                        *
* Current IP address in BMC:      010.006.143.102     *                        *
* Current MAC address in BMC:     00.03.BA.D8.7E.CD   *                        *
* Current Subnet Mask in BMC:     255.255.255.000     *                        *
* Current Gateway in BMC:         010.006.143.001     *                        *
*                                                     * *    Select Screen     *
* Refresh                                             * **    Select Item      *
*                                                     * Enter Update           *
* IP Address                     [010.006.143.102]    * F1    General Help     *
* Subnet Mask                    [255.255.255.000]    * F10   Save and Exit    *
* Default Gateway                [010.006.143.001]    * ESC   Exit             *
*                                                     *                        *
* Commit                                                                       *
********************************************************************************
                                  Advanced
********************************************************************************
* Set PEF Configuration Parameters Command.           * Enable or Disable PEF  *
* *************************************************** * Support.               *
* PEF SUPPORT                    [Enabled]            * Refer Table 24.6 of    *
* * PEF Action Global Control                         * IPMI Specification 1.5 *
* Alert Startup Delay            [Disabled]           *                        *
* Startup Delay                  [Disabled]           *                        *
* Event Message For PEF Action   [Disabled]           *                        *
*                                                     *                        *
*                                                     *                        *
*                                                     *                        *
*                                                     *                        *
*                                                     *                        *
*                                                     * *    Select Screen     *
*                                                     * **    Select Item      *
*                                                     * +-    Change Option    *
*                                                     * F1    General Help     *
*                                                     * F10   Save and Exit    *
*                                                     * ESC   Exit             *
*                                                     *                        *
********************************************************************************
                                  Advanced
********************************************************************************
* MPS Configuration                                   * Select MPS             *
* *************************************************** * Revision.              *
* MPS Revision                   [1.4]                *                        *
*                                                     *                        *
*                                                     *                        *
*                                                     *                        *
*                                                     *                        *
*                                                     *                        *
*                                                     *                        *
*                                                     *                        *
*                                                     *                        *
*                                                     *                        *
*                                                     * *    Select Screen     *
*                                                     * **    Select Item      *
*                                                     * +-    Change Option    *
*                                                     * F1    General Help     *
*                                                     * F10   Save and Exit    *
*                                                     * ESC   Exit             *
*                                                     *                        *
*                                                     *                        *
********************************************************************************
                                  Advanced
********************************************************************************
* PCI Express Configuration                           * Enable/Disable         *
* *************************************************** * PCI Express L0s and    *
* Active State Power-Management  [Disabled]           * L1 link power          *
*                                                     * states.                *
*                                                     *                        *
*                                                     *                        *
*                                                     *                        *
*                                                     *                        *
*                                                     *                        *
*                                                     *                        *
*                                                     *                        *
*                                                     *                        *
*                                                     * *    Select Screen     *
*                                                     * **    Select Item      *
*                                                     * +-    Change Option    *
*                                                     * F1    General Help     *
*                                                     * F10   Save and Exit    *
*                                                     * ESC   Exit             *
*                                                     *                        *
*                                                     *                        *
********************************************************************************
                                  Advanced
********************************************************************************
* Configure Remote Access type and parameters         * Select Remote Access   *
* *************************************************** * type.                  *
* Remote Access                  [Enabled]            *                        *
*                                                     *                        *
* Serial port number             [COM1]               *                        *
*      Base Address, IRQ         [3F8h, 4]            *                        *
* Serial Port Mode               [09600 8,n,1]        *                        *
* Flow Control                   [None]               *                        *
* Redirection After BIOS POST    [Always]             *                        *
* Terminal Type                  [ANSI]               *                        *
* VT-UTF8 Combo Key Support      [Enabled]            *                        *
* Sredir Memory Display Delay    [No Delay]           *                        *
*                                                     * *    Select Screen     *
*                                                     * **    Select Item      *
*                                                     * +-    Change Option    *
*                                                     * F1    General Help     *
*                                                     * F10   Save and Exit    *
*                                                     * ESC   Exit             *
*                                                     *                        *
*                                                     *                        *
********************************************************************************
********************************************************************************
* USB Configuration                                   * This is a workaround   *
* *************************************************** * for OSes without EHCI  *
* Module Version - 2.24.1-13.4                        * hand-off support.      *
*                                                     * The EHCI ownership     *
* USB Devices Enabled :                               * change should claim by *
*   2 Keyboards, 2 Mice, 1 Hub                        * EHCI driver.           *
*                                                     *                        *
* Legacy USB Support             [Enabled]            *                        *
* USB 2.0 Controller Mode        [HiSpeed]            *                        *
* BIOS EHCI Hand-Off             [Enabled]            *                        *
* Hotplug USB FDD Support        [Auto]               *                        *
* Hotplug USB CDROM Support      [Auto]               *                        *
*                                                     * *    Select Screen     *
*                                                     * **    Select Item      *
*                                                     * +-    Change Option    *
*                                                     * F1    General Help     *
*                                                     * F10   Save and Exit    *
*                                                     * ESC   Exit             *
********************************************************************************
Main    Advanced    PCIPnP    Boot    Security    Chipset    Exit
********************************************************************************
* WARNING: Setting wrong values in below sections    **                        *
*          may cause system to malfunction.          **                        *
*                                                    **                        *
* Clear NVRAM                    [No]                **                        *
* Plug & Play O/S                [No]                **                        *
* PCI Latency Timer              [64]                **                        *
* Allocate IRQ to PCI VGA        [Yes]               **                        *
* Palette Snooping               [Disabled]          **                        *
* PCI IDE BusMaster              [Disabled]          **                        *
* OffBoard PCI/ISA IDE Card      [Auto]              **                        *
*                                                    ** *    Select Screen     *
* Scanning OPROM on onboard SCSI [Enabled]           ** **    Select Item      *
* Scanning OPROM on onboard NICs [Enabled]           ** +-    Change Option    *
* Scanning OPROM on PCI-e Slot 0 [Enabled]           ** F1    General Help     *
* Scanning OPROM on PCI-e Slot 1 [Enabled]           ** F10   Save and Exit    *
* Scanning OPROM on PCI-e Slot 2 [Enabled]           ** ESC   Exit             *
*                                                    **                        *
* MAC Address NIC 0:    00:14:4F:A6:E7:E4            **                        *
* MAC Address NIC 1:    00:14:4F:A6:E7:E5            ** Reserved: Specified    *
* MAC Address NIC 2:    00:14:4F:A6:E7:E6            ** IRQ is reserved for    *
* MAC Address NIC 3:    00:14:4F:A6:E7:E7            ** use by Legacy ISA      *
*                                                    ** devices.               *
* IRQ3                           [Available]         **                        *
* IRQ5                           [Available]         **                        *
* IRQ7                           [Available]         **                        *
* IRQ9                           [Available]         **                        *
* IRQ10                          [Available]         ** *    Select Screen     *
* IRQ11                          [Available]         ** **    Select Item      *
* IRQ14                          [Available]         ** +-    Change Option    *
* IRQ15                          [Available]         ** F1    General Help     *
*                                                    ** F10   Save and Exit    *
* DMA Channel 0                  [Available]         ** ESC   Exit             *
* DMA Channel 1                  [Available]         **                        *
* DMA Channel 3                  [Available]         **                        *
* DMA Channel 5                  [Available]         ** F1    General Help     *
* DMA Channel 6                  [Available]         ** F10   Save and Exit    *
* DMA Channel 7                  [Available]         ** ESC   Exit             *
*                                                    **                        *
********************************************************************************
********************************************************************************
Main    Advanced    PCIPnP    Boot    Security    Chipset    Exit
********************************************************************************
* Boot Settings                                       * Configure Settings     *
* *************************************************** * during System Boot.    *
* * Boot Settings Configuration                       *                        *
*                                                     *                        *
* * Boot Device Priority                              *                        *
* * Hard Disk Drives                                  *                        *
*                                                     *                        *
*                                                     *                        *
*                                                     *                        *
*                                                     *                        *
*                                                     *                        *
*                                                     *                        *
*                                                     * *    Select Screen     *
*                                                     * **    Select Item      *
*                                                     * Enter Go to Sub Screen *
*                                                     * F1    General Help     *
*                                                     * F10   Save and Exit    *
*                                                     * ESC   Exit             *
*                                                     *                        *
*                                                     *                        *
********************************************************************************
                                Boot
********************************************************************************
* Boot Settings Configuration                         * Allows BIOS to skip    *
* *************************************************** * certain tests while    *
* Quick Boot                     [Disabled]           * booting. This will     *
* Quiet Boot                     [Disabled]           * decrease the time      *
* AddOn ROM Display Mode         [Force BIOS]         * needed to boot the     *
* Bootup Num-Lock                [On]                 * system.                *
* Wait For ’F1’ If Error         [Disabled]           *                        *
* Interrupt 19 Capture           [Enabled]            *                        *
*                                                     *                        *
*                                                     *                        *
*                                                     *                        *
*                                                     *                        *
*                                                     * *    Select Screen     *
*                                                     * **    Select Item      *
*                                                     * +-    Change Option    *
*                                                     * F1    General Help     *
*                                                     * F10   Save and Exit    *
*                                                     * ESC   Exit             *
*                                                     *                        *
*                                                     *                        *
********************************************************************************
                                Boot
********************************************************************************
* Boot Device Priority                                * Specifies the boot     *
* *************************************************** * sequence from the      *
* 1st Boot Device                [SCSI:#0200 ID00 LU] * available devices.     *
* 2nd Boot Device                [NVIDIA Boot Agent ] *                        *
* 3rd Boot Device                [2-NVIDIA Boot Agen] * A device enclosed in   *
* 4th Boot Device                [3-NVIDIA Boot Agen] * parenthesis has been   *
* 5th Boot Device                [4-NVIDIA Boot Agen] * disabled in the        *
*                                                     * corresponding type     *
*                                                     * menu.                  *
*                                                     *                        *
*                                                     *                        *
*                                                     *                        *
*                                                     * *    Select Screen     *
*                                                     * **    Select Item      *
*                                                     * +-    Change Option    *
*                                                     * F1    General Help     *
*                                                     * F10   Save and Exit    *
*                                                     * ESC   Exit             *
*                                                     *                        *
*                                                     *                        *
********************************************************************************
                                Boot
********************************************************************************
* Hard Disk Drives                                    * Specifies the boot     *
* *************************************************** * sequence from the      *
* 1st Drive                      [SCSI:#0200 ID00 LU] * available devices.     *
*                                                     *                        *
*                                                     *                        *
*                                                     *                        *
*                                                     *                        *
*                                                     *                        *
*                                                     *                        *
*                                                     *                        *
*                                                     *                        *
*                                                     * *    Select Screen     *
*                                                     * **    Select Item      *
*                                                     * +-    Change Option    *
*                                                     * F1    General Help     *
*                                                     * F10   Save and Exit    *
*                                                     * ESC   Exit             *
********************************************************************************
Main    Advanced    PCIPnP    Boot    Security    Chipset    Exit
********************************************************************************
* Security Settings                                   * Install or Change the  *
* *************************************************** * password.              *
* Supervisor Password :Not Installed                  *                        *
* User Password       :Not Installed                  *                        *
*                                                     *                        *
* Change Supervisor Password                          *                        *
* Change User Password                                *                        *
*                                                     *                        *
* Boot Sector Virus Protection   [Disabled]           *                        *
*                                                     *                        *
*                                                     *                        *
*                                                     *                        *
*                                                     * *    Select Screen     *
*                                                     * **    Select Item      *
*                                                     * Enter Change           *
*                                                     * F1    General Help     *
*                                                     * F10   Save and Exit    *
*                                                     * ESC   Exit             *
*                                                     *                        *
*                                                     *                        *
********************************************************************************
Main    Advanced    PCIPnP    Boot    Security    Chipset    Exit
********************************************************************************
* Advanced Chipset Settings                           * Options for NB         *
* *************************************************** *                        *
* WARNING: Setting wrong values in below sections     *                        *
*          may cause system to malfunction.           *                        *
*                                                     *                        *
* * NorthBridge Configuration                         *                        *
* * SouthBridge Chipset Configuration                 *                        *
*                                                     *                        *
* NVMM ROM Version : 4.081.40                         *                        *
*                                                     *                        *
*                                                     *                        *
*                                                     *                        *
*                                                     * *    Select Screen     *
*                                                     * **    Select Item      *
*                                                     * Enter Go to Sub Screen *
*                                                     * F1    General Help     *
*                                                     * F10   Save and Exit    *
*                                                     * ESC   Exit             *
*                                                     *                        *
*                                                     *                        *
********************************************************************************
********************************************************************************
* NorthBridge Chipset Configuration                   *                        *
* *************************************************** *                        *
* * Memory Configuration                              *                        *
* * ECC Configuration                                 *                        *
* * DRAM Timing Configuration                         *                        *
* *************************************************** *                        *
* Alternate VID                  [Auto]               *                        *
* Memory Timing Parameters       [CPU Node 0]         *                        *
* *************************************************** *                        *
*   Memory CLK             :333 MHz, 333 MHz          *                        *
*   CAS Latency(Tcl)       :5.0, 5.0                  *                        *
*   RAS/CAS Delay(Trcd)    :5 CLK, 5 CLK              *                        *
*   Row Precharge Time(Trp):5 CLK, 5 CLK              * *    Select Screen     *
*   Min Active RAS(Tras)   :15 CLK, 15 CLK            * **    Select Item      *
*   RAS/RAS Delay(Trrd)    :3 CLK, 3 CLK              * Enter Go to Sub Screen *
*   Row Cycle (Trc)        :21 CLK, 21 CLK            * F1    General Help     *
*                                                     * F10   Save and Exit    *
*                                                     * ESC   Exit             *
********************************************************************************
                                  Chipset
********************************************************************************
* Memory Configuration                                * Enable Bank Memory     *
* *************************************************** * Interleaving           *
* Bank Interleaving              [Auto]               *                        *
* Channel Interleaving           [XOR of Address bit] * Enable non-contiguous  *
* Enable Clock to All DIMMs      [Disabled]           * address assignment to  *
* MemClk Tristate C3/ATLVID      [Disabled]           * each chip select bank  *
* Memory Hole Remapping          [Enabled]            * to enhance cycle       *
* CS Sparing Enable              [Disabled]           * turnaround time        *
* DCT Unganged Mode              [Auto]               *                        *
* Power Down Enable              [Enabled]            *                        *
*   Power Down Mode              [Channel]            *                        *
*                                                     * *    Select Screen     *
*                                                     * **    Select Item      *
*                                                     * +-    Change Option    *
*                                                     * F1    General Help     *
*                                                     * F10   Save and Exit    *
*                                                     * ESC   Exit             *
*                                                     *                        *
********************************************************************************
                                  Chipset
********************************************************************************
* ECC Configuration                                   * Set the level of ECC   *
* *************************************************** * protection. Note: The  *
* ECC Mode                       [Good ]              * ‘Super’ ECC mode       *
*   DRAM ECC Enable              [Enabled]            * dynamically sets the   *
*   DRAM SCRUB REDIRECT          [Enabled]            * DRAM scrub rate so     *
*   4-Bit ECC Mode               [Enabled]            * all of memory is       *
*   DRAM BG Scrub                [ 1.31ms]            * scrubbed in 8 hours.   *
*   Data Cache BG Scrub          [Disabled]           *                        *
*   L2 Cache BG Scrub            [Disabled]           *                        *
*                                                     *                        *
*                                                     *                        *
*                                                     *                        *
*                                                     * *    Select Screen     *
*                                                     * **    Select Item      *
*                                                     * +-    Change Option    *
*                                                     * F1    General Help     *
*                                                     * F10   Save and Exit    *
*                                                     * ESC   Exit             *
*                                                     *                        *
*                                                     *                        *
********************************************************************************
                                  Chipset
********************************************************************************
* DRAM Timing Configuration                           *        Options         *
* *************************************************** *                        *
* Memory Clock Mode              [Auto]               * Auto                   *
* DRAM Timing Mode               [Auto]               * Limit                  *
*                                                     * Manual                 *
*                                                     *                        *
*                                                     *                        *
*                                                     *                        *
*                                                     *                        *
*                                                     *                        *
*                                                     *                        *
*                                                     *                        *
*                                                     * *    Select Screen     *
*                                                     * **    Select Item      *
*                                                     * +-    Change Option    *
*                                                     * F1    General Help     *
*                                                     * F10   Save and Exit    *
*                                                     * ESC   Exit             *
*                                                     *                        *
*                                                     *                        *
********************************************************************************
                                  Chipset
********************************************************************************
* South Bridge Chipset Configuration                  * Enable/disable         *
* *************************************************** * SMBUS 2.0 Controller   *
* 2.0 SM Bus Controller          [Enabled]            * in South Bridge        *
* Restore on AC/Power Loss       [Last State]         *                        *
* Power Button Behavior          [Instant Off]        *                        *
*                                                     *                        *
* HT Link 0 P-Comp Mode          [Auto]               *                        *
* HT Link 0 N-Comp Mode          [Auto]               *                        *
* HT Link 0 RZ-Comp Mode         [Auto]               *                        *
*                                                     *                        *
*                                                     *                        *
*                                                     *                        *
*                                                     * **    Select Screen    *
*                                                     * **    Select Item      *
*                                                     * +-    Change Option    *
*                                                     * F1    General Help     *
*                                                     * F10   Save and Exit    *
*                                                     * ESC   Exit             *
*                                                     *                        *
*                                                     *                        *
********************************************************************************
  Main    Advanced    PCIPnP    Boot    Security    Chipset    Exit
*******************************************************************************
* Exit Options                                        * Exit system setup     *
* *************************************************** * after saving the      *
* Save Changes and Exit                               * changes.              *
* Discard Changes and Exit                            *                       *
* Discard Changes                                     * F10 key can be used   *
*                                                     * for this operation.   *
* Load Optimal Defaults                               *                       *
*                                                     *                       *
*                                                     *                       *
*                                                     *                       *
*                                                     *                       *
*                                                     * **    Select Screen   *
*                                                     * **    Select Item     *
*                                                     * Enter Go to Sub Screen*
*                                                     * F1    General Help    *
*                                                     * F10   Save and Exit   *
*                                                     * ESC   Exit            *
*                                                     *                       *
*                                                     *                       *
*******************************************************************************
This procedure describes how to reset the Administration password (the root password) for the ILOM Service Processor to the default after it has been set during initial setup.
1. Shut down the server to standby power mode by using a ballpoint pen or other nonconducting stylus to press and release the recessed Power button on the front panel.
See Section 2.2, Powering Off the Server.
2. Disconnect the AC power cords from the server.
3. Remove the cable management assembly if necessary:
4. Remove the system controller as described in To Remove the System Controller (CRU).
FIGURE 2-6 Loosening Captive Screws and Removing the Cover
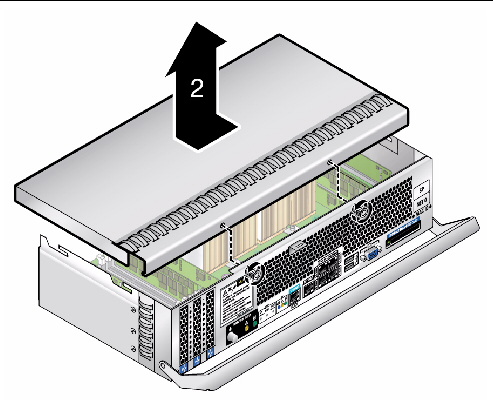
5. Push the system controller cover toward the rear and lift the cover off.
6. See the CPU board and the I/O controller board.
The jumper is located on the I/O controller board, as shown in FIGURE 2-7 (X4500) or in FIGURE 2-8 (X4540).
FIGURE 2-7 Location of Jumpers on the I/O Controller (X4500)

FIGURE 2-8 Location of Jumpers on the I/O Controller (X4540)

| Note - The hard rst jumper changes the reset button from a soft reset to a hard reset. It is used for hardware debugging only. |
7. Install the jumper across the header pins:
The jumper’s function is to clear the ILOM SP password.
8. Replace the cable management arm as described in one of the following:
9. Replace the system controller as described in Replacing the System Controller (FRU).
10. Reconnect AC power cords to the server.
The server enters standby power mode, indicated when the Power/OK LED on the front panel is flashing.
11. Return the server to main power mode by using a ballpoint pen or other nonconducting stylus to press and release the recessed Power button on the front panel.
12. Log in to the ILOM web GUI using root as the user name and changeme as the password.
For login instructions, refer to the Integrated Lights Out Manager Administration Guide.
13. Change the default password to a password of your choice.
14. Repeat Step 1 through Step 9 to remove the jumper. (Remove the jumper in Step n instead of inserting it.)
| Note - If you do not remove the passwd clr jumper, the ILOM SP and BIOS passwords will reset every time you power-cycle the server. |
| Note - The hard rst jumper changes the reset button from a soft reset to a hard reset. It is used for hardware debugging only. |
You can use this jumper to clear the server’s CMOS settings in the case of a system hang. For example, if the server hangs because of incorrect settings and does not boot, use this jumper to invalidate the settings and reboot with defaults.
| Note - Clearing CMOS settings resets the BIOS settings, including the BIOS password. |
1. Shut down the server to standby power mode by using a ballpoint pen or other nonconducting stylus to press and release the recessed Power button on the front panel.
2. Disconnect the AC power cords from the server.
3. Remove the cable management assembly if necessary:
4. Remove the system controller as described in To Remove the System Controller (CRU).
5. Push the system controller cover toward the rear and lift the cover off.
See the CPU board and the I/O controller board, as shown in FIGURE 2-7 (X4500) or in FIGURE 2-8 (X4540).
6. Install the jumper across the header pins labelled Clear CMOS.
The jumper’s function is to tell the system to clear the current CMOS settings at system reboot.
7. Wait 10 seconds, then remove the jumper.
This jumper removes battery power from the chipset where the CMOS settings are stored, thereby removing the CMOS settings.
8. Replace the cable management assembly if necessary:
9. Replace the system controller as described in Replacing the System Controller (FRU).
10. Reconnect AC power cords to the server.
The server powers up to standby power mode, indicated when the Power/OK LED on the front panel is flashing.
To reset the ILOM SP, do the following:
You can also reset the ILOM SP by shutting down the host, then removing and restoring AC power cords to the system.
For more information, see the Sun Fire X4500/X4540 Server Integrated Lights Out Manager (ILOM) Supplement.
BIOS is updated whenever you update the ILOM Service Processor firmware. For instructions on updating the firmware, refer to the Sun Integrated Lights Out Manager 2.0 User’s Guide.
In systems that have multiple PCI cards installed, and with the option ROM in all the cards enabled, the following error messages are displayed:
Not enough space to copy PCI option ROM.
Option ROM memory space exhausted.
The BIOS Option ROM is 128 KB. Of these 128 KB, approximately 86 KB are used by the VGA controller, the Marvell controller (X4500), the LSI SAS1068E controller (X4540) and the on-board NIC. Approximately 42 KB remain for the other option ROMs. Because of the order that the devices in the system are scanned and detected during system boot, the option ROM space is exhausted before all cards can be scanned. This affects which slots can be used for bootability.
Another side effect of this problem is that you cannot PXE boot using the on-board NICs. When you press F12 to PXE boot with this configuration, the following error message appears when the system tries to reach the PXE server:
PXE-ECI: Base code ROM-ID structure was not found.
Exiting Intel Boot Agent.
Currently, the devices and PCI slots are detected by the BIOS during startup in the following order:
1. On-board SATA controllers 0 through 3
3. On-board SATA controllers 4 and 5
To work around the problem for booting devices without exhausting all the option ROM memory:
1. Enter the BIOS Setup utility by pressing the F2 key while the system is booting up and performing POST.
2. On the BIOS Main Menu screen, select the PCIPnP tab to open the PCI/PnP Settings screen.
3. Change the lines for Scanning OPROM on PCI-X slots 0 and 1 to Disabled.
4. Press and release the right arrow key until the Exit menu screen is displayed.
5. Follow the instructions on the Exit menu screen to save your changes and exit the Setup utility.
To work around the problem with PXE booting, disable OPROM scanning for all PCI slots by using the procedure above. After this, you can PXE install successfully.
| Sun Fire X4500/X4540 Server Service Manual | 819-4359-19 |
Copyright © 2010, Oracle and/or its affiliates. All rights reserved.
 Integrated Lights Out Manager 3.0 Supplement for Sun Fire X4540 Server (819-4359). This procedure simultaneously removes any BIOS password that was set.
