Installing the OpenSolaris Operating System Using the Automated Installer
If you want to install the OpenSolaris operating system (OS) on multiple client systems on a network, you can use the automated installer (AI) to accomplish that task. The automated installer performs essentially “hands-free” network installations of the OpenSolaris OS.
Before You Begin
-
If you have not used the automated installer before, review the Automated Installer Task Map at: http://dlc.sun.com/osol/docs/content/2009.06/AIinstall/tasks.html
-
If you have already set up an install server, you can go to the instructions on how to Administer an Automated Install Server at: http://dlc.sun.com/osol/docs/content/2009.06/AIinstall/administer.html
-
Setup the install client image on the Automated Install Server, described at: http://dlc.sun.com/osol/docs/content/2009.06/AIinstall/client.html
 Installing the OpenSolaris Operating System From an
Automated Install Server
-
Power cycle the workstation.
-
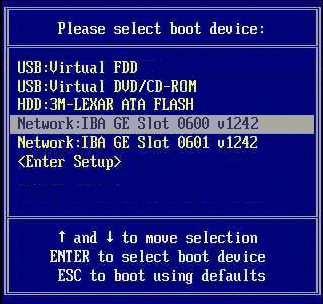
Hold down the F8 key until you see the BBS Popup menu.
This menu allows you to select a boot device.

-
Select a Network: IBA GE Slot entry and press Enter.
The network card selected must be connected to the network and be accessible by the Automated Install server.
Note –If the network card is properly connected to the network but does not boot, it may be necessary to configure the network card for booting through the workstation's BIOS configuration program.
The network card boots and after receiving the correct response from the DHCP server, displays the Boot Agent message similar to:
Intel(R) Boot Agent PXE Base Code (PXE-2.1 build 0.86)
Copyright(C) 1997-2007, Intel Corporation

CLIENT MAC ADDR 00 14 4F 29 04 12 GUID FF2000008 FFFF FFFF FFFF 7BDA264F1400
CLIENT IP: 10.6.68.29   MASK: 255.255.255.0    DHCP IP:  10.6.68.49
GATEWAY: 10.6.68.1
-
When prompted, press F12 for a network service boot.
The AI image menu will be displayed. Typically, there should be only one entry, for example:
OpenSolaris 2009.06 snv_111 X86
-
Select the OpenSolaris image and press Enter.
Note –The image is selected automatically after a timeout.
The OpenSolaris OS installation will start and the workstation will reboot when it is complete.
- © 2010, Oracle Corporation and/or its affiliates
