| Sun Ultra 40 Workstation Getting Started Guide
|
   
|
Setting Up the Sun Ultra 40 Workstation
|
This chapter includes information about the following topics:
Safety Information
Refer to the following document for safety information regarding the Sun Ultra 40 Workstation:
- Important Safety Information for Sun Hardware Systems, 816-7190 (hard copy document included in the Sun Ultra 40 Workstation ship kit).
- Sun Ultra 40 Workstation Safety and Compliance Guide, 819-2149 (available at http://www.sun.com/documentation)
Planning the Workstation Installation
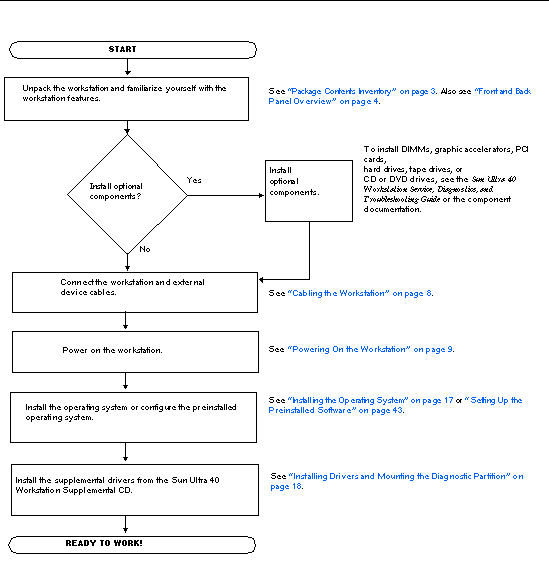
Use the following flowchart as a process tool to assist you with installation of the Sun Ultra 40 Workstation.
FIGURE 1-1 Sun Ultra 40 Workstation Installation Process
Package Contents Inventory
Carefully unpack all workstation components from the packing cartons. The following items should be packaged with the Sun Ultra 40 Workstation:
|
Item Type
|
Item
|
|
Hardware
|
- DVI video adapter
- DMS59 cable (if an NVS285 graphics card is installed)
- SLI connector (if dual video cards with SLI support are installed)
|
|
Documentation
|
- Sun Ultra 40 Workstation Setup Guide
- Sun Ultra 40 Workstation Release Notes
- Sun Ultra 40 Workstation Where to Find Doclette
- Additional license and safety documentation
|
|
Media
|
- Sun Ultra 40 Workstation Supplemental or Tools and Drivers CD (drivers and diagnostics software)
- DVD media kit containing the following software: Sun
 Studio 11, Sun Java Studio 11, Sun Java Studio Creator Update 8, Sun Java Studio Creator Update 8, Sun Java Studio Enterprise Update 8 Studio Enterprise Update 8
|
|
Additional hardware
|
Type 7 keyboard, mouse, and power cord (in separate country kits)
|
|
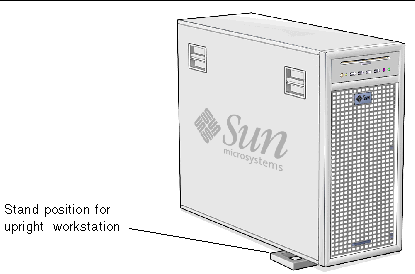
Note - The Sun Ultra 40 Workstation will be packaged with the stand deployed, as shown in the following figure. This stand must be positioned as shown when the system is upright.
|
FIGURE 1-2 Sun Ultra 40 Workstation in Upright Position
Front and Back Panel Overview
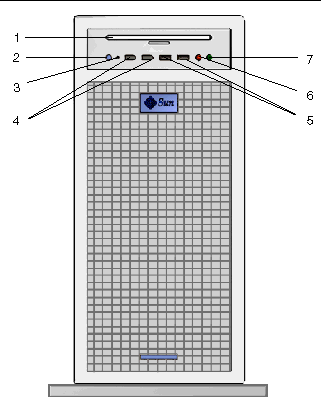
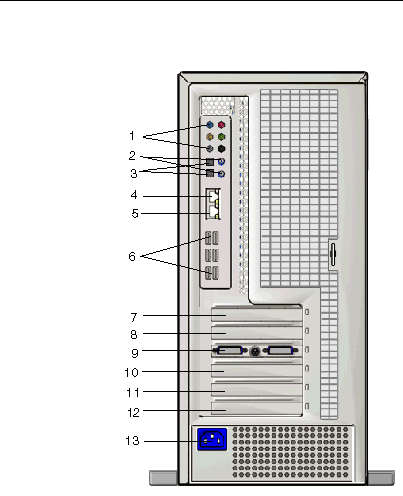
The following figures and tables show the front and back panels of the Sun Ultra 40 Workstation.
FIGURE 1-3 Front Panel of the Sun Ultra 40 Workstation
 [ D ]
[ D ]
TABLE 1-1 Front Panel
|
Label
|
Button/LED/Port
|
|
1
|
DVD drive
|
|
2
|
Power button
|
|
3
|
Power LED
|
|
4
|
1394 ports (2)
|
|
5
|
USB ports (2)
|
|
6
|
Microphone-in jack
|
|
7
|
Headphone-out jack
|
FIGURE 1-4 Sun Ultra 40 Back Panel of the Sun Ultra 40 Workstation
 [ D ]
[ D ]
TABLE 1-2 Back Panel
|
Label
|
Connector/Slot
|
Label
|
Connector/Slot
|
|
1
|
Audio connectors (6) top left to bottom right: Blue: line in; Pink mic-in; Orange: center/LFE; Lime: line-out; Gray: side surround out; Black: back surround out
|
8
|
PCI-Express x4 (PCI-E2)
|
|
2
|
SPDIF coaxial (out top, in, bottom)
|
9
|
Primary PCI-Express x16 graphics (PCI-E1)
|
|
3
|
SPDIF optical (out top, in, bottom)
|
10
|
PCI 33 MHz/32-bit (PCI0)
|
|
4
|
Secondary Ethernet connector (NIC1)
|
11
|
PCI 33 MHz/32-bit - fits 66 MHz/64-bit card (PCI1)
|
|
5
|
Primary Ethernet connector (NIC0)
|
12
|
PCI-Express x4 slot (PCI-E0)
|
|
6
|
USB connectors (6)
|
13
|
Power connector
|
|
7
|
Secondary PCI-Express x16 graphics (PCI-E3)
|
|
|
Side Cover Overview

|
Caution - Always power off the workstation before removing the side cover. If necessary, see the Sun Blade 1500 Service, Diagnostics, and Troubleshooting Manual (816-7564) for powering off and side cover removal instructions.
|
FIGURE 1-5 Side Cover Component Overview--Sun Ultra 40 Workstation
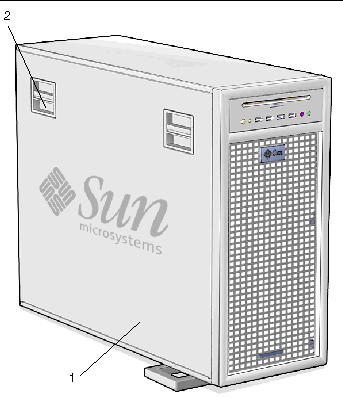
TABLE 1-3 Side Cover Component Overview
|
Item
|
Component Description
|
|
1
|
Side cover
|
|
2
|
Latch (2)
|
Keyboard and Mouse Overview
FIGURE 1-6 Keyboard and Mouse Component Overview--Sun Ultra 40 Workstation
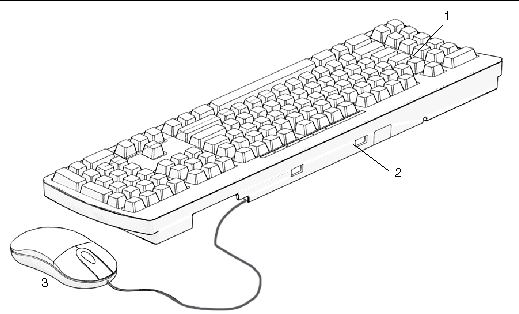
TABLE 1-4 Keyboard and Mouse Component Overview
|
Item
|
Component Description
|
|
1
|
Keyboard, Type 7
|
|
2
|
Universal serial port (3) (third USB port located under keyboard)
|
|
3
|
Mouse with scroll button
|
|
Tip - For additional information about Sun keyboards and mouse devices see Sun Type 7 Keyboard Installation Guide (819-2907).
|
Cabling the Workstation
FIGURE 1-7 illustrates the cable connections for the workstation.
FIGURE 1-7 Cable Connections
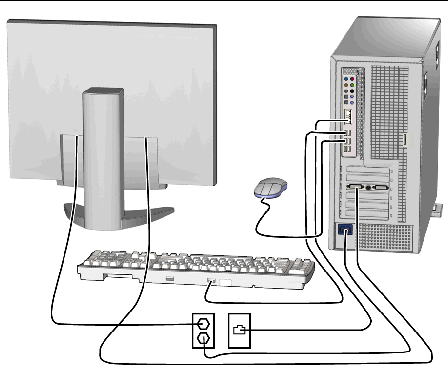
Connect the workstation and external devices in this order (see FIGURE 1-7):
1. Connect the workstation power cord to a grounded electrical outlet.
2. Connect the keyboard and mouse to the USB connectors on the back panel.
3. Connect the monitor cable to a graphics card video connector installed in a PCI- Express graphics slot.
If your workstation has a NVS285 graphics card installed, a DMS59 cable is packaged with the workstation.
4. Connect the Ethernet cable to one of the Ethernet connector on the Sun Ultra 40 Workstation, and connect the other end of the cable to an Ethernet RJ-45 jack.
5. Connect any additional external devices to the workstation's other connectors.
Powering On the Workstation
|
Tip - If you are installing optional internal components such as additional DIMMs, PCI cards, SLI connectors, optical drives, or hard drives, install those components before you power on the workstation. See the Sun Ultra 40 Workstation Service, Diagnostics, and Troubleshooting Manual for instructions on installing these components. If you are not installing optional components, you are ready to power on the workstation.
|
1. Turn on the power to the monitor and to all external devices.
2. Press and release the workstation Power button on the front panel (see FIGURE 1-3).
3. After several seconds, verify that the Power LED next to the Power button lights.
The Power LED next to the Power button lights after the workstation begins the internal booting process (see FIGURE 1-3).
4. If you are powering on the workstation for the first time, install the operating system or configure the preinstalled operating system after the system is finished booting.
- See Chapter 2 for information about installing an operating system.
- See Chapter 3 for information about configuring the preinstalled Solaris 10 Operating System.
Powering Off the Workstation
1. Save your data and close any open applications.
2. Read all of the following power-off options before powering off the workstation:
- Power off the workstation by using the operating system shutdown command or menu option.
In most cases, either action powers down the operating system and then turns off the power to the workstation.
- If the workstation power is not shut off through the operating system command or this command is not available, press and release the power button (see FIGURE 1-3 for location).
This action initiates an orderly shutdown of the operating system and powers off the workstation.
|
|
Caution - To avoid data loss, use the preceding two options whenever possible.
|
- If the workstation is not shut off, press and hold the Power button for approximately four seconds.
This action shuts down the power to the workstation but does not initiate an orderly shutdown of the system. This method could result in data loss.
If the preceding options fail to power off the workstation, see "Troubleshooting" in the Sun Ultra 40 Workstation Service, Diagnostics, and Troubleshooting Manual, 819-3952, for more options.
|
Note - After powering off the workstation, wait at least four seconds before powering on the workstation again.
|
| Sun Ultra 40 Workstation Getting Started Guide
|
819-3953-12
|
   
|
Copyright © 2006, Sun Microsystems, Inc. All Rights Reserved.


