| C H A P T E R 2 |
|
Troubleshooting DIMM Problems |
This chapter describes how to detect and correct problems with the server’s Dual Inline Memory Modules (DIMMs). It includes the following sections:
| Note - Refer to the service manual or service label for the system that you are servicing for information on DIMM population rules. |
Replace a DIMM when one of the following events takes place:
| Note - If more than one DIMM has experienced multiple CEs, other possible causes of CEs must be ruled out by a qualified Sun Support specialist before replacing any DIMMs. |
Retain copies of the logs showing the memory errors to send to Sun for verification prior to calling Sun.
This section describes the following topics:
For all operating systems, the behavior is the same for uncorrectable errors (UCEs):
1. When a UCE occurs, the memory controller causes an immediate reboot of the system.
2. During reboot, the BIOS checks the Machine Check registers and determines that the previous reboot was due to a UCE.
The uncorrectable ECC error is displayed in the service processor’s system event log (SEL) as shown here:
Memory | Uncorrectable ECC | Asserted | DIMM A0
If a DIMM has 24 or more correctable errors (CE)s in 24 hours, it is considered defective and should be replaced.
CEs will be captured in the SEL and light the fault LED after 24 single bit errors are detected in 24 hours. They are reported or handled in the supported operating systems as follows:
a. A Machine Check error-message bubble appears on the task bar.
b. Open the Event Viewer to view errors.
Access the Event Viewer through this menu path:
Start-->Administration Tools-->Event Viewer
c. View individual errors (by time) to see the details of the error.
Solaris FMA reports and sometimes retires memory with correctable Error Correction Code (ECC) errors. See your Solaris documentation for details.
To view ECC errors, use the following command:
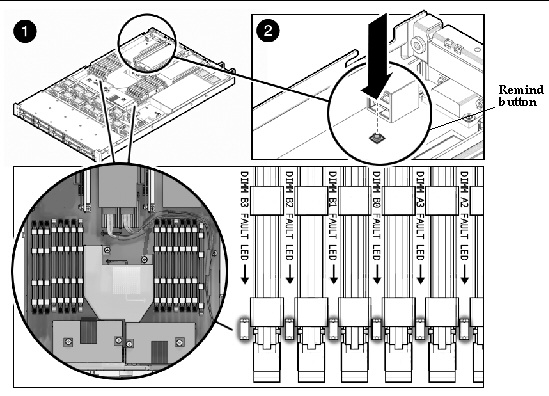
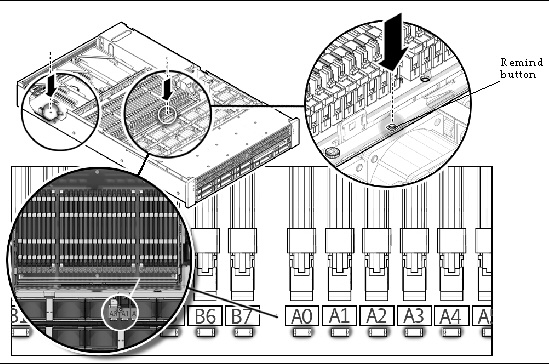
When you press the Remind button on the motherboard (or memory tray for x4450), the LEDs next to the DIMMs flash to indicate that the system has detected 24 or more CEs in a 24-hour period on that DIMM.
See FIGURE 2-1 and FIGURE 2-2 for the locations of the Remind button and LEDs on the motherboard.
FIGURE 2-1 DIMMs and LEDs on Motherboard (X4150 and X4250)

FIGURE 2-2 .DIMMs and LEDs on Mezzanine (x4450)

If your log files report an Error Correction Code (ECC) error or a problem with a DIMM, complete the following steps until you can isolate the fault.
In this example, the log file reports an error with the DIMM in D0. The fault LED on DIMM D0 is on.
To isolate and correct DIMM ECC errors:
1. If you have not already done so, shut down your server to standby power mode and remove the cover.
2. Inspect the installed DIMMs to ensure that they comply with the DIMM population rules in your product service manual.
3. Press the Remind button and inspect the DIMM fault LEDs. See FIGURE 2-1 and FIGURE 2-2.
For CEs and UCEs, a flashing LED identifies the DIMM where the error is located.
4. Disconnect the AC power cords from the server.
| Note - To recover fault information, look in the SP SEL, as described in the Sun Integrated Lights Out Manager 2.0 User's Guide. |
5. Remove the DIMMs from the DIMM slots.
Refer to your server’s service manual for details.
6. Visually inspect the DIMMs for physical damage, dust, or any other contamination on the connector or circuits.
7. Visually inspect the DIMM slot for physical damage. Look for cracked or broken plastic on the slot.
8. Dust off the DIMMs, clean the contacts, and install them.

|
Caution - Use only compressed air to dust DIMMs. |
9. If there is no obvious damage, replace any failed DIMMs.
For UCEs, if the LEDs indicate a fault with the pair, replace both DIMMs. Ensure that they are inserted correctly with ejector latches secured.
10. Reconnect AC power cords to the server.
11. Power on the server and run the diagnostics test again.
If the tests identify the same error, the problem is in the CPU, not the DIMMs.
Copyright © 2009 Sun Microsystems, Inc. All rights reserved.