|
| |
| Sun Java[TM] System Identity Manager 7.1 Update 1 Release Notes | |
Documentation Additions and Corrections
This section contains new and corrected information that was required after the Identity Manager 7.1 documentation set was published. This information is organized as follows:
Identity Manager InstallationThis section provides new information and documentation corrections related to Sun Java™ System Identity Manager Installation.
- The Exchange 5.5 resource adapter is not supported. Ignore any references to this adapter.
- The installation steps in Chapter 6, “Installing Identity Manager for Sun ONE Application Server 7” and Chapter 7, “Installing Identity Manager for Sun Java System Application Server” have been revised because you must edit the server.policy file after installing the Identity Manager software or Identity Manager will not run. Consequently, you must perform the installation steps in the following order (ID-16600):
- Specific version numbers should be removed from the “Supported Software and Environments” section in Chapter 1, “Before You Install” and the following note will be added: (ID-16687)
Identity Manager UpgradeThis section provides new information and documentation corrections for Sun Java™ System Identity Manager Upgrade.
- Before upgrading, it is important to back up both the directory where Identity Manager is installed and the database that Identity Manager is using. You can use third-party back up software or a back up utility supplied with your system to back up the Identity Manager file system. To back up your database, refer to the database documentation for recommended back up procedures. (ID-2810)
- The AD Active Sync resource has been deprecated and replaced by the AD resource. Perform the following steps to migrate to the AD Active Sync to newer releases: (ID-11363)
- Export the existing AD Active Sync resource object to an xml file (either from the command line or debug pages).
- Delete the existing resource (this will not affect Identity Manager users or resource account users)
- Create a new AD resource that is Active Sync.
- Export this new resource object to an XML file.
- Edit this file and change the value of the id attribute and the value of the name attribute to match the values from the OLD resource object saved in step 1. These attributes are in the <Resource id='idnumber' name='AD' ...> tag.
- Save the changes to the file.
- Import the modified object back into Identity Manager using either the Configure->Import Exchange File page or the command line.
- Updated the Other Custom Repository Objects section to include instructions for using Identity Manager’s SnapShot feature to create a baseline or “snap shot” of the customized repository objects in a deployment. (ID-14840)
Other Custom Repository Objects
Record the names of any other custom repository objects that you created or updated. You might have to export these objects from your current installation and then re-import them to the newer version of Identity Manager after upgrading.
You can use Identity Manager’s SnapShot feature to create a baseline or “snap shot” of the customized repository objects in your deployment, which can be very useful when you are planning an upgrade.
SnapShot copies the following, specific object types from your system for comparison:
You can then compare two snapshots to determine what changes have been made to certain system objects before and after upgrade.
Note
This feature is not intended for detailed, on-going XML diffs — it is only a minimal tool for “first-pass” comparisons.
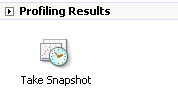
To create a snapshot:
- From the Identity Manager Debug page ( ), click the SnapShot button to view the SnapShot Management page.
Figure 1 SnapShot Management Page
- Type a name for the snapshot in the Create text box, and then click the Create button.
When Identity Manager adds the snapshot, the snapshot’s name displays in the Compare menu list and to the right of the Export label.
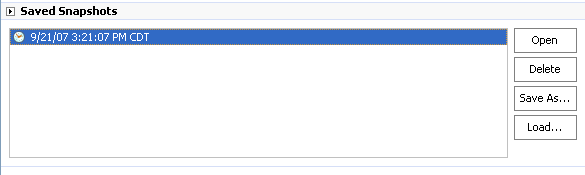
To compare two snapshots:
Figure 2 SnapShot Management Page
- Click the Compare button.
- If there are no object changes, then the page indicates that no differences were found.
- If object changes were found, then the page displays the object type and name, and whether an object is different, absent, or present.
For example, if an object is present in baseline_1, but is not present in baseline_2, then the baseline_1 column indicates Present and the baseline_2 column indicates Absent.
You can export a snapshot in XML format. Click the snapshot name to export the snapshot file.
To delete a snapshot, select the snapshot from the Delete menu, and then clicking the Delete button.
- If you are upgrading from a 6.x install to version 7.0 or 7.1, and you want to start using the new Identity Manager end-user pages, you must manually change the system configuration ui.web.user.showMenu to true for the horizontal navigation bar to display. (ID-14901)
- If you are upgrading from 6.0 or 7.0 to version 7.1, and using LocalFiles, you must export all of your data before upgrading and then re-import the data after doing a clean installation of 7.1. (ID-15366)
- Upgrading from 6.0 or 7.0 to version 7.1 requires a database schema upgrade. (ID-15392)
- During the upgrade process, Identity Manager analyzes all roles on the system and then updates any missing subroles and super roles links using the RoleUpdater class. (ID-15734)
<?xml version='1.0' encoding='UTF-8'?>
<!DOCTYPE Waveset PUBLIC 'waveset.dtd' 'waveset.dtd'>
<Waveset>
<ImportCommand class='com.waveset.session.RoleUpdater' >
<Map>
<MapEntry key='verbose' value='true' />
<MapEntry key='noupdate' value='false' />
<MapEntry key='nofixsubrolelinks' value='false' />
v</Map>
</ImportCommand>
</Waveset>
Where:
- verbose: Provides verbose output when updating roles. Specify false to enable a silent update of roles.
- noupdate: Determines whether the roles are updated. Specify false to get a report that only lists which roles will be updated.
- nofixsubrolelinks: Determines whether super roles are updated with missing subrole links. This value is set to false by default and links will be repaired.
Identity Manager Administration GuideThis section provides new information and documentation corrections for Sun Java™ System Identity Manager Administration.
Chapter 2, Getting Started with Identity Manager
- The section titled, Forgotten User ID describes how to use the Forgot Your User ID? button on the Log In to Identity Manager page to retrieve a forgotten user ID. However, when upgrading from previous Identity Manager versions to version 7.1 Update 1, the Forgot Your User ID? feature is disabled by default. (ID-16715)
Chapter 3, User and Account Management
- In the section titled Disable Users (User Actions, Organization Actions), the note has been amended.:
- In the section titled Enable Users (User Actions, Organization Actions), the note has been added:
- In the section title User Authentication, a description of the authentication question policies has been added.
The authentication question policy determines what happens when a user clicks on the Forgot Password button on the login page or when accessing the Change My Answers page. The following table describes each option:
Chapter 5, Administration
- In the section titled “Delegating Work Items,” the following note has been added.
- In the section titled “Managing Work Items,” the following information has been added.
Delegations to Deleted Users
If you have delegated a work item to a user who is later deleted from Identity Manager, then the deleted user is indicated in the Current Delegations list in parentheses. If you subsequently edit or create a delegation that includes the deleted user, then the action fails. Additionally, any user create or update work items that are delegated to a deleted user will fail.
You can recover work items that are delegated to a deleted user by ending the delegation.
- In the table titled Identity Manager Capabilities Descriptions, the End User Administrator capability has been added. Any user assigned this capability can view and modify the rights to object types specified in the End User capability, as well as the contents of the end User Controlled Organizations rule. By default, this capability is assigned to Configurator.
- In the section titled “Scope of Control,” the following information should be added: (17187)
Identity Manager allows you to control which users are within an end user’s scope of control.
You can use the EndUserControlledOrganizations rule to define whatever logic is necessary to ensure the right set of users are available for delegating, based on your organizational needs.
If you want the scoped list of users to be the same for administrators, whether they are logged into the Administrator interface or the End User interface, you must change the EndUserControlledOrganizations rule as follows:
Modify the rule to first check whether the authenticating user is an administrator, and then configure the following:
- If the user is not an administrator, return the set of organizations that should be controlled by an end user, such as the user’s own organization (for example, waveset.organization).
- If the user is an administrator, do not return any organizations so the user only controls organizations that are assigned because that user is an administrator.
For example:
Identity Manager provides a built-in ObjectGroup/organization called End User that, initially, has no member objects. The End User ObjectGroup/organization is implicitly assigned to all users, and enables them to view several types of objects, including tasks, rules, roles, and resources.
Previously, when users logged into the End User interface, they were automatically granted rights to object types specified in the EndUser capability (such as AdminRole, EndUserConfig, and EndUserTask). Now when users log in to the End User interface, Identity Manager also automatically gives them control of the new EndUser ObjectGroup. In addition, Identity Manager evaluates a new, built-in End User Controlled Organizations rule. Any ObjectGroup/organization names returned by this rule will also be automatically controlled by the user logging into the End User interface.
The authenticating user's view is the input argument to the End User Controlled Organization rule. Identity Manager expects the rule to return one (a string) or more (a list) organizations which the user logging into the End User interface will control. A new End User Administrator capability was added that enables users to manage these new objects. Users who are assigned the End User Administrator capability can view and modify rights to object types specified in the EndUser capability and to the contents of the End User Controlled Organization rule.
The End User Administrator capability is assigned to Configurator by default. Any changes made to the list or to organizations returned by the evaluation of the End User Controlled Organization rule will not be reflected dynamically for logged in users. These users must log out and then log in again to see the changes.
If the End User Controlled Organization rule returns an invalid organization (for example, the organization that does not exist in Identity Manager), the problem will be logged in the System Log. You can correct the problem by logging into the Administrator user interface and fixing the rule.
The End User ObjectGroup/organization is a member of Top and cannot have child organizations. This ObjectGroup/organization is not displayed in the tree table on the Accounts tab of the Administrator user interface. However, when editing objects (such as Roles, AdminRoles, Resources, Policy, Tasks, and so forth), you can make any object available to the End User ObjectGroup/organization from the Administrator user interface.
Use this new best practice method (instead of using End User Tasks, End User Resources, System Configuration:EndUserAccess, and End User authTypes) to give end users access to Identity Manager configuration objects such as Roles, Resources, Tasks, and so forth. Although the End User Tasks, End User Resources, System Configuration:EndUserAccess, and End User authTypes methods will continue to be supported for backward compatibility.
Chapter 8, Task Templates
The Audited Attribute Report can report attribute-level changes to Identity Manager users and accounts. However, standard audit logging does not generate enough audit log data to support a full query expression.
Standard audit logging does write the changed attributes to the acctAttrChanges field in the audit log, but the changed attributes are written in a way that the report query can only match records based on the changed attribute’s name. The report query cannot accurately match the attribute's value.
You can configure this report to match records containing changes to the attribute lastname, by specifying the following parameters:
Attribute Name = 'acctAttrChanges'
Condition = 'contains'
Value = 'lastname'
Note
Using Condition='contains' is necessary because of the way data is stored in the acctAttrChanges field. This field is not multi-valued. Essentially, it is a data structure that contains the before/after values of all changed attributes in the form attrname=value. Consequently, the preceding settings allow the report query to match any instances of lastname=xxx.
It is also possible to capture only those audit records that have a specific attribute with a specific value, but some additional configuration is required. Use the following instructions:
- Open and log in to the Identity Manager Administrator interface:
http://server-name:port/idm
- Select the Server Tasks tab.
- Select the Configure Tasks tab.
- Click the Update User Template task (for example).
- Select the Audit tab.
You should see Audit Controls for the selected task, which performs auditing when a user update occurs.
- Select the Audit entire workflow box to activate the workflow auditing feature.
- Click the Add Attribute button (located in the Audit Attributes section) to select the attributes you want to record for reporting purposes.
- When the Select an attribute menu displays in the Audit Attributes table, select an attribute from the list. (For example: Select user.global.email from the drop-down menu).
- Click Save.
- You must now enable the configuration as follows:
The workflow can now provide audit records that are suitable for matching both the attribute name and the value. Although turning on this level of auditing provides much more information, be aware that there is a significant performance cost and your workflows will run slower.
Chapter 11, Identity Auditing
The following information has been added to this chapter:
Continuous Compliance
The information in this section currently states that any provisioning operations performed on a user will cause user- and organization-assigned policies to be evaluated. This information should be corrected to read as follows: (ID-17416)
Continuous compliance means that an audit policy is applied to all provisioning operations, such that an account cannot be modified in a way that does not comply with current policy.
You enable continuous compliance by assigning an audit policy to an organization, a user, or both. Any provisioning operations performed on a user will cause the user-assigned policies to be evaluated. Any resulting policy failure will interrupt the provisioning operation.
Resolving Auditor Capabilities Limitations
By default, capabilities needed to perform auditing tasks are contained in the Top organization (object group). As a result, only those administrators who control Top can assign these capabilities to other administrators.
You can resolve this limitation by adding the capabilities to another organization. Identity Manager provides two utilities, located in the sample/scripts directory, to assist with this task.
Adding Rules
Added the following Note to this section (ID-16604, 16831):
Note
Identity Manager does not support the control of rule nesting. In addition, using the Audit Policy Wizard to create policies with Boolean expression nesting can produce unpredictable results.
For complex Rule expressions, use an XML editor to create a separate XPRESS rule that references all of the rules you want to use.
Create the Rule Expression
Changed the Note in this section to read as follows (ID-16604, 16831):
Note
Identity Manager does not support the control of rule nesting. In addition, using the Audit Policy Wizard to create policies with Boolean expression nesting can produce unpredictable results.
For complex Rule expressions, use an XML editor to create a separate XPRESS rule that references all of the rules you want to use.
Chapter 13, Service Provider Administrator
The section titled “Configure Synchronization” should state the default synchronization interval for Service Provider synchronization tasks defaults to 1 minute.
All Chapters
The release date noted in the chapter footers should be 7.1 not 7.0. (ID-16968)
Identity Manager Resources ReferenceThis section contains new information and documentation corrections for the Sun Java™ System Identity Manager Resources Reference:
General
Active Directory
The following information should be added to the Active Directory resource adapter documentation.
Specifying a Domain for Pass-Through Authentication
In a default configuration, pass-through authentication is accomplished by sending the user ID and password only. These two attributes are configured in the AuthnProperties element in the resource object’s XML as w2k_user and w2k_password. Without a domain specification, the gateway searches all known domains and tries to authenticate the user in the domain that contains the user.
In a trusted multi-domain environment, there can be two possible situations:
When the user/password combination is synchronized, configure your Active Directory resources so that they are common resources. See Identity Manager Administration for more information about setting up common resources.
If the user/password combination is domain-dependent, and if users can be expected to know the domain information, you can allow users to enter the domain information on the login screen. This option can be used in combination with common resources.
To allow the user to enter the domain on the login page, add the following property to the <AuthnProperties> element in the resource object's XML:
In an environment with multiple trusted domains and Active Directory forests, the authentication can fail using any of these configurations because the Global Catalog does not contain cross-forest information. If a user supplies a wrong password, it could also lead to account lockout in the user’s domain if the number of domains is greater than the lockout threshold.
User management across forests is only possible when multiple gateways, one for each forest, are deployed. In this case, you can configure the adapters to use a predefined domain for authentication per adapter without requiring the user to specify a domain. To accomplish this, add the following authentication property to the <AuthnProperties> element in the resource object’s XML:
Correction
In the Active Directory documentation, the “Managing ACL Lists” procedure of this guide contains the following step: (ID-16476)
Database Table
Flat File Active Sync
Gateway Adapters
The Domino Gateway, Active Directory, Novell NetWare and other gateway adapters allow you to use the RA_HANGTIMEOUT resource attribute to specify a timeout value, in seconds. This attribute controls how long before a request to the gateway times out and is considered hung.
You must manually add this attribute to the Resource object as follows:
<ResourceAttribute name='Hang Timeout' displayName='com.waveset.adapter.RAMessages:RESATTR_HANGTIMEOUT' type='int' description='com.waveset.adapter.RAMessages:RESATTR_HANGTIMEOUT_HELP' value='NewValue'>
</ResourceAttribute>The default value for this attribute is 0, indicating that Identity Manager will not check for a hung connection.
Mainframe Adapters
A step is missing in the Identity Manager Installation Notes section for the ACF2, Natural, RACF, RACF-LDAP, Scripted Host, and Top Secret adapters. Add the following step after step 3.
4. When the Attachmate libraries are installed into a WebSphere Application Server, add the property com.wrq.profile.dir=LibraryDirectory to the WebSphere/AppServer/configuration/config.ini file.
This allows the Attachmate code to find the licensing file.
Microsoft SQL Server
The following information should be added to the Usage Notes section:
Windows authentication mode for the SQL Server resource adapter can only be configured on the Microsoft SQL Server adapter if the Identity Manager server is running on a Windows machine that is included in the same Windows security/authentication framework as the SQL Server server instance.
The JDBC driver supports the use of Type 2 integrated authentication on Windows operating systems through the integratedSecurity connection string property. To use integrated authentication, copy the sqljdbc_auth.dll file to a directory on the Windows system path on the computer where the JDBC driver is installed.
The sqljdbc_auth.dll files are installed in the following location:
InstallationDirectory\sqljdbc_Version\Language\auth\
On a 32-bit processor, use the sqljdbc_auth.dll file in the x86 folder. On a 64-bit processor, use the sqljdbc_auth.dll file in the x64 folder.
For more information, see:
http://msdn2.microsoft.com/en-us/library/ms378428.aspx
NetWare
Oracle
The maximum amount of temporary tablespace the user can allocate. If the attribute appears in the schema map, the quota is always set on the temporary tablespace. If the attribute is removed from the schema map, no quota will be set on the temporary tablespace. The attribute must be removed for adapters that communicate with Oracle 10gR2 resources.
Oracle ERP
- The Oracle ERP adapter now has an npw_number account attribute to support contingent workers. (ID-16507)
Resource User Attribute
Data Type
Description
npw_number
string
Contingent worker number. It represents an npw_number from the per_people_f table.
When you enter a value on create, the adapter tries to lookup a user record in the per_people_f table, retrieve the person_id into the create API, and insert the person_id into the fnd_user table's employee_id column.
If no npw_number is entered on create, no linking is attempted.
If you enter an npw_number on create and that number is not found, then the adapter throws an exception.
The adapter will try to return the npw_number on a getUser, if npw_number is in the adapter schema.
Note: The employee_number attribute and npw_number attribute are mutually exclusive. If both are entered on create, employee_number takes precedence.
- The Oracle ERP adapter supports Oracle E-Business Suite (EBS) version 12. It is no longer necessary to edit or comment out sections the OracleERPUserForm, depending on version of ERP installed as described in the Identity Manager Resources Reference. (16705, 16713)
The FormRef attribute now supports the following properties:
- RESOURCE_NAME — Specifies the ERP resource name
- VERSION - Specifies the version of the ERP resource. Allowed values are 11.5.9, 11.5.10, 12.
- RESP_DESCR_COL_EXISTS — Defines whether the description column exists in the fnd_user_resp_groups_direct table. This property is required if Version is 11.5.10 or 12. Allows values are TRUE and FALSE.
These properties should be entered on wherever the user form is being referenced from. For example, the Tabbed User Form may need to be modified in a manner similar to the following to support Release 12.
Remedy
You must place multiple Remedy API libraries in the directory where the Gateway is installed. These libraries can be found on the Remedy server.
Table 3 Remedy API Libraries
Remedy 4.x and 5.x
Remedy 6.3
Remedy 7.0
where XX matches the version of Remedy. For example, arapi45.dll on Remedy 4.5.
SAP
General Notes
The note in step 1 in the Identity Manager Installation Notes procedure is unclear. The wording should be
Note
Make sure that the JCo toolkit you download matches the bit version of Java your application server runs on. For example, JCo is available in only in the 64-bit version on the Solaris x86 platform. Therefore, your application server must be running the 64-bit version on the Solaris x86 platform.
Renaming Accounts
The SAP adapter now supports renaming accounts. The adapter performs this function by copying an existing account to a new account and deleting the original. SAP discourages renaming accounts, but provides the option in the user management application (Transaction SU01 from the SAP GUI). Therefore, Identity Manager also supports the option. Be aware that SAP may not support the rename feature in future releases.
The SAP GUI uses a different method to perform the rename because it has access to non-public APIs and to the SAP kernel. The following steps provide a high-level description of how the adapter performs the rename operation:
- Get the user information for the existing user.
- Save the ALIAS attribute, if one exists.
- Create the new user.
- Set the Activity Groups on the new user. (If in CUA mode, get the old user's Activity Groups)
- Set the Profiles on the new user. (If in CUA mode, get the old user's Profiles.)
- Get the old user's Personalization Data.
- Set the new user's Personalization Data.
- Delete the old user.
- Set the Alias on the new user if one was set on the old user.
If an error occurs during steps 1-3, the operation fails immediately. If an error occurs during steps 4-7, the new user is deleted and the whole operation fails. (If the new user cannot be deleted, a warning is placed into the WavesetResult). If an error occurs during steps 8-9, a warning is added to the WavesetResult, but the operation succeeds.
The Rename operation requires that a new password be set on the new user. This is most easily accomplished by customizing the Rename User Task to invoke the Change User Password Task.
Sun Java System Access Manager
- The procedure described in the “Policy Agent” section in the Sun Java System Access Manager documentation is outdated. Use the following procedure instead.
- From the Identity Manager Administrator Interface menu bar, select Security.
- Click the Login tab.
- Click the Manage Login Module Groups button, located at the bottom of the page.
- Select the Login Module to modify. For example, select Default Identity System ID/Pwd Login Module Group.
- In the Assign Login Module select box, select Sun Access Manager Login Module or Sun Access Manager Realm Login Module.
- When a new Select option displays next to the Assign Login Module option, select the appropriate resource.
- When the Modify Login Module page displays, edit the displayed fields as needed, and then click Save. The Modify Login Module Group is displayed again.
- Specify Sun Access Manager Login Module as the first resource in the module group, and then click Save.
- A step is missing in the procedure listed under the heading “Sun Java System Access Manager Realm Resource Adapter. After you have copied the amclientsdk.jar file to the InstallDir/WEB-INF/lib directory (step 4), you must restart Identity Manager’s application server.
- References to Policy Agent 2.1 should be changed to Policy Agent 2.2.
Sun Java System Access Manager Realm
The Identity Manager Resources Reference contains outdated links. Use the following links instead:
- Policy agent downloads: http://wwws.sun.com/software/download/inter_ecom.html#dirserv
- Policy agent documentation: http://docs.sun.com/app/docs/coll/1322.1
In the Installation Notes section, the procedure for configuring the Sun Java System Access Manager Realm Resource Adapter has been updated as follows:
- Follow the instructions provided in the Sun Java™ System Access Manager 7 2005Q4 Developer's Guide to build the client SDK from the Sun Access Manager installation.
- Extract the AMConfig.properties and amclientsdk.jar files from the war file that is produced.
- Put a copy of the AMConfig.properties in the following directory:
InstallDir/WEB-INF/classes
- Place a copy of amclientsdk.jar in the following directory:
InstallDir/WEB-INF/lib
- Add the amclientsdk.jar file to the server class path.
- Restart the Identity Manager application server.
- After copying the files, you must add the Sun Java System Access Manager Realm resource to the Identity Manager resources list. Add the following value in the Custom Resources section of the Configure Managed Resources page.
The procedure described in the “Policy Agent” section is outdated. Use the following procedure instead.
- From the Identity Manager Administrator Interface menu bar, select Security.
- Click the Login tab.
- Click the Manage Login Module Groups button, located at the bottom of the page.
- Select the Login Module to modify. For example, select Default Identity System ID/Pwd Login Module Group.
- In the Assign Login Module select box, select Sun Access Manager Login Module or Sun Access Manager Realm Login Module.
- When a new Select option displays next to the Assign Login Module option, select the appropriate resource.
- When the Modify Login Module page displays, edit the displayed fields as needed, and then click Save. The Modify Login Module Group is displayed again.
- Specify Sun Access Manager Realm Login Module as the first resource in the module group, and then click Save.
UNIX Adapters
The documentation for the AIX, HPUX, Solaris, and Linux adapters previously stated that if you are using sudo, the NOPASSWORD option must be specified for each command the adapter uses. This is incorrect.
Synchronizing LDAP Passwords
Identity Manager now supports LDAP password synchronization Directory Server 5.2 SP5 and later. The Configure Password Synchronization page contains a new field, Directory Server version, which allows you to specify whether your Directory Server instance is 5.2 P4 or earlier, or 5.2 P5 or later.
Note the following documentation changes:
- In the procedure “Step 2: Enable Password Synchronization Features”, a new numbered step should be added between steps 6 and 7 that states you must select an option from the Directory Server version pull-down menu.
- The section titled “Installing the Password Capture Plugin” should be re-titled to “Installing and Configuring the Password Capture Plugin.” The first sentence in the first note in that section should end with “then the plugin must be installed and configured on each master replica.”
After the Password Capture plugin is enabled, clients must have the MODIFY right to both the userPassword and the idmpasswd attribute to make password changes. Adjust the access control information settings in your directory tree accordingly. This is usually necessary if administrators other than the directory manager have the ability to update the password of other users.
Identity Manager Technical Deployment OverviewThis section contains new information and documentation corrections for Sun Java™ System Identity Manager Technical Deployment Overview:
th#UserListTreeContent_Col0 {
width: 1px;
}th#UserListTreeContent_Col1 {
width: 1px;
}th#UserListTreeContent_Col2 {
width: 50%;
}th#UserListTreeContent_Col3 {
width: 50%;
}th#ResourceListTreeContent_Col0 {
width: 1px;
}th#ResourceListTreeContent_Col1 {
width: 1px;
}th#ResourceListTreeContent_Col2 {
width: 33%;
}th#ResourceListTreeContent_Col3 {
width: 33%;
}th#ResourceListTreeContent_Col4 {
width: 33%;
}
You can also resize table columns by clicking and dragging the right border of the column header. If you mouse over the right border of the column header, the cursor will change to a horizontal resize arrow. Left-click and drag the cursor will resize the column. (Resizing ends when you release the mouse button.)
- Customers who want to use custom JavaScript functions specifically in the end user navigation bar (tabs) must reference that form using endUserNavigation. For example, document.forms['endUserNavigation'].elements. (ID-13769)
- The System Configuration object now contains the security.delegation.historyLength attribute, which controls the number of previous delegations that are recorded.
- The Access Review Dashboard and Access Review Detail Report both show instances of reviews that are recorded in the audit logs. Without database maintenance, the audit logs are never trimmed, and the list of reviews grows. Identity Manager provides the ability to limit the reviews shown to a certain age range. To change this limit, you must customize compliance/dashboard.jsp (for the dashboard) and sample/auditortasks.xml (for the Details report). (The default is to show only reviews that are less than 2 years old.)
to limit reviews to the last 6 months. The same qualifiers as above apply.
Each Periodic Access Review includes a set of UserEntitlement records that were created when the review was run. These records, which accumulate over time, provide valuable historical information about accounts. However, to conserve database space, consider deleting some records. You can delete a record by executing Server Task > Run Task > Delete Access Review. Deleting a review adds new audit log entries that indicate the review is deleted, and deletes all UserEntitlement records associated with the review, which conserves database space.
- Code Example 5-5 contains information that should appear in Code Example 5-4.
Code Example 5-4 should be as follows:
Code Example 5-4 Customizing Navigation Tabs
/* LEVEL 1 TABS */
.TabLvl1Div {
background-image:url(../images/other/dot.gif);
background-repeat:repeat-x;
background-position:left bottom;
background-color:#333366;
padding:6px 10px 0px;
}
a.TabLvl1Lnk:link, a.TabLvl1Lnk:visited {
display:block;
padding:4px 10px 3px;
font: bold 0.95em sans-serif;
color:#FFF;
text-decoration:none;
text-align:center;
}
table.TabLvl1Tbl td {
background-image:url(../images/other/dot.gif);
background-repeat:repeat-x;
background-position:left top;
background-color:#666699;
border:solid 1px #aba1b5;
}
table.TabLvl1Tbl td.TabLvl1TblSelTd {
background-color:#9999CC;
background-image:url(../images/other/dot.gif);
background-repeat:repeat-x;
background-position:left bottom;
border-bottom:none;
}
/* LEVEL 2 TABS */
.TabLvl2Div {
background-image:url(../images/other/dot.gif);
background-repeat:repeat-x;
background-position:left bottom;
background-color:#9999CC;
padding:6px 0px 0px 10px
}
a.TabLvl2Lnk:link, a.TabLvl2Lnk:visited{
display:block;
padding:3px 6px 2px;
font: 0.8em sans-serif;
color:#333;
text-decoration:none;
text-align:center;
}
table.TabLvl2Tbl div.TabLvl2SelTxt {
display:block;
padding:3px 6px 2px;
font: 0.8em sans-serif;
color:#333;
font-weight:normal;
text-align:center;
}
table.TabLvl2Tbl td {
background-image:url(../images/other/dot.gif);
background-repeat:repeat-x;
background-position:left top;
background-color:#CCCCFF;
border:solid 1px #aba1b5;
}
table.TabLvl2Tbl td.TabLvl2TblSelTd {
border-bottom:none;
background-image:url(../images/other/dot.gif);
background-repeat:repeat-x;
background-position:left bottom;
background-color:#FFF;
border-left:solid 1px #aba1b5;
border-right:solid 1px #aba1b5;
border-top:solid 1px #aba1b5;
Code Example 5.5 should be as follows:
Code Example 5-5 Changing Tab Panel Tabs
table.Tab2TblNew td {background-image:url(../images/other/dot.gif);background-repeat:repeat-x;background-positi on:left top;background-color:#CCCCFF;border:solid 1px #8f989f}
table.Tab2TblNew td.Tab2TblSelTd {border-bottom:none;background-image:url(../images/other/dot.gif);background-repeat:repeat- x;background-position:left bottom;background-color:#FFF;border-left:solid 1px #8f989f;border-right:solid 1px #8f989f;border-top:solid 1px #8f989f}
The extends attribute allows for a hierarchy of work item types (workItem Types). When Identity Manager creates a work item, it delegates the work item to the specified users if its workItem type is:
- the type delegated
- one of the subordinate workItem types of the type being delegated.
workItem Type
Description
Display Name
Approval
extends WorkItem
Approval
OrganizationApproval
extends Approval
Organization Approval
ResourceApproval
extends Approval
Resource Approval
RoleApproval
extends Approval
Role Approval
Attestation
WorkItem
Access Review Attestation
review
WorkItem
Remediation
accessReviewRemediation
WorkItem
Access
- Import the following XML file:
Code Example 1 XML to Import
<?xml version='1.0' encoding='UTF-8'?>
<!DOCTYPE Configuration PUBLIC 'waveset.dtd' 'waveset.dtd'>
<Configuration name='AltMsgCatalog'>
<Extension>
<CustomCatalog id='AltMsgCatalog' enabled='true'>
<MessageSet language='en' country='US'>
<Msg id='UI_BROWSER_TITLE_PROD_NAME_OVERRIDE'>Override Name</Msg>
</MessageSet>
</CustomCatalog>
</Configuration>
</Extension>
- Using the Identity Manager IDE, load the System Configuration object for editing. Add a new top-level attribute:
Name = customMessageCatalog
Type = string
Value = AltMsgCatalog
- Open the ui.web Generic Object and look for the browserTitleProdNameOverride attribute. Set this value to true.
- Save this change to the System Configuration object, and restart your application server.
- By default, Identity Manager’s anonymous enrollment processing generates values for accountId and emailAddress by using user-supplied first (firstName) and last names (lastName) as well as employeeId. (ID-16131)
Because anonymous enrollment processing can result in the inclusion of non-ASCII characters in email addresses and account IDs, international users should modify EndUserRuleLibrary rules so that Identity Manager maintains ASCII account IDs and email addresses during anonymous enrollment processing.
To maintain account ID and email address values in ASCII during anonymous enrollment processing, follow these two steps:
- Edit the following three rules within the EndUserRuleLibrary as indicated below:
Edit this rule
To make this change...
getAccountId
To use employeeId only (and remove firstName and lastName)
getEmailAddress
To use employeeId only (remove firstName, lastName, and ".")
verifyFirstname
To change length check from 2 to 1 to allow for single character Asian first names
- Edit the End User Anon Enrollment Completion form to remove the firstName and lastName arguments from calls to the getAccountId and getEmailAddress rules.
- The discussion of how to customize the login pages in Chapter 5 “Private Labeling of Identity Manager” should include the following information about message keys. (ID-16702)
JSP or Identity Manager Component
Interface Affected
Message Key
Login Page TITLE
Administrator and User
UI_LOGIN_TITLE_TO_RESOURCE
UI_LOGIN_CHALLENGE
Login Page SUBTITLE
Administrator and User
Select a key depending on the login mode: Forgot Password, Forgot User ID, Login Challenge.
UI_LOGIN_WELCOME3
UI_LOGIN_WELCOME4
UI_LOGIN_WELCOME5
UI_LOGIN_WELCOME6
UI_LOGIN_CHALLENGE_INFO
staticLogout.jsp and user/staticUserLogout.jsp
Administrator and User
UI_LOGIN_TITLE
continueLogin.jsp
Administrator
UI_LOGIN_IN_PROGRESS_TITLE
UI_LOGIN_WELCOME
Identity Manager Workflows, Forms, and ViewsThis section contains new information and documentation corrections for Sun Java™ System Identity Manager Workflows, Forms, and Views.
Chapter 1, Identity Manager Workflow
Test Auto Attestation
Use to test new Review Determination rules without creating Attestation work items. This workflow does not create any work items, and simply terminates shortly after it starts. It leaves all User Entitlement objects in the same state that they were created in by the access scan. Use the Terminate and Delete options to clean up the results from access scans run with this workflow.
You can import this stub workflow as needed. (Identity Manager does not import it automatically.)
- Identity Manager Compliance uses workflows as integration and customization points for the application. The default compliance-related workflows are described below. (ID-15447)
Workflow Name
Purpose
Remediation
Remediation for a single Remediator working with a single Compliance Violation
Access Review Remediation
Remediation for a single remediator working with a single UserEntitlement
Attestation
Attestation for a single Attestor working with a single UserEntitlement
Multi Remediation
Remediation for a single Compliance Violation and multiple remediators
Update Compliance Violation
Mitigates a Compliance Violation
Launch Access Scan
Launch an Access Scan task from an Access Review task
Launch Entitlement Rescan
Launch a rescan of an Access Scan for a single user
Launch Violation Rescan
Launch a rescan of an Audit Policy Scan for a single user
- The description of the maxSteps property has been revised as follows: (ID-15618)
Specifies the maximum number of steps allowed in any workflow process or subprocess. Once this level is exceeded, Identity Manager terminates the workflow. This setting is used as a safeguard for detecting when a workflow is stuck in an infinite loop. The default value set in the workflow itself is 0, which indicates that Identity Manager should pull the actual setting value from the global setting stored in the SystemConfiguration object's workflow.maxSteps attribute. The value of this global setting is 5000.
Executes Beanshell or JavaScript based on the script provided. As a task, it can be scheduled to run periodically. For example, you can use it to export data from the repository to a database for reporting and analysis. Benefits include the ability to write a custom task without writing custom Java code. (Custom Java code requires a re-compile on every upgrade and must be deployed to every server because the script is embedded in the task there is no need to recompile or deploy it.)
Chapter 2, Workflow Services
- The Arguments table of the createView Session Workflow Service is incorrect. The following table describes the arguments available in this service.(ID-14201)
Table 1
Name
Required
Valid Values
Description
op
yes
createView
viewId
yes
Specifies the type of view to create.
options
no
Specifies view-specific options. The values you can pass are specific to the view being used. The most common is the User view.
Options can be found in session.UserViewConstants. The simpler views should declare their option constants in the Viewer.java file.
Probably the second most common view used from workflow is ProcessViewer, followed by PasswordViewer, DisableViewer, EnableViewer, and RenameViewer. These have comparatively few options
- The description of the disableUser Workflow Service should clarify that the default behavior of this service is to disable the Identity Manager account as well as the resource account. (ID-14572) If you do not want to disable the Identity Manager account, pass the following argument:
The discussion of this method’s arguments should read as follows:
Name
Required
Valid Values
Description
op
yes
disableUser
accountId
yes
Identifies the Identity Manager user to disable accounts for.
doWaveset
no
true/false
If true, the Identity Manager account is disabled for this user. If not supplied, it defaults to true, and the account is disabled.
services
no
Identifies a list of resources to disable. If this argument is not supplied, all of the user’s resource accounts will be disabled.
lock Provisioning Workflow Service
Use to lock an object.
Argument
Required
Description
subject
no
Indicates the effective subject for the call. If not supplied, Identity Manager uses the task's subject. If the value of this argument is none, Identity Manager performs no authorization.
options
no
(Map) A value map of option name/option value pairs. If not supplied, specific arguments below are used. If supplied, any specific arguments below will override the same argument contained in this options map.
accountId
no
(String) Identifies the name of the Identity Manager user to lock.
adminName
no
(String) Indicates the name of the administrator performing the operation.
loginAppName
no
(String) Specifies the login application name.
op
yes
Valid value is unlock
This method returns a null value.
unlock Workflow Service
Use to unlock a locked object.
Table 1
Argument
Required
Description
subject
no
(String) Indicates the effective subject for the call. If not supplied, the task's subject is used. If the value of this argument is none, then no authorization is performed.
options
no
(Map) A value map of option name/option value pairs. If not supplied, Identity Manager uses the specific arguments below. If supplied, any specific arguments below will override the same argument contained in this options map.
accountId
no
(String) Identifies the name of the Identity Manager user to unlock.
adminName
no
(String) Indicates the name of the administrator performing the operation
loginAppName
no
(String) Specifies the login application name.
doLighthouse
no
(Boolean) Indicates whether or not to unlock the Identity Manager account.
doResources
no
(Boolean) Indicates whether or not to unlock the user's resources.
doAuthenticators
no
(Boolean) If true, unlocks all pass-through authentication.
op
yes
Valid value is unlock.
This method returns a WavesetResult with the result of the operation.
Used to remove a deferred task from an Identity Manager object. Identity Manager will ensure that the administrator that launched the workflow is authorized to remove the object.
Table 2 removeDeferredTask Method Arguments
Name
Required
Valid Values
Description
type
no
valid values are the list of types
Specifies the type of the object that the deferred task will be removed from. If not supplied, the type is defaulted to user.
name
yes
Specifies the name of the object that the deferred task will be removed from.
task
Specifies the name of the TaskDefinition to remove.
Chapter 3, Identity Manager Forms
Identity Manager auditing and compliance forms provide a feature unique among Identity Manager forms: You can assign a form on a per-user and per-organization basis. Forms assigned on a per-user basis can boost the efficiency of attestation and remediation processing.
For example, you can specify the user form that Identity Manager displays for editing a user in the context of an access review, remediation or a compliance violation remediation. You can specify this user form at the level of user or organization. When Identity Manager re-scans a user in context of an access review re-scan or access review remediation, the re-scan will respect the audit policies as defined in the AccessScan. You can define this to include the continuous compliance audit policies.
Related Information
- See Identity Manager Administration for a discussion of the concepts that support Identity Manager auditing and compliance features as well as the basic procedures for implementing the default auditing and compliance features.
- See Identity Manager Rules in Identity Manager Deployment Tools for a general discussion of rules as well as specific information about remediation rules.
About Auditing-Related Form Processing
Much like userForm and viewUserForm, you can set the form on a specific user, or on an organization, and the user (or all users in the organization) will used that form. If you set a form on both user and organization, the form set on the user takes precedence. (When looking up the form, Identity Manager searches organizations upwards.)
Auditing-related forms behave the same way that the User Form and View User Form work: Each user can designate a specific form to use, and the resolution of which form a specific user should use will honor the user's organization.
Specifying User Forms
The Audit Policy List and Access Scan List forms support a fullView property that causes the form to display a significant amount of data about the elements in the list. Set this policy to false to improve the performance of the list viewer.
The Access Approval List form has a similar property named includeUE, and the Remediation List form uses the includeCV property.
Default Auditing-Related Forms
The following table identifies the default auditing-related forms that ship with Identity Manager.
Table 2
Form Name
Mapped Name
Per-User Control
General Purpose
Access Approval List
accessApprovalList
Display the list of attestation workitems
Access Review Delete Confirmation
accessReviewDeleteConfirmation
Confirm the deletion of an access review
Access Review Abort Confirmation
accessReviewAbortConfirmation
Confirm the termination of an access review
Access Review Dashboard
accessReviewDashboard
Show the list of all access reviews
Access Review Remediation Form
accessReviewRemediationWorkItem
Yes
renders each UE-based remediation workitem
Access Review Summary
accessReviewSummary
Show the details of a specific access review
Access Scan Form
accessScanForm
Display or edit an access scan
Access Scan List
accessScanList
Show the list of all access scans
Access Scan Delete Confirmation
accessScanDeleteConfirmation
Confirm the deletion of an access scan
Access Approval List
attestationList
Yes
Renders the list of all pending attestations.
Attestation Form
attestationWorkItem
Yes
Renders each attestation work item
UserEntitlementForm
userEntitlementForm
Display the contents of a UserEntitlement
UserEntitlement Summary Form
userEntitlementSummaryForm
Violation Detail Form
violationDetailForm
Show the details of a compliance violation
Remediation List
remediationList
Yes
Show a list of remediation work items
Audit Policy List
auditPolicyList
Show a list of audit policies
Audit Policy Delete Confirmation Form
auditPolicyDeleteConfirmation
Confirm the deletion of an audit policy
Conflict Violation Details Form
conflictViolationDetailsForm
Show the SOD violation matrix
Compliance Violation Summary Form
complianceViolationSummaryForm
Remediation Form
reviewWorkItem
Yes
Renders a compliance violation.
Why Customize These Forms?
Attestors and remediators can specify forms that show exactly the detail they need to more efficiently attest and remediate. For example, a resource attestor could show specific resource-specific attributes in the list form to allow them to attest without looking at each specific work item. Because this form would differ depending on the resource type (and thus attributes) involved, customizing the form on a per-attestor basis makes sense.
During attestation, each attestor can look at entitlements from a unique perspective. For example, the idmManager attestor may be looking at the user entitlement in a general way, but a resource attestor is interested only in resource-specific data. Allowing each attestor to tailor both the Attestation-list form and the AttestationWorkItem form to retrieve and display only the information they need can boost the efficiency of the product interface.
Scan Task Variables
The Audit Policy Scan Task and Access Scan Task task definitions both specify the forms to be used when initiating the task. These forms include fields that allow for most, but not all, of the scan task variables to be controlled.
Variable Name
Default Value
Purpose
maxThreads
5
Identifies the number of concurrent users to work at one time for a single scanner. Increase this value to potentially increase throughput when scanning users with accounts on very slow resources.
userLock
5000
Indicates time (in mS) spent trying to obtain lock on user to be scanned. If several concurrent scans are scanning the same user, and the user has resources that are slow, increasing this value can result in fewer lock errors, but a slower overall scan.
scanDelay
0
Indicates time (in mS) to delay between issuing new scan threads. Can be set to a positive number to force Scanner to be less CPU-hungry.
Calculates a Boolean value. If true, the field and all its nested fields will be ignored during current form processing.
Do not create potentially long-running activities in Disable elements. These expressions run each time the form is recalculated. Instead, use a different form element that will not run as frequently perform this calculation.
- You can now insert WARNING), error (ERROR), or informational (OK) alert messages into an XPRESS form. (ID-14540, ID-14953)
Note
Although this example illustrates how to insert a Warning ErrorMessage object into a form, you can assign a different severity level.
- Use the Identity Manager IDE to open the form to which you want to add the warning.
- Add the <Property name='messages'> to the main EditForm or HtmlPage display class.
- Add the <defvar name='msgList'> code block from the following sample code.
- Substitute the message key that identifies the message text to be displayed in the Alert box in the code sample string:
<message name='UI_USER_REQUESTS_ACCOUNTID_NOT_FOUND_ALERT_VALUE >
- Save and close the file.
Code Example
<Display class='EditForm'>
<Property name='componentTableWidth' value='100%'/>
<Property name='rowPolarity' value='false'/>
<Property name='requiredMarkerLocation' value='left'/>
<Property name='messages'>
<ref>msgList</ref>
</Property>
</Display>
<defvar name='msgList'>
<cond>
<and>
<notnull>
<ref>username</ref>
</notnull>
<isnull>
<ref>userview</ref>
</isnull>
</and>
<list>
<new class='com.waveset.msgcat.ErrorMessage'>
<invoke class='com.waveset.msgcat.Severity' name='fromString'>
<s>warning</s>
</invoke>
<message name='UI_USER_REQUESTS_ACCOUNTID_NOT_FOUND_ALERT_VALUE'>
<ref>username</ref>
</message>
</new>
</list>
</cond>
</defvar>
The Hidden display class corresponds to the <input type=hidden’/> HTML component. This component supports only single-valued data types because there is no way to reliably serialize and deserialize multi-valued data types. (ID-16904)
If you have a List that you want to render it as a string, you must explicitly convert it to a string. For example:
Chapter 4, Identity Manager Views
Common Attributes
The high-level attributes of the Org view are listed in the following table.
Name
Editable?
Data Type
Required?
orgName
Read
String
System-Generated
orgDisplayName
Read/Write
String
Yes
orgType
Read/Write
String
No
orgId
Read
String
System-Generated
orgAction
Write
String
No
orgNewDisplayName
Write
String
No
orgParentName
Read/Write
String
No
orgChildOrgNames
Read
List
System-Generated
orgApprovers
Read/Write
List
No
allowsOrgApprovers
Read
List
System-Generated
allowedOrgApproverIds
Read
List
System-Generated
orgUserForm
Read/Write
String
No
orgViewUserForm
Read/Write
String
No
orgPolicies
Read/Write
List
No
orgAuditPolicies
Read/Write
List
No
renameCreate
Read/Write
String
No
renameSaveAs
Read/Write
String
No
orgName
Identifies the UID for the organization.This value differs from most view object names because organizations can have the same short name, but different parent organizations.
orgDisplayName
Specifies the short name of the organization. This value is used for display purposes only and does not need to be unique.
orgType
Defines the organization type where the allowed values are junction or virtual. Organizations that are not of types junction or virtual have no value.
orgId
Specifies the ID that is used to uniquely identify the organization within Identity Manager.
orgAction
Supported only for directory junctions, virtual organizations, and dynamic organizations. Allowed value is refresh. When an organization is a directory junction or virtual organization, the behavior of the refresh operation depends on the value of orgRefreshAllOrgsUserMembers.
orgNewDisplayName
Specifies the new short name when you are renaming the organization.
orgParentName
Identifies the full pathname of the parent organization.
orgChildOrgNames
Lists the Identity Manager interface names of all direct and indirect child organizations.
orgApprovers
Lists the Identity Manager administrators who are required to approve users added to or modified in this organization.
allowedOrgApprovers
Lists the potential user names who could be approvers for users added to or modified in this organization.
allowedOrgApproverIds
Lists the potential user IDs who could be approvers for users added to or modified in this organization.
orgUserForm
Specifies the userForm used by members users of this organization when creating or editing users.
orgViewUserForm
Specifies the view user form that is used by member users of this organization when viewing users.
orgPolicies
Identifies policies that apply to all member users of this organization. This is a list of objects that are keyed by type string: Each policy object contains the following view attributes, which are prefixed by orgPolicies[<type>]. <type> represents policy type (for example, Lighthouse account).
orgAuditPolicies
Specifies the audit policies that apply to all member users of this organization.
renameCreate
When set to true, clones this organization and creates a new one using the value of orgNewDisplayName.
renameSaveAs
When set to true, renames this organization using the value of orgNewDisplayName.
Directory Junction and Virtual Organization Attributes
Name
Editable?
Data Type
Required?
orgContainerId
Read
String
System-generated
orgContainerTypes
Read
List
System-generated
orgContainers
Read
List
System-generated
orgParentContainerId
Read
String
System-generated
orgResource
Read/Write
String
yes, if directory junction or virtual organization
orgResourceType
Read
String
System-generated
orgResourceId
Read
String
System-generated
orgRefreshAllOrgsUserMembers
Write
String
No
orgContainerId
Specifies the dn of the associated LDAP directory container (for example, cn=foo,ou=bar,o=foobar.com).
orgContainerTypes
Lists the allowed resource object types that can contain other resource objects.
orgContainers
Lists the base containers for the resource used by the Identity Manager interface to display a list to choose from.
orgParentContainerId
Specifies the dn of the associated parent LDAP directory container (for example, ou=bar,o=foobar.com).
orgResource
Specifies the name of the Identity Manager resource used to synchronize directory junction and virtual organizations (for example, West Directory Server).
orgResourceType
Indicates the type of Identity Manager Resource from which to synchronize directory junction and virtual organizations (for example, LDAP).
orgResourceId
Specifies the ID of the Identity Manager resource that is used to synchronize directory junctions and virtual organizations.
orgRefreshAllOrgsUserMembers
If true and if the value of orgAction is refresh, synchronizes Identity organization user membership with resource container user membership for the selected organization and all child organizations. If false, resource container user membership will not be synchronized, only the resource containers to Identity organizations for the selected organization and all child organizations.
Dynamic Organization Attributes
Name
Editable?
Data Type
Required?
orgUserMembersRule
Read/Write
String
No
orgUserMembersRuleCacheTimeout
Read/Write
String
No
orgUserMembersRule
Identifies (by name or UID) the rule whose authType is UserMembersRule, which is evaluated at run-time to determine user membership.
orgUserMembersCacheTimeout
Specifies the amount of time (in milliseconds) before the cache times out if the user members returned by the orgUserMembersRule are to be cached. A value of 0 indicates no caching.
The discussion of the User view now includes the following discussion of the accounts[Lighthouse].delegates attributes: (ID-15468)
accounts[Lighthouse].delegates
Lists delegate objects, indexed by workItemType, where each object specifies delegate information for a specific type of work item
accounts[Lighthouse].delegatesHistory
Lists delegate objects, indexed from 0 to n, where n is the current number of delegate history objects up to the delegate history depth
This attribute has one unique attribute: selected, which is a Boolean that indicates the currently selected delegate history object.
accounts[Lighthouse].delegatesOriginal
Original list of delegate objects, indexed by workItemType, following a get operation or checkout view operation.
All accounts[Lighthouse].delegates* attributes take the following attributes:
Attributes of accounts[Lighthouse].delegate* Attributes
Description
workItemType
Identifies the type of workItem being delegated. See the description of the Delegate Object Model in the Identity Manager Technical Deployment Overview section of this Documentation Addendum for a valid list of workItem types.
workItemTypeObjects
Lists the names of the specific roles, resources, or organizations on which the user is delegating future workItem approval requests. This attribute is valid when the value of workItemType is roleApproval, resourceApproval, or organizationApproval.
If not specified, this attribute by default specifies the delegation of future workItem requests on all roles, resources, or organizations on which this user is an approver.
toType
Type to delegate to. Valid values are:
manager
delegateWorkItemsRule
selectedUsers
toUsers
Lists the names of the users to delegate to (if toType is selectedUsers).
toRule
Specifies the name of the rule that will be evaluated to determine the set of users to delegate to (if toType is delegateWorkItemsRule).
startDate
Specifies the date when delegation will start.
endDate
Specifies the date when delegation will end.
Referencing a DelegateWorkItems View Object from a Form
The following code sample illustrates how to reference a DelegateWorkItems view delegate object from a form:
<Field name='delegates[*].workItemType'>
<Field name=’delegates[*].workItemTypeObjects’>
<Field name=’delegates[*].toType’>
<Field name='delegates[*].toUsers'>
<Field name=’delegates[*].toRule’>
<Field name='delegates[*].startDate'>
<Field name='delegates[*].endDate'>
where supported index values (*) are workItemType values.
Name
Editable?
Type
Required?
name
String
Yes
status
String
Yes
user
String
Yes
userId
String
Yes
attestorHint
String
No
userView
GenericObject
Yes
reviewInstanceId
String
Yes
reviewStartDate
String
Yes
scanId
String
Yes
scanInstanceId
String
Yes
approvalWorkflowName
String
Yes
organizationId
String
Yes
attestorComments.name
String
No
attestorComments.attestor
String
No
attestorComments.time
String
No
attestorComments.timestamp
String
No
attestorComments.status
No
name
Identifies the User Entitlement (by a unique identifier).
status
Specifies the state of User Entitlement object. Valid states include PENDING, ACCEPTED, REJECTED, REMEDIATING, CANCELLED.
user
Identifies the name of the associated WSUser for this entitlement.
userId
Specifies the ID of the associated WSUser.
attestorHint
Displays the (String) hint to the attestor that is provided by the Review Determination Rule. This hints acts as “advice” from the rule to the attestor.
userView
Contains the User view that is captured by User Entitlement scanner. This view contains zero or more resource accounts depending on the configuration of the Access Scan object.
reviewInstanceId
Specifies the ID of the PAR Task instance.
reviewStartDate
Indicates the (String) start date of the PAR task (in canonical format).
scanId
Specifies the ID of AccessScan Task definition.
scanInstanceId
Specifies the ID of AccessScan Task instance.
approvalWorkflowName
Identifies the name of workflow to be run for approval. This value comes from the Access Scan Task definition.
organizationId
Specifies the ID of the WSUser's organization at the time of the scan.
attestorComments
Lists attestation records for the entitlement. Each attestation record indicates an action or statement made about the entitlement, including approval, rejection, and rescan.
attestorComments[timestamp].name
Timestamp used to identify this element in the list.
attestorComments[timestamp].attestor
Identifies the WSUser name of the attestor making the comment on the entitlement.
attestorComments[timestamp].time
Specifies the time at which the attestor attested this record. May differ from the timestamp.
attestorComments[timestamp].status
Indicates the status assigned by the attestor. This can be any string, but typically is a string that indicates the action taken by the attestor -- for example, approve, reject, rescan, remediate.
attestorComments[name].comment
Contains comments added by attestor.
- The following User view attributes have been deprecated. (ID-15468)
- accounts[Lighthouse].delegateApproversTo
- accounts[Lighthouse].delegateApproversSelected
- accounts[Lighthouse].delegateApproversStartDate
- accounts[Lighthouse].delegateApproversEndDate
- The Delegate Approvers view has been deprecated, but still works for editing Delegate objects whose workItemType is approval.
Chapter 6, XPRESS Language
Chapter 8, HTML Display Components
It can be unwieldy to display many admin roles using the MultiSelect component (either the applet or HTML version). Identity Manager provides a more scalable way of displaying and managing admin roles: the objectSelector field template. (ID-15433)
The Scalable Selection Library (in sample/formlib.xml) includes an example of using an objectSelector field template to search for admin role names that a user can select.
Code Example Example of objectSelector Field Template
<Field name='scalableWaveset.adminRoles'>
<FieldRef name='objectSelector'>
<Property name='selectorTitle' value='_FM_ADMIN_ROLES'/>
<Property name='selectorFieldName' value='waveset.adminRoles'/>
<Property name='selectorObjectType' value='AdminRole'/>
<Property name='selectorMultiValued' value='true'/>
<Property name='selectorAllowManualEntry' value='true'/>
<Property name='selectorFixedConditions'>
<appendAll>
<new class='com.waveset.object.AttributeCondition'>
<s>hidden</s>
<s>notEquals</s>
<s>true</s>
</new>
<map>
<s>onlyAssignedToCurrentSubject</s>
<Boolean>true</Boolean>
</map>
</appendAll>
</Property>
<Property name='selectorFixedInclusions'>
<appendAll>
<ref>waveset.original.adminRoles</ref>
</appendAll>
</Property>
</FieldRef>
</Field>
How to Use the objectSelector Example Code
- From the Identity Manager IDE, open the Administrator Library UserForm object.
- Add the following code to this form:
<Include>
<ObjectRef type='UserForm' name='Scalable Selection Library'/>
</Include>
- Select the accounts[Lighthouse].adminRoles field within the AdministratorFields field.
- Replace the entire accounts[Lighthouse].adminRoles with the following reference:
<FieldRef name='scalableWaveset.adminRoles'/>
- Save the object.
When you subsequently edit a user and select the Security tab, Identity Manager displays the customized form. Clicking ... opens the Selector component and exposes a search field. Use this field to search for admin roles that begin with a text string and set the value of the field to one or more values.
To restore the form, import $WSHOME/sample/formlib.xml from Configure > Import Exchange File.
See the Scalable Selection Library in sample/formlib.xml for other examples of using the objectSelector template to manage resources and roles in environments with many objects.
- The discussion of the TabPanel component now contains the following description of the validatePerTab property: (ID-15501)
Consists of three classes: Menu, MenuBar, and MenuItem.
Menu contains the following properties:
- layout - A String with value horizontal or vertical. A value of horizontal generates a horizontal navigation bar with tabs. A value of vertical causes the menu to be rendered as a vertical tree menu with typical node layout.
- stylePrefix - String prefix for the CSS class name. For the Identity Manager End User pages, this value is User.
MenuBar contains the following properties:
MenuItem contains the following properties:
- containedUrls - A List of URL path(s) to JSPs that are "related" to the MenuItem. The current MenuItem will be rendered as "selected" if any of the containedUrls JSPs are rendered. An example is the request launch results page that is displayed after a workflow is launched from the request launch page.
You can set these properties on either a MenuBar or MenuItem:
The following XPRESS example creates a menu with two tabs. The second tab contain two subtabs:
Code Example Implementation of Menu, MenuItem, and MenuBar Components
<Display class='Menu'/>
<Field>
<Display class='MenuItem'>
<Property name='URL' value='user/main.jsp'/>
<Property name='title' value='Home' />
</Display>
</Field>
<Field>
<Display class='MenuBar' >
<Property name='title' value='Work Items' />
<Property name='URL' value='user/workItemListExt.jsp' />
</Display>
<Field>
<Display class='MenuItem'>
<Property name='URL' value='user/workItemListExt.jsp'/>
<Property name='title' value='Approvals' />
</Display>
</Field>
<Field>
<Display class='MenuItem'>
<Property name='URL' value='user/otherWorkItems/listOtherWorkItems.jsp'/>
<Property name='title' value='Other' />
</Display>
</Field>
</Field>
ListEditor
Renders an editable list of strings.
Table 3 Properties of the ListEditor Component
Property
Description
listTitle
(String) Specifies the label that Identity Manager places next to the ListEditor graphical representation.
pickListTitle
(String) Specifies the label to use on the picklist component.
valueMap
(Map) Specifies a map of display labels for the values in the list.
allowDuplicates
(Boolean) A value of true indicates that Identity Manager allows duplicates in the managed list
allowTextEntry
(Boolean) A value of true indicates that Identity Manager displays a text entry box, along with an add button.
fixedWidth
(Boolean) A value of true indicates that the component should be of fixed width (same behavior as Multiselect component).
ordered
(Boolean) A value of true indicates that the order of values is important.
sorted
(Boolean) A value of true indicates that the values should be sorted in the pick list. If values are multi-valued and not ordered, Identity Manager also sorts the value list.
pickValueMap
(List or Map) Specifies a map of display labels for the values in the pick list.
pickValues
(List) Specifies the available values in the picklist component. If null, the picklist is not shown
height
(Integer) Specifies preferred height.
width
(Integer) Specifies the preferred width. Can be used by the Container as a property of the table cell in which this item is rendered
Example
The following example from the Tabbed User Form shows a form field that uses the ListEditor display class:
<Field name='accounts[Sim1].Group'>
<Display class='ListEditor' action='true'>
<Property name='listTitle' value='stuff'/>
<Property name='allowTextEntry'>
<Boolean>true</Boolean>
</Property>
<Property name='ordered'>
<Boolean>true</Boolean>
</Property>
</Display>
<Expansion>
<ref>accounts[Sim1].Group</ref>
</Expansion>
</Field>
This code snippet creates a field where the customer can add groups to or remove them from a user.
Enabling autocomplete for Identity Manager Login Pages
You can enable this feature for the Identity Manager login pages by changing the ui.web.disableAutocomplete system configuration object to true. Identity Manager login pages include login.jsp, continueLogin.jsp, user/login.jsp, and user/continueLogin.jsp.
Identity Manager login forms other than the preceding ones are generated from XPRESS, and you must edit these forms to use the new display property. These forms, which reside in the sample directory, include this property commented out by default.
Appendix A, Form and Process Mappings
- An updated version of this appendix, titled Form and Process Mappings, is included in the same directory as these Release Notes.
- You can access compliance-specific tasks through the mapped names. (ID-15447)
Process Name
Mapped Name
Description
Access Review
accessReview
Performs an access review
Access Scan
accessReviewScan
Performs an access scan
Access Review Rescan
accessReviewRescan
Performs an access rescan
Audit Policy Rescan
auditPolicyRescan
Performs an audit policy rescan
Abort Access Review
abortAccessReview
Terminates an access review
Delete Access Review
deleteAccessReview
Deletes an access review
Recover Access Review
recoverAccessReview
Recovers missing access review status objects from audit logs
Identity Manager Deployment ToolsThis section provides corrections and additions to the Identity Manager Deployment Tools documentation:.
Chapter 1, Using the Identity Manager IDE
- The “Palette Window” and “Properties Window” sections should include GenericObjects in the list of elements provided in the first paragraph of both sections, as follows: (ID-14817)
- The Palette window (such as Figure 1-11) enables you to “drag-and-drop” elements into Email Template, Form, GenericObjects, Library, Workflow Process, or Workflow Subprocess objects displayed in the Editor windows — without having to type XML.
- The Identity Manager IDE Properties window consists of a properties sheet for XML elements associated with Email Template, Form, GenericObjects, Library, Rule, Workflow Process, and Workflow Subprocess objects. You can use this properties sheet to view and edit a selected object’s properties; including the object name, file sizes, modification times, result information, and so forth.
- Several files in the Identity Manager project were changed for 7.1 Update 1; and if you modified any of these files, you must manually merge the changes when you upgrade from the Identity Manager IDE plugin version 7.1 to version 7.1 Update 1.
Upgrading Version 7.1 Projects to Version 7.1 Update 1
This section describes the “best practices” procedure for upgrading the Identity Manager IDE Plugin 7.1 version of the Identity Manager Project to Version 7.1 Update 1 (and later).
Note
The instructions in this section only describe how to upgrade the Identity Manager IDE Plugin version. They do not explain how to upgrade Identity Manager, which is a much more involved process.
To upgrade your current Identity Manager version, refer to the instructions provided in Identity Manager Upgrade.
The following Identity Manager project files were changed for Identity Manager version 7.1 Update 1:
If you modified any of these files, you must manually merge the changes when you upgrade the Identity Manager IDE plugin from version 7.1 to version 7.1 Update 1 (or later).
Note
The build.xml, build-netbeans.xml, and nbproject/project.xml files are subject to change from release to release, so avoid changing theses files if at all possible.
This section describes the “best practices” procedure for upgrading the Identity Manager IDE Plugin version of the Identity Manager project.
Note
The procedures in this section describe how to upgrade the Identity Manager IDE Plugin version only. They do not explain how to upgrade Identity Manager, which is a much more involved process.
For example, if you want to use a project created with the 7.1 version of the Identity Manager IDE plugin with the version 7.1 Update 1 plugin, use the following instructions.
Your Identity Manager version will remain at 7.1 unless you upgrade using instructions provided in Identity Manager Upgrade.
This upgrade procedure assumes that your project is checked in to source control, and the instructions are divided into two sections:
Steps to be Performed by One Deployment Team Member
One person on your deployment team should perform the following steps:
- Shut down NetBeans.
- Delete the .netbeans directory.
- Install the new nbm.
- Start NetBeans.
- Open the project.
A message displays to inform you that several project files (such as build.xml and build-netbeans.xml must be upgraded, and provides merge needed indicators if any of the files have been modified.
- Note which files have merge needed indicators, and then click Yes.
A message displays to let you know that the upgrade was successful.
- If you have any merge needed files, manually merge those files.
Your copy of each file will be named <filename>.bak and so you can diff it with the new file version to determine what needs to be merged.
- When you are finished, and everything is back up and working, check all of the files you changed or added into source control.
Steps to be Performed by Other Deployment Team Members
After someone upgrades the new Identity Manager IDE 7.1 Update 1 plugin nbm file and merges the necessary project files, the remaining members of the deployment team should perform the following steps:
- Perform a full source control update of the project.
- Shut down NetBeans.
- Delete the .netbeans directory.
- Install the new nbm.
- Start NetBeans.
- Open the project.
- The “Unable to Delete Errors” troubleshooting information provided in the “Troubleshooting Identity Manager IDE” section is no longer applicable. Now, the Netbeans embedded application server automatically shuts down whenever you perform any of the following project operations (ID-16851, 16738):
Using the Profiler to Troubleshoot Performance ProblemsIdentity Manager provides a Profiler utility to help you troubleshoot performance problems with forms, Java, rules, workflows, and XPRESS in your deployment.
Forms, Java, rules, workflows, and XPRESS can all cause performance and scale problems. The Profiler profiles how much time is spent in different areas of your forms and workflows, enabling you to determine if these forms or workflows are contributing to performance and scale problems and, if so, which parts of these objects are causing the problems.
This section explains how to use Identity Manager’s Profiler and provides a tutorial to help you learn how to troubleshoot performance issues in your deployment. The information is organized as follows:
Overview
The section provides an overview of the Identity Manager’s Profiler’s features and functionality. The information is organized as follows:
Main Features
You can use the Profiler utility to
- You an display snapshot results in four, different data views:
- Call Tree view provides a tree table showing the call timing and invocations counts throughout the system.
- Hotspots view provides a flattened list of nodes that shows the aggregate call timings regardless of parent.
- Back Traces view provides an inverted call stack showing all the call chains from which that node (known as the root node) was called.
- Callees view provides an aggregate call tree of the root node, regardless of its parent chain.
- Specify what kinds of information to include in your snapshot:
- Manage your project snapshots as follows:
- Save the snapshot in your project’s nbproject/private/idm-profiler directory or to an arbitrary location outside of your project.
Note
You can view a list of all saved snapshots in the Saved Snapshots section of the IDM Profiler view.
- Open snapshots from your project or load them from an arbitrary location outside your project.
- Delete snapshots.
- Search for specific nodes, by name.
How the Profiler Locates and Manages Source
This section describes how the Profiler looks up and manages the source for the following Identity Manager objects:
For Forms, Rules, Workflows, and XPRESS Objects
When you take a snapshot with the Profiler, the server evaluates all of the profiling data and discovers on which sources the data depends. The server then fetches all of these sources from the repository and includes them in the snapshot. Consequently, you can be sure that the Identity Manager objects displayed in the snapshot are accurately reflecting the point at which the snapshot was captured.
This process adds to the size of the snapshot, but the source size is actually a relatively small fraction of the total size. As a result, you can send a snapshot to Sun’s Customer Support without having to send your source files separately.
For Java Source
Note
In a Java source snapshot, do not assume the source is up-to-date with the server or always available.
When you take a snapshot of Java source, the client downloads the snapshot and then goes through the snapshot to capture all referenced Java sources from the project. When you save the snapshot, the client zips the sources and attaches them to the end of the snapshot.
Then, when you view the snapshot and go to the Java source, the client first checks the content of the snapshot. If the client cannot find the content there, it checks the project’s content. This process allows you to send a snapshot containing profiling data from both your custom Java code and Identity Manager code.
Statistics Caveats
The following sections contain information to consider when you evaluate results provided by the Profiler:
Self Time Statistics
To compute a root node’s Self Time statistic, the Profiler subtracts the times of all children nodes from the root node’s total time.
Consequently, an uninstrumented child node’s time is reflected in the root node’s self time. If a root node has a significant self time, you should certainly investigate why. You might not have the proper methods instrumented and so you are looking in the wrong place.
For example, assume method A calls method B.
Method A takes a total time of 10 seconds (where total time includes the call to B) and the call to B takes a total time of 10 seconds.
If both A and B are instrumented, the call stack reflects that information. You will see that A has a self-time of 0 seconds and that B has a self-time of 10 seconds (where 10 seconds was actually spent in B). If, however, B is not instrumented, you only see that the call to A takes 10 seconds and that A's self-time is 10 seconds. Consequently, you might assume the problem lies directly in A rather than in B.
In particular, you might notice large self times on JSPs during their initial compile. If you reset the collected results and then redisplay the page, the self time value will be much less.
Constructor Calls
Because there are limitations in the Java instrumentation strategy, initial calls to this() or super() will appear as a sibling to the constructor call, rather than as a child. See the following example:
class A
{
public A()
{
this(0);
}
public A(int i)
{
}
}
and:
class B
{
public static void test()
{
new A();
}
}
The call tree will look like this:
B.test()
-A.<init>(int)
-A.<init>()
Rather than this:
B.test()
-A.<init>()
-A.<init>(int)
Daemon Threads
Do not be mislead by the seemingly large amount of time spent in a number of Identity Manager’s daemon threads, such as ReconTask.WorkerThread.run() or TaskThread.WorkerThread.run(). Most of this time is spent sleeping, while waiting for events. You must explore these traces to see how much time is actually spent when they are processing an event.
Getting Started
This section describes how to start the profiler and how to work with various features of the Profiler’s graphical user interface. This information is organized as follows:
Before You Begin
Because the Profiler is very memory intensive, you should significantly increase the memory for both your server and the Netbeans Java Virtual Machine (JVM).
- To increase your server’s memory,
- Open the Netbeans window and select the Runtime tab.
- Expand the Servers node, right-click Bundled Tomcat, and select Properties from the menu.
- When the Server Manager dialog displays, clear the Enable HTTP Monitor box on the Connection tab.
- Select the Platform tab, and then set VM Options to -Xmx1024M.
- Click Close.
- To increase the Netbeans JVM memory,
When you are finished, you can start the Profiler as described in the next section.
Starting the Profiler
You can use any of the following methods to start the Profiler:
When you start the Profiler, the Profiler Options dialog displays so you can specify which profiling options you want to use.
Figure 3 Profiler Options Dialog
See Specifying the Profiler Options for information about setting these options.
Using the Profiler
This section describes the features of the Profiler graphical user interface, and how to use these features. The information is organized as follows:
Specifying the Profiler Options
The Profiler Options dialog consists of the following tabs:
Use the options on these tabs to indicate which objects to profile and which elements to display in the profile.
After specifying the Profiler options, click OK to start the Profiler. Depending on your project configuration, the Profiler does one of two things:
- If you are using a regular Identity Manager project with an Embedded Identity Manager Instance, the Profiler performs a full build, deploys into the NetBean's application server, and starts the Profiler.
- If you are using a regular Identity Manager project with an External Identity Manager Instance or the remote Identity Manager project, the Profiler attaches to the Identity Manager instance configured for the project.
Mode
The Mode tab provides the following options:
- IDM Objects Only: Select to profile form, rule, workflow, and XPRESS objects. Excludes Java objects from the profile.
- Java and IDM Objects: Select to profile form, Java, rule, workflow, and XPRESS objects.
Note
- The Java and IDM Objects option is not available if you are using a regular Identity Manager project with an external Identity Manager instance or using a remote Identity Manager project.
- You cannot change the Mode option while the Profiler is running. You must stop the Profiler to change the option.
IDM Object Filters
The IDM Object Filters tab provides the following options:
Java Filters
Select the Java Filters tab to
Java filters are given in terms of method patterns, and they are expressed in patterns that include or exclude based on canonical method name. Where a canonical method name is:
fully-qualified-class-name.method-name(parameter-type-1, parameter-type-2, ...)
Here are a few examples:
If necessary, you can instrument other JARs by modifying the following lines in build.xml as appropriate. For example,
<instrument todir="${lighthouse-dir-profiler}/WEB-INF" verbose="${instrumentor.verbose}" includeMethods="${profiler.includes}" excludeMethods="${profiler.excludes}">
<fileset dir="${lighthouse-dir}/WEB-INF">
<include name="lib/idm*.jar"/>
<include name="classes/**/*.class"/>
</fileset>
</instrument>
By default, the configuration includes all your custom classes and most Identity Manager classes. A number of Identity Manager classes are forcibly excluded — because enabling them would break the Profiler.
For example, classes from the workflow, forms, and XPRESS engines are excluded or the Profiler would produce an unintelligible snapshot when profiling Java and Identity Manager objects.
Note that Java filters provide much more filtering granularity than IDM Object Filters. Java instrumentation adds significant overhead to the execution time, which can drastically skew the profiling results. Because Identity Manager objects are interpreted rather than compiled, the instrumentation overhead is negligible. So for example, there is basically no reason to exclude workflow A and include workflow B, and so forth.
Note
You cannot modify Java filters while the Profiler is running. You must stop the Profiler before changing Java filters.
Miscellaneous
The Miscellaneous tab provides the following options:
- Prune snapshot nodes where execution time is 0:
- Automatically Open Browser Upon Profiler Start:
- Include Java Sources in Snapshot:
- Enable this option (default) to include Java sources for any Java methods referenced by the profiling data in the Snapshot. You should always use this setting for snapshots in the field. Custom Java is relatively small and it is very valuable to have for support.
- Disable this option only if you are profiling Identity Manager and have the complete Identity Manager source available.
In this situation, you do not want to include the Identity Manager source because it can create extremely large snapshots. (See How the Profiler Locates and Manages Source for more information.)
Working with the IDM Profiler View
The IDM Profiler view ( ) consists of the following areas:
Figure 4 IDM Profiler View
Current Project Area
The Current Project area consists of a drop-down menu that lists all of your current projects. Use this menu to select the project you want to profile.
Controls Area
The Controls area contains four icons:
Table 4 Controls Area Icons
Icon
Purpose

Start Identity Manager Profiler
Starts the Profiler and opens the Profiler Options dialog.

Stop Identity Manager Profiler
Stops the Profiler.

Reset Collected Results
Resets all of the profile results you collected to this point.

Modify Profiling
Re-opens the Profiler Options dialog so you can change any of the settings to modify your current profile results.
Status Area
The Status area reports whether you are connected to the Host and provides Status information as the Profiler is starting up, running, and stopping.
Profiling Results Area
The Profiling Results area contains two icons:
Table 5 Profiling Results Area Icons
Icon
Purpose
Start Identity Manager Profiler
Starts the Profiler and opens the Profiler Options dialog.

Reset Collected Results
Resets all of the profile results you collected to this point.
Saved Snapshots Area
The Saved Snapshots area provides a list of all saved snapshots. In addition, you can use the following buttons to manage these snapshots:
- Open: Click to open saved snapshots in the Snapshot View window.
- Delete: Select a snapshot in the Saved Snapshots list, and then click this button to delete the selected snapshot.
- Save As: Select a snapshot in the list and then click this button to save that snapshot externally to an arbitrary location.
- Load: Click to open a snapshot from an arbitrary location into the Snapshot View window.
Working with the Snapshot View
When you open a snapshot, the results display in the Snapshot View window, located on the upper right side of Identity Manager IDE.
Figure 5 Snapshot View Window
A snapshot provides several views of your data, which are described in the following sections:
Call Tree View
Call Tree view ( ) consists of a tree table showing the call timing and invocation counts throughout your system.
Figure 6 Example Call Tree View
This tree table contains three columns:
- Call Tree column: Lists all nodes, where the top-level nodes are one of the following:
For example, if you view the idm/login.jsp URL, you will see a top-level entry for idm/login.jsp. For this entry, the data displayed in the Time column represents the total time for that request (or requests), and the data displayed in the Invocations column represents the total number of invocations to that page. You can explore further into that data to see what calls contributed to its time.
Note
The Call Tree also contains Self Time nodes. Self Time values represent how much time was spent in the node itself. (For more information, see Self Time Statistics.)
- Time column: Lists the time spent in each node when that node was called from its parent. The percentages are given relative to parent time.
- Invocations column: Lists how many times each node was invoked from its parent.
Hotspots View
Hotspots view provides a flattened list of nodes that shows aggregate call timings regardless of parent.
This view contains the following columns:
Back Traces View
Back Traces view provides an inverted call stack showing all the call chains from where each node was called.
You can use these statistics to answer the question — How much time would I save if I eliminated this particular call chain from this node?
You can access the Back Traces view from any of the other snapshot views by right-clicking a node (known as the root node) and selecting Show Back Traces from the pop-up menu.
Callees View
Callees view provides an aggregate call tree for a node (known as the root node), regardless of its parent chain.
These statistics are helpful if you have a problem area that is called from many places throughout the master call tree and you want to see the overall profile for that node.
You can access the Callees view from any of the other snapshot views by right-clicking a node (known as the root node) and selecting Show Callees from the pop-up menu.
Note
The Time and Invocations data values used in Callees view have the same meaning as those used in Call Tree view.
Using the Pop-Up Menu Options
Right-click any node in Call Tree view or in Hotspots view and a pop-up menu displays with the options described in :
Table 7 Profiler Pop-Up Menu Options
Menu Options
Description
GoTo Source
Select this option to view the XML source for a node that corresponds to a Java method, workflow, form, rule, or XPRESS. For detailed information about this view, see How the Profiler Locates and Manages Source.
Show Back Traces
Select this option to access the Back Traces view. For detailed information about this view, see Back Traces View.
Show Callees
Select this option to access the Callees view. For detailed information about this view, see Callees View.
Find In Hotspots
Select this option to find a node in the Hotspots view. For detailed information about this view, see Hotspots View.
List Options > Sort >
Select this option to
List Options > Change Visible Columns
Select this option to change the columns displayed in the Call Tree or Hotspots list.
When the Change Visible Columns dialog displays, you can select one or more of the following options:
Searching a Snapshot
Use the Search icon
, located at the top of the Snapshot View window to search for nodes by name the Call Tree view or Hotspots tree.
Alternatively, right-click any node in Call Tree view or Hotspots view and select Find in Call Tree or Find in Hotspots (respectively) from the pop-up menu to search for a node.
Saving a Snapshot
The Profiler provides several options for saving a snapshot. See for a description of these options:
Table 8 Save Icons
Icon
Purpose
Save the Snapshot in the Project icon (located at the top of the Snapshot View window)
Saves the snapshot in the nbproject/private/idm-profiler directory of your project. Snapshots saved in your project are listed in the Saved Snapshots section of the Profiler view.

Save the Snapshot Externally icon (located at the top of the Snapshot View window)
Saves a snapshot to an external, arbitrary location.

Save As button (located in the Saved Snapshots area)
Saves a snapshot to an external, arbitrary location.
Tutorial: Troubleshooting Performance Problems
Identity Manager provides a tutorial (profiler-tutorial.zip) to help you learn how to use the Profiler to troubleshoot forms, Java rules, workflows, and XPRESS.
Step 1: Create an Identity Manager Project
Follow these steps to create an Identity Manager project:
- Select File > New Project.
- When the New Project wizard displays, specify the following, and then click Next:
- Complete the following fields on the Name and Location panel, and then click Next:
- When the Identity Manager WAR File Location panel displays, enter the location of the Identity Manager 7.1 Update 1 war file. Typically, this file is located in the waveset\images directory.
- Click Next to continue to the Repository Setup panel.
You should not have to change the default settings on this panel, just click Finish. When you see the BUILD SUCCESSFUL message in the Identity Manager IDE Output window, you can extract the Profiler tutorial files. See Step 2: Unzip the Profiler Tutorial for instructions.
Step 2: Unzip the Profiler Tutorial
Unzip profiler-tutorial.zip in the project root. The extracted files include:
project root/custom/WEB-INF/config/ProfilerTutorial1.xml
project root/custom/WEB-INF/config/ProfilerTutorial2.xml
project root/src/org/example/ProfilerTutorialExample.java
project root/PROFILER_TUTORIAL_README.txt
You are now ready to start the Profiler.
Step 3: Starting the Profiler
To start the Profiler,
- Use the instructions provided in Before You Begin to increase the memory for your server and Netbeans JVM.
- Use any of the methods described in Overview to start the Profiler.
- Continue to Step 4: Setting the Profiler Options.
Figure 9 Profiler Options Dialog
Step 4: Setting the Profiler Options
Note
For detailed information about all of the different Profiler options, see Specifying the Profiler Options.
For the purposes of this tutorial, specify the following Profiler options:
- On the Mode tab, select Java and IDM Objects to profile form, Java, rule, workflow, and XPRESS objects.
- Select the Java Filters tab.
Use the following steps to disable all Identity Manager Java classes except your custom Java classes (in this case, org.example.ProfilerTutorialExample):
- Click OK to run the Profiler.
Note
The Profiler takes a few minutes to complete the first time you run it on a project or if you have recently performed a Clean Project action.
When the Profiler finishes processing, you are prompted to Log In.
- Enter the password configurator, select the Remember Password box, and then click OK to continue.
- When the Identity Manager window displays, log in.
Note
Typically, you should log in to Identity Manager as a different user instead of logging in as configurator again. You are already logged into the Profiler as configurator, and the Identity Manager session pool only allows one entry per user. Using multiple entries can result in the appearance of a broken session pool and might skew your profiling results for finer-grained performance problems.
However, for this simple example the session pool is of no consequence so you can login as configurator/configurator.
- In Identity Manager, select Server Tasks > Run Tasks, and then click ProfilerTutorialWorkflow1.
The tutorial might take a few moments to respond.
- Although you could take a snapshot now; you are going to reset your results instead, run the Profiler, run it again, and then take a snapshot.
Note
It is a best practice to run the Profiler a couple of times before taking a snapshot to be sure all the caches are primed, all the JSPs are compiled, and so forth.
Running the Profiler several times enables you to focus on actual performance problems. The only exception to this practice is if you are having a problem populating the caches themselves.
- Return to the IDM Profiler view in the Identity Manager IDE. Click the Reset Collected Results icon
in the Profiling Results section (or in the Controls section) to reset all of the results collected so far.
- In Identity Manager, select Server Tasks > Run Tasks again, and click ProfilerTutorialWorkflow1.
- When the Process Diagram displays, return to the Identity Manager IDE and click Take Snapshot in the Profiling Results section.
Figure 10
- The Identity Manager IDE downloads your snapshot and displays the results on the right side of the window.
Figure 11 Call Tree Results
This area is the Call Tree view. At the top of the Call Tree, you should see a /idm/task/taskLaunch.jsp with a time listed in the Time column. The time should indicate that the entire request took six+ seconds.
- Expand the /idm/task/taskLaunch.jsp node, and you can see that ProfilerTutorialWorkflow1 took six seconds.
- Expand the ProfilerTutorialWorkflow1 node. Note that activity2 took four seconds and activity1 took two seconds.
- Expand activity2.
Note that action1 took two seconds and action2 took two seconds.
- Expand action1 and note that the <invoke> also took two seconds.
- Double-click the <invoke> to open ProfilerTutorialWorkflow1.xml and highlight the following line:
<invoke name='example' class='org.example.ProfilerTutorialExample'/>
You should see that a call to the ProfilerTutorialExample method took two seconds.
Note
You are actually browsing XML source that was captured in the snapshot, rather than source in the project. Snapshots are completely self-contained. (For more information, see How the Profiler Locates and Manages Source.)
- Select the CPU:<date><time> tab to return to your snapshot.
- Expand the <invoke> node, and note that the Profiler spent two seconds in the Java ProfilerTutorialExample.example() method.
- Double-click the method name to open the ProfilerTutorialExample.java source and highlight the following line:
Thread.sleep(2000);
There's the problem! This method contains a two-second thread sleep.
- If you return to the Call Tree, you can see that all of the two second paths lead to this method. (You should see three paths; for a total of six seconds.)
- Select the Hotspots tab (located at the bottom of the Call Tree area) to open the Hotspots view. Notice that ProfilerTutorialExample.example() has a total self time of six seconds.
(For more information about Hotspots, see Hotspots View.)
- Right-click ProfilerTutorialExample.example() and select Show Back Traces from the pop-up menu.
A new Back Traces tab displays at the bottom of the area.
- Expand the ProfilerTutorialExample.example() node on the Back Traces tab to see that this method was called from three places, and that the method took two seconds when it was called from each place.
(For more information about Back Traces, see Back Traces View.)
- Click the Save the snapshot in the project icon
to save your snapshot and close it.
If you check the Saved Snapshots section on the IDM Profiler tab, you should see your snapshot. (You might have to scroll down.)
Figure 12 Saved Snapshots List
- Select the saved snapshot, and then click Open to re-open it.
Note
You can use the Save As button to save your snapshots externally and use the Load button to load a snapshot from outside your project.
- Close the snapshot again.
Using the Profiler on a Workflow ManualAction
The next part of this tutorial illustrates how to profile a workflow ManualAction.
- In Identity Manager, select Server Tasks > Run Tasks, and then click ProfilerTutorialWorkflow2.
After a few moments, an empty form displays.
- Click Save and the process diagram displays.
- Select Server Tasks > Run Tasks again.
- Return to the Identity Manager IDE IDM Profiler view and click the Reset Collected Results icon in the Profiling Results section.
- Now click ProfilerTutorialWorkflow2 in Identity Manager.
- When the blank form displays again, click Save.
- In the IDM Profiler view, click Take Snapshot.
After a few seconds, a snapshot should display in the Call Tree area. You should see that /idm/task/workItemEdit.jsp took six+seconds. (This result corresponds to the manual action in the workflow.)
- Expand the /idm/task/workItemEdit.jsp node and note that running all Derivations in the ManualAction form took a total of six seconds.
- Expand the Derivation, displayNameForm, variables.dummy, and <block> nodes.
Figure 13 ProfilerTutorialWorkflow2 Snapshot Results
You should see that the <block> took six seconds and, of that time, the Profiler spent two seconds in each of the three invokes to the ProfilerTutorialExample.example(). method.
- You can double-click <block> to view the source.
Identity Manager IDE Frequently Asked Questions (FAQ)
This FAQ answers some commonly asked questions related to using the Identity Manager Integrated Development Environment (Identity Manager IDE). The information is organized into these categories:
Using NetBeans
Q: Which version of Netbeans should I use?
A: Use the Netbeans version referenced in the Identity Manager product documentation provided for the Netbeans plugin version you are using.
Note
Always use the exact version referenced because even patch releases can cause major functionality to break.
Q: The Netbeans plugin was working, I did something, and now it is no longer working. What could be causing this problem?
A: This problem is commonly caused by a corrupt file in your .netbeans directory. Generally, deleting your .netbeans directory and re-installing the NetBeans plugin resolves the problem. (Deleting the .netbeans directory effectively uninstalls the NetBeans plugin. You lose all of your user settings, but the contents of your project will be safe.)
The steps are as follows:
Working with Projects
Q: Building and running a project is taking a very long time, and the Identity Manager IDE seems to be copying a lot of files. What could be causing this problem?
A: This problem can occur for the following reasons:
When you use Clean Project or Clean And Build Project, the Identity Manager IDE deletes the entire image directory, which contains several thousand files. Identity Manager IDE must copy all of these files from idm-staging during the next build.
To use the Identity Manager IDE efficiently, you must understand when to use the Clean commands. Refer to the “When to Use Clean” section in the Identity Manager IDE README.txt file for more information.
Q: Now that I have created an Identity Manager project, what files should be checked into source control?
A: See the “CVS Best Practices” section in the Identity Manager IDE README.txt for information.
Q: What are the best practices for using project management in CVS?
A: See the “CVS Best Practices” section in the Identity Manager IDE README.txt for information.
Q: When are objects imported into the repository?
A: See Working with the Repository for information.
Q: How do I add a new JAR to the project?
A: See the “How to add a new JAR dependency” section in the Identity Manager IDE README.txt.
Working with the Repository
Q: Which repository should I use for my sandbox repository?
A: Use the embedded repository for your sandbox — particularly if you are using Identity Manager 7.1 (or higher), which has an HsSQL repository available. You lose functionality if you do not use the embedded repository.
Refer to the “Working with the Repository” section in the Identity Manager IDE README.txt for more information.
Q: When are objects imported automatically?
A: You have to configure Identity Manager IDE to import objects automatically.
The steps are as follows:
- Select Repository > Manage Embedded Repository from the IdM menu.
- Enable the Automatically Publish Identity Manager Objects option on the Manage Embedded Repository dialog.
Note
This option is not available for Identity Manager Project (Remote) or if you specify your own repository.
- Select Project > Run Project or Project > Debug Project.
The Identity Manager IDE automatically imports all objects that have changed since the last time you ran the project.
Q: What is the most effective way to upload objects?
A: Use one of the following methods to upload modified objects:
Either method uploads the object(s) directly to the server, so there is no cache latency issue and it is much faster than using Run Project or Debug Project. The Upload Objects feature is available regardless of which repository you are using.
Using the Identity Manager IDE Debugger
Q: The Identity Manager IDE Debugger is sluggish. What could be causing this problem?
A: To improve the Debugger’s performance:
Q: I cannot set a breakpoint in the Debugger. What could be causing this problem?
A: The following conditions might prevent you from setting a breakpoint:
The Identity Manager IDE basically ignores any file that starts with a <Waveset> wrapper element because the Identity Manager IDE parses that element as a multi-object file.
The following features do not work on multi-object files:
Basically, all you can do with multi-object files is import them. The only files that should contain <Waveset> wrapper elements are your project’s top-level import files.
Q: I set a breakpoint in the Debugger and it is not suspending on the breakpoint. What could be causing this problem?
A: There are two things to check:
Working with Rules
Q: When developing rules in Netbeans, why is design mode not available for a Rule Library?
A: The design mode functionality is available from the explorer tree in Projects view. Use the following steps:
Chapter 4, Developing Adapters
- If you create an adapter that implements the AsynchronousResourceAdapter class, then note that this adapter may be working with users that are partially initialized. (These users are created outside Identity Manager, but not fully populated with attributes.) The Provisioner will not automatically convert a Create operation to an Update operation if the WSUser already exists on the Resource. Your resource adapter must distinguish this case. (ID-16829)
Identity Manager Tuning, Troubleshooting, and Error MessagesThis section provides new information and documentation corrections for Sun Java™ System Identity Manager Tuning, Troubleshooting, and Error Messages.
- Some tasks have been moved from the adapter to the task package. Update these paths if you have tracing enabled for any of the following tasks, or if you have customized task definitions referencing these packages.
Old Package Name
New Package Name
com.waveset.adapter.ADSyncFailoverTask
com.waveset.task.ADSyncFailoverTask
com.waveset.adapter.ADSyncRecoveryCollectorTask
com.waveset.task.ADSyncRecoveryCollectorTask
com.waveset.adapter.SARunner
com.waveset.task.SARunner
com.waveset.adapter.SourceAdapterTask
com.waveset.task.SourceAdapterTask
- Call timer and Tracing functions are now related, and Call Timing statistics can only be collected when tracing is enabled. (ID-17106)
Show Timings
The Show Timings page provides a list of methods and their aggregate call timer statistics (not broken down by caller) that can help you track bottlenecks to specific methods and invoked APIs.
You can use the options on this page to start timing and tracing, stop timing and tracing, clear the timing statistics, and import or export call timer metrics. In addition, click any of the method names to see which methods they call.
Identity Manager Service Provider Edition DeploymentThis section provides new information and documentation corrections for Sun Java™ System Identity Manager SPE Deployment.
Chapter 5, Other Objects in Identity Manager SPE
Identity Manager Identity Manager SPE now supports link correlation and link confirmation rules.
Link Correlation Rule
The linkTargets IDMXUser view option allows the caller to specify the list of resources that should be targeted for linking. When using forms, the list can be provided as a form property with the same name. Form properties are assimilated into view options when the IDMXUser view is checked in.
A link correlation rule selects resource accounts that the user might own. Given the view of the user, a link correlation rule returns an identity, a list of identities, or an option map.
If the rule returns an option map, then the view handler uses the map to look for resource accounts and obtains a list of identities that satisfy these options. For example, the searchFilter option of the getResourceObjects FormUtil method can be used to pass a search filter to an LDAP resource adapter.
A link correlation rule must have the authType attribute set to SPERule with the subtype set to SUBTYPE_SPE_LINK_CORRELATION_RULE.
Link Confirmation Rule
A link confirmation rule eliminates any resource accounts from the list of potential accounts that the link correlation rule selects. Given the view of the user and the list of candidate resource accounts, a link confirmation rule selects at most one resource account from the candidate list. The view of the user is visible under the 'view' path, while the list of candidates is available under the 'candidates' path.
If the link correlation rule selects no more than one resource account, the link confirmation rule is optional.
Note
Unlike Identity Manager confirmation rules, a link confirmation rule is invoked only once during the linking process.
A link confirmation rule must have the authType attribute set to SPERule with the subtype set to SUBTYPE_SPE_LINK_CONFIRMATION_RULE.
LighthouseContext API
Several convenience methods have been added to the SessionFactory class. The table on page 16 should be updated as follows.
Connection Type
Method
Description
Local anonymous
getServerInternalContext()
Returns a fully authorized context without any authentication.
Local authenticated
getSPESession(String user, EncryptedData password)
Constructs a session for the Service Provider user interface.
Local authenticated
getSPESession(Map credentials)
Constructs a session for the Service Provider user interface. The map specifies the credentials of the user, including the values of the user and password keys.
Local pre-authenticated
getSPEPreAuthenticatedSession(String user)
Constructs a pre-authenticated session for the Service Provider user interface.
Remote anonymous
Not applicable
This connection type is only available through SPML.
Remote authenticated
getSession(URL url, String user, EncryptedData pass)
Returns an authenticated session.
Localization ScopeHistorically, Identity Manager does not localize resource objects and functions, primarily because they are mostly samples that get loaded (through init.xml) during initialization of Identity Manager, and because the attributes of object types can vary between actual customer deployments, depending on the level of customizations. Following is a list of areas where users might encounter English: (ID-16349)
Using helpToolWith the Identity Manager 6.0 release, a new feature has been added that allows you to search the online help and documentation files, which are in HTML format. The search engine is based on the SunLabs “Nova” search engine technology.
There are two stages to using the Nova engine: indexing and retrieval. During the indexing stage, the input documents are analyzed and an index is created which is used during the retrieval stage. During retrieval, it is possible to pull “passages” that consist of the context in which the query terms were found. The passage retrieval process requires the original HTML files to be present, so these files must exist in a location in the file system accessible by the search engine.
helpTool is a Java program that performs two basic functions:
You execute helpTool from the command line, as follows:
$ java -jar helpTool.jar
usage: HelpTool
-d Destination directory
-h This help information
-i Directory or JAR containing input files, no wildcards
-n Directory for Nova index
-o Output file name
-p Indexing properties file
Rebuilding/Re-Creating the Online Help Index
The HTML files for online help are packaged in a JAR file. You must extract these files to a directory for the search engine. Use the following procedure:
- Unpack the helpTool distribution to a temporary directory. (Details TBD)
In this example, we will extract the files to /tmp/helpTool.
- In a UNIX shell or Windows command window, change directory to the location where the Identity Manager application was deployed to your web container.
For example, a directory for Sun Java System Application Server might look like the following:
/opt/SUNWappserver/domains/domain1/applications/j2ee-modules/idm
- Change your current working directory to the help/ directory.
Note
It is important to run helpTool from this directory or the index will not build correctly. In addition, you should remove the old index files by deleting the contents of the index/help/ subdirectory.
- Gather the following information for your command line arguments:
- Run the following command:
$ java -jar /tmp/helpTool/helpTool.jar -d html/help/en_US -i ../
WEB-INF/lib/idm.jar -n index/help -o help_files_help.txt -p index/index.propertiesExtracted 475 files.
[15/Dec/2005:13:11:38] PM Init index/help AWord 1085803878
[15/Dec/2005:13:11:38] PM Making meta file: index/help/MF: 0
[15/Dec/2005:13:11:38] PM Created active file: index/help/AL
[15/Dec/2005:13:11:40] MP Partition: 1, 475 documents, 5496 terms.
[15/Dec/2005:13:11:40] MP Finished dumping: 1 index/help 0.266
[15/Dec/2005:13:11:40] IS 475 documents, 6.56 MB, 2.11 s, 11166.66 MB/h
[15/Dec/2005:13:11:40] PM Waiting for housekeeper to finish
[15/Dec/2005:13:11:41] PM Shutdown index/help AWord 1085803878Rebuilding/Re-Creating the Documentation Index
Use the following procedure to rebuild or re-create the documentation index:
- Unpack the helpTool distribution to a temporary directory. (Details TBD)
In this example, we will extract the files to /tmp/helpTool.
- In a UNIX shell or Windows command window, change directory to the location where the Identity Manager application was deployed to your web container.
For example, a directory for Sun Java System Application Server might look like:
/opt/SUNWappserver/domains/domain1/applications/j2ee-modules/idm
- Change your current working directory to the help/ directory.
Note
You must run helpTool from this directory or the index will not build correctly. In addition you should remove the old index files by deleting the contents of the index/docs/ subdirectory.
- Gather the following information for your command line arguments:
- Run the following command:
$ java -jar /tmp/helpTool/helpTool.jar -d html/docs -i ../doc/HTML/en_US -n index/docs -o help_files_docs.txt -p index/index.properties
Copied 84 files.
Copied 105 files.
Copied 1 files.
Copied 15 files.
Copied 1 files.
Copied 58 files.
Copied 134 files.
Copied 156 files.
Copied 116 files.
Copied 136 files.
Copied 21 files.
Copied 37 files.
Copied 1 files.
Copied 13 files.
Copied 2 files.
Copied 19 files.
Copied 20 files.
Copied 52 files.
Copied 3 files.
Copied 14 files.
Copied 3 files.
Copied 3 files.
Copied 608 files.
[15/Dec/2005:13:24:25] PM Init index/docs AWord 1252155067
[15/Dec/2005:13:24:25] PM Making meta file: index/docs/MF: 0
[15/Dec/2005:13:24:25] PM Created active file: index/docs/AL
[15/Dec/2005:13:24:28] MP Partition: 1, 192 documents, 38488 terms.
[15/Dec/2005:13:24:29] MP Finished dumping: 1 index/docs 0.617
[15/Dec/2005:13:24:29] IS 192 documents, 14.70 MB, 3.81 s, 13900.78 MB/h
[15/Dec/2005:13:24:29] PM Waiting for housekeeper to finish
[15/Dec/2005:13:24:30] PM Shutdown index/docs AWord 1252155067
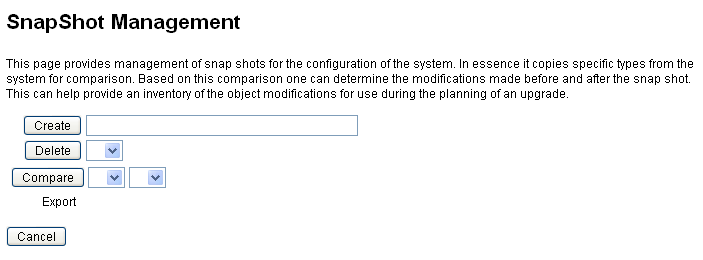

 located on the menu bar.
  located in the Controls section.