Defining Worklist Manager Console Security Using LDAP
LDAP can be used for authentication, authorization, and user management. This section provides general instructions for working with LDAP security in the GlassFish server. For more information, see Chapter 9, Configuring Security, in Sun GlassFish Enterprise Server 2.1 Administration Guide.
Perform the following steps to configure the WLM SE and Console for LDAP:
-
To Update web.xml for the Worklist Manager Console (for LDAP)
-
To Map User Groups to Security Roles for the Worklist Manager Console (for LDAP)
 To Create an LDAP Realm in the GlassFish Server
-
Launch and log in to the GlassFish Admin Console.
The default URL for the console is http://localhost:4848.
-
In the left navigation panel, expand Configuration, expand Security, and then click Realms.
-
Above the Realms list, click New.
The New Realm page appears.
-
Enter LdapRealm for the name and select com.sun.enterprise.security.auth.realm.ldap.LDAPRealm for the class name.
-
Enter at least the following properties:
-
JAAS context: The type of login to use for this realm. For LDAP, it must be ldapRealm.
-
Directory: The URL of the directory server. For example, ldap://190.111.0.111:389.
-
Base DN: The base Distinguished Name (dn) for the user data.
You can specify additional optional properties for the realm.
-
-
Click OK.
-
Continue to To Update web.xml for the Worklist Manager Console (for LDAP)
.
 To Update web.xml for the Worklist Manager
Console (for LDAP)
The roles defined in web.xml are abstract roles are not used to match groups in the LDAP directory. The groups that are mapped to the roles in sun-web.xml are used to match LDAP groups.
-
In the NetBeans Projects window, expand the Worklist Manager Console folder (by default, WLMConsoleWeb).
-
Under the Worklist Manager Console folder, expand Web Pages and then expand WEB-INF.
-
Open the file web.xml.
The XML Editor appears.
-
Click the XML tab.
-
Modify the realm-name ID attribute in the login configuration section to be LDAPRealm. It should look similar to the following:
<login-config> <auth-method>FORM</auth-method> <realm-name id="LDAPRealm"/> <form-login-config> <form-login-page>/login.jsp</form-login-page> <form-error-page>/login-failed.jsp</form-error-page> </form-login-config> </login-config> -
Click the Security tab and expand Login Configuration.
-
In the Realm Name field, enter LdapRealm.
-
Expand Security Roles, and define the necessary security roles (as described in To Define Security Roles for the Worklist Manager Console.
-
Expand Security Constraints, and click Add Security Constraint.
A new constraint appears and is named Constraint with a number appended to the end.
-
Name the new constraint worklist.
-
Under Web Resource Collection, do the following:
-
Click Add.
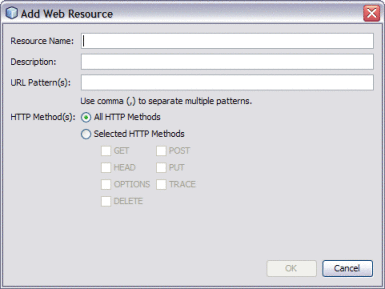
The Add Web Resource window appears.

-
For the Resource Name, enter worklist. For the URL Pattern, enter /worklist/*.
-
Select All HTTP Methods, and then click OK.
-
Repeat the above steps to add resources with the following names and URL patterns:
Resource Name
URL Pattern
TaskList
/GetTaskListServlet
xforms-jsp
/xforms-jsp/*
-
-
Select Enable Authentication Constraint.
-
Next to Role Name, click Edit.
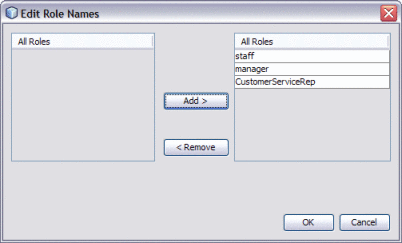
The Edit Role Names dialog box appears.
-
Select all LDAP roles in the left column, and click the right arrow button to transfer them to the right column.

-
Click OK.
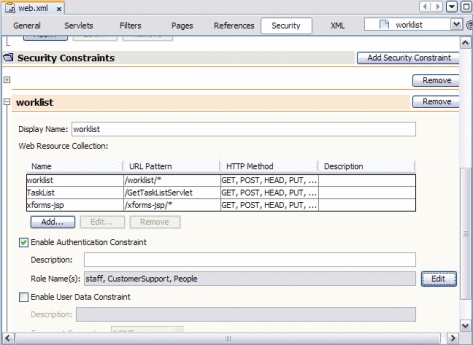
The image below illustrates a defined security constraint.

-
Save and close web.xml.
-
Continue to To Map User Groups to Security Roles for the Worklist Manager Console (for LDAP).
 To Map User Groups to Security Roles for the
Worklist Manager Console (for LDAP)
-
In the NetBeans Projects window, expand the Worklist Manager Console folder (by default, WLMConsoleWeb).
-
Under the Worklist Manager Console folder, expand Web Pages and then expand WEB-INF.
-
Open the file sun-web.xml.
The XML Editor appears.
-
Map user groups to roles, as described in To Map Groups to Security Roles for the Worklist Manager Console.
-
Continue to To Configure the Worklist Manager Service Engine for LDAP.
 To Configure the Worklist Manager Service
Engine for LDAP
-
From the Services window of the NetBeans IDE, expand the Servers node.
-
If the application server is not already started, right-click the server and then select Start.
-
Under the application server, expand JBI and expand Service Engines.
-
If the WLM SE is not started, right-click sun-wlm-engine and then select Start.
-
Right-click the service engine and select properties.
The Properties Editor appears.
-
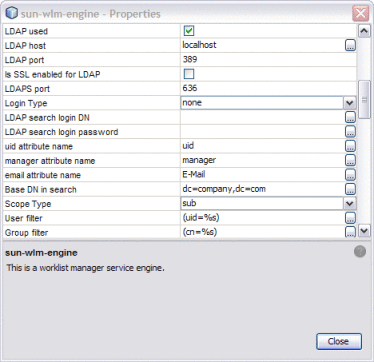
In the properties, select the check box next to LDAP Used.
-
Modify the remaining LDAP properties, which are listed and described in Table 3 under Worklist Manager Service Engine Runtime Property Descriptions (beginning with LDAP Host).

-
To apply the changes, stop and restart the WLM SE.
- © 2010, Oracle Corporation and/or its affiliates
