|
|
| Sun ONE Directory Server Administration Guide |
Chapter 6 Managing Access Control
Controlling access to your directory contents is an integral part of creating a secure directory. This chapter describes access control instructions (ACIs) that determine what permissions are granted to users who access the directory. Sun ONE Directory Server 5.2 introduces the ability to view the effective rights of a given user for a given entry. This feature simplifies the administration of the complex and powerful access control mechanism.
While you are in the planning phase for your directory deployment, you should define an access control strategy that serves your overall security policy. Refer to "Designing Access Control" in Chapter 7 of the Sun ONE Directory Server Deployment Guide for tips on planning your access control strategy.
This chapter includes the following topics:
- Access Control Principles
- Default ACIs
- ACI Syntax
- Bind Rules
- Creating ACIs From the Command Line
- Creating ACIs Using the Console
- Access Control Usage Examples
- Viewing Effective Rights
- Advanced Access Control: Using Macro ACIs
- Access Control and Replication
- Logging Access Control Information
- Compatibility with Earlier Releases
Access Control Principles
The mechanism by which you define access is called access control. When the server receives a request, it uses the authentication information provided by the user in the bind operation, and the access control instructions (ACIs) defined in the server to allow or deny access to directory information. The server can allow or deny permissions such as read, write, search, or compare. The permission level granted to a user may be dependent on the authentication information provided.
Using access control, you can control access to the entire directory, a subtree of the directory, specific entries in the directory (including entries defining configuration tasks), or a specific set of entry attributes. You can set permissions for a specific user, all users belonging to a specific group or role, or all users of the directory. Finally, you can define access for a specific client identified by its IP address or DNS name.
ACI Structure
Access control instructions are stored in the directory as attributes of entries. The aci attribute is an operational attribute; it is available for use on every entry in the directory, regardless of whether it is defined for the object class of the entry. It is used by the directory server to evaluate what rights are granted or denied when it receives an LDAP request from a client. The aci attribute is returned in an ldapsearch operation if specifically requested.
The three main parts of an ACI statement are:
- Target - Deterimes the entry or attributes to which the permissions will apply.
- Permission - Defines what operations are allowed or denied.
- Bind Rule - Determines who is subject to the ACI based on their bind DN.
The permission and bind rule portions of the ACI are set as a pair, also called an Access Control Rule (ACR). The specified permission to access the target is granted or denied depending on whether the accompanying rule is evaluated to be true. For more information, see "ACI Syntax".
ACI Placement
If an entry containing an ACI does not have any child entries, the ACI applies to that entry only. If the entry has child entries, the ACI applies to the entry itself and all entries below it. As a direct consequence, when the server evaluates access permissions to any given entry, it verifies the ACIs for every entry between the one requested and the base of its root suffix.
The aci attribute is multi-valued, which means that you can define several ACIs for the same entry or subtree.
You can create an ACI on an entry that does not apply directly to that entry but to some or all of the entries in the subtree below it. The advantage of this is that you can place at a high level in the directory tree a general ACI that effectively applies to entries more likely to be located lower in the tree. For example, at the level of an organizationalUnit entry or a locality entry, you could create an ACI that targets entries that include the inetorgperson object class.
You can use this feature to minimize the number of ACIs in the directory tree by placing general rules at high level branch points. To limit the scope of more specific rules, you should place them as close as possible to leaf entries.
Note ACIs placed in the root DSE entry (with the DN "") apply only to that entry.
ACI Evaluation
To evaluate the access rights to a particular entry, the server compiles a list of the ACIs present on the entry itself and on the parent entries back up to the base of the entry's root suffix. During evaluation, the server processes the ACIs in this order. ACIs are evaluated in all of the suffixes and subsuffixes between an entry and the base of its root suffix, but not across chained suffixes on other servers.
By default, if no ACI applies to an entry, access is denied to all users except for the Directory Manager. Access must be explicitly granted by an ACI for a user to access any entry in the server. The default ACIs define anonymous read access and allow users to modify their own entries, except for attributes needed for security. For more information, see "Default ACIs".
Although the server processes the ACIs closest to the target entry first, the effect of all ACIs that apply to an entry is cumulative. Access granted by any ACI is allowed unless any ACI denies it. ACIs that deny access, no matter where they appear in the list, take precedence over ACIs that allow access to the same resource.
For example, if you deny write permission at the directory's root level, then none of the users can write to the directory regardless of the specific permissions you grant them. To grant a specific user write permissions to the directory, you have to restrict the scope of the original denial for write permission so that it does not include the user.
ACI Limitations
When creating an access control policy for your directory service, you need to be aware of the following restrictions:
- If your directory tree is distributed over several servers using the chaining feature, some restrictions apply to the keywords you can use in access control statements:
- ACIs that depend on group entries (groupdn keyword) must be located on the same server as the group entry. If the group is dynamic, then all members of the group must have an entry on the server too. If the group is static, the members' entries can be located on remote servers.
- ACIs that depend on role definitions (roledn keyword) must be located on the same server as the role definition entry. Every entry that is intended to have the role must also be located on the same server.
However, you can do value matching of values stored in the target entry with values stored in the entry of the bind user (for example, using the userattr keyword). Access is evaluated normally even if the bind user does not have an entry on the server that holds the ACI.
For more information on how to chain access control evaluation, see "Access Control Through Chained Suffixes".
- Attributes generated by a CoS cannot be used in all ACI keywords. Specifically, you should not use attributes generated by CoS with the userattr and userdnattr keywords because the access control rule will not work. For more information, refer to "Using the userattr Keyword". For more information on CoS, see Chapter 5 "Advanced Entry Management."
- Access control rules are always evaluated on the local server. You must not specify the hostname or port number of the server in LDAP URLs used in ACI keywords. If you do, the LDAP URL will not be taken into account at all. For more information, see Appendix D, "LDAP URLs," in the see Sun ONE Directory Server Reference Manual.
- When granting proxy rights, you cannot grant a user the right to proxy as the Directory Manager, nor can you grant proxy rights to the Directory Manager.
Default ACIs
When you install the directory server, the following default ACIs are defined on the the root suffix you specified during the configuration:
- All users have anonymous access to the directory for search, compare, and read operations.
- Bound users can modify their own entry in the directory, but not delete it. They cannot modify the aci, nsroledn,and passwordPolicySubentry attributes, nor any of their resource limit attributes, password policy state attributes or account lockout state attributes.
- The configuration administrator (by default uid=admin,ou=Administrators, ou=TopologyManagement,o=NetscapeRoot) has all rights except proxy rights.
- All members of the Configuration Administrators group have all rights except proxy rights.
- All members of the Directory Administrators group have all rights except proxy rights.
- All members of the SIE group have all rights except proxy rights. The SIE group is for administrators of this directory's server group in the Administration Server.
Whenever you create a new root suffix in the directory, its base entry has the default ACIs listed above, except for the self-modification ACI. For added security, you should add this ACI as described in "Creating a New Root Suffix Using the Console".
The NetscapeRoot subtree for the Administration Server has its own set of default ACIs:
- All members of the Configuration Administrators group have all rights on the NetscapeRoot subtree except proxy rights. This allows them to add new members to the Configuration Administrators group
- All users have anonymous access to the NetscapeRoot subtree for search and read operations.
- The Group Expansion ACI allows members of the administrative groups to access the group definition.
The following sections explain how to modify these default settings to suit the needs of your organization.
ACI Syntax
ACIs are complex structures with many possible variations. Whether you create and modify ACIs using the console or from the command line, you should understand the syntax of an ACI in LDIF. The following sections describe the syntax of an ACI in detail.
The aci attribute has the following syntax:
where:
- target specifies the entry, attributes, or set of entries and attributes for which you want to control access. The target can be a distinguished name, one or more attributes, or a single LDAP filter. The target is optional. When the target is not specified, the ACI applies to the entire entry where it is defined and all of its children.
- version 3.0 is a required string that identifies the ACI version.
- name is a name for the ACI. The name can be any string that identifies the ACI. The ACI name is required and should describe the effect of the ACI.
- permission specifically states what rights you are either allowing or denying, for example read or search rights.
- bindRules specify the credentials and bind parameters that a user has to provide to be granted access. Bind rules can also be based on user or group membership or connection properties of the client.
You can have multiple targets and permission-bind rule pairs. This allows you to refine a both the entry and attributes being targeted and efficiently set multiple access controls for a given target. For example:
permission bindRule; ...; permission bindRule;)The following is an example of a complete LDIF ACI:
(targetattr=*)(version 3.0; acl "example"; allow (write)
userdn="ldap:///self";)In this example, the ACI states that the user bjensen has rights to modify all attributes in her own directory entry.
The following sections describe the syntax of each portion of the ACI in more detail.
Defining Targets
The target identifies what the ACI applies to. When a client requests an operation on attributes in an entry, the server evaluates the target to see if the ACI must be evaluatated to allow or deny the operation. If the target is not specified, the ACI applies to all attributes in the entry containing the aci attribute and to the entries below it.
The general syntax for a target is one of the following:
where:
- keyword indicates the type of target. The following types of targets are defined by the keywords in Table 6-1:
- A directory entry or its subtree.
- The attributes of an entry.
- A set of entries or attributes that match an LDAP filter.
- An attribute value or combination of values that matches an LDAP filter.
- Equal (=) indicates that the target is the object specified in the expression, and not equal (!=) indicates the target is any object not specified in the expression.
- expression is dependent on the keyword and identifies the target. The quotation marks ("") around expression are required.
The following table lists each keyword and the associated expressions:
Targeting a Directory Entry
Use the target keyword and a DN inside an LDAP URL to target a specific directory entry and any entries below it. The targetted DN must be located in the subtree below the entry where the ACI is defined. The target expression has the following syntax:
(target != "ldap:///distinguished_name")The distinguished name must be in the subtree rooted at the entry where the ACI is defined. For example, the following target may be used in an ACI on ou=People,dc=example,dc=com :
You can also use a wildcard in the DN to target any number of entries that match the LDAP URL. The following are legal examples of wildcard usage:
- (target="ldap:///uid=*,dc=example,dc=com")
Matches every entry in the entire example.com tree that has the uid attribute in the entry's RDN. This target will match entries at any depth in the tree, for example:
uid=yyorgens,ou=marketing,dc=example,dc=com
uid=bjensen,ou=eng,ou=east,dc=example,dc=com
- (target="ldap:///uid=*Anderson,ou=People,dc=example,dc=com")
Matches every entry in the ou=People branch with a uid ending in Anderson.
- (target="ldap:///*Anderson,ou=People,dc=example,dc=com")
Matches every entry in the ou=People branch whose RDN ends with Anderson, regardless of the naming attribute.
Multiple wildcards are allowed, such as in uid=*,ou=*,dc=example,dc=com. This example matches every entry in the example.com tree whose distinguished name contains only the uid and ou attributes.
Targeting Attributes
In addition to targeting directory entries, you can also target one or more attributes, or all but one or more attributes, that occur in the targeted entries. This is useful when you want to deny or allow access to partial information about an entry. For example, you could allow access to only the common name, surname, and telephone number attributes of a given entry. Or you could deny access to sensitive information such as personal data.
The targeted attribute do not need to exist on the target entry or its subtree, but the ACI will apply whenever they do. The attributes you target do not need to be defined in the schema. The absence of schema checking makes it possible to implement an access control policy before importing your data and its schema.
To target attributes, you use the targetattr keyword and give the attribute names. The targetattr keyword uses the following syntax:
(targetattr != "attribute")You can target multiple attributes by using the targetattr keyword with the following syntax:
(targetattr != "attribute1 || attribute2 ... || attributen")For example, to target an entry's common name, surname, and uid attributes, you would use the following:
Targeted attributes include all subtypes of the named attribute. For example, (targetattr = "locality") will also target locality;fr. You may also target subtypes specifically, for example (targetattr = "locality;fr;quebec").
Targeting Both an Entry and Attributes
By default, the entry targeted by an ACI containing a targetattr keyword is the entry on which the ACI is placed. That is, if you put the ACI
on the ou=Marketing, dc=example,dc=com entry, then the ACI applies to the entire Marketing subtree. However, you can also explicitly specify a target using the target keyword as follows:
(targetattr="uid") (accessControlRules;)The order in which you specify the target and the targetattr keywords is not important.
Targeting Entries or Attributes Using LDAP Filters
You can use LDAP filters to target a set of entries that match certain criteria. To do this, use the targetfilter keyword with an LDAP filter. The ACI will apply to all entries that match the filter in the subtree below the entry containing the ACI.
The syntax of the targetfilter keyword is:
where LDAPfilter is a standard LDAP search filter. For more information on filter syntax, see "LDAP Search Filters" in Chapter 4 of the Sun ONE Directory Server Getting Started Guide.
For example, suppose that all entries representing employees have a status of salaried or contractor and an attribute representing the number of hours worked, as a percentage of a full-time position. To target all the entries representing contractors or part-time employees, you could use the following filter:
Note The filter syntax describing matching rules for internationalized values is not supported in ACIs. For example, the following target filter is not valid:
Target filters select whole entries as targets of the ACI. You can associate the targetfilter and the targetattr keywords to create ACIs that apply to a subset of attributes in the targeted entries.
The following LDIF example allows members of the Engineering Admins group to modify the departmentNumber and manager attributes of all entries in the Engineering business category. This example uses LDAP filtering to select all entries with businessCategory attributes set to Engineering:
objectClass: top
objectClass: organization
aci: (targetattr="departmentNumber || manager")
(targetfilter="(businessCategory=Engineering)")
(version 3.0; acl "eng-admins-write"; allow (write)
groupdn ="ldap:///cn=Engineering Admins, dc=example,dc=com";)
Targeting Attribute Values Using LDAP Filters
You can use access control to target specific attribute values. This means that you can grant or deny permissions on an attribute if that attribute's value meets the criteria defined in the ACI. An ACI that grants or denies access based on an attribute's value, is called a value-based ACI.
For example, you might grant all users in your organization permission to modify the nsRoleDN attribute in their own entry. However, you would also want to ensure that they do not give themselves certain key roles such as "Top Level Administrator." LDAP filters are used to check that the conditions on attribute values are satisfied.
To create a value based ACI, you must use the targattrfilters keyword with the following syntax:
del=attr1:F1 && attr2:F2 ... && attrn:Fn")where:
- add represents the operation of creating an attribute.
- del represents the operation of deleting an attribute.
- attrn represents the target attributes.
- Fn represents filters that apply only to the associated attribute.
When creating an entry, if a filter applies to an attribute in the new entry, then each instance of that attribute must satisfy the filter. When deleting an entry, if a filter applies to an attribute in the entry, then each instance of that attribute must also satisfy the filter.
When modifying an entry, if the operation adds an attribute, then the add filter that applies to that attribute must be satisfied; if the operation deletes an attribute, then the delete filter that applies to that attribute must be satisfied. If individual values of an attribute already present in the entry are replaced, then both the add and delete filters must be satisfied.
For example consider the following attribute filter:
This filter can be used to allow users to add any role (nsRoleDN attribute) to their own entry, except the superAdmin role. It also allows users to add a telephone number with a 123 prefix.
Note You cannot create value-based ACIs from the Server Console.
Targeting a Single Directory Entry
There is no explicit way to target a single entry. However, it can be done:
- By creating a bind rule that matches user input in the bind request with an attribute value stored in the targeted entry. For more details, see "Defining Access Based on Value Matching".
- By using the targetfilter keyword.
With the targetfilter keyword you may specify an attribute value that appears only in the desired entry. For example, during the installation of the directory server, the following ACI is created:
(version 3.0; acl "Default anonymous access";
allow (read, search) userdn="ldap:///anyone";)This ACI can apply only to the o=NetscapeRoot entry, because that is the only entry with an attribute o having the value NetscapeRoot.
The risk associated with these methods is that your directory tree might change in the future, and you would have to remember to modify this ACI.
Defining Permissions
Permissions specify the type of access you are allowing or denying. You can either allow or deny permission to perform specific operations in the directory. The various operations that can be assigned are known as rights.
There are two parts to setting permissions:
- Allowing or denying access
- Assigning rights
Allowing or Denying Access
You can either explicitly allow or deny access permissions to your directory tree. For more guidelines on when to allow and when to deny access, refer to "Designing Access Control" in Chapter 7 of the Sun ONE Directory Server Deployment Guide.
Assigning Rights
Rights detail the specific operations a user can perform on directory data. You can allow or deny all rights, or you can assign one or more of the following rights:
Read. Indicates whether users can read directory data. This permission applies only to the search operation.
Write. Indicates whether users can modify an entry by adding, modifying, or deleting attributes. This permission applies to the modify and modrdn operations.
Add. Indicates whether users can create entries. This permission applies only to the add operation.
Delete. Indicates whether users can delete entries. This permission applies only to the delete operation.
Search. Indicates whether users can search for the directory data. Users must have Search and Read rights in order to view the data returned as part of a search result. This permission applies only to the search operation.
Compare. Indicates whether the users can compare data they supply with data stored in the directory. With compare rights, the directory returns a success or failure message in response to an inquiry, but the user cannot see the value of the entry or attribute. This permission applies only to the compare operation.
Selfwrite. Indicates whether users can add or delete their own DN in an attribute of the target entry. This right is used only for group management. Selfwrite works with proxy authorization: it grants the right to add or delete the proxy DN from the group entry (not the DN of the bound user).
Proxy. Indicates whether the specified DN can access the target with the rights of another entry. You can grant proxy access using the DN of any user in the directory except the Directory Manager DN. Moreover, you cannot grant proxy rights to the Directory Manager. An example is provided in "Proxy Authorization ACI Example". For an overview of proxy access, refer to Sun ONE Directory Server Deployment Guide.
All. Indicates that the specified DN has all rights (read, write, search, delete, compare, and selfwrite) to the targeted entry, excluding proxy rights.
Rights are granted independently of one another. This means, for example, that a user who is granted add rights can create an entry but cannot delete it if delete rights have not been specifically granted. Therefore, when planning the access control policy for your directory, you must ensure that you grant rights in a way that makes sense for users. For example, it doesn't usually make sense to grant write permission without granting read and search permissions.
Rights Required for LDAP Operations
This section describes the rights you need to grant to users depending on the type of LDAP operation you want to authorize them to perform.
Adding an entry:
- Grant add permission on the entry being added.
- Grant write permission on the value of each attribute in the entry. This right is granted by default but could be restricted using the targattrfilters keyword.
Deleting an entry:
- Grant delete permission on the entry to be deleted.
- Grant write permission on the value of each attribute in the entry. This right is granted by default but could be restricted using the targattrfilters keyword.
Modifying an attribute in an entry:
- Grant write permission on the attribute type.
- Grant write permission on the value of each attribute type. This right is granted by default but could be restricted using the targattrfilters keyword.
Modifying the RDN of an entry:
- Grant write permission on the entry.
- Grant write permission on the attribute type used in the new RDN.
- Grant write permission on the attribute type used in the old RDN, if you want to grant the right to delete the old RDN.
- Grant write permission on the value of attribute type used in the new RDN. This right is granted by default but could be restricted using the targattrfilters keyword.
Comparing the value of an attribute:
- Grant compare permission on the attribute type.
Searching for entries:
- Grant search permission on each attribute type used in the search filter.
- Grant read permission on attribute types used in the entry.
The permissions you need to set up to allow users to search the directory are more readily understood with an example. Consider the following search:
-w password -b "dc=example,dc=com" \
"(objectclass=*)" mailThe following ACI is used to determine whether user bjensen can be granted access for searching:
mail"; allow (read, search) userdn = "ldap:///self";)The search result list is empty because this ACI does not allow bjensen the right to search on the objectclass attribute. If you want the search operation described above to be successful, you must modify the ACI to read as follows:
access to mail"; allow (read, search) userdn = "ldap:///self";)Permissions Syntax
In an ACI statement, the syntax for permissions is:
where rights is a list of 1 to 8 comma-separated keywords enclosed within parentheses. Valid keywords are read, write, add, delete, search, compare, selfwrite, proxy, or all.
In the following example, read, search, and compare access is allowed, provided the bind rule is evaluated to be true:
"example"; allow (read, search, compare) bindRule;)Bind Rules
Depending on the ACIs defined for the directory, for certain operations, you need to bind to the directory. Binding means logging in or authenticating yourself to the directory by providing a bind DN and password, or, if using SSL, a certificate. The credentials provided in the bind operation, and the circumstances of the bind determine whether access to the directory is allowed or denied.
Every permission set in an ACI has a corresponding bind rule that details the required credentials and bind parameters.
A simple bind rule might require that the person accessing the directory must belong to a specific group. A complex bind rule can state that a person must belong to a specific group and must log in from a machine with a specific IP address, between 8 am and 5 pm.
Bind rules define who can access the directory, when, and from where. More specifically, bind rules can specify:
- Users, groups, and roles that are granted access
- Location from which an entity must bind
- Time or day on which binding must occur
- Type of authentication that must be in use during binding
Additionally, bind rules can be complex constructions that combine these criteria by using Boolean operators. See "Using Boolean Bind Rules" for more information.
The server evaluates the logical expressions used in ACIs according to a three-valued logic similar to the one used to evaluate LDAP filters, as described in RFC 2251 Lightweight Directory Access Protocol (v3). In summary, this means that if any component in the expression evaluates to Undefined (for example if the evaluation of the expression aborted due to a resource limitation), then the server handles this case correctly: it does not erroneously grant access because an Undefined value occurred in a complex Boolean expression.
Bind Rule Syntax
Whether access is allowed or denied depends on whether an ACI's bind rule is evaluated to be true. Bind rules use one of the two following patterns:
where equal (=) indicates that keyword and expression must match in order for the bind rule to be true, and not equal (!=) indicates that keyword and expression must not match in order for the bind rule to be true.
Note The timeofday keyword also supports the inequality expressions (<, <=, >, >=). This is the only keyword that supports these expressions.
The quotation marks ("") around expression and the delimiting semicolon (;) are required. The expressions you can use depend on the associated keyword.
The following table lists each keyword and the associated expressions. It also indicates whether wildcard characters are allowed in the expression.
The following sections further detail the bind rule syntax for each keyword.
Defining User Access - userdn Keyword
User access is defined using the userdn keyword. The userdn keyword requires one or more valid distinguished names in the following format:
where dn can be a DN or one of the expressions anyone, all, self or parent. These expressions refer to the following users:
- userdn = "ldap:///anyone" - Both anonymous and authenticated users.
- userdn = "ldap:///all" - Only authenticated users.
- userdn = "ldap:///self" - Only the same user as the target entry of the ACI.
- userdn = "ldap:///parent" - Only the parent entry of the ACI target.
The userdn keyword can also be expressed as an LDAP filter of the form:
Note If a DN contains a comma, the comma must be preceded by a backslash (\) escape character.
Anonymous Access (anyone Keyword)
Granting anonymous access to the directory means that anyone can access it without providing a bind DN or password, and regardless of the circumstances of the bind. You can limit anonymous access to specific types of access (for example, access for read or access for search) or to specific subtrees or individual entries within the directory. Anonymous access using the anyone keyword also allows access by any authenticated user.
For example, if you want to allow anonymous read and search access to the entire example.com tree, you would create the following ACI on the dc=example,dc=com node:
allow (read, search) userdn = "ldap:///anyone";)General Access (all Keyword)
You can use bind rules to indicate that a permission applies to anyone who has successfully bound to the directory. The all keyword therefore allows access by all authenticated users. This allows general access while preventing anonymous access.
For example, if you want to grant read access to the entire tree to all authenticated users, you would create the following ACI on the dc=example,dc=com node:
userdn="ldap:///all";)Self Access (self Keyword)
Specifies that users are granted or denied access to their own entries. In this case, access is granted or denied if the bind DN matches the DN of the targeted entry.
For example, if you want to grant all users in the example.com tree write access to their userPassword attribute, you would create the following ACI on the dc=example,dc=com node.
"modify own password"; allow (write) userdn = "ldap:///self";)Parent Access (parent Keyword)
Specifies that users are granted or denied access to the entry only if their bind DN is the parent of the targeted entry. Note that you must edit ACIs manually in Server Console to use the parent keyword.
For example, if you want to allow users to modify any child entries of their bind DN, you would create the following ACI on the dc=example,dc=com node:
allow (write) userdn="ldap:///parent";)LDAP URLs
You can dynamically target users in ACIs using a URL with a filter as follows:
For example, all users in the accounting and engineering branches of the example.com tree would be granted or denied access to the targeted resource dynamically based on the following URL:
Note Do not specify a hostname or port number within the LDAP URL. LDAP URLs always apply to the local server.
Wildcards
You can also specify a set of users by using the wildcard character (*). For example, specifying a user DN of uid=b*,dc=example,dc=com indicates that only users with a bind DN beginning with the letter b will be allowed or denied access based on the permissions you set.
Logical OR of LDAP URLs
Specify several LDAP URLs or keyword expressions to create complex rules for user access. For example:
ldap:///cn=b*,dc=example,dc=com";The bind rule is evaluated to be true for users binding with either of the DN patterns.
Excluding a Specific LDAP URL
Use the not-equal (!=) operator to define user access that excludes specific URLs or DNs. For example:
The bind rule is evaluated to be true if the client is not binding as a UID-based distinguished name in the accounting subtree. This bind rule only makes sense if the targeted entry is not under the accounting branch of the directory tree.
Defining Group Access - groupdn Keyword
Members of a specific group can access a targeted resource. This is known as group access. Group access is defined using the groupdn keyword to specify that access to a targeted entry will be granted or denied if the user binds using a DN that belongs to a specific group.
The groupdn keyword requires the distinguished names of one or more groups in the following format:
The bind rule is evaluated to be true if the bind DN belongs to a group specified by any of the groupDNs. The following section give examples using the groupdn keyword.
Note If a group DN contains a comma, the comma must be escaped by a backslash (\).
Single LDAP URL
The bind rule is evaluated to be true if the bind DN belongs to the Administrators group. If you wanted to grant the Administrators group permission to write to the entire directory tree, you would create the following ACI on the dc=example,dc=com node:
groupdn="ldap:///cn=Administrators,dc=example,dc=com";)Logical OR of LDAP URLs
ldap:///cn=Mail Administrators,dc=example,dc=com";The bind rule is evaluated to be true if the bind DN belongs to either the Administrators or the Mail Administrators group.
Defining Role Access - roledn Keyword
Members of a specific role can access a targeted resource. This is known as role access. Role access is defined using the roledn keyword to specify that access to a targeted entry will be granted or denied if the user binds using a DN that belongs to a specific role.
The roledn keyword requires one or more valid distinguished names in the following format:
The bind rule is evaluated to be true if the bind DN belongs to the specified role.
Note If a DN contains a comma, the comma must be escaped by a backslash (\).
The roledn keyword has the same syntax and is used in the same way as the groupdn keyword.
Defining Access Based on Value Matching
You can set bind rules to specify that an attribute value of the entry used to bind to the directory must match an attribute value of the targeted entry.
For example, you can specify that the bind DN must match the DN in the manager attribute of a user entry in order for the ACI to apply. In this case, only the user's manager would have access to the entry.
This example is based on DN matching. However, you can match any attribute of the entry used in the bind with the targeted entry. For example, you could create an ACI that allowed any user whose favoriteDrink attribute is "beer" to read all the entries of other users that have the same value for favoriteDrink.
Using the userattr Keyword
The userattr keyword can be used to specify which attribute values must match between the entry used to bind and the targeted entry.
You can specify:
- A user DN
- A group DN
- A role DN
- An LDAP filter, in an LDAP URL
- Any attribute type
The LDIF syntax of the userattr keyword is as follows:
or, if you are using an attribute type that requires a value other than a user DN, group DN, role DN, or an LDAP filter:
where:
- attrName is the name of the attribute used for value matching
- bindType is one of USERDN,GROUPDN,LDAPURL
- attrValue is any string representing an attribute value
The following sections provide examples of the userattr keyword with the various possible bind types.
Example with USERDN Bind Type
The following is an example of the userattr keyword associated with a bind based on the user DN:
The bind rule is evaluated to be true if the bind DN matches the value of the manager attribute in the targeted entry. You can use this to allow a user's manager to modify employees' attributes. This mechanism only works if the manager attribute in the targeted entry is expressed as a full DN.
The following example grants a manager full access to his or her employees' entries:
(version 3.0;acl "manager-write";
1-866-222-0917 733981allow (all) userattr = "manager#USERDN";)Example with GROUPDN Bind Type
The following is an example of the userattr keyword associated with a bind based on a group DN:
The bind rule is evaluated to be true if the bind DN is a member of the group specified in the owner attribute of the targeted entry. For example, you can use this mechanism to allow a group to manage employees' status information. You can use an attribute other than owner, as long as the attribute you use contains the DN of a group entry.
The group you point to can be a dynamic group, and the DN of the group can be under any suffix in the directory. However, the evaluation of this type of ACI by the server is very resource intensive.
If you are using static groups that are under the same suffix as the targeted entry, you can use the following expression:
In this example, the group entry is under the dc=example,dc=com suffix. The server can process this type of syntax more quickly than the previous example.
Example With ROLEDN Bind Type
The following is an example of the userattr keyword associated with a bind based on a role DN:
The bind rule is evaluated to be true if the bind DN belongs to the role specified in the exampleEmployeeReportsTo attribute of the targeted entry. For example, if you create a nested role for all managers in your company, you can use this mechanism to grant managers at all levels access to information about employees that are at a lower grade than themselves.
The DN of the role can be under any suffix in the directory. If, in addition, you are using filtered roles, the evaluation of this type of ACI uses a lot of resources on the server.
Example With LDAPURL Bind Type
The following is an example of the userattr keyword associated with a bind based on an LDAP filter:
The bind rule is evaluated to be true if the bind DN matches the filter specified in the myfilter attribute of the targeted entry. The myfilter attribute can be replaced by any attribute that contains an LDAP filter.
Example With Any Attribute Value
The following is an example of the userattr keyword associated with a bind based on any attribute value:
The bind rule is evaluated to be true if the bind DN and the target DN include the favoriteDrink attribute with a value of Beer.
Using the userattr Keyword With Inheritance
When you use the userattr keyword to associate the entry used to bind with the target entry, the ACI applies only to the target specified and not to the entries below it. In some circumstances, you might want to extend the application of the ACI several levels below the targeted entry. This is possible by using the parent keyword, and specifying the number of levels below the target that should inherit the ACI.
When you use the userattr keyword in association with the parent keyword, the syntax is as follows:
where :
- inheritance_level is a comma separated list that indicates how many levels below the target will inherit the ACI. You can include five levels [0,1,2,3,4] below the targeted entry; zero (0) indicates the targeted entry.
- attribute is the attribute targeted by the userattr or groupattr keyword.
- bindType can be either USERDN or GROUPDN. The LDAPURL and ROLEDN bind types are not supported with inheritance.
For example,
This bind rule is evaluated to be true if the bindDN matches the manager attribute of the targeted entry. The permissions granted when the bind rule is evaluated to be true apply to the target entry and to all entries immediately below it.
Example With userattr Inheritance
The example in the following figure indicates that user bjensen is allowed to read and search the cn=Profiles entry as well as the first level of child entries which includes cn=mail and cn=news.
Figure 6-1 Using Inheritance With the userattr Keyword
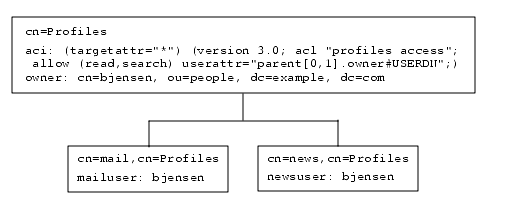
In this example, if you did not use inheritance you would have to do one of the following to achieve the same result:
- Explicitly set read and search access for user bjensen on the cn=Profiles, cn=mail, and cn=news entries in the directory.
- Add the owner attribute and the following ACI to the cn=mail,cn=Profiles and cn=news,cn=Profiles entries:
aci: (targetattr="*") (version 3.0; acl "profiles access"; allow
(read,search) userattr="owner#USERDN";)Granting Add Permission Using the userattr Keyword
If you use the userattr keyword in conjunction with all or add permissions, you might find that the behavior of the server is not what you expect. Typically, when a new entry is created in the directory, Directory Server evaluates access rights on the entry being created, and not on the parent entry. However, in the case of ACIs using the userattr keyword, this behavior could create a security hole, and the server's normal behavior is modified to avoid it.
Consider the following example:
(version 3.0; acl "manager-write"; allow (all)
userattr = "manager#USERDN";)This ACI grants managers all rights on the entries of employees that report to them. However, because access rights are evaluated on the entry being created, this type of ACI would also allow any employee to create an entry in which the manager attribute is set to their own DN. For example, disgruntled employee Joe (cn=Joe,ou=eng,dc=example,dc=com), might want to create an entry in the Human Resources branch of the tree, to use (or misuse) the privileges granted to Human Resources employees.
He could do this by creating the following entry:
objectclass: top
...
cn: Trojan Horse
manager: cn=Joe,ou=eng,dc=example,dc=comTo avoid this type of security threat, the ACI evaluation process does not grant add permission at level 0, that is, to the entry itself. You can, however, use the parent keyword to grant add rights below existing entries. You must specify the number of levels below the parent for add rights. For example, the following ACI allows child entries to be added to any entry in the dc=example,dc=com that has a manager attribute that matches the bind DN:
(version 3.0; acl "parent-access"; allow (add)
userattr = "parent[0,1].manager#USERDN";)This ACI ensures that add permission is granted only to users whose bind DN matches the manager attribute of the parent entry.
Defining Access From a Specific IP Address
Using bind rules, you can indicate that the bind operation must originate from a specific IP address. This is often used to force all directory updates to occur from a given machine or network domain.
The LDIF syntax for setting a bind rule based on an IP address is as follows:
The IPaddressList is a list of one or more comma-separated elements from among any of the following:
- A specific IPv4 address: 123.45.6.7
- An IPv4 address with wildcards to specify a subnetwork: 12.3.45.*
- An IPv4 address or subnetwork with subnetwork mask: 123.45.6.*+255.255.255.115
- An IPv6 address in any of its legal forms, as defined by RFC 2373 (http://www.ietf.org/rfc/rfc2373.txt). The following addresses are equivalent:
- 12AB:0000:0000:CD30:0000:0000:0000:0000
- 12AB::CD30:0:0:0:0
- 12AB:0:0:CD30::
- An IPv6 address with a subnet prefix length: 12AB::CD30:0:0:0:0/60
The bind rule is evaluated to be true if the client accessing the directory is located at the named IP address. This can be useful for allowing certain kinds of directory access only from a specific subnet or machine.
From the Server Console, you can define specific machines to which the ACI applies through the Access Control Editor. For more information, see "Creating ACIs Using the Console".
Defining Access from a Specific Domain
A bind rule can specify that the bind operation must originate from a particular domain or host machine. This is often used to force all directory updates to occur from a given machine or network domain.
The LDIF syntax for setting a bind rule based on the DNS host name is as follows:
Caution
The dns keyword requires that the naming service used on your machine is DNS. If the name service is not DNS, you should use the ip keyword instead.
The dns keyword requires a fully qualified DNS domain name. Granting access to a host without specifying the domain creates a potential security threat. For example, the following expression is allowed but not recommended:
You should use a fully qualified name such as:
The dns keyword allows wildcards. For example:
The bind rule is evaluated to be true if the client accessing the directory is located in the named domain. This can be useful for allowing access only from a specific domain. Note that wildcards will not work if your system uses a naming service other than DNS. In such a case, if you want to restrict access to a particular domain, use the ip keyword, as described in "Defining Access From a Specific IP Address".
Defining Access at a Specific Time of Day or Day of Week
You can use bind rules to specify that binding can only occur at a certain time of day or on a certain day of the week. For example, you can set a rule that will allow access only if it is between the hours of 8 am and 5 pm Monday through Friday. The time used to evaluate access rights is the time on the directory server, not the time on the client.
The LDIF syntax for setting a bind rule based on the time of day is as follows:
where operator can be one of the following symbols: equal to (=), not equal to (!=), greater than (>), greater than or equal to (>=), less than (<), or less than or equal to (<=). The time is expressed as four digits representing hours and minutes in the 24-hour clock (0 to 2359). For example:
- timeofday = "1200"; is true if the client is accessing the directory during the minute that the system clock shows noon.
- timeofday != "0100"; is true for access at any other time than 1 a.m.
- timeofday > "0800"; is true for access from 8:01 a.m. through 11:59 p.m.
- timeofday >= "0800"; is true for access from 8:00 a.m. through 11:59 p.m.
- timeofday < "1800"; is true for access from 12:00 midnight through 5:59 p.m.
Note The time and date on the server are used for the evaluation of the timeofday and dayofweek bind rules, and not the time on the client.
The LDIF syntax for setting a bind rule based on the day in the week is as follows:
The possible values for the dayofweek keyword are the English three-letter abbreviations for the days of the week: sun, mon, tue, wed, thu, fri, sat. Specify all days you wish to grant access, for example:
The bind rule is true if the directory is being accessed on one of the days listed.
Defining Access Based on Authentication Method
You can set bind rules that state that a client must bind to the directory using a specific authentication method. The authentication methods available are:
- None - Authentication is not required. This is the default. It represents anonymous access.
- Simple - The client must provide a user name and password to bind to the directory.
- SSL - The client must bind to the directory over a Secure Sockets Layer (SSL) or Transport Layer Security (TLS) connection.
In the case of SSL, the connection is established to the LDAPS second port; in the case of TLS, the connection is established through a Start TLS operation.In both cases, a certificate must be provided. For information on setting up SSL, see Chapter 11 "Implementing Security."
- SASL - The client must bind to the directory over a Simple Authentication and Security Layer (SASL) connection. Note that Sun ONE Directory Server does not provide a SASL module.
You cannot set up authentication-based bind rules through the Access Control Editor.
The LDIF syntax for setting a bind rule based on an authentication method is as follows:
where authentication_method is none, simple, ssl, or sasl sasl_mechanism. For example:
Examples
The following are examples of the authmethod keyword:
- authmethod = "none"; Authentication is not checked during bind rule evaluation.
- authmethod = "simple"; The bind rule is evaluated to be true if the client is accessing the directory using a username and password.
- authmethod = "ssl"; The bind rule is evaluated to be true if the client authenticates to the directory using a certificate over LDAPS. It will not be true if the client authenticates using simple authentication (bind DN and password) over LDAPS.
- authmethod = "sasl DIGEST-MD5"; The bind rule is evaluated to be true if the client is accessing the directory using the SASL DIGEST-MD5 mechanism. The other supported SASL mechanisms are EXTERNAL (all platforms) and GSSAPI (only on Solaris systems).
Using Boolean Bind Rules
Bind rules can be complex expressions that use the Boolean expressions AND, OR, and NOT to set very precise access rules. You cannot use the Server Console to create Boolean bind rules. You must create an LDIF statement.
The LDIF syntax for a Boolean bind rule is as follows:
For example, the following bind rule will be evaluated to be true if the bind DN is a member of either the administrator's group or the mail administrator's group, and if the client is running from within the example.com domain:
groupdn = "ldap:///cn=mail administrators,dc=example,dc=com" and
dns = "*.example.com";)The trailing semicolon (;) is a required delimiter that must appear after the final bind rule.
Boolean expressions are evaluated in the following order:
- Innermost to outermost parenthetical expressions first
- All expressions from left to right
- NOT before AND or OR operators
The Boolean OR and Boolean AND operators have no order of precedence.
Consider the following Boolean bind rules:
Because Boolean expressions are evaluated from left to right, in the first case, bind rule A is evaluated before bind rule B, and in the second case, bind rule B is evaluated before bind rule A.
However, the Boolean NOT is evaluated before the Boolean OR and Boolean AND. Thus, in the following example:
bind rule B is evaluated before bind rule A despite the left-to-right rule.
Creating ACIs From the Command Line
You can create access control instructions manually using LDIF statements, and add them to your directory tree using the ldapmodify command. Because ACI values can be very complex, it is useful to view existing values and copy them to help create new ones.
Viewing aci Attribute Values
ACIs are stored as one or more values of the aci attribute on an entry. The aci attribute is a multi-valued operational attribute that may be read and modified by directory users and that should itself be protected by ACIs. Administrative users are usually given full access to the aci attribute and may view its values in one of the following ways.
You can view the aci attribute values as any other values in the Generic Editor. In the top-level Directory tab of the Directory Server console, right-click an entry with ACIs and choose the Edit With Generic Editor menu item. However, aci values are usually long strings that are difficult to view and edit in this dialog.
Instead, you may then invoke the Access Control Editor by right-clicking the entry in the directory tree and choosing the Set Access Permissions menu item. Select an ACI and click Edit, then click Edit Manually to view the corresponding aci value. By switching between the Manual and Visual editors of the ACI, you can compare the syntax of the aci value with its configuration.
If your operating system allows it, you may copy the aci value from either the Generci Editor or the Manual Access Control Editor to paste it into your LDIF file. Administrative users can also view the aci attribute of an entry by running the following ldapsearch command:
-b entryDN -s base "(objectclass=*)" aciThe result is LDIF text that you may copy into your new LDIF ACI definition for editing.
Note To view the effect of an aci value, in terms of the permissions that it grants or denies, see "Viewing Effective Rights".
Creating ACIs Using the Console
The Directory Server console can be configured to show which entries in the directory have aci attributes. Select or deselect the View>Display>ACI Count menu item to toggle this display. Entries listed in the top-level Directory tab will then be appended with the number of ACIs which are defined in their aci attribute.You may then use the Directory Server console to view, create, edit, and delete access control instructions for your directory.
See "Access Control Usage Examples" for a collection of access control rules commonly used in Directory Server security policies, along with step-by-step instructions for using the Directory Server console to create them.
The Access Control Editor does not enable you to construct some of the more complex ACIs when you are in Visual editing mode. In particular, from the Access Control Editor you cannot:
- Deny access (see "Permissions Syntax")
- Create value-based ACIs (see "Targeting Attribute Values Using LDAP Filters")
- Define parent access (see "Parent Access (parent Keyword)")
- Create ACIs that contain Boolean bind rules (see "Using Boolean Bind Rules")
- Generally, create ACIs that use the following keywords: roledn, userattr, authmethod
Tip In the Access Control Editor, you can click on the Edit Manually button at any time to check the LDIF representation of the changes you make through the graphical interface.
Viewing the ACIs of an Entry
- On the top-level Directory tab of the Directory Server console, browse the directory tree to display the entry for which you wish to set access control. You must have directory administrator or directory manager priveleges to edit ACIs.
- Right-click the entry and select Set Access Permissions from the pop-up menu. Alternatively, left-click the entry to select it, and choose Set Access Permissions from the Object menu.
The Access Control Management dialog is displayed as shown in the following figure. It lists the description of all ACIs defined on the selected entry and allows you to edit or remove them and create new ones.
Figure 6-2 The Access Control Management Dialog
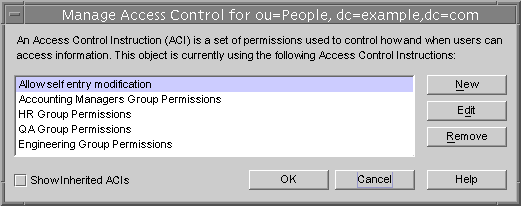
Selecting the Show Inherited ACIs checkbox will also list all ACIs defined by parents of the selected entry and that apply to it. However, inherited ACIs cannot be edited or removed, you must manage them on the entry where they are defined.
Click New to define new access permissions on the selected object and its entire subtree. The ACI editor is displayed as shown in following figure. Figure 6-3 The ACI Editor Dialog
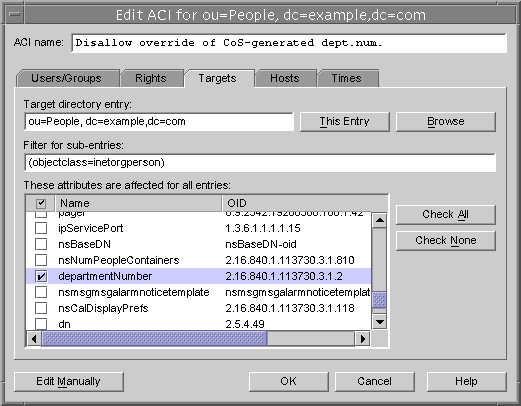
The ACI name at the top of the dialog is the description of ACI that will appear in the Access Control Management Dialog. Giving descriptive ACI names will make it easier to manage ACIs throughout the directory, especially when viewing the inherited ACIs on a leaf entry.
The tabs of the Access Control Editor allow you to specify the users who are granted or denied access, the targets that are being accessed or restricted, and advanced parameters such as the allowed hostnames and times for the operation. For details about the individual fields in the Access Control tabs, please refer to the online help.
The tabs of the ACI editor provide a graphical display of the contents of the ACI value. Click the Edit Manually button to see the ACI value and edit it textually. In the text editor, you may define advanced ACIs that cannot be defined through the tabs. However, once you edit the ACI value, you may not be able to edit the ACI visually anymore, even if you do not use advanced features.
Creating a New ACI
- Display the Access Control Editor.
This task is explained in "Viewing the ACIs of an Entry".
If the view displayed is different from Figure 6-3, click the Edit Visually button.
- Name the ACI, by typing a name in the ACI Name text box.
The name can be any string you want to use to uniquely identify the ACI. If you do not enter a name, the server uses unnamed ACI.
- In the Users/Groups tab, select the users to whom you are granting access by highlighting All Users, or clicking the Add button to search the directory for the users to add.
In the Add Users and Groups window:
- Select a search area from the drop-down list, enter a search string in the Search field, and click the Search button.
The search results are displayed in the list below.
- Highlight the entries you want in the search result list, and click the Add button to add them to the list of entries which have access permission.
- Click OK to dismiss the Add Users and Groups window.
The entries you selected are now listed on the Users/Groups tab in the ACI editor.
- In the Access Control Editor, click the Rights tab, and use the checkboxes to select the rights to grant.
- Click the Targets tab, then click This Entry to display the node targeted by the ACI.
You can change the value of the target DN, but the new DN must be a direct or indirect child of the selected entry.
If you do not want every entry in the subtree under this node to be targeted by the ACI, you must enter a filter in the Filter for Sub-entries field.
Additionally, you can restrict the scope of the ACI to only certain attributes by selecting the attributes you want to target in the attribute list.
- Click the Hosts tab, then the Add button to display the Add Host Filter dialog box.
You can specify a hostname or an IP address. If you specify an IP address, you can use the wildcard character (*).
- Click the Times tab to display the table showing at what times access is allowed.
By default, access is allowed at all times. You can change the access times by clicking and dragging the cursor over the table. You cannot select discrete blocks of time.
- When you have finished editing the ACI, click OK.
The ACI Editor is dismissed and the new ACI is listed in the ACI Manager window.
Editing an ACI
To edit an ACI:
- On the Directory tab, right-click the top entry in the subtree, and choose Set Access Permissions from the pop-up menu.
The Access Control Manager window is displayed. It contains the list of ACIs belonging to the entry.
- In the Access Control Manager window, highlight the ACI that you want to edit, and click Edit.
The Access Control Editor is displayed. For details on the information you can edit using this dialog box, refer to the online help.
- Make the changes you want under the various tabs of the Access Control Editor.
- When you have finished editing the ACI, click OK.
The ACI Editor is dismissed, and the modified ACI is listed in the ACI Manager.
Deleting an ACI
To delete an ACI:
- On the Directory tab, right-click the top entry in the subtree, and choose Set Access Permissions from the pop-up menu.
The Access Control Manager window is displayed. It contains the list of ACIs belonging to the entry.
- In the Access Control Manager window, select the ACI that you want to delete.
- Click Remove.
The ACI is no longer listed in the Access Control Manager.
Access Control Usage Examples
The examples provided in this section illustrate how an imaginary ISP company, example.com, would implement its access control policy. All the examples explain how to perform a given task from the console and using an LDIF file.
Example.com's business is to offer a web hosting service and internet access. Part of Example.com's web hosting service is to host the directories of client companies. Example.com actually hosts and partially manages the directories of two medium-sized companies, Company333, and Company999. It also provides internet access to a number of individual subscribers.
These are the access control rules that example.com wants to put in place:
- Grant anonymous access for read, search, and compare to the entire example.com tree for example.com employees (see "Granting Anonymous Access").
- Grant write access to example.com employees for personal information for such as homeTelephoneNumber, homeAddress (see "Granting Write Access to Personal Entries").
- Grant example.com employees the right to add any role to their entry, except certain critical roles (see "Restricting Access to Key Roles").
- Grant the example.com Human Resources group all rights on the entries in the People branch (see "Granting a Group Full Access to a Suffix").
- Grant all example.com employees the right to create group entries under the Social Committee branch of the directory, and to delete group entries that they own (see "Granting Rights to Add and Delete Group Entries").
- Grant all example.com employees the right to add themselves to group entries under the Social Committee branch of the directory (see "Allowing Users to Add or Remove Themselves From a Group").
- Grant access to the directory administrator (role) of Company333 and Company999 on their respective branches of the directory tree, with certain conditions such as SSL authentication, time and date restrictions, and specified location (see "Granting Conditional Access to a Group or Role").
- Grant individual subscribers access to their own entries (see "Granting Write Access to Personal Entries").
- Deny individual subscribers access to the billing information in their own entries (see "Denying Access").
- Grant anonymous access to the world to the individual subscribers subtree, except for subscribers who have specifically requested to be unlisted. (This part of the directory could be a slave server outside of the firewall and updated once a day.) See "Granting Anonymous Access" and "Setting a Target Using Filtering".
Granting Anonymous Access
Most directories are run such that you can anonymously access at least one suffix for read, search, or compare. For example, you might want to set these permissions if you are running a corporate personnel directory that you want employees to be able to search, such as a phone book. This is the case at example.com internally, and is illustrated in the ACI "Anonymous example.com" example.
As an ISP, example.com also wants to advertise the contact information of all of its subscribers by creating a public phone book accessible to the world. This is illustrated in the ACI "Anonymous World" example.
ACI "Anonymous example.com"
In LDIF, to grant read, search, and compare permissions to the entire example.com tree to example.com employees, you would write the following statement:
example"; allow (read, search, compare)
userdn= "ldap:///anyone" and dns="*.example.com";)This example assumes that the aci is added to the dc=example,dc=com entry. Note that the userPassword attribute is excluded from the scope of the ACI.
From the console, you can set this permission by doing the following:
- On the Directory tab, right click the example.com node in the left navigation tree, and choose Set Access Permissions from the pop-up menu to display the Access Control Manager.
- Click New to display the Access Control Editor.
- On the Users/Groups tab, in the ACI name field, type "Anonymous example.com". Check that All Users is displayed in the list of users granted access permission.
- On the Rights tab, tick the checkboxes for read, compare, and search rights. Make sure the other checkboxes are clear.
- On the Targets tab, click This Entry to display the dc=example,dc=com suffix in the target directory entry field. In the attribute table, locate the userPassword attribute and clear the corresponding checkbox.
All other checkboxes should be ticked. This task is made easier if you click the Name header to organize the list of attributes alphabetically.
- On the Hosts tab, click Add, and in the DNS host filter field, type *.example.com. Click OK to dismiss the dialog box.
- Click OK in the Access Control Editor window.
The new ACI is added to the ones listed in the Access Control Manager window.
ACI "Anonymous World"
In LDIF, to grant read and search access of the individual subscribers subtree to the world, while denying access to information on unlisted subscribers, you could write the following statement:
(targetattr="homePostalAddress || homePhone || mail")
(version 3.0; acl "Anonymous World"; allow (read, search)
userdn="ldap:///anyone";)This example assumes that the ACI is added to the ou=subscribers,dc=example, dc=com entry. It also assumes that every subscriber entry has an unlistedSubscriber attribute which is set to yes or no. The target definition filters out the unlisted subscribers based on the value of this attribute. For details on the filter definition, refer to "Setting a Target Using Filtering".
From the console, you can set this permission by doing the following:
- On the Directory tab, right click the Subscribers entry under the example.com node in the left navigation tree, and choose Set Access Permissions from the pop-up menu to display the Access Control Manager.
- Click New to display the Access Control Editor.
- On the Users/Groups tab, in the ACI name field, type "Anonymous World". Check that All Users is displayed in the list of users granted access permission.
- On the Rights tab, tick the checkboxes for read, and search rights. Make sure the other checkboxes are clear.
- On the Targets tab, click This Entry to display the dc=subscribers, dc=example,dc=com suffix in the target directory entry field.
- In the filter for subentries field, type the following filter:
(!(unlistedSubscriber=yes))
- In the attribute table, tick the checkboxes for the homePhone, homePostalAddress, and mail attributes.
All other checkboxes should be clear. This task is made easier if you click the Check None button to clear the checkboxes for all attributes in the table, then click the Name header to organize them alphabetically, and select the appropriate ones.
- Click OK.
The new ACI is added to the ones listed in the Access Control Manager window.
Granting Write Access to Personal Entries
Many directory administrators want to allow internal users to change some but not all of the attributes in their own entry. The directory administrators at example.com want to allow users to change their own password, home telephone number, and home address, but nothing else. This is illustrated in the ACI "Write example.com" example.
It is also example.com's policy to let their subscribers update their own personal information in the example.com tree provided that they establish an SSL connection to the directory. This is illustrated in the ACI "Write Subscribers" example.
ACI "Write example.com"
Note By setting this permission, you are also granting users the right to delete attribute values.
In LDIF, to grant example.com employees the right to update their password, home telephone number and home address, you would write the following statement:
homePostalAddress")(version 3.0; acl "Write example.com";
allow (write) userdn="ldap:///self" and dns="*.example.com";)This example assumes that the ACI is added to the ou=People,dc=example,dc=com entry.
From the console, you can set this permission by doing the following:
- On the Directory tab, right-click ou=People,dc=example,dc=com entry the in the left navigation tree, and choose Set Access Permissions from the pop-up menu to display the Access Control Manager.
- Click New to display the Access Control Editor.
- On the Users/Groups tab, in the ACI name field, type "Write example.com". In the list of users granted access permission, do the following:
- Select and remove All Users, then click Add.
The Add Users and Groups dialog box is displayed.
- Set the Search area to Special Rights, and select Self from the Search results list.
- Click the Add button to list Self in the list of users who are granted access permission.
- Click OK to dismiss the Add Users and Groups dialog box.
- On the Rights tab, tick the checkbox for write right. Make sure the other checkboxes are clear.
- On the Targets tab, click This Entry to enter ou=People,dc=example,dc=com in the target directory entry field. In the attribute table, tick the checkboxes for the homePhone, homePostalAddress, and userPassword attributes.
All other checkboxes should be clear. This task is made easier if you click the Check None button to clear the checkboxes for all attributes in the table, then click the Name header to organize them alphabetically, and select the appropriate ones.
- On the Hosts tab, click Add to display the Add Host Filter dialog box. In the DNS host filter field, type *.example.com. Click OK to dismiss the dialog box.
- Click OK in the Access Control Editor window.
The new ACI is added to the ones listed in the Access Control Manager window.
ACI "Write Subscribers"
Note By setting this permission, you are also granting users the right to delete attribute values.
In LDIF, to grant example.com subscribers the right to update their password and home telephone number, you would write the following statement:
(version 3.0; acl "Write Subscribers"; allow (write)
userdn= "ldap://self" and authmethod="ssl";)This example assumes that the aci is added to the ou=subscribers,dc=example, dc=com entry.
Note that example.com subscribers do not have write access to their home address, because they might delete the attribute, and example.com needs that information for billing. Therefore, the home address is business-critical information.
From the console, you can set this permission by doing the following:
- On the Directory tab, right click the Subscribers entry under the example.com node in the left navigation tree, and choose Set Access Permissions from the pop-up menu to display the Access Control Manager.
- Click New to display the Access Control Editor.
- On the Users/Groups tab, in the ACI name field, type "Write Subscribers". In the list of users granted access permission, do the following:
- Select and remove All Users, then click Add.
The Add Users and Groups dialog box is displayed.
- Set the Search area to Special Rights, and select Self from the Search results list.
- Click the Add button to list Self in the list of users who are granted access permission.
- Click OK to dismiss the Add Users and Groups dialog box.
- On the Rights tab, tick the checkbox for write. Make sure the other checkboxes are clear.
- On the Targets tab, click This Entry to display the dc=subscribers, dc=example,dc=com suffix in the target directory entry field.
- In the filter for subentries field, type the following filter:
(!(unlistedSubscriber=yes))
- In the attribute table, tick the checkboxes for the homePhone, homePostalAddress, and mail attributes.
All other checkboxes should be clear. This task is made easier if you click the Check None button to clear the checkboxes for all attributes in the table, then click the Name header to organize them alphabetically, and select the appropriate ones.
- If you want users to authenticate using SSL, switch to manual editing by clicking the Edit Manually button and add authmethod=ssl to the LDIF statement so that it reads as follows:
- Click OK.
The new ACI is added to the ones listed in the Access Control Manager window.
Restricting Access to Key Roles
You can use role definitions in the directory to identify functions that are critical to your business, the administration of your network and directory, or another purpose.
For example, you might create a superAdmin role by identifying a subset of your system administrators that are available at a particular time of day and day of the week at corporate sites worldwide. Or you might want to create a First Aid role that includes all members of staff on a particular site that have done first aid training. For information on creating role definitions, refer to "Assigning Roles".
When a role gives any sort of privileged user rights over critical corporate or business functions, you should consider restricting access to that role. For example, at example.com, employees can add any role to their own entry, except the superAdmin role. This is illustrated in the ACI "Roles" example.
ACI "Roles"
In LDIF, to grant example.com employees the right to add any role to their own entry, except the superAdmin role, you would write the following statement:
(nsRoleDN !="cn=superAdmin, dc=example, dc=com")")
(version 3.0; acl "Roles"; allow (write)
userdn= "ldap:///self" and dns="*.example.com";)This example assumes that the ACI is added to the ou=People,dc=example, dc=com entry.
From the console, you can set this permission by doing the following:
- On the Directory tab, right click the example.com node in the left navigation tree, and choose Set Access Permissions from the pop-up menu to display the Access Control Manager.
- Click New to display the Access Control Editor.
- On the Users/Groups tab, in the ACI name field, type "Roles". In the list of users granted access permission, do the following:
- Select and remove All Users, then click Add.
The Add Users and Groups dialog box is displayed.
- Set the Search area in the Add Users and Groups dialog box to Special Rights, and select Self from the Search results list.
- Click the Add button to list Self in the list of users who are granted access permission.
- Click OK to dismiss the Add Users and Groups dialog box.
- On the Rights tab, tick the checkbox for write. Make sure the other checkboxes are clear.
- On the Hosts tab, click Add to display the Add Host Filter dialog box. In the DNS host filter field, type *.example.com. Click OK to dismiss the dialog box.
- To create the value-based filter for roles, switch to manual editing by clicking the Edit Manually button. Add the following to the beginning of the LDIF statement:
(targattrfilters="add=nsRoleDN:(nsRoleDN != "cn=superAdmin, dc=example,dc=com")")
The LDIF statement should read as follows:
(targetattr="*") (targattrfilters="add=nsRoleDN:(nsRoleDN != "cn=superAdmin, dc=example,dc=com")") (target = "ldap:///dc=example,dc=com") (version 3.0; acl "Roles"; allow (write) (userdn = "ldap:///self") and (dns="*.example.com");)
- Click OK.
The new ACI is added to the ones listed in the Access Control Manager window.
Granting a Group Full Access to a Suffix
Most directories have a group that is used to identify certain corporate functions. These groups can be given full access to all or part of the directory. By applying the access rights to the group, you can avoid setting the access rights for each member individually. Instead, you grant users these access rights simply by adding them to the group.
For example, when you install the Directory Server using the Typical Install process, an Administrators group with full access to the directory is created by default.
At example.com, the Human Resources group is allowed full access to the ou=People branch of the directory so that they can update the employee directory. This is illustrated in the ACI "HR" example.
ACI "HR"
In LDIF, to grant the HR group all rights on the employee branch of the directory, you would use the following statement:
userdn= "ldap:///cn=HRgroup,ou=People,dc=example,dc=com";)This example assumes that the ACI is added to the ou=People,dc=example,dc=com entry.
From the console, you can set this permission by doing the following:
- On the Directory tab, right click the example.com-people entry under the example.com node in the left navigation tree, and choose Set Access Permissions from the pop-up menu to display the Access Control Manager.
- Click New to display the Access Control Editor.
- On the Users/Groups tab, in the ACI name field, type "HR". In the list of users granted access permission, do the following:
- Select and remove All Users, then click Add.
The Add Users and Groups dialog box is displayed.
- Set the Search area to Users and Groups, and type "HRgroup" in the Search for field.
This example assumes that you have created an HR group or role. For more information on groups and roles, see Chapter 5 "Advanced Entry Management."
- Click the Add button to list the HR group in the list of users who are granted access permission.
- Click OK to dismiss the Add Users and Groups dialog box.
- On the Rights tab, click the Check All button.
All checkboxes are ticked, except for Proxy rights.
- Click OK.
The new ACI is added to the ones listed in the Access Control Manager window.
Granting Rights to Add and Delete Group Entries
Some organizations want to allow employees to create entries in the tree if it can increase their efficiency, or if it can contribute to the corporate dynamics.
At example.com for example, there is an active social committee that is organized into various clubs: tennis, swimming, skiing, role-playing, etc. Any example.com employee can create a group entry representing a new club. This is illustrated in the ACI "Create Group" example. Any example.com employee can become a member of one of these groups. This is illustrated in ACI "Group Members" under "Allowing Users to Add or Remove Themselves From a Group". Only the group owner can modify or delete a group entry. This is illustrated in the ACI "Delete Group" example.
ACI "Create Group"
In LDIF, to grant example.com employees the right to create a group entry under the ou=Social Committee branch, you would write the following statement:
(targetattr="*")(targattrfilters="add=objectClass:
(objectClass=groupOfNames)") (version 3.0; acl "Create Group";
allow (read,search,add) (userdn= "ldap:///uid=*,ou=People,
dc=example,dc=com") and dns="*.example.com";)
Note This ACI does not grant write permission, which means that the entry creator cannot modify the entry.
This example assumes that the ACI is added to the ou=social committee, dc=example,dc=com entry.
From the console, you can set this permission by doing the following:
- On the Directory tab, right click the Social Committee entry under the example.com node in the left navigation tree, and choose Set Access Permissions from the pop-up menu to display the Access Control Manager.
- Click New to display the Access Control Editor.
- On the Users/Groups tab, in the ACI name field, type "Create Group". In the list of users granted access permission, do the following:
- Select and remove All Users, then click Add.
The Add Users and Groups dialog box is displayed.
- Set the Search area to Special Rights, and select All Authenticated Users from the Search results list.
- Click the Add button to list All Authenticated Users in the list of users who are granted access permission.
- Click OK to dismiss the Add Users and Groups dialog box.
- On the Rights tab, tick the checkbox for read, search, and add. Make sure the other checkboxes are clear.
- On the Targets tab, click This Entry to display the ou=social committee, dc=example,dc=com suffix in the target directory entry field.
- On the Hosts tab, click Add to display the Add Host Filter dialog box. In the DNS host filter field, type *.example.com. Click OK to dismiss the dialog box.
- To create the value-based filter that will allow employees to add only group entries to this subtree, switch to manual editing by clicking the Edit Manually button. Add the following to the beginning of the LDIF statement:
(targattrfilters="add=objectClass:(objectClass=groupOfNames)")
The LDIF statement should read as follows:
(targetattr = "*") (targattrfilters="add=objectClass:(objectClass=groupOfNames)") (target="ldap:///ou=social committee,dc=example,dc=com) (version 3.0; acl "Create Group"; allow (read,search,add) (userdn= "ldap:///all") and (dns="*.example.com"); )
- Click OK.
The new ACI is added to the ones listed in the Access Control Manager window.
ACI "Delete Group"
In LDIF, to grant example.com employees the right to modify or delete a group entry which they own under the ou=Social Comittee branch, you would write the following statement:
(targetattr = "*")
(targattrfilters="del=objectClass:(objectClass=groupOfNames)")
(version 3.0; acl "Delete Group"; allow (write,delete)
userattr="owner#GROUPDN";)This example assumes that the aci is added to the ou=social committee, dc=example,dc=com entry.
Using the console is not an effective way of creating this ACI because you would have to use manual editing mode to create the target filter, and to check group ownership.
Granting Conditional Access to a Group or Role
In many cases, when you grant a group or role privileged access to the directory, you want to ensure that those privileges are protected from intruders trying to impersonate your privileged users. Therefore, in many cases, access control rules that grant critical access to a group or role are often associated with a number of conditions.
example.com, for example, has created a Directory Administrator role for each of its hosted companies, Company333 and Company999. It wants these companies to be able to manage their own data and implement their own access control rules while securing it against intruders. For this reason, Company333 and Company999 have full rights on their respective branches of the directory tree, provided the following conditions are fulfilled:
- Connection authenticated using a certificate over SSL,
- Access requested between 8 am and 6 pm, Monday through Thursday, and
- Access requested from a specified IP address for each company.
These conditions are illustrated in a single ACI for each company, ACI "Company333" and ACI "Company999". Because the content of these ACIs is the same, the examples below illustrate the "Company333" ACI only.
ACI "Company333"
In LDIF, to grant Company333 full access to their own branch of the directory under the conditions stated above, you would write the following statement:
(targetattr = "*") (version 3.0; acl "Company333"; allow (all)
(roledn="ldap:///cn=DirectoryAdmin,ou=Company333,
ou=corporate-clients,dc=example,dc=com") and (authmethod="ssl")
and (dayofweek="Mon,Tues,Wed,Thu") and (timeofday >= "0800" and
timeofday <= "1800") and (ip="255.255.123.234"); )This example assumes that the ACI is added to the ou=Company333, ou=corporate-clients,dc=example,dc=com entry.
From the console, you can set this permission by doing the following:
- On the Directory tab, right click the Company333 entry under the example.com node in the left navigation tree, and choose Set Access Permissions from the pop-up menu to display the Access Control Manager.
- Click New to display the Access Control Editor.
- On the Users/Groups tab, in the ACI name field, type "Company333". In the list of users granted access permission, do the following:
- Select and remove All Users, then click Add.
The Add Users and Groups dialog box is displayed.
- Set the Search area to Users and Groups, and type DirectoryAdmin in the Search For field.
This example assumes that you have created an administrators role with a cn of DirectoryAdmin.
- Click the Add button to list the administrators role in the list of users who are granted access permission.
- Click OK to dismiss the Add Users and Groups dialog box.
- On the Rights tab, click the Check All button.
- On the Targets tab, click This Entry to display the ou=Company333,ou=corporate-clients,dc=example,dc=com suffix in the target directory entry field.
- On the Hosts tab, click Add to display the Add Host Filter dialog box. In the IP address host filter field, type 255.255.123.234. Click OK to dismiss the dialog box.
The IP address must be a valid IP address for the host machine that the Company333 administrators will use to connect to the example.com directory.
- On the Times tab, select the block time corresponding to Monday through Thursday, and 8 am to 6 pm.
A message appears below the table that specifies what time block you have selected.
- To enforce SSL authentication from Company333 administrators, switch to manual editing by clicking the Edit Manually button. Add the following to the end of the LDIF statement:
and (authmethod="ssl")
The LDIF statement should be similar to:
aci: (targetattr = "*")(target="ou=Company333,
ou=corporate-clients,dc=example,dc=com") (version 3.0; acl
"Company333"; allow (all) (roledn="ldap:///cn=DirectoryAdmin,
ou=Company333,ou=corporate-clients, dc=example,dc=com") and
(dayofweek="Mon,Tues,Wed,Thu") and (timeofday >= "0800" and
timeofday <= "1800") and (ip="255.255.123.234") and
(authmethod="ssl"); )
- Click OK.
The new ACI is added to the ones listed in the Access Control Manager window.
Denying Access
If your directory holds business-critical information, you might specifically want to deny access to it.
For example, example.com wants all subscribers to be able to read billing information such as connection time or account balance under their own entries, but explicitly wants to deny write access to that information. This is illustrated in ACI "Billing Info Read" and ACI "Billing Info Deny" respectively.
ACI "Billing Info Read"
In LDIF, to grant subscribers permission to read billing information in their own entry, you would write the following statement:
(version 3.0; acl "Billing Info Read"; allow (search,read)
userdn="ldap:///self";)This example assumes that the relevant attributes have been created in the schema, and that the ACI is added to the ou=subscribers,dc=example,dc=com entry.
From the console, you can set this permission by doing the following:
- On the Directory tab, right click the subscribers entry under the example.com node in the left navigation tree, and choose Set Access Permissions from the pop-up menu to display the Access Control Manager.
- Click New to display the Access Control Editor.
- On the Users/Groups tab, in the ACI name field, type "Billing Info Read". In the list of users granted access permission, do the following:
- Select and remove All Users, then click Add.
The Add Users and Groups dialog box is displayed.
- Set the Search area in the Add Users and Groups dialog box to Special Rights, and select Self from the Search results list.
- Click the Add button to list Self in the list of users who are granted access permission.
- Click OK to dismiss the Add Users and Groups dialog box.
- On the Rights tab, tick the checkboxes for search and read rights. Make sure the other checkboxes are clear.
- On the Targets tab, click This Entry to display the ou=subscribers, dc=example,dc=com suffix in the target directory entry field. In the attribute table, tick the checkboxes for the connectionTime and accountBalance attributes.
All other checkboxes should be clear. This task is made easier if you click the Check None button to clear the checkboxes for all attributes in the table, then click the Name header to organize them alphabetically, and select the appropriate ones.
This example assumes that you have added the connectionTime and accountBalance attributes to the schema.
- Click OK.
The new ACI is added to the ones listed in the Access Control Manager window.
ACI "Billing Info Deny"
In LDIF, to deny subscribers permission to modify billing information in their own entry, you would write the following statement:
(version 3.0; acl "Billing Info Deny";
deny (write) userdn="ldap:///self";)This example assumes that the relevant attributes have been created in the schema, and that the ACI is added to the ou=subscribers,dc=example,dc=com entry.
From the console, you can set this permission by doing the following:
- On the Directory tab, right click the subscribers entry under the example.com node in the left navigation tree, and choose Set Access Permissions from the pop-up menu to display the Access Control Manager.
- Click New to display the Access Control Editor.
- On the Users/Groups tab, in the ACI name field, type "Billing Info Deny". In the list of users granted access permission, do the following:
- Select and remove All Users, then click Add.
The Add Users and Groups dialog box is displayed.
- Set the Search area in the Add Users and Groups dialog box to Special Rights, and select Self from the Search results list.
- Click the Add button to list Self in the list of users who are granted access permission.
- Click OK to dismiss the Add Users and Groups dialog box.
- On the Rights tab, tick the checkbox for write. Make sure the other checkboxes are clear.
- Click the Edit Manually button and in the LDIF statement that is displayed, change the word allow to deny.
- On the Targets tab, click This Entry to display the ou=subscribers, dc=example,dc=com suffix in the target directory entry field. In the attribute table, tick the checkboxes for the connectionTime and accountBalance attributes.
All other checkboxes should be clear. This task is made easier if you click the Check None button to clear the checkboxes for all attributes in the table, then click the Name header to organize them alphabetically, and select the appropriate ones.
This example assumes that you have added the connectionTime and accountBalance attributes to the schema.
- Click OK.
The new ACI is added to the ones listed in the Access Control Manager window.
Setting a Target Using Filtering
If you want to set access controls that allow access to a number of entries that are spread across the directory, you may want to use a filter to set the target. Keep in mind that because search filters do not directly name the object for which you are managing access, it is easy to unintentionally allow or deny access to the wrong objects, especially as your directory becomes more complex. Additionally, filters can make it difficult for you to troubleshoot access control problems within your directory.
Allowing Users to Add or Remove Themselves From a Group
Many directories set ACIs that allow users to add or remove themselves from groups. This is useful, for example, for allowing users to add and remove themselves from mailing lists.
At example.com, employees can add themselves to any group entry under the ou=social committee subtree. This is illustrated in the ACI "Group Members" example.
ACI "Group Members"
In LDIF, to grant example.com employees the right to add or delete themselves from a group, you would write the following statement:
allow (selfwrite)
(userdn= "ldap:///uid=*,ou=People,dc=example,dc=com") ;)This example assumes that the ACI is added to the ou=social committee, dc=example,dc=com entry.
From the console, you can set this permission by doing the following:
- On the Directory tab, right click the People entry under the example.com node in the left navigation tree, and choose Set Access Permissions from the pop-up menu to display the Access Control Manager.
- Click New to display the Access Control Editor.
- On the Users/Groups tab, in the ACI name field, type "Group Members". In the list of users granted access permission, do the following:
- Select and remove All Users, then click Add.
The Add Users and Groups dialog box is displayed.
- Set the Search area in the Add Users and Groups dialog box to Special Rights, and select All Authenticated Users from the Search results list.
- Click the Add button to list All Authenticated Users in the list of users who are granted access permission.
- Click OK to dismiss the Add Users and Groups dialog box.
- On the Rights tab, tick the checkbox for selfwrite. Make sure the other checkboxes are clear.
- On the Targets tab, type dc=example,dc=com suffix in the target directory entry field. In the attribute table, tick the checkbox for the member attribute.
All other checkboxes should be clear. This task is made easier if you click the Check None button to clear the checkboxes for all attributes in the table, then click the Name header to organize them alphabetically, and select the appropriate ones.
- Click OK.
The new ACI is added to the ones listed in the Access Control Manager window.
Defining Permissions for DNs That Contain a Comma
DNs that contain commas require special treatment within your LDIF ACI statements. In the target and bind rule portions of the ACI statement, commas must be escaped by a single backslash (\). The following example illustrates this syntax:
objectClass: top
objectClass: organization
aci: (target="ldap:///o=example.com Bolivia\,S.A.")
(targetattr="*") (version 3.0; acl "aci 2"; allow (all)
groupdn = "ldap:///cn=Directory Administrators,
o=example.com Bolivia\, S.A.";)Proxy Authorization ACI Example
The proxy authorization method is a special form of authentication: a user that binds to the directory using its own identity is granted through proxy authorization the rights of another user.
For this example, suppose:
- The client application's bind DN is uid=MoneyWizAcctSoftware, ou=Applications,dc=example,dc=com.
- The targeted subtree to which the client application is requesting access is ou=Accounting,dc=example,dc=com.
- An Accounting Administrator with access permissions to the ou=Accounting,dc=example,dc=com subtree exists in the directory.
In order for the client application to gain access to the Accounting subtree (using the same access permissions as the Accounting Administrator):
- The Accounting Administrator must have access permissions to the ou=Accounting,dc=example,dc=com subtree. For example, the following ACI grants all rights to the Accounting Administrator entry:
(targetattr="*") (version 3.0; acl "allowAll-AcctAdmin"; allow
(all) userdn="uid=AcctAdministrator,ou=Administrators,
dc=example,dc=com")
- The following ACI granting proxy rights to the client application must exist in the directory:
(targetattr="*") (version 3.0; acl "allowproxy-
accountingsoftware"; allow (proxy) userdn=
"uid=MoneyWizAcctSoftware,ou=Applications,dc=example,dc=com")With this ACI in place, the MoneyWizAcctSoftware client application can bind to the directory and send an LDAP command such as ldapsearch or ldapmodify that requires the access rights of the proxy DN.
In the above example, if the client wanted to perform an ldapsearch command, the command would include the following controls:
-D "uid=MoneyWizAcctSoftware,ou=Applications,dc=example,dc=com"\
-w password\
-y "uid=AcctAdministrator,ou=Administrators,dc=example,dc=com"\ ...Note that the client binds as itself, but is granted the privileges of the proxy entry. The client does not need the password of the proxy entry.
Viewing Effective Rights
When maintaining the access policy on the entries of a directory, it is very helpful to know what are the effects on security of the ACIs you define. Sun ONE Directory Server 5.2 introduces a new mechanism to evaluate existing ACIs and report the effective rights that they grant for a given user on a given entry.
Directory Server will respond to the new "Get Effective Rights" control which may be included in a search operation. The response to this control is to return the effective rights information about the entries and attributes in the search results. This extra information includes read and write permissions for each entry and for each attribute in each entry. The permissions may be requested for the bind DN used for the search or for an arbitrary DN, allowing administrators to test the permissions of directory users.
Effective rights functionality relies on an LDAP control. To view the effective rights on a chained suffix, you must enable this control in the chaining policy, as described in "Configuring the Chaining Policy". You must also ensure that the proxy identity used to bind to the remote server is also allowed to access the effective rights attribtues.
Using the Get Effective Rights Control
Specify the "Get Effective Rights" control by using the ldapsearch command with the -J "1.3.6.1.4.1.42.2.27.9.5.2" option. By default, the control will return the effective rights of the bind DN entry on the entries and attributes in the search results. Use the following options to change the default behavior:
- -c "dn: DN" - The search results will show the effective rights of the user binding with the given DN. This option allows an administrator to check the effective rights of another user. The option -c "dn:" will show the effective rights for anonymous authenticaiton.
- -X "attributeName ..." - The search results will also include the effective rights on the named attributes. Use this option to specify attributes that will not appear in the search results. For example, use this option to determine if a user has permission to add an attribute that does not currently exist in an entry.
When using either or both the -c and -X attributes, the -J option with the OID of the "Get Effective Rights" control is implied and does not need to be specified.
Then you must select the type of information you wish to view, either the simple rights or the more detailed logging information that explains how those rights are granted or denied. The type of information is determined by adding either aclRights or aclRightsInfo;logs, respectively, as an attribute to return in the search results. You may request both attributes to receive all effective rights information, although the simple rights are redundant with the information in the detailed logging information.
The following example shows how a user may view her rights in the directory. In the results, a 1 means that permission is granted, and a 0 means that permission is denied:
-h rousseau.example.com -p 389 \
-D "uid=cfuente,ou=People,dc=example,dc=com" \
-w password -b "dc=example,dc=com" \
"(objectclass=*)" aclRights
aclRights;entryLevel: add:0,delete:0,read:1,write:0,proxy:0
aclRights;entryLevel: add:0,delete:0,read:1,write:0,proxy:0
aclRights;entryLevel: add:0,delete:0,read:1,write:0,proxy:0
aclRights;entryLevel: add:0,delete:0,read:1,write:0,proxy:0
aclRights;entryLevel: add:0,delete:0,read:1,write:0,proxy:0
aclRights;entryLevel: add:0,delete:0,read:1,write:0,proxy:0
aclRights;entryLevel: add:0,delete:0,read:1,write:1,proxy:0This result shows Carla Fuente the entries in the directory where she has at least read permission and that she can modify her own entry. The effective rights control does not bypass normal access permissions, so a user will never see the entries for which they do not have read permission. In the following example, the Directory Manager can see the entries to which Carla Fuente does not have read permission:
-D "cn=Directory Manager" -w password \
-c "dn: uid=cfuente,ou=People,dc=example,dc=com" \
-b "dc=example,dc=com" \
"(objectclass=*)" aclRights
aclRights;entryLevel: add:0,delete:0,read:1,write:0,proxy:0
aclRights;entryLevel: add:0,delete:0,read:1,write:0,proxy:0
aclRights;entryLevel: add:0,delete:0,read:0,write:0,proxy:0
aclRights;entryLevel: add:0,delete:0,read:0,write:0,proxy:0
aclRights;entryLevel: add:0,delete:0,read:1,write:0,proxy:0
aclRights;entryLevel: add:0,delete:0,read:1,write:0,proxy:0
aclRights;entryLevel: add:0,delete:0,read:1,write:0,proxy:0
aclRights;entryLevel: add:0,delete:0,read:1,write:0,proxy:0
aclRights;entryLevel: add:0,delete:0,read:1,write:1,proxy:0In the output above, the directory manager can see that Carla Fuente cannot even view the Special Users nor the Directory Administrators branches of the directory tree. In the following example, the directory manager can see that Carla Fuente cannot modify the mail and manager attributes in her own entry:
-D "cn=Directory Manager" -w password \
-c "dn: uid=cfuente,ou=People,dc=example,dc=com" \
-b "dc=example,dc=com" \
"(uid=cfuente)" aclRights "*"
dn: uid=cfuente, ou=People, dc=example,dc=com
write:0,selfwrite_add:0,selfwrite_delete:0,proxy:0
mail: cfuente@example.com
write:1,selfwrite_add:1,selfwrite_delete:1,proxy:0
uid: cfuente
write:1,selfwrite_add:1,selfwrite_delete:1,proxy:0
givenName: Carla
write:1,selfwrite_add:1,selfwrite_delete:1,proxy:0
sn: Fuente
write:1,selfwrite_add:1,selfwrite_delete:1,proxy:0
cn: Carla Fuente
compare:0,write:1,selfwrite_add:1,selfwrite_delete:1,proxy:0
userPassword: {SSHA}wnbWHIq2HPiY/5ECwe6MWBGx2KMiZ8JmjF80Ow==
write:0,selfwrite_add:0,selfwrite_delete:0,proxy:0
manager: uid=bjensen,ou=People,dc=example,dc=com
write:1,selfwrite_add:1,selfwrite_delete:1,proxy:0
telephoneNumber: (234) 555-7898
write:1,selfwrite_add:1,selfwrite_delete:1,proxy:0
objectClass: top
objectClass: person
objectClass: organizationalPerson
objectClass: inetorgpersonThe format of the aclRights and aclRightsInfo;logs attributes is described in detail in "Understanding the Effective Rights Results," in Chapter 7 of the Sun ONE Directory Server Deployment Guide.
Advanced Access Control: Using Macro ACIs
In organizations that use repeating directory tree structures, it is possible to optimize the number of ACIs used in the directory by using macros. Reducing the number of ACIs in your directory tree makes it easier to manage your access control policy, and improves the efficiency of ACI memory usage.
Macros are placeholders that are used to represent a DN or a portion of a DN in an ACI. You can use a macro to represent a DN in the target portion of the ACI, in the bind rule portion, or in both. In practice, when Directory Server gets an incoming LDAP operation, the ACI macros are matched against the resource targeted by the LDAP operation to deterime a matching substring, if any. If there is a match, the bind rule-side macro is expanded using the matched substring, and access to the resource is determined by evaluating that expanded bind rule.
Macro ACI Example
The benefits of macro ACIs and how they work are best explained using an example. Figure 6-4 shows a directory tree in which using macro ACIs is an effective way of reducing the overall number of ACIs.
In this illustration, note the repeating pattern of subdomains with the same tree structure (ou=groups, ou=people). This pattern is also repeated across the tree, because the example.com directory tree stores the following suffixes dc=hostedCompany2,dc=example,dc=com, and dc=hostedCompany3,dc=example,dc=com.
The ACIs that apply in the directory tree also have a repeating pattern. For example, the following ACI is located on the dc=hostedCompany1,dc=example,dc=com node:
(targetfilter=(objectClass=nsManagedDomain))(version 3.0;
acl "Domain access"; allow (read,search) groupdn=
"ldap:///cn=DomainAdmins,ou=Groups,dc=hostedCompany1,
dc=example,dc=com";)This ACI grants read and search rights to the DomainAdmins group to any entry in the dc=hostedCompany1,dc=example,dc=com tree.
Figure 6-4 Example Directory Tree for Macro ACIs
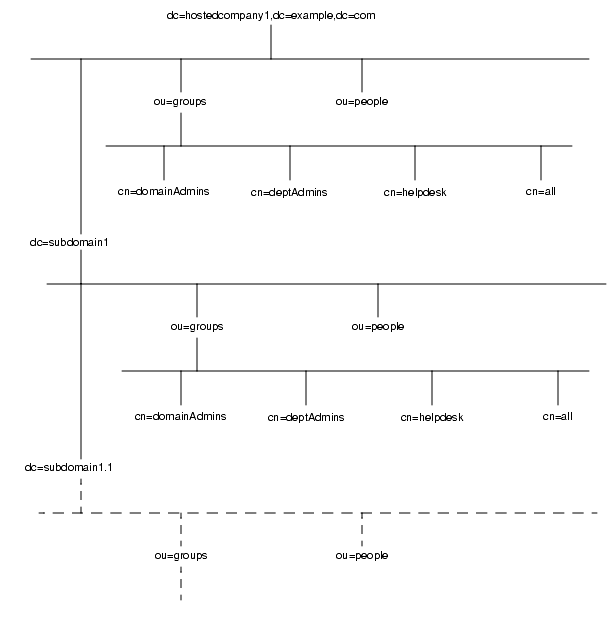
The following ACI is located on the dc=hostedCompany1,dc=example,dc=com node:
(targetfilter=(objectClass=nsManagedDomain))
(version 3.0; acl "Domain access"; allow (read,search)
groupdn="ldap:///cn=DomainAdmins,ou=Groups,dc=hostedCompany1,
dc=example,dc=com";)The following ACI is located on the dc=subdomain1,dc=hostedCompany1, dc=example,dc=com node:
(targetfilter=(objectClass=nsManagedDomain))
(version 3.0; acl "Domain access"; allow (read,search)
groupdn="ldap:///cn=DomainAdmins,ou=Groups,dc=subdomain1,
dc=hostedCompany1,dc=example,dc=com";)The following ACI is located on the dc=hostedCompany2,dc=example,dc=com node:
(targetfilter=(objectClass=nsManagedDomain))
(version 3.0; acl "Domain access"; allow (read,search)
groupdn="ldap:///cn=DomainAdmins,ou=Groups,dc=hostedCompany2,
dc=example,dc=com";)The following ACI is located on the dc=subdomain1,dc=hostedCompany2, dc=example,dc=com node:
(targetfilter=(objectClass=nsManagedDomain))
(version 3.0; acl "Domain access"; allow (read,search)
groupdn="ldap:///cn=DomainAdmins,ou=Groups, dc=subdomain1,
dc=hostedCompany2,dc=example,dc=com";)In the four ACIs shown above, the only difference is the DN specified in the groupdn keyword. By using a macro for the DN, it is possible to replace these ACIs by a single ACI at the root of the tree, on the dc=example,dc=com node. This ACI reads as follows:
(targetattr="*")(targetfilter=(objectClass=nsManagedDomain))
(version 3.0; acl "Domain access"; allow (read,search) groupdn=
"ldap:///cn=DomainAdmins,ou=Groups,[$dn],dc=example,dc=com";)Note that the target keyword which was not previously used needs to be introduced.
In the example above, the number of ACIs is reduced from four to one. However, the real benefit is a factor of how many repeating patterns you have down and across your directory tree.
Macro ACI Syntax
To simplify the discussion in this section, the ACI keywords used to provide bind credentials such as userdn, roledn, groupdn, and userattr, are collectively called the subject of the ACI. The subject determines to whom the ACI applies.
Macro ACIs include the following types of expressions to replace a DN or part of a DN:
- ($dn) - For matching in the target and direct substitution in the subject.
- [$dn] - For substituting multiple RDNs that work in subtrees of the subject.
- ($attr.attributeName) - For substituting the value of the attributeName attribute from the target entry into the subject.
Table 6-3 shows in what parts of the ACI you can use DN macros:
The following restrictions apply:
- When using the ($dn) and [$dn] macros in a subject, you must define a target that contains the ($dn) macro.
- You can combine the ($dn) macro, but not [$dn], with the ($attr.attrName) macro in a subject.
Matching for ($dn) in the Target
The ($dn) macro in the target of an ACI determines the substitution value by comparison to the entry targetted by the LDAP request. For example, you have an LDAP request targeted at the cn=all,ou=groups,dc=subdomain1, dc=hostedCompany1,dc=example,dc=com entry, and an ACI that defines the target as follows:
The ($dn) macro matches with "dc=subdomain1, dc=hostedCompany1". This substring is then used for substitutions in the subject of the ACI.
Substituting ($dn) in the Subject
In the subject of the ACI, the ($dn) macro is replaced by the entire substring that matches in the target. For example:
dc=example,dc=com"becomes:
dc=hostedCompany1,dc=example,dc=com"Once the macro has been expanded, Directory Server evaluates the ACI following the normal process to determine whether access is granted or not.
Substituting [$dn] in the Subject
The substitution mechanism for [$dn] is slightly different than for ($dn). The DN of the targeted resource is examined several times, each time dropping the left-most RDN component, until a match is found.
For example, you have an LDAP request targeted at the cn=all,ou=groups, dc=subdomain1,dc=hostedCompany1,dc=example,dc=com subtree, and the following ACI:
(target="ldap:///ou=Groups,($dn),dc=example,dc=com")
(version 3.0; acl "Domain access"; allow (read,search)
groupdn="ldap:///cn=DomainAdmins,ou=Groups,[$dn],
dc=example,dc=com";)The server proceeds as follows to expand this ACI:
- ($dn) in target matches dc=subdomain1,dc=hostedCompany1.
- Replace [$dn] in the subject with dc=subdomain1,dc=hostedCompany1.
The resulting subject is groupdn="ldap:///cn=DomainAdmins,ou=Groups, dc=subdomain1,dc=hostedCompany1,dc=example,dc=com". If access is granted because the bind DN is a member of that group, the macro expansion stops, and the ACI is evaluated. If it is not a member, the process continues.
- Replace [$dn] in the subject with dc=hostedCompany1.
The resulting subject is groupdn="ldap:///cn=DomainAdmins,ou=Groups, dc=hostedCompany1,dc=example,dc=com". Again, the bind DN is tested as a member of this group and if so, the ACI is evaluated fully. If it is not a member, macro expansion stops with the last RDN of the matched value and ACI evaluation is finished for this ACI.
The advantage of the [$dn] macro is that it provides a flexible way of granting access to domain-level administrators to all the subdomains in the directory tree. Therefore, it is useful for expressing a hierarchical relationship between domains.
For example, consider the following ACI:
(targetattr="*")(targetfilter=(objectClass=nsManagedDomain))
(version 3.0; acl "Domain access"; allow (read,search) groupdn=
"ldap:///cn=DomainAdmins,ou=Groups,[$dn],dc=example,dc=com";)It grants access to the members of cn=DomainAdmins,ou=Groups, dc=hostedCompany1,dc=example,dc=com to all of the subdomains under dc=hostedCompany1, so an administrator belonging to that group could access, for example, the subtree ou=people,dc=subdomain1.1,dc=subdomain1.
However, at the same time, members of cn=DomainAdmins,ou=Groups, dc=subdomain1.1, would be denied access to the ou=people,dc=subdomain1, dc=hostedCompany1 and ou=people,dc=hostedCompany1 nodes.
Macro Matching for ($attr.attrName)
The ($attr.attrname) macro is always used in the subject part of a DN. For example, you could define the following roledn:
dc=example,dc=com"Now, assume the server receives an LDAP operation targeted at the following entry:
cn: Babs Jensen
sn: Jensen
ou: Sales
...In order to evaluate the roledn part of the ACI, the server reads the value of the ou attribute stored in the targeted entry, and substitutes this value in the subject to expand the macro. In the example, the roledn is expanded as follows:
dc=example,dc=com"The Directory Server then evaluates the ACI according to the normal ACI evaluation algorithm.
When the attribute named in the macro is multi-valued, each value is used in turn to expand the macro, and the first one that provides a successful match is used.
Access Control and Replication
ACIs are stored as attributes of entries, therefore, if an entry containing ACIs is part of a replicated suffix, the ACIs are replicated like any other attribute.
ACIs are always evaluated on the Directory Server that services the incoming LDAP requests. This means that when a consumer server receives an update request, it will return a referral to the master server before evaluating whether the request can be serviced or not on the master.
Logging Access Control Information
To obtain information on access control in the error logs, you must set the appropriate log level.
To set the error log level from the console:
- On the top-level Directory tab of the Directory Server console, right click the cn=config node, and choose Edit With Generic Editor from the pop-up menu.
This displays the Generic Editor with the contents of the cn=config entry.
- Scroll down the list of attribute value pairs to locate the nsslapd-errorlog-level attribute.
- Add 128 to the value already displayed in the nsslapd-errorlog-level field.
For example, if the value already displayed is 8192 (replication debugging), you should change the value to 8320. For complete information on error log levels, refer to the Sun ONE Directory Server Reference Manual.
- Click OK to save your changes and dismiss the Generic Editor.
Compatibility with Earlier Releases
Some ACI keywords that were used in earlier releases of Directory Server have been deprecated in Sun ONE Directory Server 5.2. However, for reasons of backward compatibility, they are still supported. These keywords are:
- userdnattr
- groupdnattr
Therefore, if you have set up a replication agreement between a legacy supplier server and a consumer Directory Server 5.2, you should not encounter any problems in the replication of ACIs.
However, we recommend that you replace these keywords with the functionality of the userattr keyword, as described in "Defining Access Based on Value Matching".