|
| |
| Sun Java Enterprise System 2003Q4 Deployment Example Series: Evaluation Scenario | |
Chapter 2
Installing the Java Enterprise System Evaluation DeploymentThis chapter shows you how to install the Java Enterprise System components on a single machine for evaluation purposes. You run the Java Enterprise System installer in custom mode, and the installer prompts you for information about many of the system components. The installer uses the values you supply to configure the components.
The other components are configured after installation, using component configuration tools.
This chapter contains the following sections:
For more information about the information you supply in the installer, see Chapter 4, “Gathering Installation and Configuration Information,” and Appendix A, “Worksheets for Gathering Information,” in the Java Enterprise System Installation Guide (http://docs.sun.com/doc/816-6874).
Checking Installation RequirementsBefore you install Java Enterprise System, make sure the computer on which you are installing is ready. The computer should meet the following requirements:
- This deployment example assumes that the computer on which you are installing is running a fresh installation of the Solaris™ 9 Operating System with the necessary patches. Patches are available at http://sunsolve.sun.com. If you install on the Solaris 8 Operating System, some path names will vary slightly from those shown in the example.
- Before you install Java Enterprise System, ensure that you have met the minimum hardware and operating system requirements, as well as patch requirements. For the latest information on the supported platforms, software and hardware requirements, and patches, see the Java Enterprise System Release Notes at http://docs.sun.com/doc/816-6876
- Installing all of the Java Enterprise System components on a one computer requires two gigabytes of free disk space and one gigabyte of system memory. If you have less than one gigabyte of memory, you can install the components, but you may have difficulty starting all of the processes without excessive swapping. In particular, you may not be able to perform the Calendar Server configuration described in Configuring a Calendar Server Instance.
- You must run the installer as root. Ensure you have root access to the computer on which you are installing Java Enterprise System.
Installing the ComponentsYou install Java Enterprise System components by running the Java Enterprise System installer.
To Start the Installer
- Obtain the Java Enterprise System software by one of the following means:
- Log in as root to the machine on which you are installing Java Enterprise System.
- Change to the correct directory.
- If you downloaded the software, change to the directory to which you downloaded it. cd installer-directory/platform-directory
- If you are using a CD, type cd /cdrom/platform-directory
- If you are using a DVD, navigate to the platform directory.
The platform directory is either Solaris_sparc or Solaris_X86.
- Start the Java Enterprise System installer in graphical mode.
./installer
The Java Enterprise System Welcome page opens.
- In the Welcome page, click Next to continue.
The Software License Agreement page opens.
- In the Software License Agreement page, click Yes, Accept License and continue.
The Language Support page opens.
- In the Language Support page, select the languages you want your installation of Java Enterprise System to support. English is always supported. If you need support for additional languages, select them. Click Next.
The Component Selection page opens. Proceed to To Select Components for Installation.
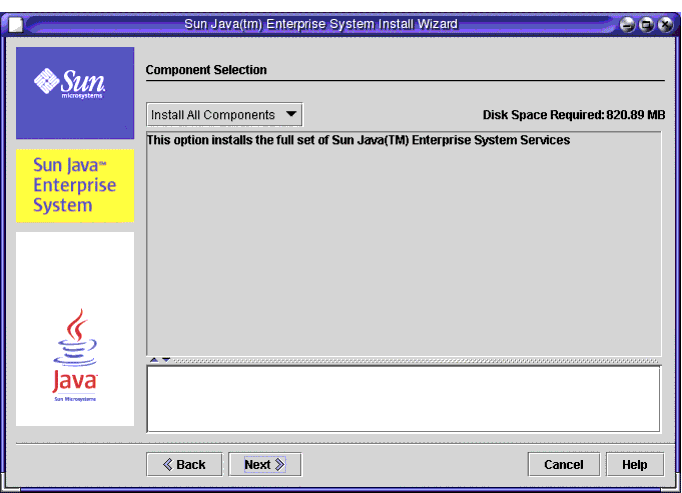
Figure 2-1 Component Selection Page
To Select Components for Installation
- In the Component Selection page, select the components to install. For this evaluation deployment example, you install all Java Enterprise System components.
- If no components are currently installed on the machine, the Install All Components option is available. Choose this option. Click Next and proceed to Step 2.
- If any components are already installed on your machine, you cannot choose Install All Components. Instead, you must select components individually from the list that appears on the Component Selection page. Notice that components and their sub-components are arranged in a tree structure. The components that are already installed on the machine are dimmed.
To select components, you need to expand the tree nodes to see the sub-components. Ensure that you select all components and sub-components. Click Next and proceed to Step 2.
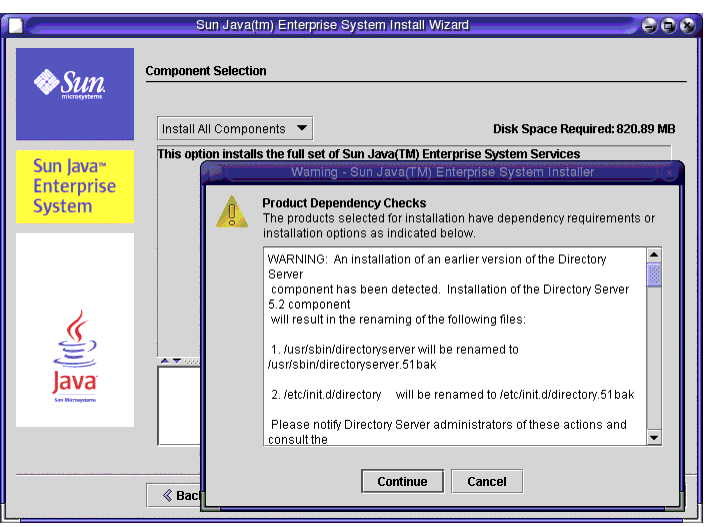
Figure 2-2 Component Product Dependency Warning Message
- The installer validates your selections. The following results are possible:
- If the components that you selected are compatible with each other and with the components that are detected on the system, the installer opens the Shared Components Upgrade Required page. Proceed to Step 3.
- If the components that you selected are not compatible with components that are detected on the system, the installer displays a message that describes the problem. You must resolve the problem described in the message before proceeding. In some cases, you must upgrade or remove the incompatible components that are detected by the installer.
Figure 2-2 shows a common situation. The installer detects an installed version of Directory Server that was included in the default installation of Solaris OS. In this case, the installer prompts you to back up the existing Directory Server and install a new, compatible, Directory Server. If you receive this type of message, click Continue, and then proceed to Step 3.
- If the components you select require other components that you did not select, but for which a remote copy would be acceptable, you can proceed but you receive a warning. For this deployment example you do not want to use remote copies of any components. Ensure all of the necessary components are installed on the same machine, and then proceed to Step 3.
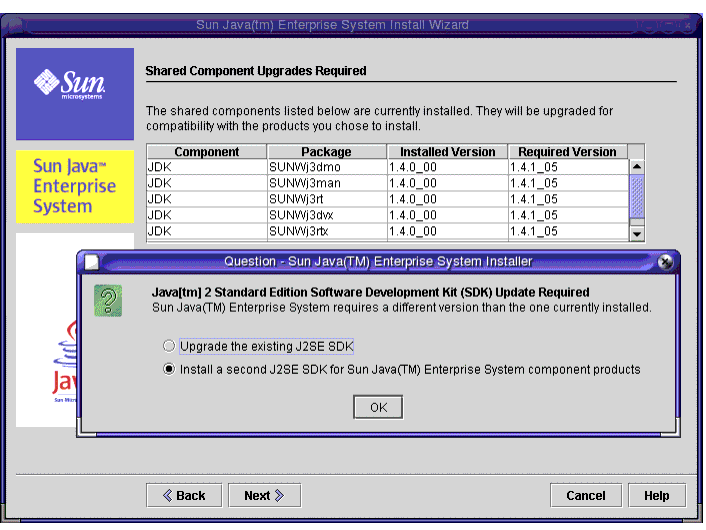
- If an incompatible version of J2SE is installed, a Question message opens above the Shared Components Upgrade Required page and prompts you for how to proceed. This situation is illustrated in Figure 2-3. For the evaluation deployment example, accept the default value (Install a second J2SE SDK for Sun Java(TM) Enterprise system components), and then click OK.
- In the Shared Components Upgrade Required page, review the list of shared components that must be upgraded. The list varies from one Solaris installation to another. Click Next to continue.
The Installation Directories page opens.
- In the Installation Directories page, accept the default directories. Click Next to continue.
The Checking System Requirements page opens.
Tip
For a complete list of component default installation directories, see Chapter 4, “Gathering Installation and Configuration Information,” in the Java Enterprise System Installation Guide.
- The Checking System Requirements page checks your machine against the following system requirements:
- Disk space
- Memory
- Operating system patches
If you receive a low memory warning you can probably ignore it. The evaluation deployment will function adequately with considerably less memory than a production deployment.
When the system check is complete, click Next to continue.
The Configuration Type page opens.
To Select a Configuration Type
- In the Configuration Type page, select Custom Configuration and click Next to continue.
Custom configuration lets you specify configuration values for most of the Java Enterprise System components. The installer configures the components according to the values you specify on the installer pages.
The Custom Configuration page opens.
- The Custom Configuration page displays a message explaining that the Java Enterprise System installer does not configure Instant Messaging, Messaging Server, Calendar Server, or Sun Cluster software. Chapter 3 explains how to configure Calendar Server and Messaging Server.
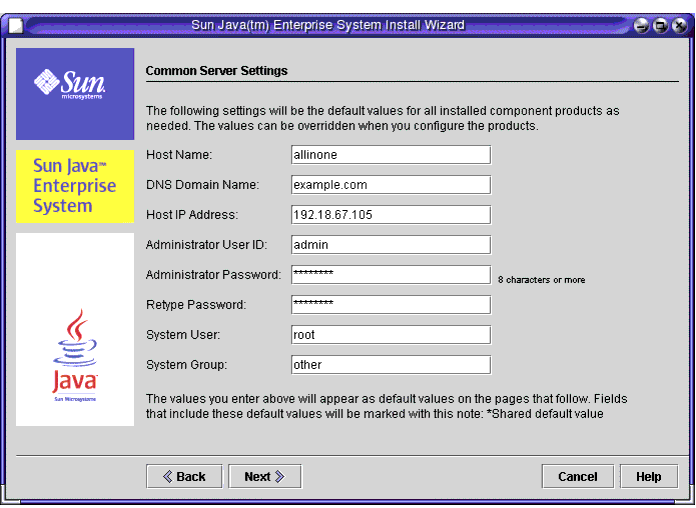
Click Next. The Common Server Settings page opens.
Figure 2-4 Common Server Settings Page
To Supply Common Server Settings
- In the Common Server Settings page:
- Review the default values. The default values are derived from your current session:
- The Host Name field is filled with the name of the machine you are currently logged in to.
- the DNS Domain Name field is filled with the domain that the machine belongs to.
Figure 2-4 shows the default values for a machine named allinone.example.com. The Host Name field is filled with the machine name, allinone, and the DNS Domain Name field is filled with example.com. Your installer should display similar values, derived from the machine on which you are installing.
- Type a password in the Administrator Password and Retype Password fields. For this deployment example, the value password is recommended.
- Click Next. The Web Server: Administration (1 of 2) page opens.
To Supply Web Server Information
- In the Web Server: Administration page, accept the default value and click Next.
The Web Server: Administration (2 of 2) page opens.
- In the Web Server: Default Web Server Instance page, accept the default values. Do not select Automatically start Web Server when system restarts. Click Next.
The Application Server: Administration page opens.
To Supply Application Server Information
To Supply Directory Server Information
- In the Directory Server: Administration (1 of 5) page, accept the default values and click Next.
The Directory Server: Server Settings (2 of 5) page opens.
- In the Directory Server: Server Settings (2 of 5) page, accept the default values and click Next.
The Directory Server: Configuration Directory Server (3 of 5) page opens.
- In the Directory Server: Configuration Directory Server (3 of 5) page, accept the default value (Store configuration data on this server) and click Next.
The Directory Server: Data Storage Location (4 of 5) page opens.
- In the Directory Server: Data Storage Location (4 of 5) page, accept the default value (Store user data and group data on this server) and click Next.
The Directory Server: Populate Data (5 of 5) page opens.
- In the Directory Server: Populate Data (5 of 5) page, accept the default value (the Sample data radio button under the Populate with data checkbox is selected) and click Next.
The Administration Server: Server Settings page opens.
To Supply Administration Server Information
- In the Administration Server: Server Settings (1 of 2) page, accept the default values and click Next.
The Administration Server: Configuration Directory Settings (2 of 2) page opens.
- In the The Administration Server: Configuration Directory Settings (2 of 2) page, accept the default values and click Next.
The Directory Proxy Server: Port Selection page opens.
To Supply Directory Proxy Server Information
- In the Directory Proxy Server: Port Selection page, accept the default values and click Next.
The Directory Proxy Server: Configuration Directory Server Administrator page opens.
- In the Directory Proxy Server: Configuration Directory Server Administrator page, accept the default values and click Next.
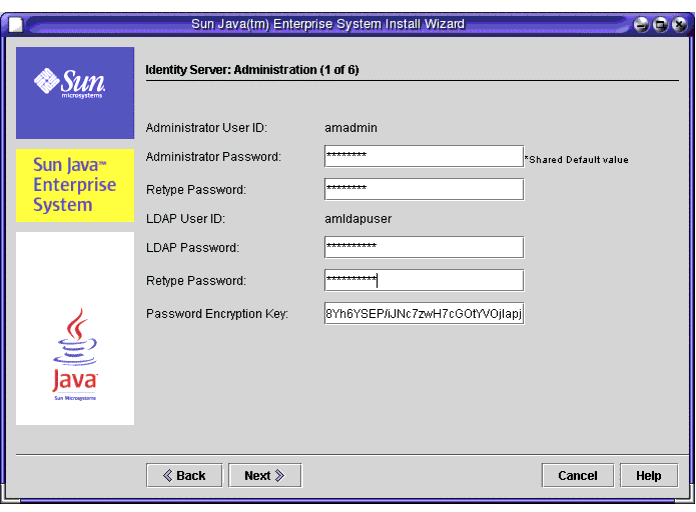
The Identity Server: Administration (1 of 6) page opens.
Figure 2-5 Identity Server: Administration Page
To Supply Identity Server Information
- In the Identity Server: Administration (1 of 6) page, supply an LDAP password. Notice that the Administrator Password field is filled with the default password you supplied on the Common Server Settings page (See To Supply Common Server Settings.) Click Next.
Note
The LDAP password cannot be the same as the Administrator password. For this deployment example, the value ldappassword is recommended.
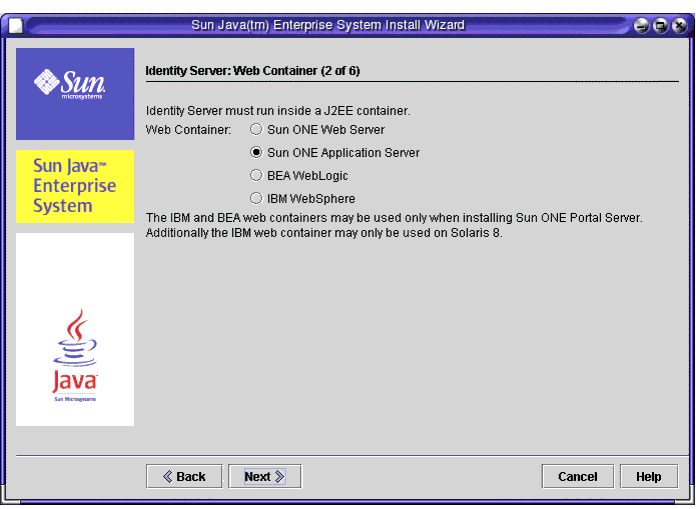
The Identity Server: Web Container page opens.
Figure 2-6 The Identity Server: Web Container page
- In the Identity Server: Web Container (2 of 6) page Select Sun ONE Application Server and click Next.
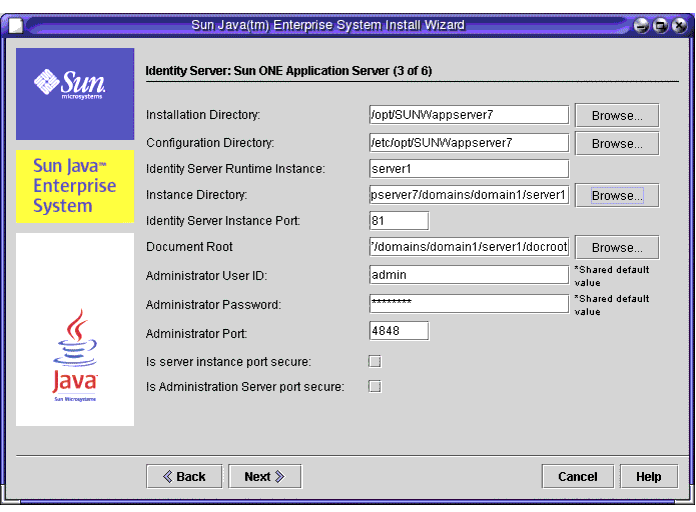
The Identity Server: Sun ONE Application Server (3 of 6) page opens.
Figure 2-7 Identity Server: Sun ONE Application Server Page
- In the Identity Server: Sun ONE Application Server (3 of 6) page, accept the default values and click Next.
The Identity Server: Web Container for running Sun ONE Identity Server Services (4 of 6) page opens.
- In the Identity Server: Web Container for running Sun ONE Identity Server Services (4 of 6) page, accept the default values and click Next.
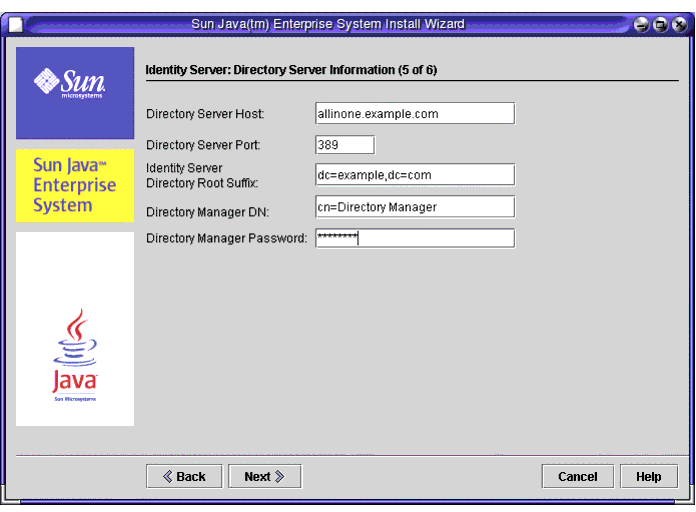
The Identity Server: Directory Server Information (5 of 6) page opens.
Figure 2-8 Identity Server: Directory Server Information Page
- In the Identity Server: Directory Server Information (5 of 6) page, type a Directory Manager password. For this deployment example, the value password is recommended. Click Next.
The Identity Server: Directory Server Information (6 of 6) page opens.
Note
The password you supply must match the Directory Manager password you establish for Directory Server on the Directory Server Administration page. (See To Supply Directory Server Information.)
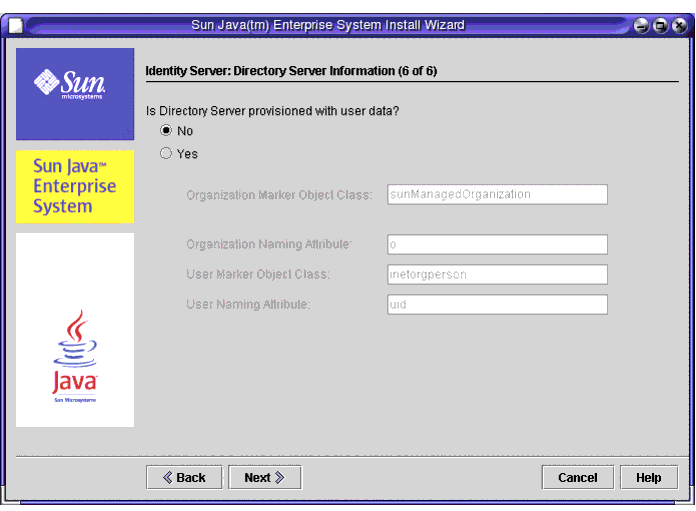
Figure 2-9 Identity Server: Directory Server Information Page
- In the Identity Server: Directory Server Information (6 of 6) page, accept the default value (No), and click Next.
The Portal Server: Web Container page opens.
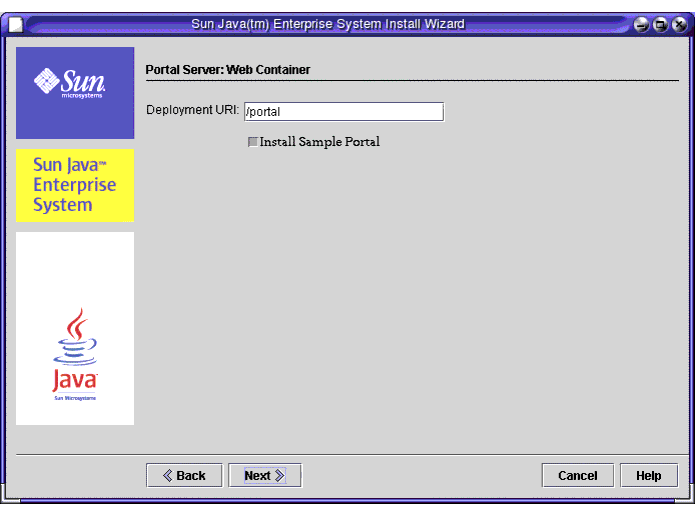
Figure 2-10 Portal Server: Web Container Page
To Supply Portal Server Information
- In the Portal Server: Web Container page, accept the default value (/portal) for Deployment URI. Accept the default state (selected) for the Install Sample Portal checkbox. Click Next.
Tip
Ensure that you select Install Sample Portal. You use the sample portal to verify the messaging and calendar services.
The Portal Server, Secure Remote Access: Gateway Information page opens.
Figure 2-11 Portal Server, Secure Remote Access: Gateway Information Page
To Supply Portal Server, Secure Remote Access Information
- In the Portal Server, Secure Remote Access: Gateway Information page, supply a log user password. For the evaluation deployment example, password is recommended. Click Next.
The Portal Server, Secure Remote Access: Gateway page opens.
- In the Portal Server, Secure Remote Access: Gateway page, accept the default values and click Next.
The Portal Server, Secure Remote Access: Netlet Proxy page opens.
- In the Portal Server, Secure Remote Access: Netlet Proxy page, accept the defaults and click Next.
The Portal Server, Secure Remote Access: Rewriter Proxy page opens.
- In the Portal Server, Secure Remote Access: Rewriter Proxy page, accept the defaults and click Next.
The Portal Server, Secure Remote Access Certificate page opens.
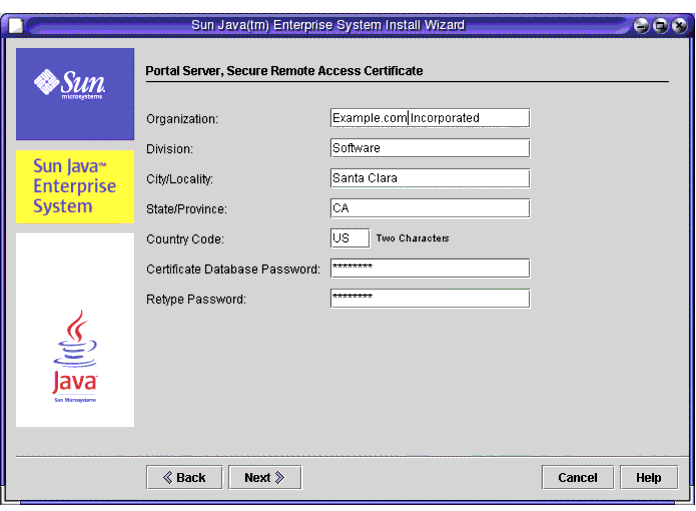
Figure 2-12 Portal Server, Secure Remote Access Certificate Page
- In the Portal Server, Secure Remote Access Certificate page, type a Certificate Database Password. For the evaluation deployment example, password is recommended. Click Next.
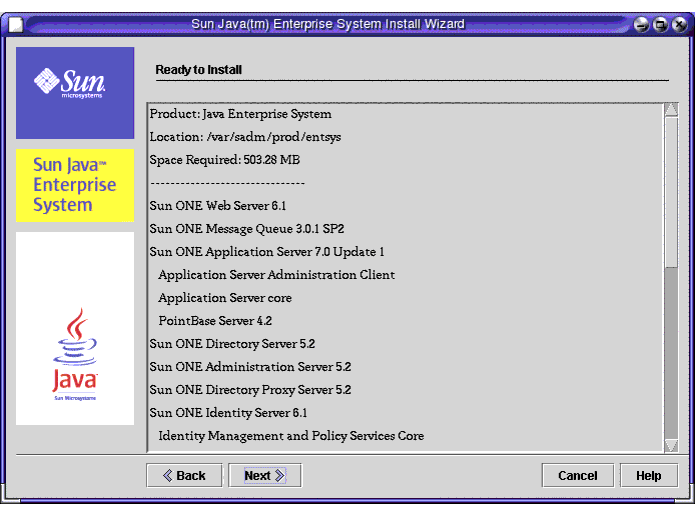
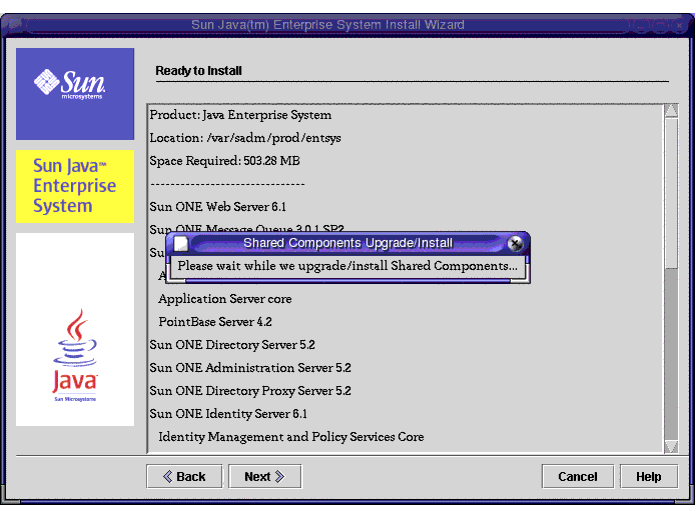
The Ready to Install page opens.
Figure 2-13 Ready to Install Page
To Complete the Installation
- In the Ready to Install page, review the information. Click Next.
The shared components are upgraded.
Figure 2-14 Shared Components Upgrade Message
- When the installer finishes upgrading shared components, it displays the Product Registration page.
- In the Product Registration page, deselect Open Registration Window, and then click Next.
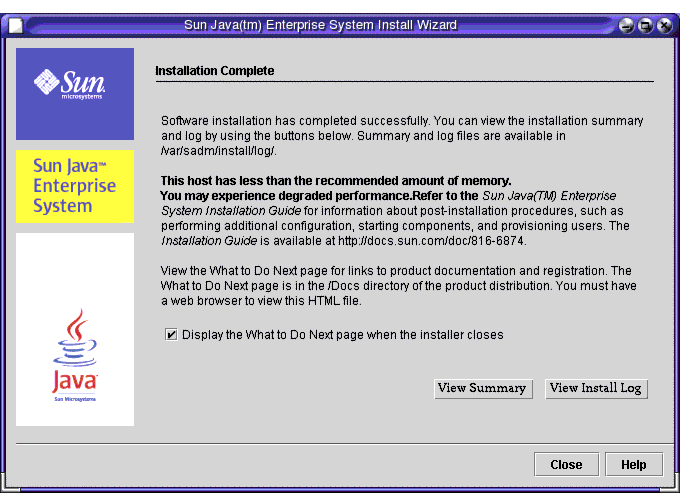
The Installing page opens.
- When the installation is finished, the Installation Complete page opens.
Figure 2-15 Installation Complete Page
- View the installation summary and log, and then click Close.
The What to Do Next page opens.
- Review this page, and then close the web browser.
Uninstalling the ComponentsJava Enterprise System provides an uninstallation program for removing component products that you installed. The uninstaller checks component dependencies for the system on which it is running and issues warnings when it discovers a dependency.
You can find the uninstaller in /var/sadm/prod/entsys.
Full instructions for using the installer are contained in Java Enterprise System Installation Guide, which you can find online at http://docs.sun.com/doc/816-6874.