Installing and Configuring PasswordSync on Windows
This section contains information and instructions for installing and configuring PasswordSync.
This information is organized as follows:
 To Install the PasswordSync Configuration Application
The following procedure describes how to install the PasswordSync configuration application.
Note –
You must install PasswordSync on each domain controller in the domains that will be synchronized with Waveset.
Be sure to uninstall any previously installed versions of PasswordSync before continuing.
-
From the Waveset installation media,
-
If you are installing to a 32-bit version of Windows, double-click pwsync\IdmPwSync_x86.msi.
-
If you are installing to a 64-bit version of Windows, double-click pwsync\IdmPwSync_x64.msi.
The installation wizard opens and the Welcome window displays with the following navigational buttons:
-
Cancel. Click to exit the wizard at any time without saving any of your changes.
-
Back. Click to return to a previous dialog box.
-
Next. Click to progress to the next dialog box.
-
-
Read the information provided on the Welcome screen, and then click Next to display the Choose Setup Type window.
-
Click either Typical or Complete to install the full PasswordSync package, or click Custom to control which parts of the package are installed. Click Next to continue.
-
When the Ready to Install window displays, click Install to install the product.
-
A final window displays. Enable the Launch Configuration Application box so that you can begin configuring Password Sync, and then click Finish to complete the installation process.
Instructions for configuring PasswordSync are provided in Chapter 11, PasswordSync.
Note –A dialog displays, stating that you must restart the system for the changes to take effect. It is not necessary to restart until after you have configured PasswordSync, but you must restart the domain controller before implementing PasswordSync.
Installing and Configuring PasswordSync on Windows describes the files that are installed on each domain controller.
Installed Component
Description
%$INSTALL_DIR$%\configure.exe
PasswordSync configuration program
%$INSTALL_DIR$%\configure.exe.manifest
Data file for the configuration program
%$INSTALL_DIR$%\passwordsyncmsgs.dll
DLL that handles PasswordSync messages
%SYSTEMROOT%\SYSTEM32\lhpwic.dll
Password Notification DLL that implements the Windows PasswordChangeNotify() function
 To Configure PasswordSync
If you run the configuration application from the installer, the application displays the configuration screens as a wizard. After you have completed the wizard, each subsequent time you run the PasswordSync configuration application, you can navigate between screens by selecting a tab.
-
Start the PasswordSync configuration application (if it is not already running).
By default, the configuration application is installed at Program Files -> Waveset PasswordSync -> Configuration.
Note –If you do not plan to use JMS, launch the configuration application from a command line, being sure to include the -direct flag as follows:
C:\InstallDir\Configure.exe -direct
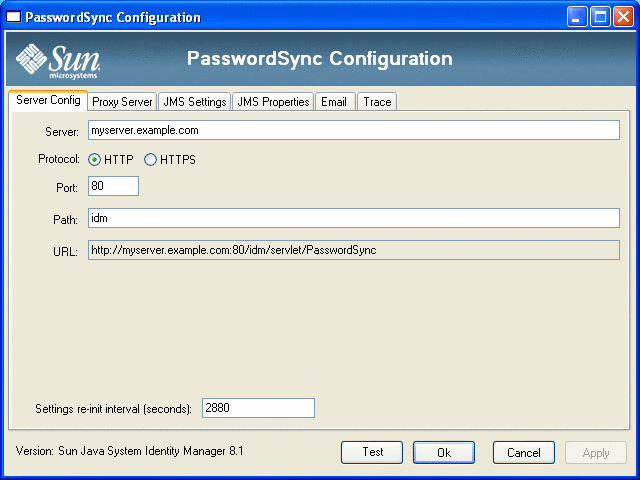
The PasswordSync Configuration wizard dialog is displayed (see Figure 11–4).
Figure 11–4 PasswordSync Configuration Wizard
-
Edit the fields on this dialog as necessary.
These fields include:
-
Server must be replaced with the fully-qualified host name or IP address where Waveset is installed.
-
Protocol indicate whether to make secure connections to Waveset.
PasswordSync supports the configuration of certificate check behavior for HTTPS connections. When you enable HTTPS, the following options display:
-
Allow revoked certificates. This setting maps to the securityIgnoreCertRevoke registry value on the connection. By default, PasswordSync does not ignore revocation issues and the securityIgnoreCertRevoke registry value is set to 0.
If you want PasswordSync to ignore revoked certificate messages, check this box (or set the SECURITY_FLAG_IGNORE_REVOCATION registry value to 1).
-
Allow invalid certificates. This setting affects the SECURITY_FLAG_IGNORE_CERT_CN_INVALID, SECURITY_FLAG_IGNORE_CERT_DATE_INVALID, and SECURITY_FLAG_IGNORE_UNKNOWN_CA options on the connection. By default, PasswordSync does not allow invalid certificates and the registry values are set to 0.
Checking this box, or setting the securityAllowInvalidCert registry value to 1, allows PasswordSync to use certificates that do not pass a number of safety checks. Enabling this option is not recommended for a production environment.
Note –These settings are not displayed for the HTTP protocol type, nor do they affect HTTP settings.
-
-
Port specify an available port for the server. For HTTP, the default port is 80. For HTTPS, the default port is 443.
-
Path specify the path to Waveset on the application server.
-
URL is generated by concatenating the other fields together. The value cannot be edited within the URL field.
-
Settings re-init interval (seconds) specify how often the PasswordSync dll should reread configuration settings from the registry. The default value is 2880 seconds or 8 hours.
Note –This PasswordSync Configuration wizard displays the value in seconds, but the registry value is actually stored in milliseconds.
The PasswordSync dll reads the configuration settings from the registry while the dll is active. This interval value is stored in the reinitIntervalMilli registry value.
Passwords cannot be synchronized while the settings are being updated, which can cause a small delay in processing a password change. Normally this delay is less than a second. PasswordSync processes any password changes received during an update directly after the update has completed. Also, PasswordSync does not process setting updates while a password synchronization is in progress. The update will be rescheduled and performed at a later time.
-
-
Click Next to display the Proxy Server Configuration page (Figure 11–5) and edit the fields as needed.
Figure 11–5 PasswordSync Wizard Proxy Server Dialog
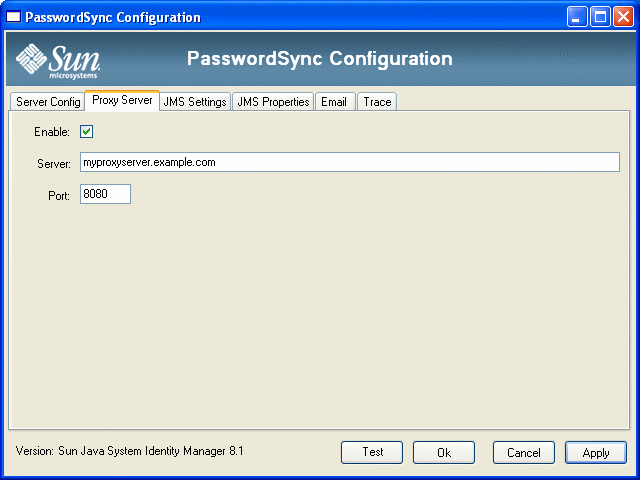
These fields include:
-
Enable. Select if a proxy server is required.
-
Server. You must enter the fully-qualified host name or IP address of the proxy server.
-
Port. Specify an available port number for the server. (The default proxy port is 8080 and the default HTTPS port is 443.)
-
-
Click Next.
Figure 11–6 PasswordSync Wizard JMS Settings Dialog
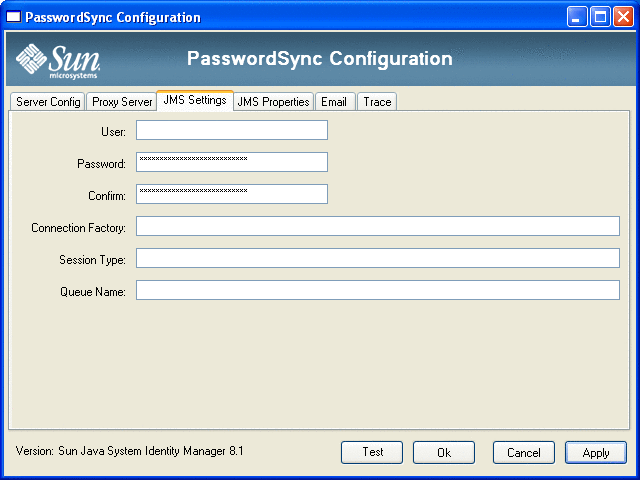
When the JMS Settings dialog (Figure 11–6) appears, perform one of the following actions:
-
Edit the following fields, as needed:
-
User specifies the JMS user name that places new messages on the queue.
-
Password and Confirm specify the password for the JMS user.
-
Connection Factory specifies the name of the JMS connection factory to be used. This factory must already exist on the JMS system.
-
In most cases, Session Type should be set to LOCAL, which indicates that a local session transaction will be used. The session will be committed after each message is received. Other possible values include AUTO, CLIENT, and DUPS_OK.
-
Queue Name specifies the Destination Lookup Name for the password synchronization events.
-
-
If you do not plan to use JMS and you launched the configuration wizard with the -direct flag, click Next to display the User dialog. Skip to step Figure 11–7.
-
-
Click Next to display the JMS Properties dialog (Figure 11–7).
Figure 11–7 PasswordSync Wizard JMS Properties Dialog
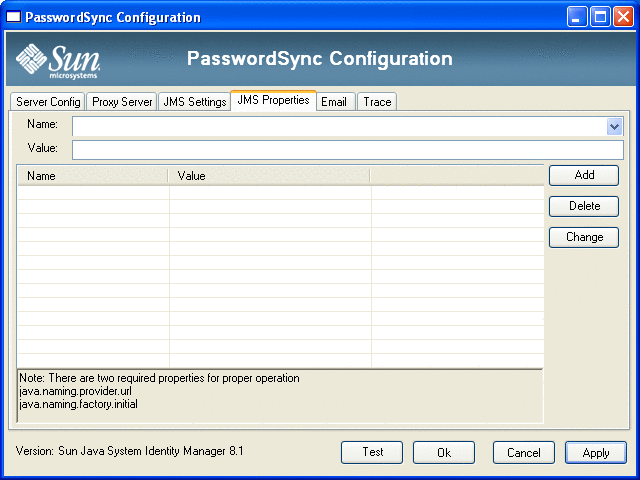
The JMS Properties dialog allows you to define the set of properties that are used to build the initial JNDI context. You must define the following name/value pairs:
-
java.naming.provider.url — Specify the URL of the machine running the JNDI service.
-
java.naming.factory.initial — Specify the classname (including the package) of the Initial Context Factory for the JNDI Service Provider.
The Name pull-down menu contains a list of classes from the java.naming package. Select a class or type in a class name, then enter its corresponding value in the Value field.
-
-
If you do not plan to use JMS and you launched the configuration wizard with the -direct flag, configure the User tab. Otherwise, skip this step and go to the next step.
To configure the User tab, edit the fields as necessary.
-
Account ID. Specify the user name that will be used to connect to Waveset.
-
Password. Specify the password that will be used to connect to Waveset.
-
-
Click Next to display the Email dialog (Figure 11–8) and edit the fields as necessary.
Figure 11–8 PasswordSync Wizard Email Dialog

To send an email notification when a user’s password change does not synchronize successfully due to a communication error or other error outside of Waveset, use the following options on the Email dialog to set up the notification and configure the email.
-
Enable Email. Select to enable this feature.
-
Email End User. Select if the user is to receive notifications. Otherwise, only the administrator will be notified.
-
SMTP Server. Enter the fully qualified name or IP address of the SMTP server to be used when sending failure notifications.
-
Administrator Email Address. Enter the email address where you want to send the notifications.
-
Sender’s Name. Enter the sender's “friendly name.”
-
Sender’s Address. Enter the sender's email address.
-
Message Subject. Enter the subject line for all notifications.
-
Message Body. Enter the text for the notification.
The message body might contain the following variables:
-
$(accountId) — The accountId of the user attempting to change password.
-
$(sourceEndpoint) — The host name of the domain controller where the password notifier is installed, to help locate troubled machines.
-
$(errorMessage) — The error message that describes the error that has occurred.
-
-
-
Click the Trace tab Figure 11–9.
Figure 11–9 Trace Tab
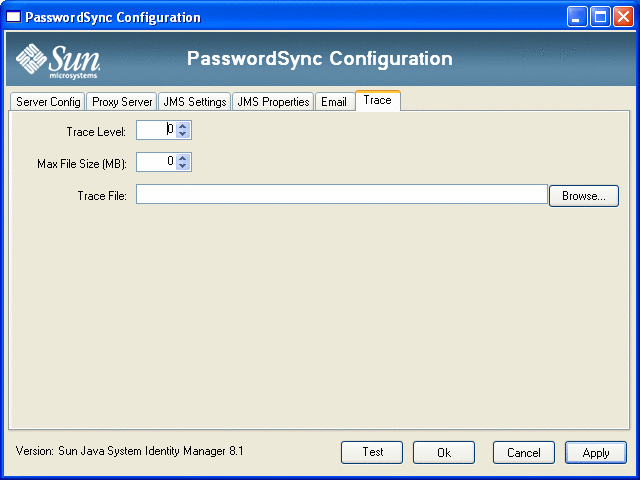
Set the following fields.
-
Trace Level.
-
Max File Size (MB).
-
Trace File.
-
-
Click Finish to save your changes.
If you run the configuration application again, a set of tabs is displayed instead of a wizard. If you want to display the application as a wizard, type the following command from the command line:
C:\InstallDir\Configure.exe -wizard
To test your PasswordSync configuration, see Testing Your Configuration.
Installing PasswordSync Silently
You can configure the PasswordSync installer for silent installation. To use this feature, you must first record configuration parameters to a file while installing PasswordSync. Future installations will reference the file and replay the configuration settings.
Note –
To use the silent installation procedure, you must install the complete product on each server that will use PasswordSync. Recording and replaying the configuration settings relies on the configuration application to be installed on the system, which can be accomplished by adding ADDLOCAL=”Configuration” to the command. See the example noted at the end of To Install PasswordSync Silently
The silent installation process utilizes a Windows utility calledmsiexec that installs .msi files from the command line.
Type msiexec /? at a command prompt to view usage information for this utility.
Documentation is also available on Microsoft's website. For example, for documentation on using msiexec on Windows Server 2003, see http://technet.microsoft.com/en-us/library/cc759262(WS.10).aspx.
 To Capture Installation Parameters to a Configuration
File
Follow these instructions to install PasswordSync using the installation wizard. The configuration utility captures configuration parameters and writes them to an XML file.
Before You Begin
Remove older versions of PasswordSync before installing.
-
Go to the directory with the PasswordSync installation (.msi) file.
See To Install the PasswordSync Configuration Application for information.
-
Type the following at a command prompt. Arguments and values are case sensitive.
msiexec /i pwSyncInstallFile CONFIGARGS="-writexml fullPathToFile"
where:
-
pwSyncInstallFile is the PasswordSync installation file. (Either IdmPwSync_86.msi or IdmPwSync_x64.msi).
-
fullPathToFile specifies where to write the XML file.
For example:
msiexec /i IdmPwSync_x86.msi CONFIGARGS="-writexml c:\tmp\myconfig.xml"
-
-
Install the product.
 To Install PasswordSync Silently
Before You Begin
-
You should have created an installation configuration XML file. See To Capture Installation Parameters to a Configuration File for instructions.
-
Remove older versions of PasswordSync before installing.
-
Copy your installation configuration XML file to a location where it can be read by the installer.
-
Type the following at a command prompt. Arguments and values are case sensitive.
msiexec /i pwSyncInstallFile ADDLOCAL="installFeature" CONFIGARGS="-readxml fullPathToFile"
 INSTALLDIR="installDir" /q
where:
-
pwSyncInstallFile is the PasswordSync installation file. (Either IdmPwSync_86.msi or IdmPwSync_x64.msi).
-
installFeature specifies which PasswordSync features to install. Choose one of the following:
-
MainProgram — Only install the interceptor .dll file
-
Configuration — Only install the configuration application
-
ALL — Install the complete product
If nothing is specified, MainProgram is used by default if the /q option is supplied.
-
-
fullPathToFile specifies the path to the configuration XML file.
-
installDir specifies the full path to a custom installation directory. Optional.
-
/q specifies a non-GUI install that automatically reboots the server when finished. If not included, the installation wizard will display but the configuration will run with the predefined settings. Optional.
Example:
msiexec /i IdmPwSync_x86.msi CONFIGARGS="-readxml c:\tmp\myconfig.xml"

msiexec /i IdmPwSync_x86.msi ADDLOCAL="Configuration"
CONFIGARGS="-readxml c:\tmp\myconfig.xml" /q

msiexec /i IdmPwSync_x64.msi ADDLOCAL="ALL"
CONFIGARGS="-readxml c:\tmp\myconfig.xml"
INSTALLDIR="C:\Program Files\Sun Microsystems\MyCustomInstallDirectory" /q
-
- © 2010, Oracle Corporation and/or its affiliates
