|
| |
| Sun Java System Identity Server 2004Q2 Deployment Planning Guide | |
Chapter 5
Deployment ScenariosThis chapter describes various deployment scenarios for Sun Java™ System Identity Server 2004Q2, including:
Multiple Servers ScenarioA typical deployment scenario might have two servers, with both Identity Server and Directory Server installed on each one. The Directory Server instances are set up in a multiple master configuration.
The Identity Server installed on the first server points to either instance of Directory Server. During installation using the Java Enterprise System installer, you can choose an existing Directory Server with or without an existing DIT, depending on your setup.
You install the second instance of Identity Server on the second server by running the Identity Server installation scripts, with the instance pointing to an Directory Server with an existing DIT. Identity Server does not write any information to Directory Server that it recognizes as already existing, so there is no danger of overwriting existing data.
Multiple instances of Identity Server can be installed against Directory Server for enhanced performance, directory replication support, or agent failover. To install multiple instances of Identity Server on different servers against the same Directory Server, see To Install Multiple Identity Server Instances.
Figure 5-1 shows two Identity Server instances with one Directory Server.
Figure 5-1 Multiple Identity Server Instances With One Directory Server
To Install Multiple Identity Server Instances
To install multiple instances of Identity Server 2004Q2, follow these steps:
- Install the first instance of Identity Server by running the Java Enterprise System installer. For information about the installer, refer to the Sun Java Enterprise System 2004Q2 Installation Guide.
- Create and start a new web container instance for each Identity Server instance you plan to create, using the administration tools for the web container.
For Web Server 6.1 SP2, see:
http://docs.sun.com/coll/S1_websvr61_en.For Application Server 7.0 Update 3, see:
:http //docs.sun.com/coll/s1_asse_en.- Copy the IdentityServer_base/SUNWam/bin/amsamplesilent file to a writable directory and make that directory your current directory. On Linux systems, this file is in the IdentityServer_base/identity/bin directory. For example, you might create a directory named /newinstances.
- Rename the copy of the amsamplesilent file to describe the new instance you want to deploy. For example, if you plan to create a new Identity Server instance for Web Server 6.1, rename the file to amnewws6instance.
In case you might need to uninstall this instance later, save the new amnewws6instance file.
- Set the following variables in the amnewws6instance file:
DEPLOY_LEVEL=1
NEW_INSTANCE=true
WEB_CONTAINER=WS6Set other variables in the amnewws6instance file as required for the new instance you want to create. For a description of these variables, refer to the Identity Server 2004Q2 Administration Guide.
Important All Identity Server instances must use the same value for the password encryption key. To set the AM_ENC_PWD variable for a new instance, copy the value from the am.encryption.pwd property in the AMConfig.properties file for the first instance.
- Run the amconfig script, specifying the new amnewws6instance file as input. For example, on Solaris systems:
cd IdentityServer_base/SUNWam/bin/
./amconfig -s /newinstances/amnewws6instance
The -s option runs the script in silent mode.
The script reads the variables in the amnewws6instance file and then runs in silent mode to configure the new web container.
For more information about creating new Identity Server instances, see the Identity Server 2004Q2 Administration Guide.
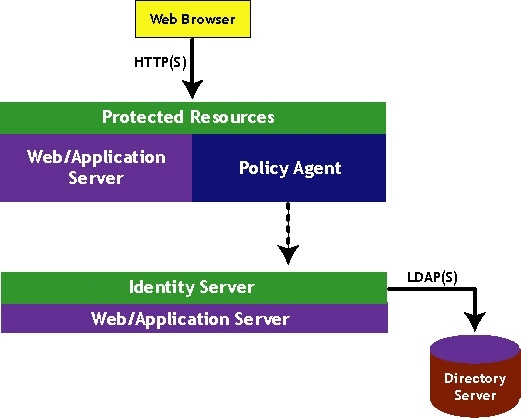
Web DeploymentThe most common use of an Identity Server deployment is when a web browser accesses an application or resource deployed on a web server. The application/resource is protected by Identity Server and communicates with it using a policy agent installed on the web server. Additionally, the web server might have the Identity Server SDK deployed. This architecture does not impose restrictions with regards to the number of web servers within a machine, or the instances of Identity Server across multiple machines. For example, a machine might have multiple web servers, each deploying Identity Server. Similarly, there might be multiple web servers running on different machines, each deploying Identity Server. Figure 5-2 illustrates this simple deployment scenario.
Figure 5-2 Simple Web Deployment Scenario
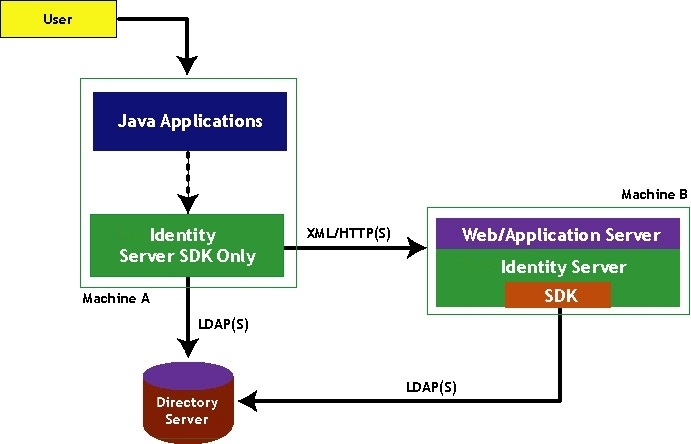
Java Application DeploymentAnother common scenario for Identity Server is one in which Java™ applications access an Identity Server SDK installed directly on the machine where they are deployed. In this scenario, there must be an additional machine with an instance of Sun Java System Web Server or Sun Java System Application Server running, at least, one instance of Identity Server; this machine maintains the state information to provide single sign-on. Figure 5-3 illustrates this Java application deployment scenario.
Figure 5-3 Java Application Deployment
Multiple JVM EnvironmentIdentity Server services are supported in multiple Java Virtual Machine (JVM) environments. In other words, an instance of Sun Java System Application Server can be configured to have multiple JVMs with Identity Server services running in all of them. The Identity Server architecture imposes no restrictions on the deployment with regards to the number of Application Server instances within a machine, the number of Identity Server services across multiple machines, or the number of JVMs that a single Application Server can have. See the Java System Application Server documentation for more information on the multiple JVM environment.
Replication ConsiderationsLoad balancing across replicated Directory Servers and locating replicated servers closer to users are two ways to improve Identity Server performance and response time. Directory Server can be set up in single-supplier or multi-supplier configurations. Load-balancing applications such as Sun Java System Directory Proxy Server can also be used. Directory Proxy Server dynamically performs proportional load balancing of LDAP operations across a set of configured Directory Servers. If one or more Directory Server(s) become unavailable, the load is proportionally redistributed among the remaining servers. When the server comes back on line, the load is proportionally and dynamically reallocated.
When Identity Server is installed for replication purposes, each instance of Directory Server and each instance of Identity Server, must be configured with the same values for the following:
Configuring For Replication
Identity Server can be configured to work with single-supplier or multi-supplier replication. Figure 5-4 illustrates a single-supplier configuration where the consumer is a read-only database. Requests for write operations are referred to the supplier database. This configuration provides some measure of enhanced server performance by distributing the workload to more than one directory.
Figure 5-4 Single Supplier Replication
Figure 5-5 illustrates a multi-supplier configuration using multiple instances of Identity Server. This configuration provides failover protection as well as high availability, resulting in further enhanced server performance.
Figure 5-5 Multi-Supplier Configuration (also known as Multi-Master Replication)
The following steps can be used to configure replication at the root or top level of the Identity Server directory tree when Identity Server has not yet been installed. They can also be used to configure replication at the default organization level.
- Install supplier and consumer Directory Servers.
See the Sun Java Enterprise System 2004Q2 Installation Guide for detailed instructions.
- Set up replication agreements between the supplier and consumer, and verify that the directory referrals and updates are working properly.
See the Directory Server 5 2004Q2 Administration Guide for detailed instructions.
Note
It might be necessary to migrate existing Directory Server data to work with this version of Identity Server. For instructions on how to do this see the Identity Server 2004Q2 Migration Guide.
- If deploying Identity Server and Directory Server for the first time, or there is no plan to use existing user data, run the Sun Java Enterprise System 2004Q2 installation program to install Identity Server.
During installation, answer yes when asked if there is an existing Directory Server, and specify the host name and port number for a supplier Directory Server you installed in Step 1.
- In the server where Identity Server Management and Policy services are installed, modify the AMConfig.properties file:
- Solaris systems: IdentityServer_base/SUNWam/lib/AMConfig.properties
- Linux systems: IdentityServer_base/identity/lib/AMConfig.properties
- Modify the following properties to reflect the host and port number of a consumer Directory Server installed in Step 1.
- Modify the following properties to reflect the number of times Identity Server should continue to make the same request when the requested entry is not found.
com.iplanet.am.replica.retries
- Modify the following properties to reflect the number of milliseconds Identity Server should allow to elapse between retries.
com.iplanet.am.replica.delay.between.retries
- In each Identity Server Authentication module enabled, specify the consumer directory installed in Step 1. In the following substeps, the LDAP Authentication module is used as an example:
- In the Identity Server console, choose Service Management.
- Locate the authentication module to be reconfigured, clicking the Properties arrow.
- In the right pane:
- In the first field named LDAP Server and Port, type the host name and port number for the primary (consumer) Directory Server. For example, consumer1.example.com:389.
- In the second field named LDAP Server and Port, type the host name and port number for the secondary (or supplier) Directory Server. For example, supplier1.example.com:389.
- Click Submit.
- In the following file: Identity_Server_base/SUNWam/config/ums/serverconfig.xml, specify the host name and port number of the consumer directory installed in Step 1 as in Code Example 5-1.
- Restart Identity Server with the following command:
Identity_Server_base/SUNWam/bin/amserver start
Configuring With a Load Balancer
Figure 5-6 illustrates a multi-supplier configuration that includes Directory Proxy Server. This configuration takes full advantage of Identity Server support for failover, high availability, and managed load-balancing.
Figure 5-6 Multi-supplier Replication With Load Balancer
Using LDAP load balancers adds a layer of high availability and directory failover protection beyond the basic level that comes with Identity Server. For example, Directory Proxy Server can specify what percentage of the load gets redistributed to each of server. And, when all back-end LDAP servers become unavailable, it continues to manage request traffic and begins rejecting client queries. If you choose to install a load-balancer, Identity Server must be configured to recognize the application.
- Before configuring:
- Set up the Directory Servers for replication. For comprehensive information about directory replication and for detailed setup instructions, see “Managing Replication” in the Directory Server 5 2004Q2 Administration Guide.
- Install and configure the LDAP load balancer. Follow the instructions in the documentation that comes with the product.
- In the file IdentityServer_base/SUNWam/lib/AMconfig.properties (on Solaris systems), modify the following properties to reflect the host and port number of a consumer Directory Server installed in Step a.
com.iplanet.am.directory.host
com.iplanet.am.directory.port
- For each Identity Server Authentication module enabled, specify the consumer Directory Server installed in Step a. In the following substeps, the LDAP Authentication module is used as an example:
- In the IdentityServer_base/SUNWam/config/ums/serverconfig.xml file (on Solaris systems), specify the host name and port number of the consumer directory installed in Step a as in Code Example 5-2.
- Restart Identity Server with the amserver start command. For example, on Solaris systems:
IdentityServer_base/SUNWam/bin/amserver start
Note
See Appendix E, "Load Balancer Configuration" for more specifics about configuring Identity Server with a load balancer.
Replication Caveats
There may be situations in which directory replication cannot be implemented in an Identity Server deployment. For example, authentication server host names or IP addresses must be the same. This precludes using geographically separated, replicated Identity Server servers. The remote servers would not be able to perform authentication against servers that are only local to their respective LANs. For comprehensive information on planning and implementing Directory Server replication, see the Sun Java System Directory Server Deployment Guide.
Directory Server With a FirewallIf your deployment is configured with a firewall between Identity Server and Directory Server, Identity Server connections can time out if the firewall idle connection timeout value is less than the Directory Server idle connection timeout value (nsslapd-idletimeout attribute). This problem usually occurs during non-peak usage hours when the load on Identity Server is low.
When Directory Server connections are dropped by the firewall, Identity Server does not recognize that the connections have been dropped and then goes through the pool of LDAP connections until all connections are exhausted. Identity Server must be restarted to create a fresh pool of LDAP connections.
To prevent this problem, consider the following solutions:
Setting the Global Timeout Attribute
You might be able to set the Directory Server global nsslapd-idletimeout attribute to a value less than the firewall idle connection timeout value. However, this solution might not be acceptable because nsslapd-idletimeout is a global configuration attribute that affects applications other than Identity Server.
Setting the Timeout for Individual Client Connections
Directory Server allows you to set specific attributes for individual client connections. The nsIdleTimeout attribute specifies the idle connection timeout value for individual clients. This value takes precedence over the nsslapd-idletimeout value set for the global Directory Server configuration.
Set the nsIdleTimeout attribute for the Identity Server user that binds to the LDAP directory, which by default is amldapuser.
To add the nsIdleTimeout attribute for amldapuser, use either the Directory Server console or the ldapmodify tool. For example, to use ldapmodify:
ldapmodify -h host-name -p port -D "cn=Directory Manager" -w password
dn: cn=amldapuser,ou=DSAME Users, dc=example,dc=com
changetype: modify
add: nsIdleTimeout
nsIdleTimeout: timeout-valueFor timeout-value, specify a value less than the connection idle timeout value set for the firewall. Thus Directory Server will close the Identity Server connections for amldapuser before they are closed by the firewall.
For information about the Directory Server attributes and the ldapmodify tool, see the Directory Server 5 2004Q2 Administration Guide on the following Web site:
http://docs.sun.com/coll/DirectoryServer_04q2
Session Failover for Identity ServerThis section describes session failover for Identity Server 2004Q2, including:
Overview of Session Failover
Identity Server 2004Q2 provides session failover using Sun Java System Application Server 7.0.0_01 Enterprise Edition (EE) as a web container.
Note
Application Server 7.0.0_01 EE is not a component of the Sun Java Enterprise System 2004Q2 release. To obtain a copy of this release, contact your Sun Microsystems technical representative.
Session failover automatically and transparently redirects an Identity Server request to a secondary server if the primary server fails because a hardware or software problem occurs or if the server is temporarily shut down.
For example, a user might be configuring Identity Server when the primary server fails. Session failover automatically transfers the user’s session to a secondary server, allowing the session to continue without the user having to authenticate again.
Identity Server 2004Q2 supports session failover by:
- Saving the authenticated session state
- Using LDAP replication for persistent data tier
- Using HTTP session failover function of the Application Server container for Identity Server session state replication
- Using load balancing to distribute requests and to shield clients from individual server failures
Requirements for Session Failover
The session failover implementation described in this chapter requires Identity Server 2004Q2. Other requirements include:
Implementing Session Failover
This section describes how to implement session failover for Identity Server 2004Q2:
Install Web Server 6.0 SP6 (for the Load Balancer Plug-in)
If you plan to install the load balancer plug-in when you install Application Server 7.0.0_01 EE, you must install Web Server 6.0 SP 6 on the server where you plan to install the plug-in. For information about installing and configuring Sun ONE Web Server, refer to the Web Server Enterprise Edition Installation Guide on this Web site:
http://docs.sun.com/coll/S1_ipwebsrvree60_en
Install and Configure Application Server 7.0.0_01 EE
Install and configure Application Server 7.0.0_01 EE in a cluster environment using at least two managed servers. For information about installation, refer to the Application Server 7, Enterprise Edition Installation Guide on the following Web site:
http://docs.sun.com/coll/s1_asee_en
Considerations for installing Application Server 7.0.0_01 EE include:
Previously Installed Versions of Application Server 7
If you have a previously installed version of Application Server 7 installed on your target server, you must remove it using the uninstallation program before you install Application Server 7.0.0_01 EE.
Solaris 9 OS bundled installations or non-package-based evaluation installations do not affect the Application Server 7.0.0_01 EE installation program, so they do not need to be removed. However, you might need to resolve any port number conflicts. You must also shut down the bundled Application Server 7 instances before you install.
Installation Directory
The default installation directory is /opt/SUNWappserver7, but you can specify a different directory, if you prefer.
Component Selection Page
Load balancer plug-in. On the Component Selection page, to install the load balancer plug-in, Web Server 6.0 SP 6 must already be installed. For more information, see Install Web Server 6.0 SP6 (for the Load Balancer Plug-in).
If you install the load balancer plug-in for the first Application Server instance, you do not need to select this plug-in when you install additional instances.
High Availability Database Server. On the Component Selection page, select “High Availability Database Server” and not “High Availability Database Administration Client” in order to install the ODBC driver. (If you select “High Availability Database Administration Client”, the installer does not install the ODBC driver, and you will have problems running the application later.)
Java Configuration Panel
J2SE version. On the Java Configuration panel, select the Java 2 SDK 1.4.2_03 version.
Configuration Directories
For the product configuration directory, the default is /etc/opt/SUNWappserver7. For the server configuration directory, the default is /var/opt/SUNWappserver7.
You can accept the default values or specify different directories, if you prefer.
Web Server
Web Server. If you select the load balancer plug-in, the installer displays the Web Server Directory page. Select Web Server 6.0 SP 6 and then provide the Web Server instance path.
Application Server Component Options
Application Server options include:
The installation program displays the default port number for the admin server port and HTTP server port if the port is not in use. Change the port number, if necessary. The installation program then checks the port numbers for validity and availability when you click Next on the panel.
Post-Installation Tasks
After you install Application Server 7.0.0_01 EE, refer to Chapter 3, “Preparing for HADB Setup” in the Application Server 7, Enterprise Edition Installation Guide (http://docs.sun.com/doc/817-2146-10).
Chapter 3 describes the tasks you need to perform to use the Application Server HADB, including “Configuring Shared Memory and Semaphores,” “Setting Up Host Communication,” “Setting Up the User Environment,” and “Using the clsetup Command.”
For additional information about configuring and managing the Application Server cluster, the load balancer plug-in, and the high-availability database (HADB), see also the Application Server 7, Enterprise Edition Administrator's Guide (http://docs.sun.com/doc/817-1881-10).
Specifically, refer to Chapter 16, “Configuring Load Balancing.”
Edit the sun-web.xml Files
Edit the sun-web.xml file in each of these directories:
Property changes. Make the following property changes in the sun-web.xml file, as shown in bold text:
<?xml version="1.0" encoding="UTF-8"?>
<!-- Copyright 2004 Sun Microsystems, Inc. All rights reserved.-->
<!DOCTYPE sun-web-app PUBLIC '-//Sun Microsystems, Inc.//DTD Sun Java System Application Server 7.0 Servlet 2.3//EN' 'http://www.sun.com/software/sunone/appserver/dtds/sun-web-app_2_3-0.dtd'><?xml version="1.0" encoding="UTF-8"?>
...
<sun-web-app>
<property name="encodeCookies" value="false" />
<locale-charset-info>
<parameter-encoding form-hint-field="gx_charset" />
</locale-charset-info>
<session-config>
<cookie-properties>
<property name="cookiePath" value="/"/>
</cookie-properties>
</session-config>
<resource-env-ref>
<resource-env-ref-name>jdbc/SessionRepository</resource-en v-ref-name>
<jndi-name>jdbc/hastore</jndi-name>
</resource-env-ref>
<sun-web-app>
...
Add the <distributable/> line to each sun-web.xml file, as shown in bold text:
<!DOCTYPE web-app PUBLIC "-//Sun Microsystems, Inc.//DTD Web Application 2.3//EN" "file:/etc/opt/SUNWam/dtd/web-app_2_3.dtd">
<web-app>
<display-name>iDSAME Services</display-name>
<distributable/>
<context-param>
<param-name>Webmaster</param-name>
<param-value>webmaster@sun.com</param-value>
</context-param>
Uncomment the following lines in each sun-web.xml file:
<resource-env-ref>
<description>DataSource Reference</description>
<resource-env-ref-name>jdbc/SessionRepository</resource-env-ref-name>
<resource-env-ref-type>javax.sql.DataSource</resource-env-ref-type>
</resource-env-ref>
Install Identity Server Instances
Install and configure an instance of Identity Server 2004Q2 for each Application Server web container instance:
The Identity Server 2004Q2 installation and configuration scripts and amsamplesilent file are available in the IdentityServer_base/SUNWam/bin directory. On Linux systems, this file is in the IdentityServer_base/identity/bin directory. To install an instance of Identity Server 2004Q2, follow these steps:
- Log in as or become superuser (root).
- Copy the amsamplesilent file to a writable directory and make that directory your current directory. For example, you might copy the file to a directory named /newinstances.
- Rename the copy of the amsamplesilent file to describe the new instance you want to deploy. For example, you might rename the file to amnewAS7instance to create a new instance for Application Server.
- Edit the amnewAS7instance file and set the variables to create the new Identity Server instance for Application Server. For example:
DEPLOY_LEVEL=1
NEW_INSTANCE=true
WEB_CONTAINER=AS7
DIRECTORY_MODE=1 (for a fresh install)
Set other variables in the amnewAS7instance file as required for the new Application Server instance you want to create. For a description of these variables, refer to the Identity Server 2004Q2 Administration Guide.
Important All Identity Server instances must use the same value for the password encryption key. To set the AM_ENC_PWD variable for a new instance, copy the value from the am.encryption.pwd property in the /etc/opt/SUNWam/config/AMConfig.properties file for the first instance.
- Run the amconfig script, specifying the new amnewAS7instance file as the input file. For example, on Solaris systems:
cd IdentityServer_base/SUNWam/bin/
./amconfig -s /newinstances/amnewAS7instance
The -s option runs the script in silent mode.
The script reads the variables in the amnewAS7instance file and then runs in silent mode to configure the new web container.
Repeat these steps for each additional Identity Server instance you want to create.
Configure Identity Server 2004Q2
To configure Identity Server, perform these tasks, in order:
Add Server Names and URLs in Console for the First Instance
Perform the following steps by logging into the first Identity Server instance:
- From your browser, access the console for the first Identity Server instance and login as amadmin. For example:
http://host-name.domain-name:port/amconsole
where host-name.domain-name:port is the fully qualified host name and port of the first Identity Server instance.
- On the Identity Management tab, add all the server names in the cluster, including the server name for the load balancer, in “Organization Aliases”.
- On the Service Configuration tab, click “Platform”, and then add all the server URLs, including the URL for the load balancer, in the “Server List”. The format for each server URL is:
http://host-name.port | ServerID
where:
host-name.port is the fully qualified host name and port number.
ServerID is a two-byte value that uniquely identifies the instance.
The default is the value for the first instance.
For example, if you have four Identity Server instances and one load balancer:
http://IS1.example.com:8080|01
http://IS2.example.com:8080|02
http://IS3.example.com:8080|03
http://IS4.example.com:8080|04
http://lbhost.example.com:80|05
Modify the AMConfig.properties File for Each Instance
Modify the /etc/opt/SUNWam/config/AMConfig.properties file for each Identity Server instance, as follows:
- To enable session failover, set the following properties:
com.iplanet.am.session.failover.enabled=true
com.iplanet.am.cookie.encode=false
- To identify the server instances, add the following property:
com.iplanet.am.session.failover.cluster.serverList=01,02,03,04
where 01,02,03,04 are the two-byte values that uniquely identify the Identity Server instances. Each server that is participating in load balancing needs to have a unique identifier.
However, do not add an identifier for the load balancer.
- Set server host, port, protocol, and other URLs to point to the load balancer. For example:
com.iplanet.am.server.host=lbhost.example.com
com.iplanet.am.server.port=lbport
com.iplanet.am.console.host=lbhost.example.com
com.iplanet.am.console.port=lbport
com.iplanet.am.profile.host=lbhost.example.com
com.iplanet.am.profile.port=lbport
com.iplanet.am.naming.url=http://lbhost.example.com:lbport/amserver/namin gserviceNote Do not set (or modify) the following properties to point to the load balancer:
com.iplanet.am.notification.url=http://IS1.example.com:8080/amserver /notificationservice
com.iplanet.am.localserver.protocol=http
com.iplanet.am.localserver.host=IS.example.com
com.iplanet.am.localserver.port=8080
com.iplanet.am.admin.cli.certdb.prefix=https-IS1.example.com-IS1
com.iplanet.am.directory.host
com.iplanet.am.directory.port
Identity Server and Portal Server DeploymentFor the Java Enterprise System 2004Q2 release, you can deploy Identity Server 2004Q2 with Portal Server 6 2004Q2 either on the same physical server or on multiple servers.
Installation on a Single Server
In this scenario, Identity Server and Portal Server are installed on the same physical server. You must also install or have access to an installed version of Directory Server, which can be either on the same server or a remote server.
To install these components, run the Java Enterprise System installer in a single session and make these selections:
- On the Component Selection panel, select these products and subcomponents:
- Under Communication & Collaboration Services, select Portal Server 6.3.
- Under Directory & Identity Services, select Identity Server 6.2 and its subcomponents:
- Identity Management and Policy Services Core
- Identity Server Administration Console
- Common Domain Services for Federation Management
- Identity Server SDK
Important By default, when you select Portal Server 6.3, the installer installs only the Identity Server SDK, so you must specifically check the other subcomponents.
- Install and configure one of the following web containers:
Installation on Multiple Servers
In this scenario, Portal Server will access Identity Server on a local server from a remote server. You must also install or have access to an installed version of Directory Server, which can be either on a local or remote server.
- On the local server, install Identity Server and a web container. You must install and configure the components on this server before you install and configure the components on the remote server.
- On the remote server, install Portal Server and the Identity Server SDK. You do not need to select the other Identity Server subcomponents on the remote server.
For more information, refer to these documents:
- Running the installer: Sun Java Enterprise System 2004Q2 Installation Guide (http://docs.sun.com/doc/817-5760).
- Deploying Portal Server: Sun Java System Portal Server 6 2004Q2 Deployment Guide (http://docs.sun.com/doc/817-5321).
- Configuring Identity Server: Sun Java System Identity Server 2004Q2 Administration Guide (http://docs.sun.com/doc/817-5709).
Federation ManagementThis section describes the configuration for a deployment using the Federation Management functionality of Identity Server. This scenario assumes that Domain A, Domain B and Domain C each contain two instances of Identity Server and one instance of Directory Server. Domain A and Domain B have Service Provider A and Service Provider B, respectively. Domain C has Identity Provider C.
In order to manage this federation scenario correctly there are two concepts to understand.
- A Hosted Provider defines a specific instance of Identity Server as one acting as a service provider.
- A Remote Provider contains data related to any type of provider hosted on machine different from the one on which the instance of Identity Server is currently being configured. This may or may not be an instance of Identity Server; it could be any compliant service provider or identity provider.
So, in the above defined scenario, Service Provider A will configure itself as a hosted provider and Service Provider B and Service Provider C as remote providers. Service Provider B will configure itself as a hosted provider and Service Provider A and Service Provider C as remote providers. Service Provider C will configure itself as a hosted provider and Service Provider A and Service Provider B as remote providers. Once these are configured, an Authentication Domain can be created in each of the domains.
For information about Federation Management, see the Identity Server 2004Q2 Federation Management Guide.