| C H A P T E R 2 |
|
Preparing to Service the System |
This chapter describes how to prepare the servers for servicing.
The following topics are covered:
This section describes important safety information that you need to know prior to removing or installing parts in the Sun Fire X4170, X4270, and X4275 Servers.

|
Caution - Never attempt to run the server with the covers removed. Hazardous voltage present. |

|
Caution - Equipment damage possible. The covers must be in place for proper air flow. |
For your protection, observe the following safety precautions when setting up your equipment:
The Sun Fire X4170, X4270, and X4275 Servers can be serviced with the following tools:
To obtain support for your server, you need your chassis serial number. The chassis serial number is located on a sticker on the front of the server, and or another sticker on the top of the server.
Refer to the following topics in this section to power on and off a server:
The following procedure assumes that the power cord is connected to the server.
1. Verify that the server is in the standby power state.
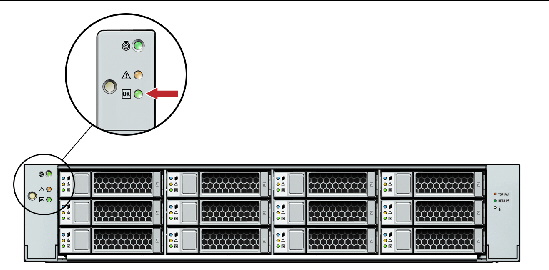
In the Standby power state, the OK/Power LED on the front panel of the server blinks (0.1 second on, 2.9 seconds off). The standby power state indicates that the server SP is active but the server host is powered off.
For the location of the OK/Power LED, see FIGURE 2-1, FIGURE 2-2, and FIGURE 2-3.
2. Apply full power to the server SP and host.
For the location of the Power button on each type of server, see FIGURE 2-1, FIGURE 2-2, and FIGURE 2-3.
The Power/OK LED illuminates a SLOW BLINK while the system is booting. A STEADY ON green light illuminates when the server module SP and host are both powered on.
FIGURE 2-1 Sun Fire X4170 Server Front Panel Power/OK LED
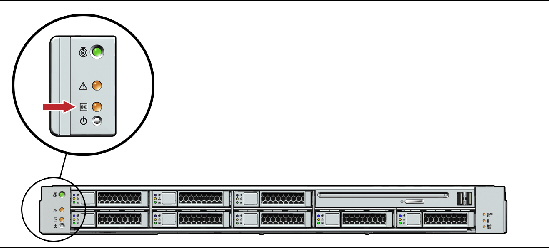
FIGURE 2-2 Sun Fire X4270 Server Front Panel Power/OK LED
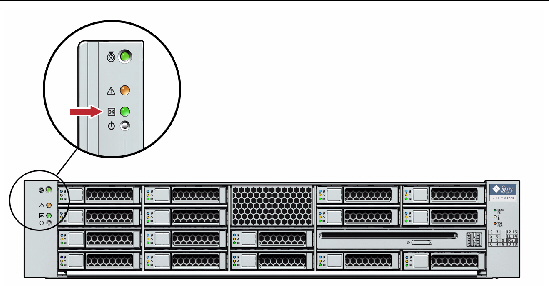
FIGURE 2-3 Sun Fire X4275 Server Front Panel Power/OK LED
To remove main power from the server, use one of the methods shown in the following table.
|
Use a pencil, pen, or other pointed object, to press and release the Power button on the front panel (see FIGURE 2-1, FIGURE 2-2 and FIGURE 2-3). Pressing the power button causes Advanced Configuration and Power Interface (ACPI)-enabled operating systems to perform an orderly shutdown of the operating system. Servers not running ACPI-enabled operating systems will shut down to standby power mode immediately. |
|
|
Press and hold the Power button for at least five seconds until the main power is off and the server enters standby power mode (see FIGURE 2-1, FIGURE 2-2 and FIGURE 2-3). When the main power is off, the Power/OK LED on the front panel flashes, indicating that the server is in standby power mode. Caution - All applications and files will be closed abruptly without saving changes. File system corruption might occur. |
|
|
See Power Off the Server Using the Service Processor Command-Line Interface. |

|
Caution - To completely power off the server, you must disconnect the AC power cords from the back panel of the server. |
You can use the ILOM service processor to perform a graceful shutdown of the server and ensure that all of your data is saved and the server is ready for restart.
ssh root@service_processor_ip_address
Password: root_password (The default password is changeme.)
Depending on the type of problem, you might want to view server status or log files, or run diagnostics before you shut down the server.
3. Save any open files and quit all running programs.
Refer to your application documentation for specific information.
4. Power down the server. Type:
-> stop /SYS (for a Graceful shutdown as defined in TABLE 2-1)
-> stop -f/SYS (for an Emergency Shut as defined in TABLE 2-1)
For additional information, refer to the Sun Integrated Lights Out Manager 2.0 User’s Guide (820-1188).
Wake On LAN (WOL) enables you to power on a server from another location over a network connection. Specifically this feature provides the ability for the network controller in the server to power the server on when a "magic packet" is received over the network from a remote system.
1. The Wake On LAN (WOL) option in the Boot menu of the BIOS must be enabled.
For details, see Enable or Disable WOL in BIOS.
2. The server must be connected to an active power source.
3. The server’s WOL network port must be connected to an active Ethernet connection.
4. You must have another system on the network that can send magic packets to network adapter (MAC address) that is installed in the server.
Typically you could use a magic packet program to send the packets over the network to wake a shutdown (WOL-enabled) server. For more details about how to send a magic packet over the network to a WOL-enabled server, refer to the documentation supplied with the magic packet program.
5. Test the WOL implementation by ensuring that the magic packet sent over the network powers on the server.
If the test fails, verify that your network environment supports magic packets. For instance, some switches and routers might block magic packets.
1. Reset the power on the server.
For details, see Powering On and Off the Server.
2. Press F2 to enter the BIOS Setup utility, when the system is booting.
3. In the BIOS Setup utility, use the arrow keys (or Tab key) to select Boot in the BIOS main menu.
4. In the Boot dialog, highlight the Wake ON LAN setting, and then press Enter.
A tab appears listing the Wake ON LAN options, one for each network port.
5. In the tab, enable the appropriate port (for example, NET0 WAKE ON LAN for network port 0), then press Enter and do one of the following:
6. Press F10 to save the setting and exit the BIOS Setup utility.
If you intend to use the Trusted Platform Module (TPM) feature set that is provided in Windows 2003 and Windows 2008, you must configure the server to support this feature.
1. Power on or power cycle the server.
2. To enter the BIOS Setup utility, press the F2 key while the system is performing the power-on self-test (POST) (FIGURE 2-4).
FIGURE 2-4 Press F2 to Enter the BIOS Setup utility

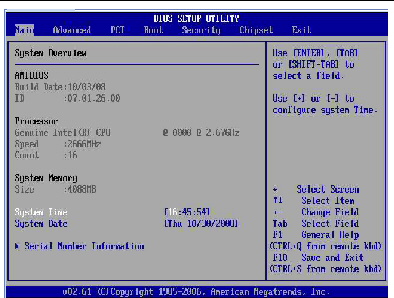
When BIOS is started, the main BIOS Setup utility top-level screen appears (FIGURE 2-5).
FIGURE 2-5 BIOS Setup Utility Main Screen
3. In the BIOS Setup utility screen, select the Advanced menu option.
The Advanced page appears (FIGURE 2-6).
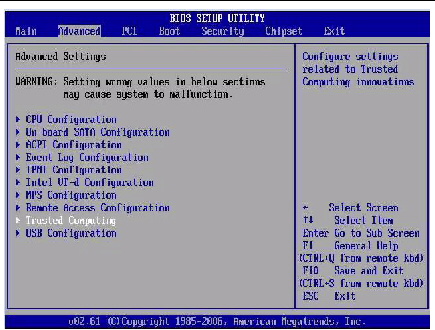
4. In the Advanced dialog, select Trusted Computing and press Enter.
The Trusted Computing dialog appears (FIGURE 2-7).
FIGURE 2-7 Trusted Computing Dialog
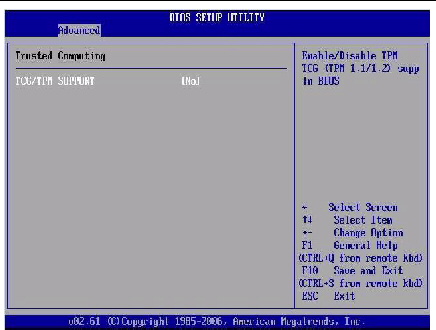
5. In the Advanced Trusted Computing dialog, select the TCG/TPM Support.
6. In the pop-up tab, set the TCG/TPM Support option to Yes and click Ok.
The updated Trusted Computing dialog appears and shows that the TCG/TPM Support setting has changed to Yes (FIGURE 2-8).
FIGURE 2-8 Trusted Computing Dialog Showing TCG/TPM Support Enabled
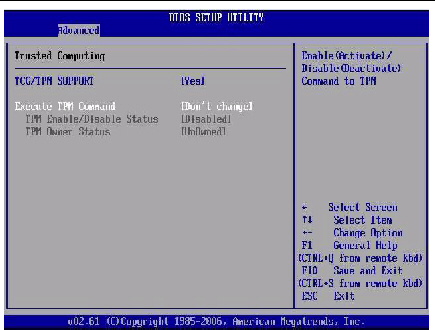
| Note - In the above screen, the Execute TPM Command setting shows the default, Don’t Change. |
7. In the Advanced Trusted Computing dialog, select the Execute TPM Command option setting.
8. In the pop-up tab, set the Execute TPM Command option to Enabled and click Ok.
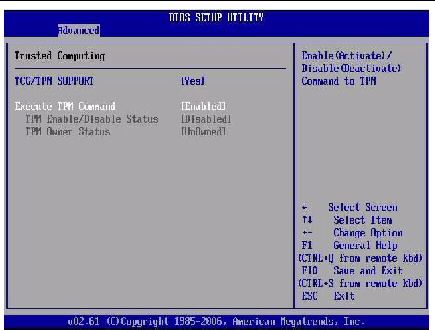
The updated Trusted Computing dialog appears and shows that the Execute TPM Command setting has changed to Enabled (FIGURE 2-9).
FIGURE 2-9 Execute TPM Command Setting Enabled
9. Press F10 to save the changes and exit BIOS.
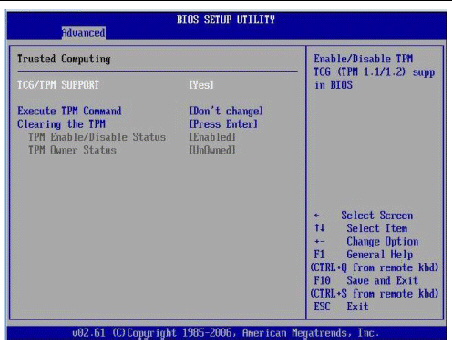
10. To verify that TPM support is configured, do the following:
b. To enter the BIOS Setup utility, press the F2 key while the system is performing the power-on self-test (POST) (FIGURE 2-4).
When BIOS is started, the main BIOS Setup utility top-level screen appears (see FIGURE 2-5).
c. Select Advanced -> Trusted Computing and press Enter.
The updated Trusted Computing dialog appears (FIGURE 2-10).
Confirm that the TCG/TPM Support setting is set to Yes and the TPM Enabled/Disable Status is set to Enabled.
FIGURE 2-10 Updated TPM Enabled/Disabled Setting
This completes the TPM configuration.
The following components can be serviced with the server in the maintenance position:
If the server is installed in a rack with extendable slide rails, use this procedure to extend the server to the maintenance position.
1. Verify that no cables will be damaged or will interfere when the server is extended.
Although the cable management arm (CMA) that is supplied with the server is hinged to accommodate extending the server, you should ensure that all cables and cords are capable of extending.
2. From the front of the server, release the two slide release latches (FIGURE 2-11).
Squeeze the green slide release latches to release the slide rails.
FIGURE 2-11 Slide Release Latches
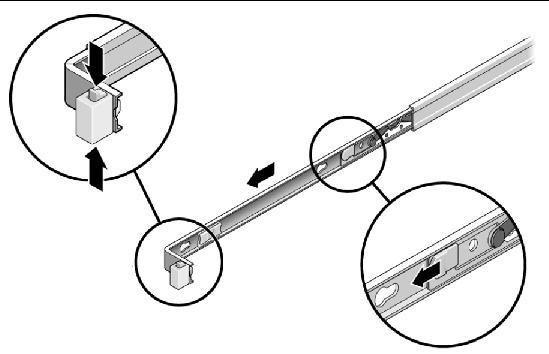
3. While squeezing the slide release latches, slowly pull the server forward until the slide rails latch.
The server must be removed from the rack to service the following components:

|
Caution - If necessary, use two people to dismount and carry the chassis. |
1. Disconnect all the cables and power cords from the server.
2. Extend the server to the maintenance position.
See Extending the Server to the Maintenance Position.
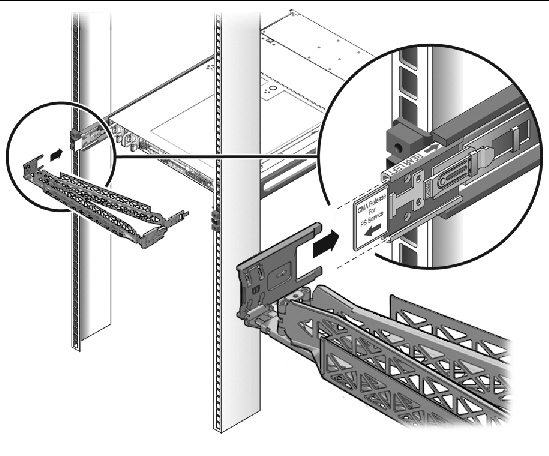
3. Press the metal lever that is located on the inner side of the rail to disconnect the cable management arm (CMA) from the rail assembly (FIGURE 2-12).
The CMA is still attached to the cabinet, but the server chassis is now disconnected from the CMA.
FIGURE 2-12 Metal Lever and Cable Management Arm

|
Caution - If necessary, use two people to dismount and carry the chassis. |
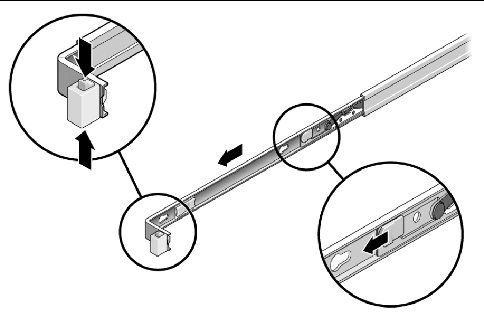
4. From the front of the server, pull the release tabs forward and pull the server forward until it is free of the rack rails (FIGURE 2-13).
A release tab is located on each rail.
FIGURE 2-13 Release Tabs and Slide Assembly
5. Set the server on a sturdy work surface.
Electrostatic discharge (ESD) sensitive devices, such as the motherboards, PCIe cards, storage drives, and memory cards, require special handling.

|
Caution - You must disconnect both power supplies before servicing any of the components documented in this chapter. |
Wear an antistatic wrist strap and use an antistatic mat when handling components such as storage drive assemblies, circuit boards, or PCIe cards. When servicing or removing server components, attach an antistatic strap to your wrist and then to a metal area on the chassis. Following this practice equalizes the electrical potentials between you and the server.
Place ESD-sensitive components on an antistatic mat.
1. Prepare an antistatic surface to set parts on during the removal, installation, or replacement process.
Place ESD-sensitive components such as the printed circuit boards on an antistatic mat. The following items can be used as an antistatic mat:
2. Attach an antistatic wrist strap.
When servicing or removing server components, attach an antistatic strap to your wrist and then to a metal area on the chassis.
The top cover and fan door are integrated.
| Note - Servicing some components requires that the top cover be removed. |
Refer to the following topics to remove the server top cover:
1. Ensure that the AC power cords are disconnected from the server power supplies.
2. Unlatch the fan module door (see FIGURE 2-14 [1]).
Pull the two release tabs back to release the door. Rotate the fan door to the open position and hold it there.
FIGURE 2-14 Removing the Top Cover From the Sun Fire X4170 and X4270 Servers
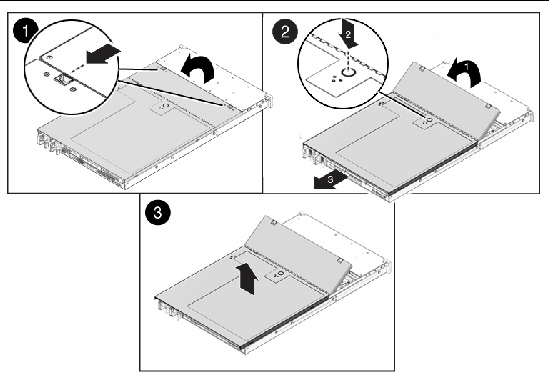
3. Press the top cover release button and slide the top cover toward the rear of the server about a 0.5 inches (12.7 mm) [2].
4. Lift up and remove the top cover [3].
1. Ensure that the AC power cords are disconnected from the server power supplies.
2. Unlatch the fan module door (FIGURE 2-15 [1]).
Press the two green release buttons on the sides of the fan module door to release the door. Rotate the fan module door to the open position and hold it there.
FIGURE 2-15 Removing the Top Cover From the Sun Fire X4275 Server
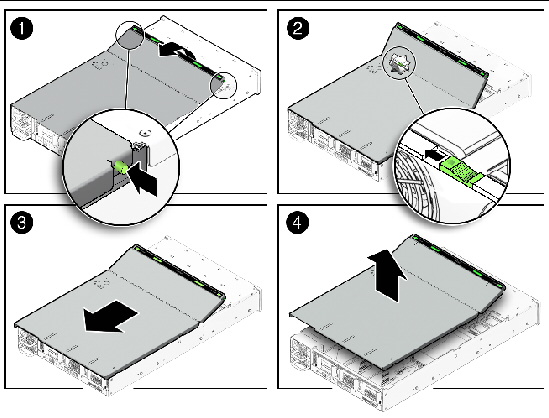
Locate the green tab to the right (facing the front of the server) and to the rear of the fan modules and slide the tab to the right-most position [2].
4. Slide the top cover toward the rear of the server about a 0.5 inch (12 mm) [3].
5. Lift up and remove the top cover [4].
Copyright © 2010, Oracle and/or its affiliates. All rights reserved.