Multiple Servers - Migrate Incrementally to Native Mode
This incremental-migration scenario makes the following assumptions:
-
Messaging and Calendar Server are running in a two-tiered, multiple-server environment.
-
The installation does not include user-developed applications (or provisioning tools) that rely on Schema 1.
This scenario uses the sample distributed environment shown in Migration Steps
Characteristics of This Scenario
-
Server downtime is minimized. At any given time, most servers are running and available.
-
Most of the LDAP directory is available to the servers and for provisioning.
-
You migrate the LDAP directory in stages, selecting individual domains for migration.
-
The overall migration time is extended.
-
The migration process is somewhat more complex than that of a direct, all-at-once migration.
Deployments Suitable for Incremental Migration
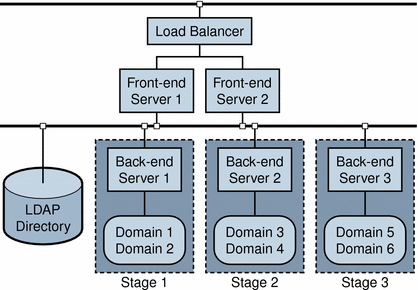
The scenario described in this section uses the sample distributed environment shown in Migration Steps.
In this example, each back-end server manages a unique portion of the LDAP directory, as follows:
-
Back-end Server 1 (B1) manages Domain 1 and 2.
-
Back-end Server 2 (B2) manages Domain 3 and 4.
-
Back-end Server 3 (B3) manages Domain 5 and 6.
This structure lends itself to incremental migration because each server can be upgraded and configured separately, and its corresponding domains can be migrated separately.
In the scenario, the migration proceeds in three stages corresponding to the three server-domain groups listed above.
Rules for Incremental Migration
The following rules apply to incremental migration of servers and LDAP directory domains:
-
When you migrate a domain, you also must upgrade and configure every server that manages any part of that domain.
-
When you upgrade and configure a server, you also must migrate every domain (or part of a domain) managed by the server.
Cross-Domain Deployment—Not Recommended for Incremental Migration
If all the servers in your installation manage across domain boundaries (if multiple servers share access to each domain), your installation might not be a good candidate for incremental migration.
For example, suppose your installation contains two back-end servers in the following configuration:
-
Back-end Server 1 manages Domain 1, 2, and 3.
-
Back-end Server 2 manages Domain 2, 3, and 4.
This installation should migrate directly (both servers, the entire LDAP directory), not incrementally.
A Complex Deployment Suitable for Incremental Migration
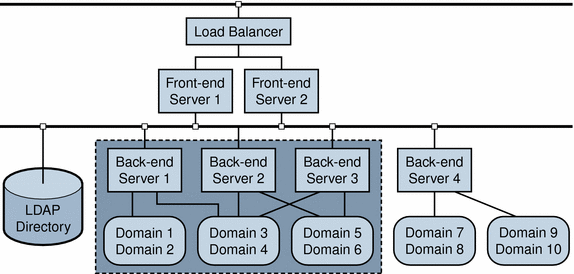
In a complex deployment with many back-end servers, you might still be able to migrate groups of domains incrementally. Your installation must fit the guidelines described in Rules for Incremental Migration.
A Complex Deployment Suitable for Incremental Migration shows one part of a large, complex server configuration and LDAP directory. It is assumed that the entire deployment includes many additional servers and domains not shown in the figure.
Figure 2–2 A Portion of a Multiple-Server Deployment Suitable for Incremental Migration

In the example shown in A Complex Deployment Suitable for Incremental Migration, Back-end servers 1, 2, and 3 manage across domain boundaries, as follows:
-
Back-end Server 1 manages Domain 1, 2, and 3.
-
Back-end Server 2 manages Domain 3, 4, and 5.
-
Back-end Server 3 manages Domain 4, 5, and 6.
No individual server exclusively manages a single domain.
Taken together, however, Back-end servers 1, 2, and 3 manage a unique set of domains that can be migrated incrementally.
In this example, when you run the Schema Migration Utility, you can specify Domains 1, 2, 3, 4, 5, and 6 in the migration to Schema 2. You can then reconfigure Back-end servers 1, 2, and 3 to use Schema 2.
Similarly, you could migrate and configure other groups of domains and servers that form distinct units within the deployment. In the example shown in A Complex Deployment Suitable for Incremental Migration, Back-end Server 4 and the domains it manages might be candidates for another stage in an incremental migration.
When to Configure the Front-end Servers
When you migrate directory domains incrementally, the front-end servers should remain configured to use Schema 1 until you have migrated the entire directory to Schema 2.
To look up user entries, the front-end servers might have to read information in any domain in the directory. The servers must be able to use the DC Tree to find user entries in the domains still in Schema 1. Once a front-end server is configured for Schema 2, it cannot recognize domain information held in the DC Tree.
After you migrate all domains to Schema 2 and reconfigure all the back-end servers to use Schema 2, you can reconfigure the front-end servers to use Schema 2.
Domain Provisioning During an Incremental Migration
If you must create a new domain during an incremental migration, create it in Schema 1, by using a 5.x (Schema 1) provisioning tool. Of course, the new domain must be managed by a server still configured to use Schema 1.
This rule assumes that the front-end servers are configured to use Schema 1 until the entire directory has been migrated to Schema 2. A front-end server configured for Schema 1 can look up user entries in an existing domain that was migrated to Schema 2; the front-end server uses the DC Tree, which still contains the old routing information to the user entries.
However, if you create a new domain with a Schema 2 provisioning tool, no domain information will exist in the DC Tree. The front-end server will be unable to find the new domain information in the Organization Tree and will not find the new user entries.
At some point in the migration, the new domain must be migrated to Schema 2 and its managing server(s) reconfigured to use Schema 2.
Migration Steps
The following steps outline how to migrate a two-tiered, multiple-server deployment to Schema 2, native mode in three stages.
Migration Steps shows the sample configuration of servers and domains used in this scenario.
Figure 2–3 Two-tier, Multiple-Server Environment: Incremental Migration

 To Perform an Incremental Migration
Steps
-
Upgrade Back-end Server 1 (B1) from version 5.x to version 6 (if you have not already done so).
For information about upgrading Messaging Server, see Upgrading Messaging Server to Version 6
For information about upgrading Calendar Server, see Upgrading Calendar Server to Version 6
-
Be sure that Server B1 is still configured for Schema 1.
During the server upgrade, you run the Communications Services Directory Server Setup Perl script, comm_dssetup.pl. The script asks you to specify the schema version Directory Server will use:
-
Specify Schema 1.
Set comm_dssetup.pl -t option as follows: -t 1
You only need to run the comm_dssetup.pl once for each Directory Server used by the Messaging and Calendar servers, although it does no harm to run the script more than once.
For information about running comm_dssetup.pl, see Running the Directory Server Setup Script
-
-
Install Access Manager 6.1 or later.
Follow the Access Manager installation instructions in the Sun Java Enterprise System 2005Q4 Installation Guide for UNIX
-
Before you run the Java Enterprise System installation program, gather the information needed to install Access Manager with a provisioned directory.
For details, see Access Manager: Provisioned Directory Information in Sun Java Enterprise System 2005Q4 Installation Reference.
-
During the installation, you are asked if you want Access Manager to use an existing provisioned directory. Answer yes.
The installation program asks you to specify the following parameters associated with your directory:
Organization Object Marker Class: Object class defined for the organization in the existing provisioned directory. The default value is SunManagedOrganization.
Organization Naming Attribute: Naming attribute used to define organizations in the existing provisioned directory. The default value is o.
User Marker Object Class: Object class defined for users in the existing provisioned directory. The default value is inetorgperson.
User Naming Attribute: Naming attribute used for users in the existing provisioned directory. The default value is uid.
-
After you install Access Manager, configure Access Manager to operate with the existing directory.
Follow the steps in “Chapter 4, Configuring Access Manager With an Existing Directory Server” in Sun Java System Access Manager 6 2005Q1 Migration Guide.
Note –Do not provision your LDAP directory with Access Manager tools before you have migrated the directory to Schema 2. The Messaging and Calendar servers cannot recognize any new domain information provisioned by Access Manager tools until you perform the migration to Schema 2 and reconfigure the servers for Schema 2.
-
-
Install and configure the Communications Services Delegated Administrator console and utility (commadmin).
Use the Sun Java Enterprise System Installer to install Delegated Administrator.
After the installation, you must run the Delegated Administrator configuration program, config-commda.
For details, see Chapter Chapter 3, Configuring Delegated Administrator, in Sun Java System Communications Services 6 2005Q4 Delegated Administrator Guide.
-
Back up Domains 1 and 2 in the LDAP directory.
-
Migrate Domains 1 and 2 of the LDAP directory from Schema 1 to Schema 2, native mode. (Server B1 uniquely manages Domains 1 and 2.)
-
Use the Schema Migration utility, commdirmig, to perform the migration.
-
Use the -d Domain option to migrate Domains 1 and 2.
Do not provision Domains 1 and 2 while commdirmig is running. You can provision other domains in the directory.
For information on running the commdirmig utility and on the utility options and syntax, see Chapter 3, Using the Migration Utility
-
Note –Do not remove the DC Tree for Domains 1 and 2 until all domains in the directory have been migrated to Schema 2, native mode, and all dependencies on the DC Tree are removed.
-
-
Reconfigure Server B1 to use Schema 2, native mode.
For information about reconfiguring Messaging Server, see Configuring Messaging Server for Schema 2
For information about reconfiguring Calendar Server, see Configuring Calendar Server to Use Schema 2
-
Stop and restart the Administration Server.
You can use the following commands:
/usr/bin/mpsadmserver stop
/usr/bin/mpsadmserver start
-
Verify that the following processes are functioning properly:
-
The upgraded server is working with the migrated domains
-
Provisioning can take place successfully
-
-
Repeat Migration Steps through Migration Steps for
-
Repeat Migration Steps through Migration Steps for:
-
Upgrade Front-end Server 1 (F1) and Front-end Server 2 (F2) from version 5.x to version 6 (if you have not already done so).
For information about upgrading Messaging Server, see Upgrading Messaging Server to Version 6
For information about upgrading Calendar Server, see Upgrading Calendar Server to Version 6
-
Run the comm_dssetup.pl script. The script asks you to specify the schema version Directory Server will use:
-
Specify Schema 2, native mode. Choose Schema 2 because you have already migrated all domains in the directory to Schema 2.
Set comm_dssetup.pl -t option as follows: -t 2
For information about running comm_dssetup.pl, see Running the Directory Server Setup Script
-
-
Reconfigure Server F1 and Server F2 to use Schema 2, native mode.
For information about reconfiguring Messaging Server, see Configuring Messaging Server for Schema 2
For information about reconfiguring Calendar Server, see Configuring Calendar Server to Use Schema 2
-
If you wish, remove the DC Tree (the defunct Schema 1 directory elements).
Note –Do not remove the DC Tree until you have verified that the migration was completed successfully (as described in the preceding “verify” step).
You can use an LDAP command-line tool to remove the DC Tree.
This step is optional. The DC Tree is not used in Schema 2, but it does no harm to leave the deprecated DC Tree in the LDAP directory after Schema 2 is in place.
- © 2010, Oracle Corporation and/or its affiliates
