Sun StorageTek Enterprise PCI-X 4 Gb FC Single and Dual Port Host Bus Adapters Installation Guide Enterprise PCI-X 4 Gb FC Single and Dual Port Host Bus Adapters Installation Guide
|
| Sun StorageTek Enterprise PCI-X 4 Gb FC Single and Dual Port Host Bus Adapters Installation Guide
|
|
Installing, Connecting, and Testing the Host Bus Adapter |
This guide describes how to install and configure your new Sun StorageTek Enterprise PCI-X 4 Gb Fibre Channel (FC) Single and Dual Port Host Bus Adapter (HBA). The HBA is also referred to as SG-XPCI1FC-QF4 (single port) or SG-XPCI2FC-QF4 (dual port).
This guide contains the following topics:
Your system must have the following functions to support the Sun StorageTek Enterprise PCI-X 4 Gb FC Single and Dual Port HBA:
| Note - This product is not compatible with 5.0V PCI slot. |
To install the HBA in your system, follow the steps described in these sections:
|
Verify that the HBA is shipped with the following items (see FIGURE 1):

|
To install the HBA, you need to open the system and identify an empty PCI or PCI-X slot. Do not put it in 5.0V PCI slot. If necessary, consult your system manual for instructions to remove the system cover.

|
Caution - Damage to the HBA can occur as the result of careless handling or electrostatic discharge (ESD). Always handle the HBA with care to avoid damage to electrostatic sensitive components. |
To minimize the possibility of ESD-related damage, Sun strongly recommends using both a workstation antistatic mat and an ESD wrist strap. You can get an ESD wrist strap from any reputable electronics store or from Sun as part number #250-1007. Observe the following precautions to avoid ESD-related problems:
1. Record IEEE and serial numbers.
Each HBA is shipped with a unique 64-bit identifier called the IEEE address. The Fibre Channel industry uses a World Wide Name (WWN) derived from the IEEE address. This number is needed for FC connectivity.
Because the SG-XPCI2FC-QF4 HBA has two ports, it has two IEEE addresses. The IEEE address is used for configuring your system. The serial number is used for communicating with Sun. All numbers are clearly marked on the board. Record these numbers before installation.
2. Shut down, power off, and unplug the system.
4. Remove the blank panel from an empty PCI or PCI-X slot.
5. If needed, replace the low profile PCI bracket with the standard mounting bracket by performing the following steps:
a. Remove the mounting bracket screws from the HBA (see FIGURE 2).
FIGURE 2 Removing the Bracket Screws

b. Remove the bracket and store it for future use.
c. Align the new mounting bracket tabs with the holes in the HBA.
| Note - Be careful not to push the bracket past the transceiver housing’s grounding tabs. Ensure that the LEDs are properly aligned with the holes in the bracket. |
d. Replace the screws that attach the HBA to the bracket.
6. Insert the HBA into the empty PCI or PCI-X slot. Press firmly until the adapter is seated.
7. Secure the HBA’s mounting bracket to the case with the panel screw or clip.
8. Replace the system case and tighten the case screws.
The HBA is now installed in the system and is ready for the optical cable attachment.
|
| Note - The HBA does not allow normal data transmission on an optical link unless it is connected to another similar or compatible Fibre Channel product (that is, multimode to multimode). |
Use multimode fiber-optic cable, intended for short-wave lasers, that adheres to the specifications in TABLE 1.
TABLE 2 summarizes the Power-On Self-Test (POST) conditions and results.
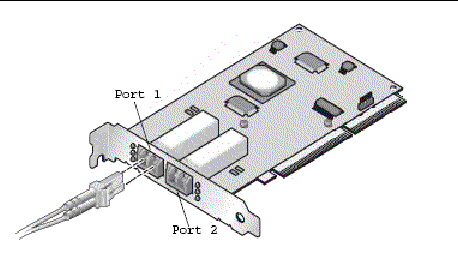
Follow these steps when attaching the optical cable:
1. Connect the fiber-optic cable to an LC connector on the HBA (see FIGURE 3).
FIGURE 3 Attaching the Optical Cable
2. Connect the other end of the cable to the Fibre Channel device.
After the optical cable is connected to the HBA, you are ready to apply power to the system.
|
1. Verify that the HBA is securely installed in the system.
2. Verify that the correct optical cable is attached.
3. Plug in and power on the system.
4. Observe light-emitting diodes (LEDs) for POST results.
LEDs can be seen through openings in the HBA’s mounting bracket. Each port has a corresponding set of LEDs.
|
1. Issue the show-devs command at the ok prompt to list the installed devices.
The HBA can be identified in the output containing the SUNW,qlc@n and SUNW,qlc@n,1 node names, where n is usually a single-digit number from 1 to 9.
In this example, there is one Dual Channel SG-XPCI2FC-QF4 adapter installed:
2. To positively identify the port as a Sun StorageTek 4 Gb FC port, cd to the SUNW,qlc@n entries and then issue the .properties command as shown in the example that follows.
|
If online storage is connected to the HBA, use the apply show-children command to list the attached storage.
In the example that follows, a storage JBOD has 12 targets attached to one port of the dual-ported HBA.
| Note - You may need to use the reset-all command before using apply show-children. |
|
1. During system power on initiation the following system booting BIOS initialization screen is displayed:
2. Immediately press Control-Q.
The following QLogic Fast!UTIL menu is displayed.
Then the following QLogic Fast!UTIL menu is displayed.
QLogic Fast!UTIL Select Host Adapter ---------------------------------------------------------- Adapter Type I/O Address Slot Bus Device Function QLA2462 9400 01 02 01 1 QLA2462 9800 01 02 01 0 |
3. Use the Arrow key to move the Highlight to the HBA port which has devices connected and press Enter.
The following QLogic Fast!UTIL menu is displayed.
4. Use Arrow key to move the Highlight to “Scan Fibre Devices” and press Enter.
In the example that follows, a storage JBOD has 6 targets attached to one port of the dual-ported HBA.
The following QLogic Fast!UTIL menu is displayed.
5. To exit the QLogic Fast!UTIL, press the Escape key and move the Highlight to “Exit Fast!UTIL” and press Enter.
The following QLogic Fast!UTIL menu is displayed.
The following QLogic Fast!UTIL menu is displayed.
QLogic Fast!UTIL Exit Fast!UTIL ---------------------------------- Reboot System Return to Fast!UTIL |
After you have completed the hardware installation and powered on the system, follow the instructions in this section to install the HBA driver with the Solaris 10 Operating System (OS) (SPARC or x64 Platform Edition).
1. Go to the SunSolve site at:
http://sunsolve.sun.com
2. Click on Patch Portal under Recommended and Security Patches.
3. Click on Recommended Patch Clusters under Recommended Solaris Patch Clusters, J2SE and Java Enterprise System Clusters.
4. Select and download one of the following:
Install this patch cluster before installing qlc driver patch.
|
The following qlc driver patches are needed to support the HBA:
|
|
Caution - Before installing this patch, you should ensure that all other recommended Sun patches are installed. |
|
The following SunVTS patches are needed to perform the diagnostic test for the HBA:
Diagnostic support for the HBA is available with SunVTS 6.0 with these patches.
After you have completed the hardware installation and powered on the system, follow the instructions in this section to install the HBA driver with the Red Hat and SuSE HBA driver and utilities.
|
http://www.qlogic.com/support/sun_page.html
The download page for SG-XPCI1FC-QF4 and SG-XPCI2FC-QF4 will be displayed under Sun Recommended Enterprise 4 Gb Fibre Channel HBA Software.
2. Locate the Drivers for Linux section, and click the link in the Download column for the Linux driver.
3. Download the driver and utility program to a local drive.
4. Click the Driver Download button. After the driver is downloaded, click the utility program Download button.
5. Open the ReadMe and Release notes by clicking the link to it, locate and follow the instructions for installing the driver and utilities. To verify the installation, follow the instructions provided in the description section of the ReadMe file.
To verify the installation, follow the instructions provided in the description section of the QLogic User's Guide.
Diagnostic support is provided by the QLogic SANsurfer Pro or command line interface (CLI) utility. It supports the following functions:
Details are provided in the description section of the ReadMe file.
This section describes installing the HBA driver with the following OSs:
These operating systems are supported on the Sun StorageTek Enterprise 4 Gb Fibre Channel Single and Dual Port HBA. Before installing the drivers for Linux, you must have the relevant Linux OS installed on your hard disk. The driver source is available for download as a .tgz package at the QLogic web page dedicated to Sun products. Instructions to install the drivers, and to create a bootable device connected to this HBA, are also provided in the README file associated with the driver at the QLogic download page.
|
The driver source is applicable to both IA32 and AMD64 hardware architectures. Follow the instructions in this section to download and install the Red Hat and SuSE OS HBA driver and utility.
1. Go to the QLogic download site for Sun Microsystems at:
http://www.qlogic.com/support/sun_page.html
2. Scroll down and locate the table titled Sun Recommended Enterprise 4 Gb Fibre Channel HBA software.
3. Scroll through this table and locate the following in the Name column:
Red Hat Enterprise Linux 4 Driver and SLES 9 (Kernel 2.6) Source Tarball or Red Hat Enterprise Linux 3 Driver and SLES 8 (Kernel 2.4) Source Tarball.
4. Click Download in the right column.
5. Click the README and locate the installation steps for using the .tgz source package.
6. Follow the instructions and download the driver source by clicking the associated Download button.
Diagnostics for the Sun StorageTek 4 Gb FC Enterprise PCI or PCI-X Single and Dual Channel HBA are provided in the SANsurfer Pro and SANsurfer CLI for Linux utility. These diagnostics are available for download at the QLogic web page dedicated for Sun products.
Follow these instructions to run a quick diagnostic check on the HBA:
1. Go to the QLogic download site for Sun Microsystems at:
http://www.qlogic.com/support/sun_page.html
2. Scroll down and locate the table titled Sun Recommended Enterprise 4 Gb Fibre Channel HBA software.
3. Scroll through this table and locate the following in the Name column:
SANsurfer Pro for Red Hat Enterprise Linux 3 (Kernel 2.4) and 4 (kernel 2.6) AMD64 platforms
4. Click Download in the right column.
5. Click the README for the download and install instructions.
The instructions in this section describe how to install an HBA driver for a Sun StorageTek 4 Gb FC Enterprise PCI or PCI-X Single or Dual Channel HBA connected to an external (non-boot) Fibre Channel device. Before you start this process, ensure that the operating system is installed and that your system is configured with the latest Service Pack and Windows Update.
| Note - The driver is only installed once, even if you have multiple Sun StorageTek HBAs installed. |
|
2. Install the Sun StorageTek Enterprise 4Gb FC PCI-X Single or Dual Channel HBA into a PCI or PCI-X slot. See Installing the HBA for more information.
3. Power up the system and allow Windows OS to boot.
4. When the Found New Hardware wizard appears, click Cancel.
5. Go to the QLogic download site for Sun Microsystems at:
http://www.qlogic.com/support/sun_page.html
6. Scroll down and locate the table titled Sun Recommended Enterprise 4 Gb Fibre Channel HBA software.
7. Scroll through this table and locate the following in the Name column:
Windows Server 2003 x64 Edition STOR Miniport Microsoft Certified Driver Package
8. Click Download in the right column.
9. Save the q23wx64Storv91016.exe file to a directory of your choice.
Following the ReadMe file to install the Driver.
11. Click Next to return to the SANsurfer HBA Install Wizard window (main).
|
The QLogic SANsurfer Pro and CLI provides configuration management utilities and diagnostics for the Sun StorageTek Enterprise 4Gb FC PCI-X Single and Dual Channel HBA. Follow these instructions to install the SANsurfer Pro and CLI for Windows:
1. Go to the QLogic download site for Sun Microsystems at:
http://www.qlogic.com/support/sun_page.html
2. Scroll down and locate the table titled Sun Recommended Enterprise 4 Gb Fibre Channel HBA software.
3. Scroll through this table and locate the following in the Name column:
SANsurfer Pro for Windows 2000 and Windows Server 2003
4. Click Download in the right column.
| Sun StorageTek Enterprise PCI-X 4 Gb FC Single and Dual Port Host Bus Adapters Installation Guide
|
819-3899-12 |
Copyright © 2008, Sun Microsystems, Inc. All Rights Reserved.
 To Verify the Package Contents
 m (multimode)