 To Secure the Service
To use the IDE to configure security for a web service and/or a web service operation, perform the following steps.
-
Create or open your web service.
If you need an example of how to create a web service, refer to Chapter 3, WSIT Example Using a Web Container and NetBeans IDE.
Note –When creating an application using the wizards in NetBeans IDE and running on GlassFish, the Java EE Version defaults to Java EE 5. This results in an application compliant with JSR-109, Implementing Enterprise Web Services, which can be read at http://jcp.org/en/jsr/detail?id=109. If you select a value other than the default, for example, J2EE 1.4, the application that is created is not JSR-109 compliant, which means that the application is not JAX-WS, but is JAX-RPC.
-
In the Projects window, expand the Web Services node.
-
Right-click the node for the web service you want to secure.
-
Select Edit Web Service Attributes.
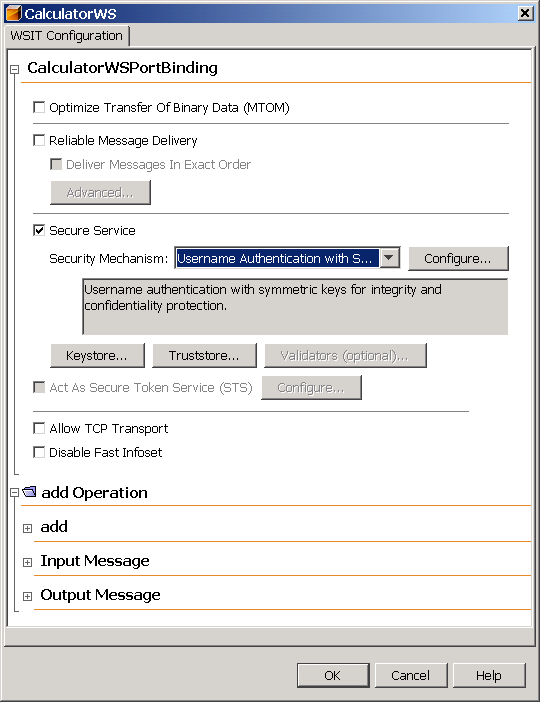
When the Web Service Attributes Editor is opened, the WSIT Configuration options appear (see Figure 7–1).
Figure 7–1 Web Service Attributes Editor Page

-
This option enables WSIT security for all of the operations of a web service.
For information on how to secure selected operations, refer to Securing Operations and Messages.
-
Select a Security Mechanism from the list.
Most of the mechanisms are fully functional without further configuration, however, if you’d like to customize the mechanism, click Configure to specify the configuration for that mechanism.
Options in the Configure dialog are discussed in Security Mechanism Configuration Options.
-
Specify Keystore, Truststore, STS, SSL, and/or user information as required for the selected security mechanism.
Refer to the entry for the selected security mechanism in Table 7–1. This table summarizes the information that needs to be set up for each of the security mechanisms.
-
Click OK to save your changes.
-
Run the web application by right-clicking the project node and selecting Run Project.
-
Verify the URL of the WSDL file before proceeding with the creation of the web service client.
The client will be created from this WSDL file, and will get the service’s security policies through the web service reference URL when the client is built or refreshed.
Next Steps
The WSIT Configuration file that is used when the web service is deployed can be viewed by expanding the Web Pages->WEB-INF elements of the application in the tree, and then double-clicking the wsit-package.service.xml file to open it in the editor. The full contents of an example service-side WSIT configuration file can be viewed at Service-Side WSIT Configuration Files.
Steps for configuring an example application are provided for several of the mechanisms. See the following sections for a complete example of how to configure a web service and a web service client to use these security mechanisms:
- © 2010, Oracle Corporation and/or its affiliates
