| Sun ONE Web Server 6.1 Administrator's Guide |
Chapter 11
Monitoring ServersThis chapter contains information on ways to monitor your server, including the built-in monitoring tool, the quality of service features, and Simple Network Management Protocol (SNMP).
You can use SNMP together with Sun ONE management information bases (MIB) and network management software such as HP OpenView to monitor your servers in real-time just as you monitor other devices in your network.
Note
On Windows, before installing Sun ONE Web Server 6.1, ensure that Windows SNMP components are already installed on your machine.
You can view the server’s status in real time by using the statistics feature or the SNMP. If you’re using UNIX or Linux, you must configure your Sun ONE server for SNMP if you plan to use it. This chapter provides the information you need to use SNMP on UNIX or Linux with your Sun ONE server.
The following topics are included in this chapter:
Monitoring the Server Using StatisticsYou can use the statistics feature to monitor your server’s current activity. The statistics show you how many requests your server is handling and how well it is handling these requests. You can view some statistics for individual virtual servers, and others for the entire server instance. If the interactive server monitor reports that the server is handling a large number of requests, you may need to adjust the server configuration or the system’s network kernel to accommodate the requests. For more information, see the online Sun ONE Web Server 6.1 Performance Tuning, Sizing and Scaling Guide.
Once you enable statistics, you can view statistics in the following areas:
For a description of the various server statistics for which the interactive server monitor reports the totals, see the Monitor Current Activity page in the online help.
Enabling Statistics
To enable statistics, follow these steps:
For more information on enabling statistics, see the online help.
Using Statistics
Once you’ve enabled statistics, you can get a variety of information on how your server instance and your virtual servers are running. The statistics are broken up into functional areas.
To access statistics, follow these steps:
- From the Server Manager, click the Monitor tab.
- Click Monitor Current Activity.
- From the drop-down list, choose the poll interval.
The poll interval is the number of seconds between updates of the statistics information displayed.
- From the drop-down list, choose the kind of statistics you want displayed.
- Click Submit.
If your server instance is running, and you have enabled statistics/profiling, you see a page displaying the kind of statistics you selected. The page is updated every 5-15 seconds, depending upon what you chose for the poll interval.
You can use the data you see in statistics to tune your server. For more information, see the online Sun ONE Web Server 6.1 Performance Tuning, Sizing, and Scaling Guide.
Using Quality of ServiceQuality of Service refers to the performance limits you set for a server instance virtual server class, or virtual server. For example, if you are an ISP, you might want to charge different amounts of money for virtual servers depending on how much bandwidth you allow them. You can limit two areas: the amount of bandwidth and the number of connections.
You can enable these settings for the entire server or for a class of virtual servers in the Server Manager from the Monitor tab. However, you can override these server or class-level settings for an individual virtual server. For more information on setting quality of service limits for an individual server, see Configuring Virtual Server Quality of Service Settings.
Two settings govern how traffic is counted and how often the bandwidth is recomputed: the recompute interval and the metric interval. The recompute is how often (in milliseconds) the bandwidth is computed. The metric interval is the period of time for which data is used in traffic calculations.
This section includes the following topics:
Quality of Service Example
The following example shows how the quality of service information is collected and computed:
The server has metric interval of 30 seconds.
The server starts up at a time of 0 seconds.
At time 1 second, an HTTP connection generates 5000 bytes of traffic to/from the server.
No more connections are made after that. At 30 seconds, the total traffic for the last 30 seconds is 5000 bytes.
At 32 seconds, the traffic sample from 1 second is discarded, since it is older than the 30 seconds of the metric interval. The total traffic for the last 30 seconds is now 0.
The recompute interval works similarly. The server’s recompute interval is 100ms.
Continuing with the example, the bandwidth gets recomputed periodically every 100 milliseconds. The calculation is based on the amount of traffic as well as the metric interval.
At time 0 seconds, the bandwidth is calculated for the first time. The total traffic is zero, divided by the metric interval of 30 seconds, gives a bandwidth of zero.
At 1 second, the bandwidth is calculated for the 10th time (1000 milliseconds/ 100 milliseconds). The total traffic is 5000 bytes, which is divided by 30 seconds. The bandwidth is 5000/30 = 166 bytes per second.
At 30 seconds, the bandwidth is calculated for the 300th time. The total traffic is 5000 bytes, which is divided by 30 seconds. The bandwidth is 5000/30 = 166 bytes per second.
At 32 seconds, the bandwidth is computed again for the 320th time. The traffic is now 0 (since the one connection that generated traffic is too old to be counted), divided by 30, gives a bandwidth of 0 bytes/second.
Setting Up Quality of Service
To configure the quality of service settings for a server instance or a class of virtual servers, you need to configure the settings in through the user interface. To actually enforce your quality of service settings, you must also set up Server Application Functions (SAFs) in your obj.conf file.
To configure quality of service, follow these steps:
- From the Server Manager, click the Monitor tab.
- Click Quality of Service.
A page appears listing general settings for quality of service, followed by a list containing the server instance as a whole and each class of virtual servers.
- To enable quality of service as a whole, click Enable.
By default quality of service is enabled. Enabling quality of service increases server overhead slightly.
- Choose the Recompute Interval.
The recompute interval is the number of milliseconds between each computation of the bandwidth for all servers, classes, and virtual servers. The default is 100 milliseconds.
- Choose the Metric Interval.
The metric interval is the interval in seconds during which the traffic is measured. The default is 30 seconds. All bandwidth measured during this time is averaged to give the bytes per second.
If your site has a lot of large file transfers, use a large value (several minutes or more) or this field. A large file transfer might take up all the allowed bandwidth for a short metric interval, and result in connections being denied if you’ve enforced the maximum bandwidth setting. Since the bandwidth is averaged by the metric interval, a longer interval smooths out spikes caused by large files.
If the bandwidth limit is much lower than available bandwidth (for example, 1 MB-per-second bandwidth limit but with a 1 GB-per-second connection to the backbone), the metric interval should be shortened.
Please note that if you have large static file transfers and a bandwidth limit that is much lower than available bandwidth, you have to decide which situation to tune for, since the problems require opposite solutions.
- Enable quality of service for the server instance and/or the virtual server classes.
The lower portion of the screen lists the server instance and server classes. Choose Enable as the action next to the items for which you want to enable quality of service.
- Set the maximum bandwidth, in bytes per second.
- Choose whether or not to enforce the maximum bandwidth setting.
If you choose to enforce the maximum bandwidth, once the server reaches its bandwidth limit additional connections are refused.
If you do not enforce the maximum bandwidth, when the maximum is exceeded the server logs a message to the error log.
- Choose the maximum number of connections allowed.
This number is the number of concurrent requests processed.
- Choose whether or not to enforce the maximum connections setting.
If you choose to enforce the maximum connections, once the server reaches its limit additional connections are refused.
- If you do not enforce the maximum connections, when the maximum is exceeded the server logs a message to the error log.
- Click OK.
Required Changes to obj.conf
To enable quality of service, you must include directives in your obj.conf to invoke two Server Application Functions (SAFs): an AuthTrans qos-handler and an Error qos-error.
The qos-handler AuthTrans directive must be the first AuthTrans configured in the default object in order to work properly. The role of the quality of service handler is to examine the current statistics for the virtual server, virtual server class, and global server, and enforce the limits by returning an error.
Sun ONE Web Server includes a built-in sample quality of service handler SAF, called qos-handler. This SAF logs when limits are reached, and returns 503 "Server busy" to the server so that it can be processed by NSAPI.
Sun ONE Web Server also includes a built-in sample error SAF called qos-error which returns an error page stating which limits caused the 503 error and the value of the statistic that triggered the limit. You may want to alter the sample code to provide different error information.
These samples are available at server_root/plugins/nsapi/examples/qos.c. You can use these samples, or you can write your own SAFs.
For more information on these SAFs and how to use them, see the Sun ONE Web Server 6.1 NSAPI Programmer’s Guide.
Known Limitations to Quality of Service
When you use the quality of service features, keep in mind the following limitations:
- The connection or bandwidth statistics are not shared across server processes because of performance. In other words, the setting of MaxProc is not accounted for. So all the limits apply individually to a server process, not to the aggregate of all processes. For more information on MaxProcs and multiple processes, see the online Sun ONE Web Server 6.1 Performance Tuning, Sizing, and Scaling Guide.
- The quality of service features only measure the HTTP bandwidth at the application level. The HTTP bandwidth can differ from the actual TCP network bandwidth for a variety of reasons:
- The quality of service features cannot accurately measure traffic from PR_TransmitFile calls. For basic I/O operations such as PR_Send()/net_write or PR_Recv()/net_read, the data transferred can be quickly accounted for by the bandwidth manager, since the number of bytes transferred in one system call is usually the size of a buffer and the I/O call returns quickly. This works very well to measure the instantaneous bandwidth of dynamic content applications. However, because the amount of data transferred from PR_TransmitFile is only known at the end of the transfer, it can’t be measured before it completes.
If the PR_TransmitFile is short, then the quality of service features will perform adequately. However, If the PR_TransmitFile is long, such as in the case of a long file downloaded by a dialup user, the whole amount of data transferred will be counted at completion time. When the bandwidth manager recomputes bandwidth after the next recompute interval period starts, the bandwidth computed will go up significantly because of that recent large PR_TransmitFile. This case could cause the server to deny all requests until the next metric interval, when the bandwidth manager will "expire" the transmit file operation, since it is too old, and thus the bandwidth value will go back down. If your site has a lot of very long static file downloads, the you should increase the metric interval from the default 30 seconds.
- The bandwidth computed is always an approximation because it is not measured instantaneously, but is recomputed at regular intervals and over a certain period. For example, if the metric interval is the default 30 seconds and the server is idle for 29 seconds, then the next second, a client could potentially use 30 times the bandwidth limit in one second.
- The quality of service bandwidth statistics are lost whenever the server is reconfigured dynamically. In addition, the quality of service limitations are not enforced in threads that have connections on an older, inactive configuration, because the bandwidth manager thread only computes bandwidth statistics for the active configuration. Potentially, a client that doesn’t close its socket for a long time and remains active so that the server doesn’t time it out would not be subject to the quality of service limitations after a server dynamic reconfiguration.
- The concurrent connections are computed with a different granularity for virtual servers than for virtual server classes and the global server instance. The connection counter for an individual virtual server is incremented atomically immediately after the request is parsed and routed to the virtual server. It is also decremented atomically at the end of the response processing for that request. This means that the virtual server connection statistics are always exact at any instant.
However, the connection statistics for the virtual server class and global server instance are not updated instantly. They are updated by the bandwidth manager thread every recompute interval. The connection count for the virtual server class is the sum of the connections on all virtual servers of that class; and the global server instance connection count is the sum of connections on all virtual server classes.
Because of the way these values are computed, the number of connections for a virtual server is always correct (and if you’ve enforced a limit to the number of connections, you can never have more than the limit), and the virtual server class and server instance values are not quite as accurate, since they’re only computed at intervals.
SNMP BasicsSNMP is a protocol used to exchange data about network activity. With SNMP, data travels between a managed device and a network management station (NMS). A managed device is anything that runs SNMP: hosts, routers, your web server, and other servers on your network. The NMS is a machine used to remotely manage that network. Usually, the NMS software will provide a graph to display collected data or use that data to make sure the server is operating within a particular tolerance.
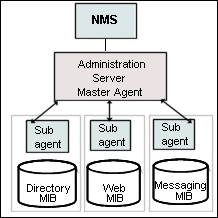
The NMS is usually a powerful workstation with one or more network management applications installed. A network management application such as HP OpenView graphically shows information about managed devices, such as your web servers. For example, it might show which servers in your enterprise are up or down, or the number and type of error messages received. When you use SNMP with a Sun ONE server, this information is transferred between the NMS and the server through the use of two types of agents, the subagent and the master agent.
The subagent gathers information about the server and passes the information to the server’s master agent. Every Sun ONE server, except for the Administration Server, has as subagent.
Note
After making any SNMP configuration changes, you must click the Apply button, then restart SNMP subagent.
The master agent communicates with the NMS. The master agent is installed with the Administration Server.
You can have multiple subagents installed on a host computer, but only one master agent. For example, if you had Directory Server, Sun ONE Web Server, and the Messaging Server installed on the same host, the subagents for each of the servers would communicate with the same master agent, as shown below:
The Sun ONE Web Server MIBSun ONE Web Server stores variables pertaining to network management. Variables the master agent can access are called managed objects. These objects are defined in a tree-like structure called the management information base (MIB). The MIB provides access to the web server’s network configuration, status, and statistics. Using SNMP, you can view this information from the network management workstation (NMS).
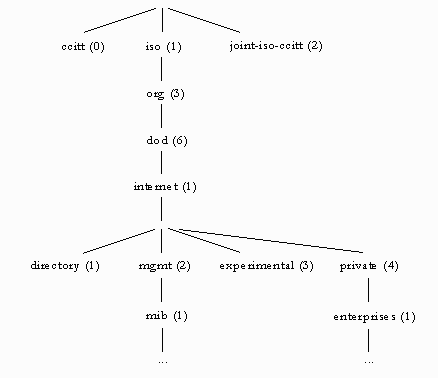
A server's MIB contains variable definitions pertaining to network management for that particular server. The top level of the MIB tree is shown in the figure below:
The top level of the MIB tree shows that the internet object identifier has four subtrees: directory (1), mgmt (2), experimental (3), and private (4). The private (4) subtree contains the enterprises (1) node. Each subtree in the enterprises (1) node is assigned to an individual enterprise, which is an organization that has registered its own specific MIB extensions. An enterprise can then create product-specific subtrees under its subtree. MIBs created by companies are located under the enterprises (1) node. The Sun ONE MIBs are located under the enterprises (1) node.
Each Sun ONE server subagent provides a MIB for use in SNMP communication. The server reports significant events to the network management station (NMS) by sending messages or traps containing these variables. The NMS can also query the server’s MIB for data, or can remotely change variables in the MIB.
Each Sun ONE server has its own management information base (MIB). All Sun ONE MIBs are located at:
The Sun ONE Web Server’s MIB is a file called webserv61.mib. This MIB contains the definitions for various variables pertaining to network management for Sun ONE Web Server.
The Sun ONE Web Server 6.1 MIB has an object identifier of
http 60 (iws60 OBJECT IDENTIFIER ::= {http 60 }) and is located in the server_root/plugins/snmp directory.You can see administrative information about your web server and monitor the server in real time using the Sun ONE Web Server MIB. Table 11-1 lists and describes the managed objects stored in the webserv61.mib.
Setting Up SNMPIn general, to use SNMP you must have a master agent and at least one subagent installed and running on a your system. You need to install the master agent before you can enable a subagent.
The procedures for setting up SNMP are different depending upon your system. Table 8.1 provides an overview of procedures you will follow for different situations. The actual procedures are described in detail later in the chapter.
Before you begin, you should verify two things:
See your system documentation for information on how to verify this information.
Note
After changing SNMP settings in the Administration Server, installing a new server, or deleting an existing server, you must perform the following steps:
Table 2 Overview of procedures for enabling SNMP master agents and subagents.
Using a Proxy SNMP Agent (UNIX/Linux)You need to use a proxy SNMP agent when you already have a native agent running, and you want to use continue using it concurrently with an Sun ONE Web Server master agent. Before you start, be sure to stop the native master agent. (See your system documentation for detailed information.)
This section includes the following topics:
Installing the Proxy SNMP Agent
If an SNMP agent is running on your system and you want to continue using the native SNMP daemon, follow the steps in these sections:
- Install the SNMP master agent. See Installing the SNMP Master Agent.
- Install and start the proxy SNMP agent and restart the native SNMP daemon. See Using a Proxy SNMP Agent (UNIX/Linux).
- Start the SNMP master agent. See Enabling and Starting the SNMP Master Agent.
- Enable the subagent. See Enabling the Subagent.
To install the SNMP proxy agent, edit the CONFIG file (you can give this file a different name), located in plugins/snmp/sagt in the server root directory, so that it includes the port that the SNMP daemon will listen to. It also needs to include the MIB trees and traps that the proxy SNMP agent will forward.
Here is an example of a CONFIG file:
AGENT AT PORT 1161 WITH COMMUNITY public
SUBTREES 1.3.6.1.2.1.1,
1.3.6.1.2.1.2,
1.3.6.1.2.1.3,
1.3.6.1.2.1.4,
1.3.6.1.2.1.5,
1.3.6.1.2.1.6,
1.3.6.1.2.1.7,
1.3.6.1.2.1.8
FORWARD ALL TRAPS;
Starting the Proxy SNMP Agent
To start the proxy SNMP agent, at the command prompt, enter:
Restarting the Native SNMP Daemon
After starting the proxy SNMP agent, you need to restart the native SNMP daemon at the port you specified in the CONFIG file. To restart the native SNMP daemon, at the command prompt, enter
where port_number is the port number specified in the CONFIG file. For example, on the Solaris platform, using the port in the previously mentioned example of a CONFIG file, you’d enter:
Reconfiguring the SNMP Native AgentIf your SNMP daemon is running on AIX, it supports SMUX. For this reason, you don’t need to install a master agent. However, you do need to change the AIX SNMP daemon configuration.
AIX uses several configuration files to screen its communications. One of them, snmpd.conf, needs to be changed so that the SNMP daemon accepts the incoming messages from the SMUX subagent. For more information, see the online manual page for snmpd.conf. You need to add a line to define each subagent.
For example, you might add this line to the snmpd.conf:
IP_address is the IP address of the host the subagent is running on, and net_mask is the network mask of that host.
Installing the SNMP Master AgentTo configure the SNMP master agent you must install the Administration Server instance as the root user. However, even a non-root user can accomplish basic SNMP tasks, such as MIB browsing, on a web server instance by configuring the SNMP sub-agent to work with the master agent.
To install the master SNMP agent using the Server Manager:
- Log in as root.
- Check whether an SNMP daemon (snmpd) is running on port 161.
If no SNMP daemon is running, go to Step 4.
If an SNMP daemon is running, make sure you know how to restart it and which MIB trees it supports.
- If an SNMP daemon is running, kill its process.
- In the Server Manager, choose the SNMP Master Agent Trap page from the Global Settings tab. The Manager Entries page appears.
- Type the name of the system that is running your network management software.
- Type the port number at which your network management system listens for traps. (The well-known port is 162.) For more information on traps, see Configuring Trap Destinations.
- Type the community string you want to use in the trap. For more information on community strings, see Configuring the Community String.
- Click OK.
- In the Server Manager, the SNMP Master Agent Community page from the choose Global Settings tab. The Community Strings page appears.
- Type the community string for the master agent.
- Choose an operation for the community.
- Click OK.
Enabling and Starting the SNMP Master AgentMaster agent operation is defined in an agent configuration file named CONFIG. You can edit the CONFIG file using the Server Manager, or you can edit the file manually. You must install the master SNMP agent before you can enable the SNMP subagent.
If you get a bind error similar to “System Error: Could not bind to port,” when restarting the master agent, use ps -ef | grep snmp to check if magt is running. If it is running, use the command kill -9 pid to end the process. The CGIs for SNMP will then start working again.
This section includes the following topics:
Starting the Master Agent on Another Port
The Administration Interface will not start the SNMP master agent on ports other than 161. However, you can manually start the master agent on another port using the following steps:
The master agent will then start on the desired port. However, the user interface will be able to detect that the master agent is running.
Manually Configuring the SNMP Master Agent
To configure the master SNMP agent manually:
- Log in as superuser.
- Check to see if there is an SNMP daemon (snmpd) running on port 161.
If an SNMP daemon is running, make sure you know how to restart it and which MIB trees it supports. Then kill its process.
- Edit the CONFIG file located in plugins/snmp/magt in the server root directory.
- (Optional) Define sysContact and sysLocation variables in the CONFIG file.
Editing the Master Agent CONFIG File
The CONFIG file defines the community and the manager that master agent will work with. The manager value should be a valid system name or an IP address.
Here is an example of a basic CONFIG file:
COMMUNITY public
ALLOW ALL OPERATIONS
MANAGER manager_station_name
SEND ALL TRAPS TO PORT 162
WITH COMMUNITY public
Defining sysContact and sysLocation Variables
You can edit the CONFIG file to add initial values for sysContact and sysLocation which specify the sysContact and sysLocation MIB-II variables. The strings for sysContact and sysLocation in this example are enclosed in quotes. Any string that contains spaces, line breaks, tabs, and so on must be in quotes. You can also specify the value in hexadecimal notation.
Here is an example of a CONFIG file with sysContract and sysLocation variables defined:
Configuring the SNMP Subagent
You can configure the SNMP subagent to monitor your server.
To configure the SNMP subagent, perform the following steps:
- From the Administration Server, select the server instance and click Manage.
- Select the Monitor tab.
- Select SNMP Subagent Configuration.
- (UNIX only) Enter the name and domain of the server in the Master Host field.
- Enter the Description of the server, including operating system information.
- Enter the Organization responsible for the server.
- Enter the absolute path for the server in the Location field.
- Enter the name of the person responsible for the server and the person’s contact information in the Contact field.
- Select On to Enable the SNMP Statistics Collection.
- Click OK.
- Click Apply.
- Select Apply Changes to restart your server for changes to take effect.
Starting the SNMP Master Agent
Once you have installed the SNMP master agent, you can start it manually or by using the Administration Server.
Manually Starting the SNMP Master Agent
To start the master agent manually, enter the following at the command prompt:
The INIT file is a nonvolatile file that contains information from the MIB-II system group, including system location and contact information. If INIT doesn’t already exist, starting the master agent for the first time will create it. An invalid manager name in the CONFIG file will cause the master agent start-up to fail.
To start a master agent on a nonstandard port, use one of two methods:
Method one: In the CONFIG file, specify a transport mapping for each interface over which the master agent listens for SNMP requests from managers. Transport mappings allow the master agent to accept connections at the standard port and at a nonstandard port. The master agent can also accept SNMP traffic at a nonstandard port. The maximum number of concurrent SNMP is limited by your target system’s limits on the number of open sockets or file descriptors per process. Here is an example of a transport mapping entry:
After editing the CONFIG file manually, you should start the master agent manually by typing the following at the command prompt:
Method two: Edit the /etc/services file to allow the master agent to accept connections at the standard port as well as a nonstandard port.
Starting the SNMP Master Agent Using the Administration Server
To start the SNMP master agent using the Administration Server, perform the following steps:
Configuring the SNMP Master AgentOnce you’ve enabled the master agent and enabled a subagent on a host computer, you need to configure the host’s Administration Server. This entails specifying community strings and trap destinations.
Configuring the Community String
A community string is a text string that an SNMP agent uses for authorization. This means that a network management station would send a community string with each message it sends to the agent. The agent can then verify whether the network management station is authorized to get information. Community strings are not concealed when sent in SNMP packets; strings are sent in ASCII text.
You can configure the community string for the SNMP master agent from the Community Strings page in the Server Manager. You also define which SNMP-related operations a particular community can perform. From the Server Manager, you can also view, edit, and remove the communities you have already configured.
Configuring Trap Destinations
An SNMP trap is a message the SNMP agent sends to a network management station. For example, an SNMP agent sends a trap when an interface’s status has changed from up to down. The SNMP agent must know the address of the network management station so it knows where to send traps. You can configure this trap destination for the SNMP master agent from Sun ONE Web Server. You can also view, edit, and remove the trap destinations you have already configured. When you configure trap destinations using Sun ONE Web Server, you are actually editing the CONFIG file.
Enabling the SubagentAfter you have installed the master agent that comes with the Administration Server, you must enable the subagent for your server instance before you attempt to start it. For more information on installing the master agent, see Installing the SNMP Master Agent. You can use the Server Manager to enable the subagent.
To stop the SNMP function on UNIX/Linux platforms, you must stop the subagent first, then the master agent. If you stop the master agent first, you may not be able to stop the subagent. If that happens, restart the master agent, stop the subagent, then stop the master agent.
To enable the SNMP subagent, use the SNMP Subagent Configuration page in the Server Manager, and start the subagent from the SNMP Subagent Control page. For more information, see the corresponding sections in the online help.
Once you have enabled the subagent, you can start, stop or restart it from The SNMP Subagent Control Page (UNIX/Linux) or the Services Control Panel for Windows.
Note
After making any SNMP configuration changes, you must click the Apply button, then restart SNMP subagent.
Understanding SNMP MessagesGET and SET are two types of messages defined by SNMP. GET and SET messages are sent by a network management station (NMS) to a master agent. You can use one or the other, or both with the Administration Server.
SNMP exchanges network information in the form of protocol data units (PDUs). These units contain information about variables stored on the managed device, such as the web server. These variables, also known as managed objects, have values and titles that are reported to the NMS as necessary. Protocol data units sent by the server to the NMS are known as “traps.” The use of GET, SET, and “trap” messages are illustrated in the following examples.
NMS-initiated Communication. The NMS either requests information from the server or changes the value of a variable store in the server’s MIB. For example:
- The NMS sends a message to the Administration Server master agent. The message might be a request for data (a GET message), or an instruction to set a variable in the MIB (a SET message).
- The master agent forwards the message to the appropriate subagent.
- The subagent retrieves the data or changes the variable in the MIB.
- The subagent reports data or status to the master agent, and then the master agent forwards the message back (a GET message) to the NMS.
- The NMS displays the data textually or graphically through its network management application.
Server-initiated Communication. The server subagent sends a message or “trap” to the NMS when a significant event has occurred. For example: