Constructing the Environments
In implementing AS2 PM Projects in the sample scenario, you must set up at least one Environment for each eXchange installation. The sample scenario is set up to operate on one machine but mimic two TPs. As a result, for this sample, you need to construct the Environments as explained under the following sections:
Using Environment Explorer
You perform these operations using Enterprise Designer’s Environment Explorer and its canvas windows. The sample Environments contain the following types of components:
-
Instances for external systems accessed by eWays
-
Instance for the B2B Service Configurator external system
-
Instance for the Logical Host
For example, the Oracle external system must be configured to reference your Oracle setup. Other external systems (for example, the File and Batch eWays) have configurations that may differ depending on your system setup, and so forth. Also, you might be using nonstandard ports or user name/password combinations that vary from system to system.
The remainder of this section describes the common procedures to construct the sample scenario’s Environments.
Note –
Before you begin, make sure you have followed the preliminary instructions provided under Beginning Operations.
Setting up the Environments
This section explains how to create the sample’s Environments for Atlanta and Berlin. Use the procedures to set up Atlanta first, then Berlin.
 To Create the Basic Components
-
On Enterprise Designer, near the lower left of the window, click the Environment Explorer tab.
-
On the Environment Explorer tree, right-click the Repository and, on the context menu, click New Environment.
-
Name the newly created Environment envA (envB for Berlin).
-
Right-click envA (envB for Berlin) and, on the menu, click New Logical Host and name the Logical Host lhA (lhB for Berlin).
-
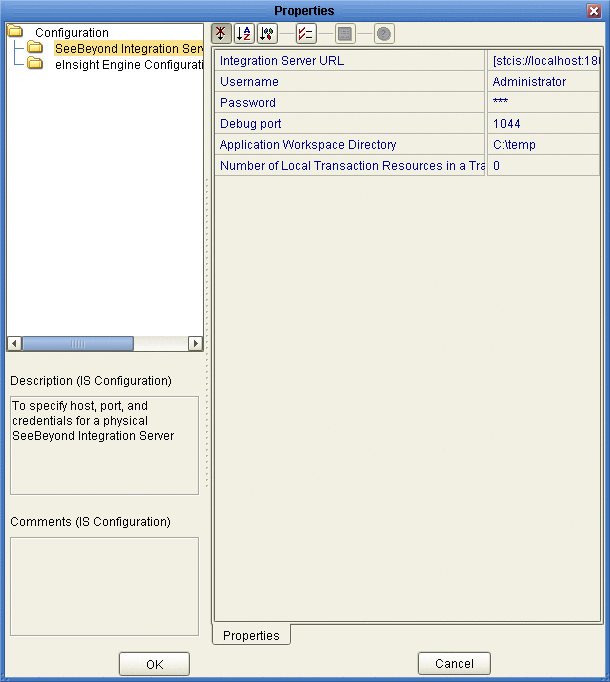
Right-click IntegrationSvr1 and select Properties from the context menu.
The Properties dialog box for IntegrationSvr1 appears (see Figure 6–4). For more information on how to use this dialog box, see the eGate Integrator User's Guide.
Figure 6–4 Integration Server Properties Dialog Box: Environment

-
For lhA > IntegrationSvr1 on Environment Explorer, set the Configuration > SeeBeyond Integration Server properties as follows:
-
For the rest of the IntegrationSvr1 properties settings, accept the defaults.
-
Create a Sun SeeBeyond JMS IQ Manager under IntegrationSvr1 and name it SBJMSIQMgr1.
 To Create and Configure the Oracle External
System
-
On Enterprise Designer, on the Environment Explorer tree, right-click envA (envB for Berlin) and, on the context menu, click New Oracle External System.
-
Name the new component esOracle and click OK.
These actions create, for the current Environment, an external system instance for the Oracle eWay in outbound mode.
Note –The eXchange database uses Oracle. For more information on Oracle requirements for eXchange and AS2 PM, see the AS2 Protocol Manager Release Notes.
-
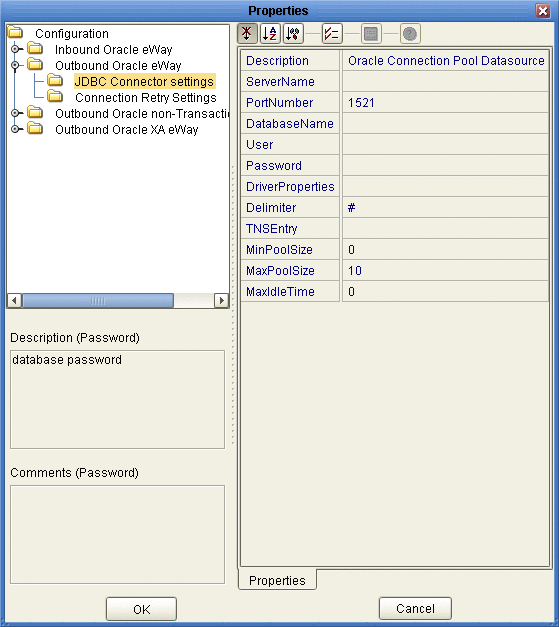
Right-click esOracle and select Properties from the context menu.
The Properties dialog box for the external system appears (see Figure 6–5). For more information on how to use this dialog box, see the Oracle eWay Adapter User's Guide.
Figure 6–5 Oracle External System Properties Dialog Box: Environment

-
Configure the Configuration > Outbound Oracle eWay > JDBC Connector settings properties for esOracle as follows:
-
Description: Oracle Connection Pool Datasource
-
ServerName: Host name of the Oracle server machine
-
PortNumber: 1521 (change this value only if your Oracle system administrator changed the default)
-
DatabaseName: SID for your current Oracle system
-
User: Valid user ID for the current Oracle system
-
Password: Valid password for the current Oracle system (masked)
-
Driver Properties: Blank, for this sample
-
Delimiter: #
-
TNS Entry: Blank, for this sample
-
MinPoolSize: 0
-
MaxPoolSize: 10
-
MaxIdleTime: 0
-
-
When all properties have been configured correctly for your site, click OK.
 To Create and Configure the LDAP External
System
-
Create a new LDAP eWay (New > LDAP External System) under envA (envB for Berlin) and name it esLDAP.
-
Set the Environment Configuration > Connection properties for esLDAP as follows:
-
Initial Context Factory: com.sun.jndi.ldap.LdapCtxFactory
-
Provider URL: As necessary for your system, for Atlanta and Berlin (the two URLs must be different), according to the provided syntax, for example:
ldap://ex4:1389/o=bhex2_1,dc=stc,dc=com
-
Authentication: simple
-
Principal: As necessary for your system
-
Credentials: Password, as necessary for your system
Note –A separate LDAP external system instance is required for each B2B Host.
-
-
For all other LDAP eWay (esLDAP) properties, accept the defaults.
-
When all properties have been configured correctly for your site, click OK.
 To Create and Configure the B2B Configurator
Service External System
-
Create a B2B Service Configurator (New > B2B Configurator Service) external system under envA (envB for Berlin) and name it esB2BService.
-
Set the environment-configuration > Database Settings properties for esB2BService as follows:
-
Type: Oracle
-
URL: Points to the eXchange database, an example of the URL syntax: jdbc:oracle:thin:@hostname:port:exchange
-
UserName: Valid user ID for the current Oracle system
-
Password: Valid password for the current Oracle system (masked)
-
-
Set the environment-configuration > JMS Settings properties for esB2BService as follows:
-
JMS Server URL: Points to the IQ Manager port, envA Logical Host on 18000 (envB on 28000), the IQ Manager port for envA: 18007 (28007 for envB), this port number listed in the Domain Manager for the current Logical Host, an example of the URL syntax: stcms://hostname:port
-
Security Principal: Administrator
-
Security Credentials: STC (masked)
-
Connection Factory: connectionfactories/topicconnectionfactory
-
Resend Topic: topics/EX_TODELIVERY
-
Timeout Topic: topics/EX_ERROR
-
Business Protocol Topic for Batching: topics/EX_BATCHER
-
Delivery Protocol Topic for Batching: topics/EX_DELIVERYBATCHER
-
-
For the rest of the B2B Configurator Service properties settings, accept the defaults.
-
When all properties have been configured correctly for your site, click OK.
 To Create and Configure the Keystore External
System
-
Create a Keystore (New > Keystore) external system under envA (envB for Berlin) and name it esKeystore.
-
Set the Environment Configuration > Connection Settings properties for esKeystore as follows:
-
LDAP: As necessary for your system, for Atlanta and Berlin (the two URLs must be different), according to the provided syntax, for example:
ldap://ex4:1389/o=bhex2_1,dc=stc,dc=com
-
Password: Valid password for the current Keystore (masked)
-
Keystore Type: PKCS12 (change from default)
-
LDAP User Name: The user name you use for the current LDAP system
-
LDAP User Password: The password you use for the current LDAP system
-
Keystore Provider: BC (change from default)
-
-
When all properties have been configured correctly for your site, click OK.
 To Create and Configure the File eWays
-
Create a new File eWay (New > File External System) in inbound mode under envA and name it esFileA.
-
Set the Configuration > Inbound File eWay > Parameter Settings property for esFileA as follows:
Directory:
C:/temp/eXchange/Sample/AS2/Data/Atlanta
Note –Make sure this folder and the folder for envB are correctly configured under the appropriate parameter in ePM. It is recommended that you create an additional folder under AS2 named Errors.
-
Set the Configuration > Outbound File eWay > Parameter Settings property (for DLQ and processing errors) for esFileA as follows:
Directory:
C:/temp/eXchange/Sample/AS2/Errors/Atlanta
-
For all other File eWay (esFileA and esFileB) properties, accept the defaults.
-
Create a new File eWay (New > File External System) in inbound mode under envB and name it esFileB.
-
Set the Configuration > Inbound File eWay > Parameter Settings property for esFileB as follows:
Directory:
C:/temp/eXchange/Sample/AS2/Data/Berlin
-
Set the Configuration > Outbound File eWay > Parameter Settings property (for DLQ and processing errors) for esFileB as follows:
Directory:
C:/temp/eXchange/Sample/AS2/Errors/Berlin
-
When all properties have been configured correctly for your site, click OK.
 To Create and Configure the Additional External
Systems
-
In Enterprise Designer, on the Environment Explorer tree, right-click envA (envB for Berlin) and, on the context menu, click New Batch Local File System.
-
Name the new external system esBLF, and click OK.
These operations create, for the Environment, an external system for the Batch eWay in local file mode.
-
In Properties dialog boxes for your new external systems, accept the defaults.
Note –When you are finished with each Properties dialog box, click OK.
-
Create an HTTP eWay (client mode) external system under envA (envB for Berlin) and name it esHTTP.
-
Open the Properties dialog boxes for esHTTP and accept the defaults.
-
Create an HTTP eWay (server mode) external system under envA (envB for Berlin) and name it esHTTPserver.
-
Open the Properties dialog boxes for esHTTPserver and accept the defaults.
Note –When you build a B2B Host Deployment Profile, eXchange automatically creates another external system on the chosen Environment. This external system is called an eXchange Service. For more information on this service, see the eXchange Integrator User’s Guide. Also, see Constructing the B2B Host Project.
-
When all properties have been configured correctly for your site, click OK.
When You Are Finished for Atlanta
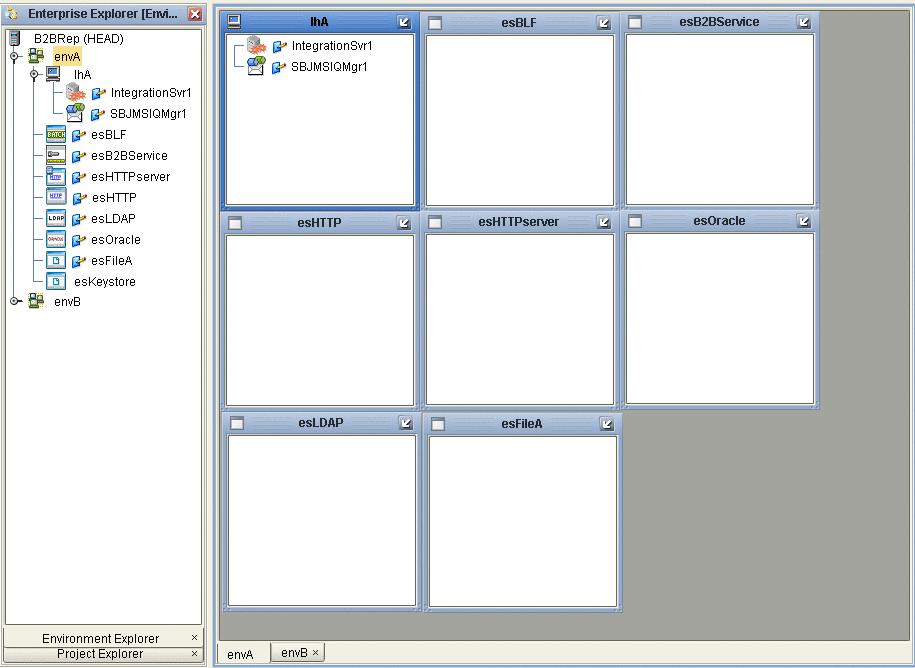
Result: You have set up the Environment for Atlanta, envA. See Figure 6–6.
Figure 6–6 Sample Scenario’s Atlanta Environment

When You Are Finished for Berlin
Result: You have set up the Environment for Berlin, envB, which appears directly under envA on the Environment Explorer tree. The Berlin Environment appears similar to the Atlanta Environment shown in Figure 6–6.
Final Result
You have now finished setting up the Environments for Atlanta and Berlin, including the external system components to be used by both.
 To Prepare for the Next Steps
- © 2010, Oracle Corporation and/or its affiliates
