| C H A P T E R 4 |
|
Managing User Accounts |
|
Oracle Integrated Lights Out Manager (ILOM) 3.0 Concepts Guide (820-6410) |
||
|
Oracle Integrated Lights Out Manager (ILOM) 3.0 CLI Procedures Guide (820-6412) |
||
|
Oracle Integrated Lights Out Manager (ILOM) 3.0 Management Protocols Reference Guide (820-6413) |
||
|
The ILOM 3.0 Documentation Collection is available at: http://docs.sun.com/app/docs/prod/int.lights.mgr30#hic |
||
|
1. Log in to the ILOM SP web interface or the CMM ILOM web interface.
2. Select User Management --> User Accounts.
The User Account Settings page is displayed.
3. Click the check box next to Enable Single Sign On to enable the feature, or deselect the check box to disable the feature.
|
1. Log in to the ILOM SP web interface or the CMM ILOM web interface.
2. Select System Information --> Session Time-Out.
The Session Time-Out page appears.
3. Select your preferred time increment from the drop-down list.
4. Click the Apply button to save your change.
|
1. Log in to the ILOM SP web interface or the CMM ILOM web interface.
2. Select User Management --> User Accounts.
The User Account Settings page appears.
3. In the Users table, click Add.
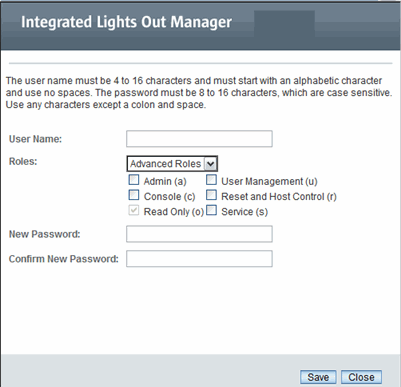
4. Complete the following information:
a. Type a user name in the User Name field.
b. Choose a role. Options include:
c. Select the appropriate roles.
d. Type a password in the Password field.
The password must be at least 8 characters and no more than 16 characters. The password is case-sensitive. Use alphabetical, numeric, and special characters for better security. You can use any character except a colon. Do not include spaces in passwords.
e. Retype the password in the Confirm Password field to confirm the password.
f. When you are done entering the new user’s information, click Save.
The User Account Settings page is redisplayed. The new user account and associated information is listed on the User Account Settings page.
|
1. Log in to the ILOM SP web interface or the CMM ILOM web interface.
2. Select User Management --> User Accounts.
The User Account Settings page appears.
3. In the Users table, select a radio button next to the user account you want to modify and click Edit.
A dialog appears listing the role assigned.
4. Modify the role assigned to a user.
Note that when the Advanced Role is selected, a user can select any of the six available roles. However, if you chose Administrator or Operator, ILOM will automatically assign the roles. For example, the two following figures identify the roles assigned by ILOM for Administrator and Operator.


5. Type a new password in the New Password field.
The password must be between 8 and 16 characters. The password is case-sensitive. Use alphabetical, numeric, and special characters for better security. You can use any character except a colon. Do not include spaces in passwords.
6. Retype the password in the Confirm New Password field to confirm the password.
7. After you have modified the account information, click Save for your changes to take effect, or click Close to return to the previous settings.
The User Account Settings page is redisplayed with your changes.
|
| Note - To add, modify, or delete user accounts you need the User Management (u) role enabled. |
1. Log in to the ILOM SP web interface or the CMM ILOM web interface.
2. Select User Management --> User Accounts.
The User Account Settings page appears.
3. Select the radio button next to the user account you want to delete.
4. In the Users table, click Delete.
5. Click OK to delete the account or click Cancel to stop the process.
The User Account Settings page refreshes with the user account you deleted no longer listed.
|
1. Log in to the ILOM SP web interface or the CMM ILOM web interface.
2. Select User Management --> Active Sessions.
The Active Sessions page appears. You can find the user name, the date and time that the user initiated the session, the types of session of the users currently logged in to ILOM, and the mode. If you are using ILOM 3.0.4 or a later version of ILOM, you can also view each user’s assigned role.
The SSH keys enable you to automate password authentication. Use the following procedures in this section to add or delete SSH keys.
|
1. Log in to the ILOM SP web interface or the CMM ILOM web interface.
2. Select User Management --> User Accounts
The User Accounts Setting page appears.
3. In the User Account Settings page, scroll down to the SSH table and click Add.
The SSH key add screen appears.
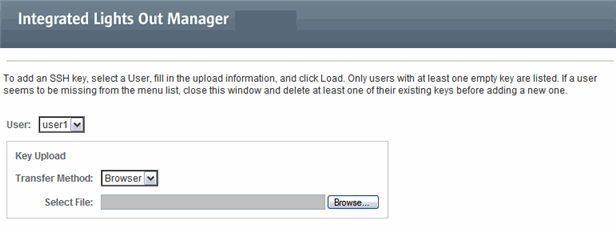
4. Select the user from the User drop-down list.
5. Select a transfer method from the Transfer Method drop-down list.
The following transfer methods are available:
6. If you select the Browser transfer method, click Browse and browse to the location of the SSH key. Proceed to Step 9.
7. If you select the TFTP transfer method, the prompts shown in the following figure appear and you must provide the following information, then proceed to Step 9:

8. If you select the SCP, FTP, SFTP, HTTP, or HTTPS transfer method, the prompts shown in the next figure appear and you must provide the following information, then proceed to Step 9:

9. To add the SSH key to the selected user account, click Load.
The SSH key is added to the user account.
|
1. Log in to the ILOM SP web interface or the CMM ILOM web interface.
2. Select User Management--> User Accounts
The User Account Settings page appears.
3. Scroll down to the SSH Keys section at the bottom of the page, select a user, and click Delete.
A confirmation dialog box appears.
|
1. Log in to the ILOM SP web interface or the CMM ILOM web interface.
2. Select User Management --> Active Directory.
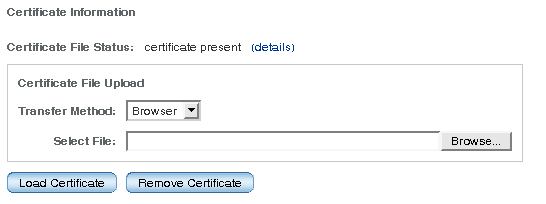
The Active Directory page appears. There are three sections to the Active Directory page, as shown in the following figures.
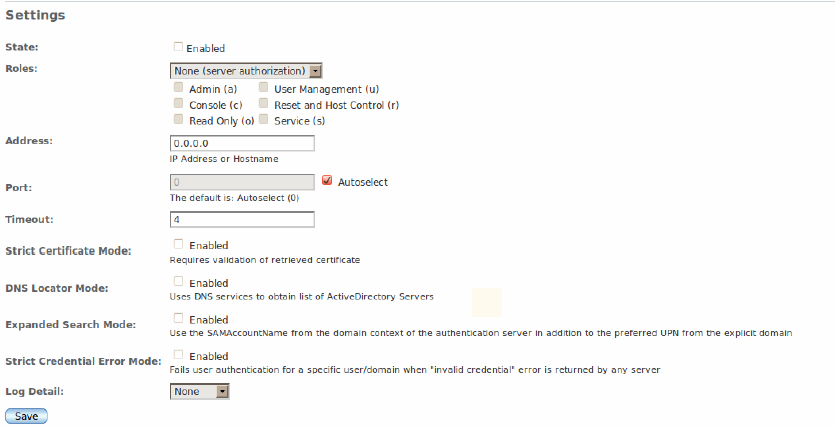
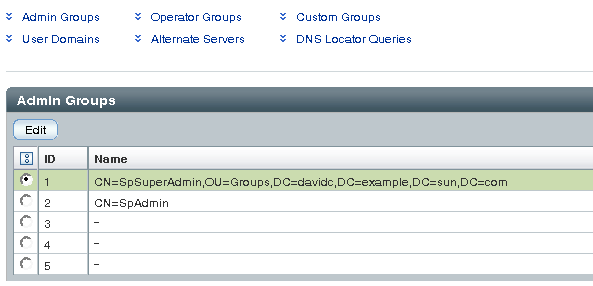
3. Configure the Active Directory settings displayed in the top section of the Active Directory Settings page.
See the following table for a description of the Active Directory settings.
4. Click Save in the top section of the Active Directory settings page for your settings to take effect.
5. View the Active Directory certificate information in the middle section of the Active Directory settings page.
See the following table for a description of Active Directory certificate settings.
|
Click on “details” for information about issuer, subject, serial number, valid_from, valid_to, and version. |
6. Complete the “Certificate File Upload” section by selecting a transfer method for uploading the certificate file and the requested parameters.
| Note - This section is only required if Strict Certificate Mode is going to be enabled. If Strict Certificate Mode is disabled, data will still be protected but a certificate will not be needed. |
The following table describes the required parameters for each transfer method:
7. Click the Load Certificate button or Remove Certificate button.
8. If a certificate is loaded, click on the “details” link to show the following information.
|
1. Log in to the ILOM SP web interface or the CMM ILOM web interface.
2. Select User Management --> Active Directory.
The Active Directory page appears.
3. At the bottom of the Active Directory page, click the link to access the category of table you want to configure:
4. Select the radio button of the individual table, then click Edit.
5. Enter the required data into the tables.
In the following tables, default data shows the expected format of the Active Directory data.
The Admin Groups table contains the names of the Microsoft Active Directory groups in the Distinguished Name (DN) format, Simple Name format, or NT-Style Name.
The Operator Groups table contains the names of the Microsoft Active Directory groups in the Distinguished Name (DN) format, Simple Name format, or NT-Style Name.
The Custom Groups table contains the names of the Microsoft Active Directory groups in the Distinguished Name (DN) format, Simple Name format, or NT-Style Name. The associated roles for the entry are also configured.
|
Admin, User Management, Console, Reset and Host Control, Read Only (aucro) |
User Domains are the authentication domains used to authenticate a user. When the user logs in, the name used is formatted in the specific domain name format. User authentication is attempted based on the user name that is entered and the configured user domains.
In the example below, the domain listed in entry 1 shows the principle format that is used in the first attempt to authenticate the user. Entry 2 shows the complete Distinguished Name, which Active Directory would use if the attempt to authenticate with the first entry failed.
| Note - In the example below, <USERNAME> will be replaced with the user’s login name. During authentication, the user’s login name replaces <USERNAME>. |
The Alternate Servers table provides redundancy as well as a choice of different servers if required due to isolated domains. If a certificate is not supplied, but is required, the top-level primary certificate is used. The alternate servers have the same rules and requirements as the top-level certificate mode. Each server has its own certificate status, and its own certificate command to retrieve the certificate if it is needed.
The following image shows an Alternate Servers table with a certificate present in ID 2:

The following certificate information is displayed when you click on the “details” link:
The DNS Locator Queries table queries DNS servers to learn about the hosts to use for authentication.
The DNS Locator service query identifies the named DNS service. The port ID is generally part of the record, but it can be overridden by using the format <PORT:636>. Also, named services specific for the domain being authenticated can be specified by using the <DOMAIN> substitution marker.
| Note - DNS and DNS Locator Mode must be enabled for DNS Locator Queries to work. |
6. Click Save for your changes to take effect.
|
1. Log in to the ILOM SP web interface or the CMM ILOM web interface.
2. Select User Management --> Active Directory.
The Active Directory page appears.
3. In the Log Detail drop-down list, select the level of detail that you would like the event log to capture.
Choices are None, High, Medium, Low, and Trace.
4. Click Save to save your changes.
5. Attempt an authentication to generate events. Follow these steps:
a. From the System Monitoring tab select Event Logs.
b. In the Filter drop-down list, select Custom Filter.
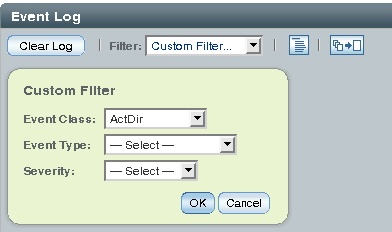
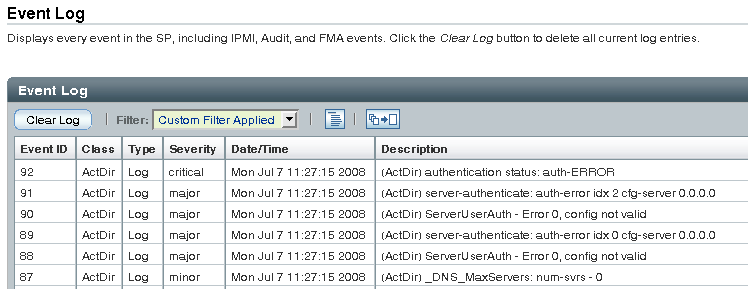
c. In the Event Class drop-down list, select ActDir.
All Active Directory events will appear in the event log.
|
1. Ensure that all users authenticating to ILOM have passwords stored in "crypt" format or the GNU extension to crypt, commonly referred to as "MD5 crypt."
ILOM only supports LDAP authentication for passwords stored in these two variations of the crypt format.
userPassword: {CRYPT}ajCa2He4PJhNo
userPassword: {CRYPT}$1$pzKng1$du1Bf0NWBjh9t3FbUgf46.
2. Add object classes posixAccount and shadowAccount, and populate the required property values for this schema (RFC 2307). See the following table for a description of the required property values.
3. Configure the LDAP server to enable LDAP server access to ILOM user accounts.
Either enable your LDAP server to accept anonymous binds, or create a proxy user on your LDAP server that has read-only access to all user accounts that will authenticate through ILOM.
See your LDAP server documentation for more details.
|
1. Log in to the ILOM SP web interface or the CMM ILOM web interface.
2. Select User Management --> LDAP.
The LDAP Settings page appears.
3. Enter the following values:
4. Click Save for your changes to take effect.
5. To verify that LDAP authentication works, log in to ILOM using an LDAP user name and password.
| Note - ILOM searches local users before LDAP users. If an LDAP user name exists as a local user, ILOM uses the local account for authentication. |
|
Follow these steps to view and configure LDAP/SSL settings:
1. Log in to the ILOM SP web interface or the CMM ILOM web interface.
2. Select User Management --> LDAP/SSL.
The LDAP/SSL page appears. There are three sections to the LDAP/SSL page.
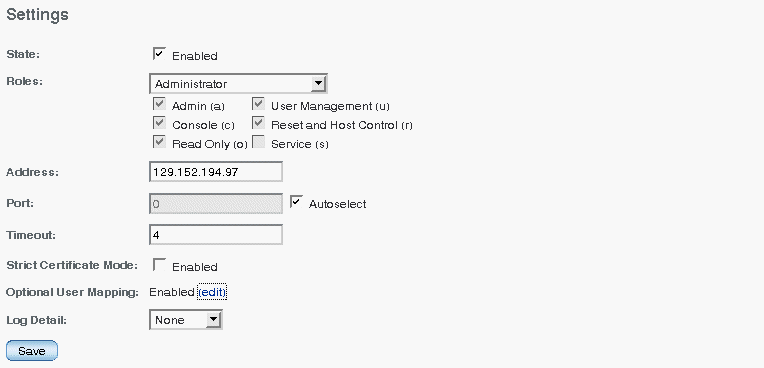

3. Configure the LDAP/SSL settings displayed in the top section of the LDAP/SSL Settings page.
See the following table for a description of the LDAP/SSL settings.
4. Click Save in the top section of the LDAP/SSL settings page to save any changes made to this section.
5. View the LDAP/SSL certificate information in the middle section of the LDAP/SSL settings page.
See the following table for a description of LDAP/SSL certificate settings.
|
Click on “details” for information about issuer, subject, serial number, valid_from, valid_to, and version. |
6. Complete the “Certificate File Upload” section by selecting a transfer method for uploading the certificate file.
| Note - This section is only required if Strict Certificate Mode is used. If Strict Certificate Mode is disabled, data will still be protected but a certificate will not be needed. |
The following table describes the required parameters for each transfer method:
7. Click the Load Certificate button or Remove Certificate button.
8. If a certificate was loaded, click on the “details” link in the web interface to show the following information.
|
1. Log in to the ILOM SP web interface or the CMM ILOM web interface.
2. Select User Management --> LDAP/SSL.
3. At the bottom of the LDAP/SSL page, click the link to access the category of table you want to configure:
4. Select the radio button of the individual table, then click Edit.
5. Enter the required data in the tables.
In the following tables, default data shows the expected format of the LDAP/SSL data.
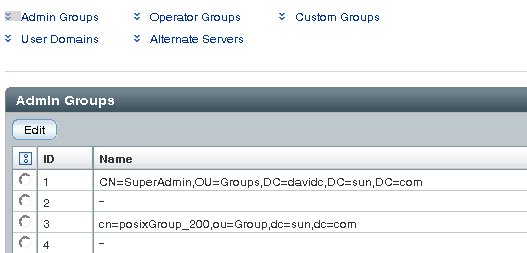
The Admin Groups table contains the names of the LDAP/SSL groups in the Distinguished Name (DN) format.
The Operator Groups table contains the names of the LDAP/SSL groups in the Distinguished Name (DN) format.
The Custom Groups table contains the names of the LDAP/SSL groups in the Distinguished Name (DN) format, Simple Name format, or NT-Style Name. The associated roles for the entry are also configured. The name listed in entry 1 uses the Simple Name format.
|
Admin, User Management, Console, Reset and Host Control, Read Only (aucro) |
User Domains are the authentication domains used to authenticate a user. When the user logs in, the name used is formatted in the specific domain name format. User authentication is attempted based on the user name that is entered and the configured user domains.
Entry 1 shows the complete Distinguished Name, which LDAP/SSL would use if the attempt to authenticate the first entry failed.
| Note - <USERNAME> will be replaced with the user’s login name during authentication. Either the principle or Distinguished Name format is supported. |
The Alternate Servers table provides redundancy for authentication. If a certificate is not supplied, but is required, the top-level primary certificate is used. The alternate servers have the same rules and requirements as the top-level certificate mode. Each server has its own certificate status, and its own certificate command to retrieve the certificate if it is needed.
The following image shows an Alternate Servers table with a certificate present in ID 2:

The following information is displayed when you click on the “details” link:
|
1. Log in to the ILOM SP web interface or the CMM ILOM web interface.
2. Select User Management --> LDAP/SSL.
3. In the Log Detail drop-down list, select the level of detail that you would like the event log to capture.
Choices are None, High, Medium, Low, and Trace.
4. Click Save to save your changes.
5. Attempt an authentication to generate events:
a. Select System Monitoring --> Event Logs.
b. In the Filter drop-down list, select Custom Filter.
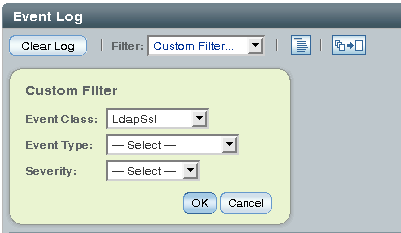
c. In the Event Class drop-down list, select LdapSsl.
d. Click OK for your changes to take effect.
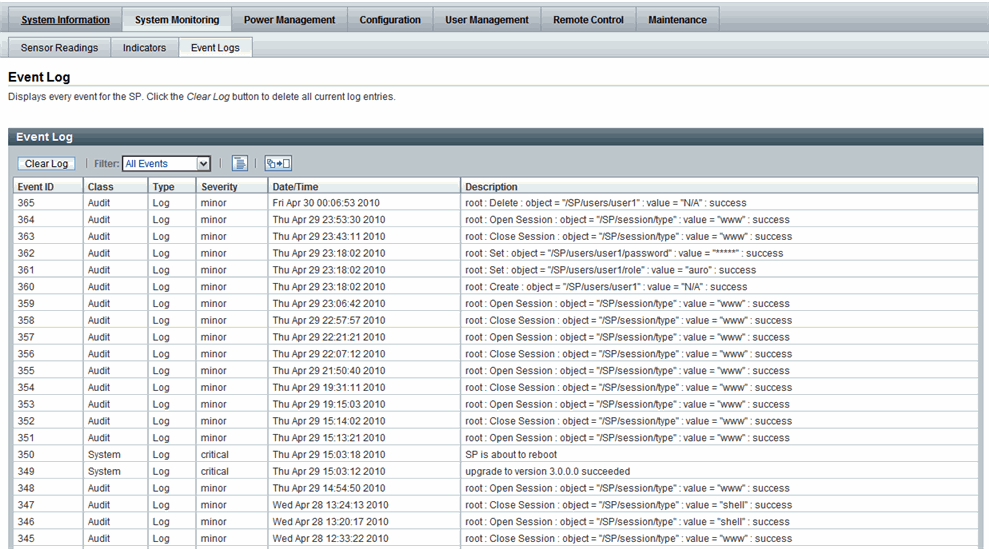
All LDAP/SSL events will appear in the event log.
|
1. Log in to the ILOM SP web interface or the CMM ILOM web interface.
2. Select User Management --> RADIUS.
The RADIUS Settings page appears.
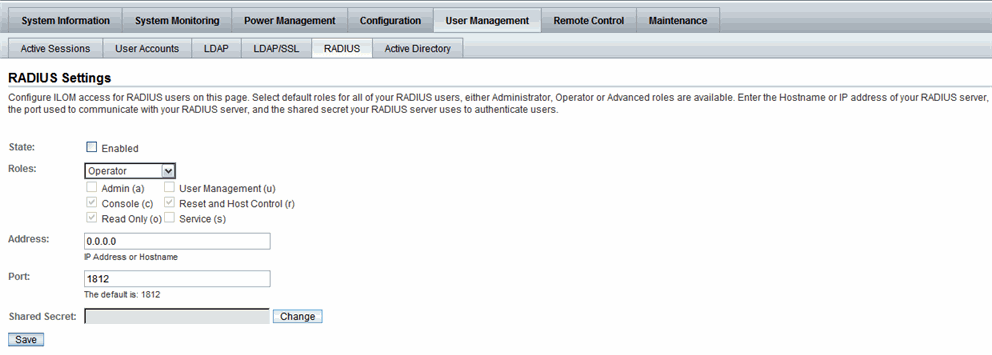
4. Click Save for your changes to take effect.
Copyright © 2010, Oracle and/or its affiliates. All rights reserved.