| C H A P T E R 2 |
|
Hardware Installation and Removal |
This chapter explains how to install and remove the Sun StorageTek SAS RAID External HBA, and how to connect external disk drive enclosures.
The chapter contains the following sections:

|
Caution - Damage to the HBA can occur as the result of careless handling or electrostatic discharge (ESD). Always handle the HBA with care to avoid damage to electrostatic sensitive components. |
To minimize the possibility of ESD-related damage, use both a workstation antistatic mat and an ESD wrist strap. You can get an ESD wrist strap from any reputable electronics store or from Sun as part number #250-1007. Observe the following precautions to avoid ESD-related problems:
|
1. Read Safety Agency Compliance Statements.
2. Familiarize yourself with the physical features of the Sun StorageTek SAS RAID External HBA and the RAID levels that it supports.
See Component Layout.
3. Ensure you have a supported external disk drive enclosure (see Storage System Support) with the right quantity of disk drives for the RAID level you want to use for the arrays (see Selecting the Best RAID Level).
All the disk drives must have the same performance level. You can use different-sized disk drives in the array, but the array will be limited to the capacity of the smallest and slowest disk drive.
For more information, refer to the Sun StorageTek RAID Manager Software User’s Guide or online Help.
The Sun StorageTek SAS RAID External HBA supports both SAS and SATA disk drives.
4. Ensure that you have the proper cables for the HBA and external disk drive enclosure.
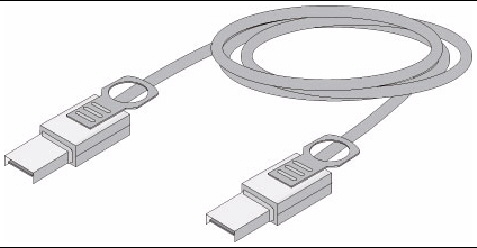
You will need at least one SAS cable that has a x4 SFF-8088 connector on the host end that will connect to the HBA (the connector on the target end depends on the connection requirement of the hard disk drive enclosure). Use only Sun-provided SAS cables (provided with your Sun system at time of purchase). For more information or to purchase cables for your Sun system, visit the Sun web site at http://www.sun.com. Cable connectors are keyed so that you cannot insert them incorrectly.
FIGURE 2-1 External SAS Cable (SFF-8088 Connector) Used to Connect to an External Hard Disk Drive Enclosure

5. If you are installing the HBA into a full-height computer chassis, replace the original low-profile bracket with the full-height bracket included in the HBA ship kit.

|
Caution - Handle the HBA by its bracket or edges only. |
The following procedure describes the tasks to perform in order to install the HBA on an existing operating system (OS):
1. Install the battery backup module (BBU).
See Installing the Battery Backup Module.
2. If you are installing on an x64 system, skip to the next step. If you are installing on a SPARC system, use the Open Boot Prompt (OBP) to make note of the current devices on the system.
See Verifying the Current Devices on a SPARC System.
3. Install and connect the HBA and disk drives.
See Installing the HBA.
See Installing the Driver on an Existing Operating System.
5. Install the Sun StorageTek RAID Manager GUI and begin to manage data storage.
Use the Sun StorageTek RAID Manager CD provided in the HBA ship kit to install the Sun StorageTek RAID Manager software. For information about installing and using the software, see the Sun StorageTek RAID Manager Software User’s Guide. For the latest version of the software, go to: http://support.intel.com/support/go/sunraid.htm.
|
See Observing ESD and Handling Precautions.
2. Lay the top square piece of packing foam from the ship kit on your work surface, smooth side up.
3. Take the HBA out of the antistatic bag and set it on the packing foam with the heat sink facing up.
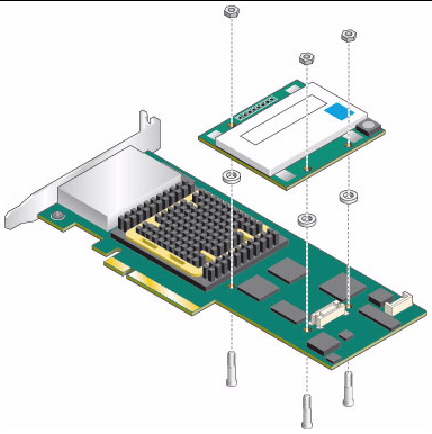
4. Slightly lift the HBA, and from underneath it, insert three plastic screws from the BBU kit through the following three mounting holes in the HBA:

5. Place a spacer over each screw.
The BBU connector on the HBA is between the two screw holes closest to the right edge of the HBA.
6. Line up the BBU connector on the BBU module with the connector on the HBA.
The screws you inserted will line up with matching holes in the BBU.
7. Gently press down on the right edge of the BBU module until the connectors click into place.

|
Caution - DO NOT force the connection. If a gentle push does not mate the connectors, realign the components and try again. |
8. Obtain the three nuts from the BBU kit, and for each nut, do the following:
a. Place the nut onto the screw and hold the nut in place.
b. With the Phillips head screw driver, reach underneath the HBA and, while holding the nut in place with your other hand (or with needle nose pliers or tweezers), screw the plastic screw into the nut.
c. Repeat Step a - Step b for the remaining nuts.
| Note - If you are unable to place a nut onto the screw that is close to the heat sink, use a small pair of needle nose pliers or tweezers. |

|
Caution - Do not over-tighten the nuts. |
If you are installing on a non-SPARC system, skip to Installing the HBA.
|
1. Enter the Open Boot Prompt (OBP) and use the show-disks command to list the current devices.
{0} ok show-disks a) /pci@0/pci@0/pci@2/scsi@0/disk b) /pci@0/pci@0/pci@1/pci@0/pci@1/pci@0/usb@0,2/storage@2/disk q) NO SELECTION Enter Selection, q to quit: q {0} ok |
| Note - Device paths might vary from this example, depending on the SPARC system you are using and into which PCI-E slot the card is plugged. |
This will help you determine which device is the HBA after you install the HBA.
| Note - For the Sun SPARC Enterprise T5120, T5220, T5140, and T5240 servers, contact Sun support to install the HBA. |
|
1. Turn off the computer and disconnect the power cord.
2. Open the cabinet, following the manufacturer instructions.
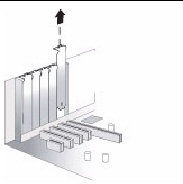
3. Select an available x8 PCI-Express expansion slot that is compatible with the HBA and remove the slot cover as shown in FIGURE 2-3.

|
Caution - Touch a grounded metal object before handling the HBA. |
| Note - FIGURE 2-3 may differ slightly from the Sun StorageTek SAS RAID External HBA and computer system hardware. |
FIGURE 2-3 Remove Slot Cover from Expansion Slot

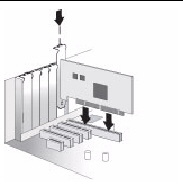
4. As shown in FIGURE 2-4, insert the HBA into the PCI-Express expansion slot and press down gently but firmly until it clicks into place.
When installed properly, the HBA will appear level with the expansion slot.
FIGURE 2-4 Installing the Sun StorageTek SAS RAID External HBA

5. Secure the bracket in the x8 PCI Express slot, using the retention device (for instance, a screw or lever) supplied with the computer.
6. Connect the disk activity LED cable of the computer to the LED connector on the HBA.
Ensure that the positive lead of the LED cable (usually a red wire or a wire marked with a red stripe) is attached to pin 1.
7. Close the computer cabinet, reattach the power cord, then continue with Connecting Disk Drive Enclosures.
Use high-quality cables to connect the Sun StorageTek SAS RAID External HBA to the external disk drive enclosures. Use only Sun-supplied cables. For more information or to purchase cables, visit the Sun web site at http://www.sun.com.
1. Install the SAS or SATA disk drives into the external disk drive enclosure, following the instructions in the enclosure documentation.
2. Use external SAS cables (FIGURE 2-1) to attach the HBA to the external disk drive enclosure.
This section contains the following subsections:
|
1. Power-up the computer and storage systems.
a. Ensure that all hard disk drives are securely installed.
b. Connect all power cords securely and plug them into the proper power sources.
c. Power-on the disk drive enclosure, and verify that all available HDD status indicators are normal for the storage enclosure(s) that they are in.
d. Power-on the computer system.
2. Enter the Open Boot Prompt (OBP) and use the show-disks command to list the current devices.
In the following example, the HBA is the first device that is listed.
| Note - Device paths might vary from this example, depending on which SPARC system you are using and into which PCI-E slot the card is plugged. |
3. Use the select command to select the device node for the HBA and follow the on-screen instructions by pressing Enter when prompted.
| Note - When you run this command, omit /disk from the HBA device path, as shown in the following example. |
4. To display the firmware version on the HBA, use the show-version command.
5. To display additional configuration information, list the device properties by using the .properties command.
6. Return to the root node by using the unselect-dev command.
| Note - At this point, there are no volumes created and the output from a probe-scsi-all command will not display any drives. |
If no errors or issues were discovered, continue to Next Steps to complete the installation process. If any issues were discovered, correct them and retest the HBA before continuing.
|
1. Power-up the computer and storage systems:
a. Ensure that all hard disk drives are securely installed.
b. Connect all power cords securely and plug them into the proper power sources.
c. If applicable, power-on the disk drive enclosure, and verify that all available HDD status indicators are normal for the storage enclosure(s) that they are in.
d. Power-on the computer system.
2. Enter the BIOS RAID Configuration Utility (RCU) by doing the following:
a. During POST, press Ctrl + A when prompted.
b. As the computer continues its startup sequence, review the boot messages to determine the firmware version on the HBA.
Boot messages, similar to those shown in the following example, are displayed that indicate the firmware version (in this example, the FW build is 15815).
c. When the utility starts, review the list of HBAs installed on the computer.
d. If more than one HBA is listed, select the one you wish to test and press Enter.
3. Enter the Array Configuration Utility (ACU) by highlighting Array Configuration Utility and then pressing Enter.
You might see a screen indicating Configuration Change. This is normal for a newly installed HBA and targets.
5. Verify that all attached HDDs are detected by the HBA:
a. At the Main Menu, highlight Initialize Drives and press Enter.
b. In the Select drives for initialization column, verify that all attached HDDs are displayed.
c. Select drives to initialize them for verification.
You can initialize all of the drives now or wait until you are ready to create arrays.
6. Verify that all HDDs are available for array creation:
a. Return to the Main Menu page, highlight Create Array, and press Enter.
b. In the Select drives to create Array column, verify that all the attached HDDs are available for array creation.
c. Highlight a couple of drives and press the space bar.
Verify that the drives are moved into the right column in preparation for array creation.
8. Test the alarm for the HBA by doing the following:
a. Press Esc until you reach the controller Options menu.
b. Highlight Serial Select and press Enter.
c. Highlight Controller Configuration and press Enter.
d. Highlight Alarm Control... and press Enter.
e. Highlight Test and press Enter.
Verify a 3-second audible alarm.
9. Verify that all target devices are present by doing the following:
a. Press Esc until you reach the controller Options menu.
b. Highlight Disk Utilities and press Enter.
You will see an indication that the HBA is scanning SAS devices.
c. After the scanning completes, verify that all attached target devices are displayed, including HDDs and any enclosure management devices, if appropriate for your storage configuration.
If any issues were discovered, correct them and retest the HBA before continuing.
To complete the installation, continue with Installing the Driver on an Existing Operating System.
The following instructions describe the tasks required to remove the HBA. If you need to replace a failed HBA, remove the hardware, as described in this section, and see Best Practices For Replacing an HBA.

|
Caution - Never remove the HBA when an attached array is in the process of rebuilding a logical drive from a 'Degraded' state. |
|
1. If the computer is running the OS, halt all I/O activity to the HBA.
2. Complete all transactions being done by the HBA such as migrations, rebuilds, verifications, and so on.
3. Properly log out of the OS and shut down the computer.
5. Power-down the external disk drive enclosure for the HBA.
6. Disconnect the SAS cable(s) from the HBA.
|
1. Remove the retention mechanism (screw, clip, and so on) that is securing the HBA bracket to the chassis.
2. Hold the upper portion of the bracket with one hand and the rear of the HBA with the other hand.
3. Pull straight up until the HBA clears the PCI Express expansion slot.
4. Lift the HBA from the computer chassis.
Copyright © 2009 Sun Microsystems, Inc. All rights reserved.