| C H A P T E R 2 |
|
Installing Trays |
Use the procedures in this chapter to install trays in a cabinet. The number of trays you need to install depends on your overall storage requirements. You can install a maximum of four trays, one controller tray and up to three drive expansion trays for each array.
This chapter describes the process of installing the Sun StorageTek 2500 Series Array. It contains the following sections:
The installation procedures in this chapter require the following items:
Use the following procedures to prepare for installation:
Use the universal rail kit, ordered separately, to mount the Sun StorageTek 2500 Series Array trays in any of the following cabinets:
Unpack the universal rail kit and check the contents.
The universal rail kit (part number 594-2489-02) comes with pre-assembled rails and contains the following items:
To loosen the adjustment screws on the left and right rails:
Use a flathead screwdriver to loosen the two rail adjustment screws on each rail to allow adjustment of each rail length (FIGURE 2-1FIGURE 2-1).
FIGURE 2-1 Loosening the Rail Screws to Adjust the Rail Length
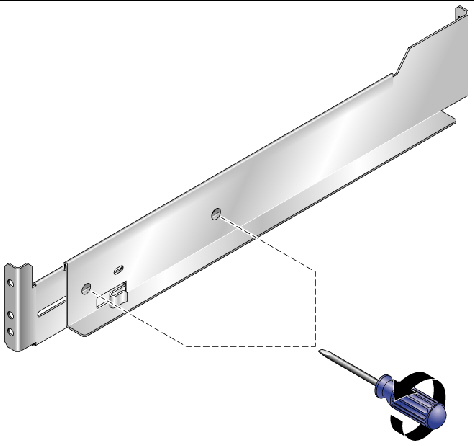
| Note - The rails are pre-configured to adjust to cabinet rail depths of between 24 inches (609.6mm) and 34 inches (863.6mm). |

|
Caution - Two people are needed to lift and move the tray. Use care to avoid injury. A tray can weigh up to 54.3 pounds (24.6 kg). |

2. Check the contents of the box for the following items:
AC power cords are shipped separately with each tray.
Select the cabinet in which you will be installing the array. Be sure the cabinet is installed as described in the installation instructions provided with it.
1. Stabilize the cabinet as described in the cabinet documentation.
2. If the cabinet has casters, make sure the casters are locked to prevent the cabinet from rolling.
3. Remove or open the front panel.
4. Remove or open the vented back panel.
Install the trays starting with the controller tray at the lowest available 2U tray slot in the cabinet. Next, install the expansion trays for the first controller tray. If room remains in the cabinet, repeat for the next controller tray and expansion trays.
Starting at the bottom distributes the weight correctly in the cabinet.
| Tip - If you plan on adding hosts to the cabinet, make sure that you have cables of sufficient length to reach their controller tray. |
Depending on the type of cabinet in which you will install the tray, use one of the following procedures to attach the rails:
Each tray requires two standard mounting rack units (2RU) of vertical space in the cabinet. Most cabinets have a “U” mark on their vertical rail with three mounting holes in the left cabinet vertical rail and in the right cabinet vertical rail. The top mounting hole of the lower RU is always closest to the bottom mounting hole of the upper RU, hence the division between RUs on a cabinet rail is between the two closest mounting holes in a grouping.
The universal rails have an adjustable depth of 24” to 34”.
This procedure describes the steps to attach the universal rail kit to:
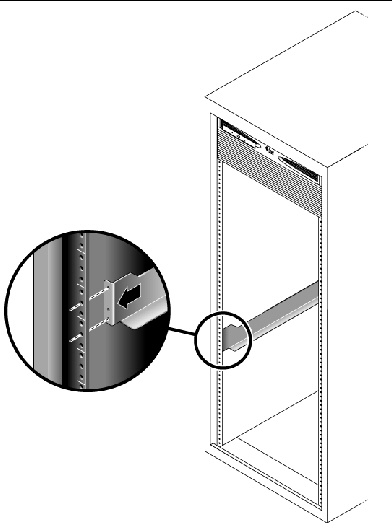
1. To attach the universal rail kit to a cabinet with these cabinet rail types, position the front flange of the left universal rail behind the left front cabinet rail (FIGURE 2-2).
| Note - The U marks are not labeled on all racks, as they are on the Sun cabinets. The rule of thumb to remember is that the division of RUs passes between the two closest rail holes in each set of holes (see FIGURE 2-2). |
FIGURE 2-2 Positioning the Front of the Left Rail Behind the Left Front Cabinet Rail
2. Insert the 8-32 screws through the center holes in each RU of the rack into the top and bottom holes in the Universal rail (FIGURE 2-3FIGURE 2-3).
These screws pass through the cabinet rail holes and screw into threaded holes in the Universal rail.
FIGURE 2-3 Securing the Left Rail to the Front of the Cabinet

3. Repeat Step 1 and Step 2 for the right rail.
4. At the back of the cabinet, adjust the length of the left rail as needed to fit the cabinet, and position the rail flange behind the face of the cabinet rail (FIGURE 2-4).
FIGURE 2-4 Adjusting the Length of the Left Rail at the Back of the Cabinet

5. Align the rail flange so that the top and bottom mounting holes match the center holes in the RUs corresponding to those used on the front of the cabinet.
6. Insert the 8-32 screws through the center holes of the rack into the top and bottom mounting holes on the universal rail (FIGURE 2-5).
FIGURE 2-5 Securing the Left Rail to the Back of the Cabinet

7. Repeat Step 4, Step 5, and Step 6 for the right rail.
This procedure describes the steps to attach the universal rail kit to:
To attach the universal rail kit to a cabinet with un-threaded cabinet rails, follow these steps first for the left rail and then for the right rail:
1. Hook a cabinet rail adapter plate over the front of the cabinet rail. (FIGURE 2-6)
FIGURE 2-6 Inserting the Cabinet Rail Adapter Plate on the Cabinet Rail
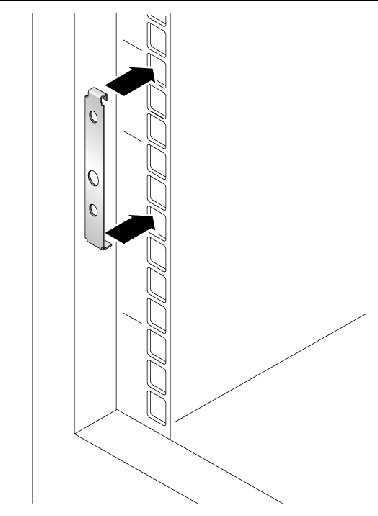
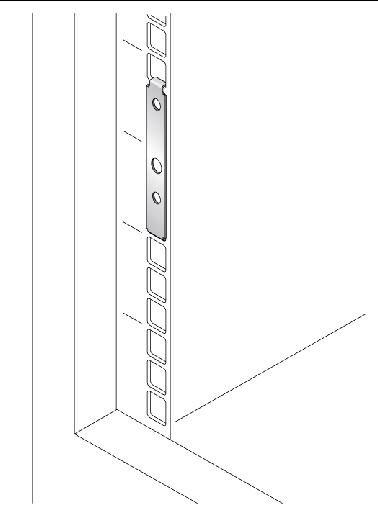
Position the adapter plate over of the 2RU slot in which the tray is to be mounted. The hook on the top of the adapter plate hooks into the top hole of the upper RU. The flat flange on the bottom of the adapter plate fits into the bottom hole of the lower RU (FIGURE 2-7).
FIGURE 2-7 Adapter Plate in Place on the Cabinet Rail
2. Slide the front flange of the universal rail between the front cabinet rail and the top hook of the rail adapter plate (FIGURE 2-8).
FIGURE 2-8 Sliding the Flange of the Universal Rail Behind the Cabinet Rail
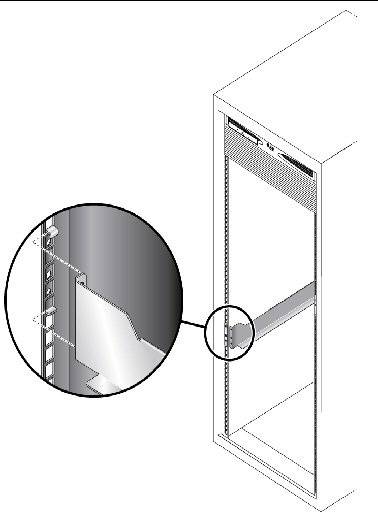
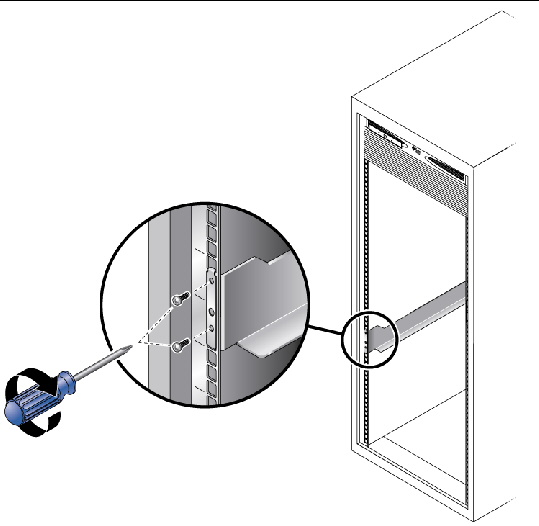
3. Insert and tighten two 8-32 screws through the top and bottom holes in the adapter plate, through the cabinet rail, and into the top and bottom threaded holes in the universal rail mounting flange (FIGURE 2-9).
FIGURE 2-9 Securing the Rail to the Front left of the Cabinet
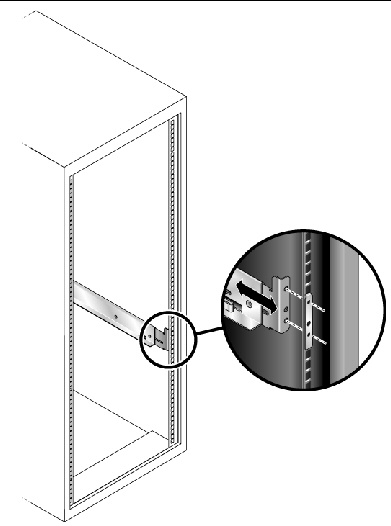
4. Repeat Step 1 through Step 3 on the corresponding cabinet rail at the back of the cabinet (FIGURE 2-10).
Mounting the rail on the back of the cabinet is the same as mounting it to the front, after you extend the rail the necessary length to reach the rear cabinet rail.
FIGURE 2-10 Adjusting the Length of the Rail at the Back of the Cabinet
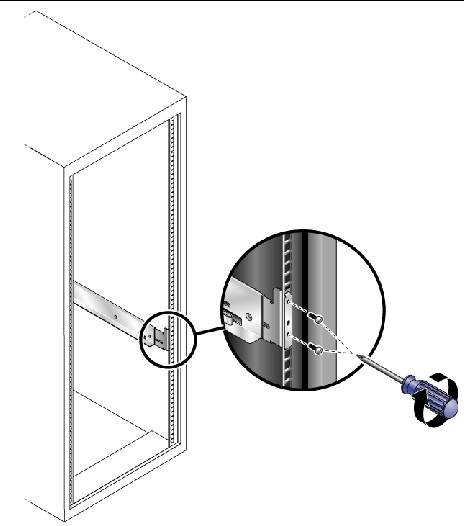
5. Insert and tighten two 8-32 screws through the top and bottom holes in the adapter plate, back cabinet rail, and universal rail mounting flange (FIGURE 2-11).
The screws passes through the unthreaded holes of the adapter plate and cabinet rail mounting rail and screw into the threaded holes of the rail mounting flange.
FIGURE 2-11 Securing the Rail to the Back of the Cabinet
6. Repeat Step 1 through Step 5 to install the right rail.
Install the controller tray in the first empty 2RU slot at the bottom of the cabinet. If you are installing expansion trays, continue installing the trays from the bottom up.
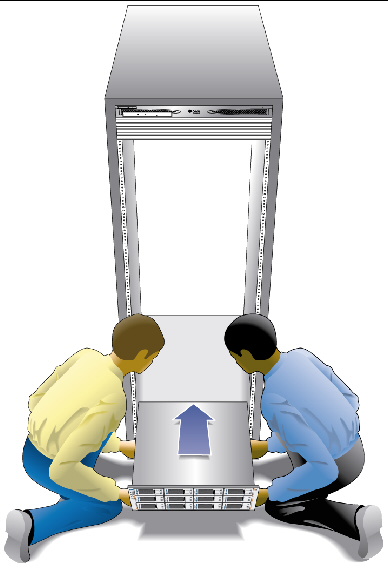
1. Using two people, one at each side of the tray, carefully lift and rest the tray on the bottom ledge of the left and right rails (FIGURE 2-12).

|
Caution - Use care to avoid injury. A tray can weigh up to 55 pounds (25 kg). |
FIGURE 2-12 Positioning the Controller Tray in the Cabinet
2. Carefully slide the tray into the cabinet until the front mounting flanges on the tray touch the vertical face of the cabinet (FIGURE 2-13).
FIGURE 2-13 Controller Tray Installed
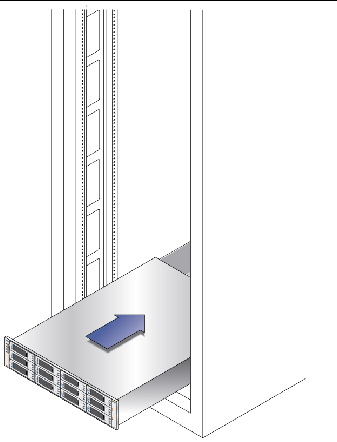
The tray has mounting flanges on both sides with three mounting holes in them. The top and bottom holes are large enough to fit over the heads of the screws already in the cabinet rails used to mount the universal rails. If the tray was shipped with end caps (bezels) clipped on the tray mounting flanges, remove them before sliding the tray all the way in over the mounting screw heads.
To remove an end cap, place your thumb on the lower front face of the cap and reach your forefinger underneath to the back bottom edge of the cap, then pull the cap towards you and slightly upwards.
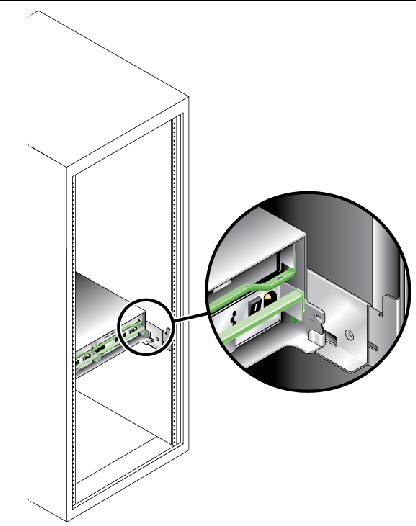
On the rear of the controller tray, a flat metal tab on each side corner slides into a special mounting clip on the rear of each universal rail, securing the back of the tray. This eliminates the need for rear mounting screws to secure the tray. For racks that might move or be shipped, Sun recommends that you install M4 screws through the hole in the tab and into the corresponding threaded hole in the rail as shown in FIGURE 2-14.
FIGURE 2-14 Rail Clip and Rear Mounting Hole on Rear of Tray
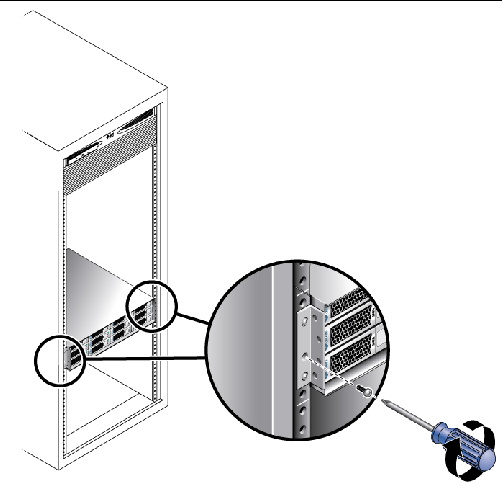
3. Insert a single 8-32 pan head screw through the center hole in each front mounting flange and tighten (FIGURE 2-15).
FIGURE 2-15 Securing the Tray to the Front of a Sun Rack 900/1000 Cabinet
4. Replace the end caps (bezels) that cover the mounting flanges on the front of the array tray.
On each front mounting flange, there is a small tab over which the end caps fit. The end caps have a slot on top for this tab.
a. Place the end cap over the tab so the tab can go into the slot.
b. Snap the bottom of the end cap into place.
1. Verify that both power switches are turned off.
2. Verify that the circuit breakers in the cabinet are turned off.
3. Connect each power supply in the tray to a separate power source in the cabinet.
4. Connect the primary power cables from the cabinet to the external power source.
| Note - Do not power on the storage array until you complete the procedures in this chapter. The power-on sequence is described in detail in Chapter 7. |
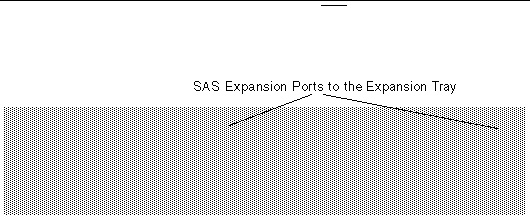
This section describes how to cable a controller tray to the drive expansion trays for several different configurations. Each controller has one expansion port (FIGURE 2-16). Controller A controls drive channel 1 through the A-side modules; Controller B controls drive channel 2 through the B-side modules. Each drive channel provides a separate path for data transfer from the controller tray to the expansion trays; the two channels provide redundancy.
FIGURE 2-16 Expansion Ports on the Controller Tray
Each expansion tray has two SAS port connectors, one marked with an up arrow and the other marked with a down arrow (FIGURE 2-17). You use SAS cables to connect drive expansion trays to the controllers in the controller tray.
FIGURE 2-17 Expansion Ports on a Drive Expansion Tray

The configuration naming convention is “controller trays x trays” where the first number is the controller tray and the second is the sum of the controller tray and the number of drive expansion trays. For example, 1x1 is a standalone controller tray, 1x2 is the controller tray and one expansion tray, 1x3 is the controller tray and 2 expansion trays (TABLE 2-1).
| Note - Do not add more expansion trays than the storage array supports. |
Use the following instructions to connect the controller tray to one or more drive expansion trays.
Keep the following points in mind when adding expansion trays to your storage array:
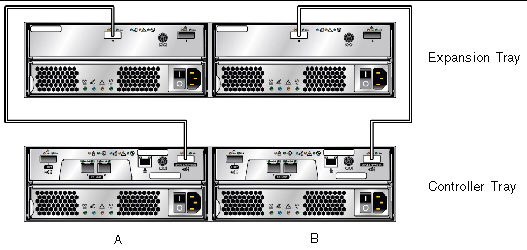
A Controller tray has two expansion ports, one on Controller A and one on Controller B. To connect a drive expansion tray, connect an SAS cable from each expansion port on the controller to each In port on the expansion tray. FIGURE 2-18 shows a 1x2 array configuration consisting of one controller tray and one drive expansion tray. Two SAS cables are required.
FIGURE 2-18 1x2 Array Configuration Cabling Example
To cable a 1x2 array configuration:
1. Locate the Controller A and Controller B expansion ports at the back of the controller tray (FIGURE 2-16).
2. Locate the In and Out expansion ports at the A-side and B-side back of the expansion tray (FIGURE 2-17).
3. Connect one SAS cable between the Controller A expansion port and the A-side In port on the expansion tray (FIGURE 2-18).
4. Connect one SAS cable between the Controller B expansion port and the B-side In port on the expansion tray (FIGURE 2-18).
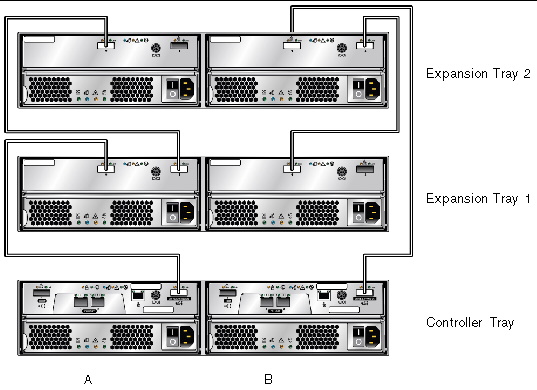
Each additional expansion tray is added to the preceding expansion tray by connecting SAS cables from the Out ports of the first tray to the In ports of the next tray. FIGURE 2-19 illustrates a 1x3 storage array configuration consisting of one controller tray and two expansion trays. The cable connections on the B-side are reversed (the cable from the controller A expansion port goes to the In port of expansion tray 1; the cable from the controller B expansion port goes to the In port on expansion tray 2) for maximum redundancy. This pattern continues for each additional tray you add. Two more SAS cables are required for each additional tray.
FIGURE 2-19 1x3 Storage Array Configuration Cabling
To cable a 1x3 array configuration for maximum redundancy:
1. Locate the Controller A and Controller B expansion ports at the back of the controller tray (FIGURE 2-16).
2. Locate In and Out expansion ports at the A-side and B-side back of the expansion tray (FIGURE 2-17).
3. Connect one SAS cable between the Controller A expansion port and the A-side expansion In port of expansion tray 1 (FIGURE 2-19).
4. Connect one SAS cable between the Controller B expansion Out port and the B-side expansion In port of expansion tray 2 (FIGURE 2-19).
5. Connect one SAS cable between the expansion tray 1 Out port and the A-side expansion In port of expansion tray 2 (FIGURE 2-19).
6. Connect one SAS cable between the expansion tray 2 B-side Out port and the B-side In port of expansion tray 1 (FIGURE 2-19).
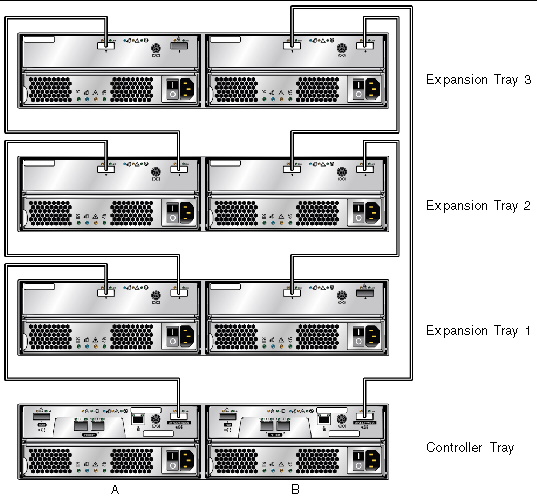
Each additional expansion tray is added to the preceding expansion tray by connecting two additional SAS cables from the Out ports of the preceding tray to the In ports of the next tray in the loop. FIGURE 2-20 illustrates a 1x4 storage array configuration consisting of one controller tray and three expansion trays.
The cable connections on the B-side are reversed (the cable from the controller A expansion port goes to the In port of expansion tray 1; the cable from the controller B expansion port goes to the In port on expansion tray 3) for maximum redundancy.
FIGURE 2-20 1x4 Storage Array Configuration Cabling
To cable a 1x4 array configuration for maximum redundancy:
1. Locate the Controller A and Controller B expansion ports at the back of the controller tray (FIGURE 2-16).
2. Locate In and Out expansion ports at the A-side and B-side back of the expansion tray (FIGURE 2-17).
3. Connect one SAS cable between the Controller A expansion port and the A-side expansion In port of expansion tray 1 (FIGURE 2-20).
4. Connect one SAS cable between the Controller B expansion Out port and the B-side expansion In port of expansion tray 3 (FIGURE 2-20).
5. Connect one SAS cable between the expansion tray 1 Out port and the A-side expansion In port of expansion tray 2 (FIGURE 2-20).
6. Connect one SAS cable between the expansion tray 2 Out port and the A-side expansion In port of expansion tray 3 (FIGURE 2-20).
7. Connect one SAS cable between the expansion tray 3 B-side Out port and the B-side In port of expansion tray 2 (FIGURE 2-20).
8. Connect one SAS cable between the expansion tray 2 B-side Out port and the B-side In port of expansion tray 1 (FIGURE 2-20).
Labels for the drive-side interface cables identify which controller ports and which I/O module ports in an expansion tray you use when you attach cables between a controller tray and the drive expansion tray. Cable labels are useful if you need to disconnect cables to service a controller.
Attach a label to each end of the cable. Use this design to create labels for drive cables:
In this example, the storage configuration has the following characteristics:
Using this design, the label includes the following information:
CtA-Dch1, Dm1-Tray_A (left), Out
This configuration has a single controller and a single back-end channel. By definition, there is a single path connection to the data host, and no redundancy is available. There can be drive expansion trays on the single back-end channel.
The cabling is the same as the cabling on a single channel of an ordinary array, such as that shown on the A-side in FIGURE 2-18. CRU removal and replacement procedures in a single-controller configuration are the same as those for a dual-controller configuration with a failed controller (with the exception of the service procedures targeted at the failed controller). These procedures are available in Service Advisor. Maintenance procedures such as firmware updates or servicing of the controller tray or drive expansion trays will cause loss of access to the storage array during the performing of the procedure, since there is no backup channel.
Performance and default behavior are the same as a dual-controller configuration with a failed or missing controller. Write cache is by nature in write-through mode because there is no cache mirroring possible.
Now You Are Ready To Connect The Management Host, As Described In Chapter 3.
© © 2009 Sun Microsystems, Inc. All rights reserved.