Chapter 1 Using the JMS JCA Wizard
The following sections provide instruction on basic operations for the JMS JCA. If you have any questions or problems, see the Java CAPS web site at http://goldstar.stc.com/support.
This section covers the following tasks:
Additional details on the JMS JCA are provided in the following sections:
Using the JMS JCA Wizard
The JMS JCA Wizard provides tooling support for Java EE users to easily connect to JMS message servers from their Java EE applications. The wizard is written as a NetBeans IDE plugin module and provides GUI support for the JMS JCA inbound configuration, and code fragment generation through a drag-and-drop code palette. The wizard leverages the EJB 3.0 and JCA 1.5 APIs to simplify the user experience. The runtime components are Glassfish and the JMS JCA Adapter. Glassfish is the open source Java EE application server and the JMS JCA Adapter is the open source JCA 1.5 compliant resource adapter. The advantage of using the JMS JCA Adapter is that it allows you to connect to a different vendor's message server transparently, such as WebSphere JMS, Weblogic JMS, jBoss JMS, and Sun MQ. For more information regarding these components, go to Glassfish Project and JMS JCA Project. All relevant components required by the JMS JCA Wizard are packaged in the Open ESB installer, which includes the NetBeans IDE, the JMS JCA Wizard plugin module, Glassfish , JMS JCA Adapter in addition to other Open ESB components. You can download the latest Open ESB installer from Open ESB Download.
 To Receive a JMS TextMessage
This topic provides instructions on building a Message-Driven Bean (MDB) that will monitor a designated queue on a JMS destination (of the JMS Server) in order to receive JMS messages. Upon receipt of the a JMS message, the MDB will print out the content of the message, if it is of type TextMessage.
-
Start the Glassfish AppServer and use a browser to connect to the Admin Console via http://localhost:4848.
-
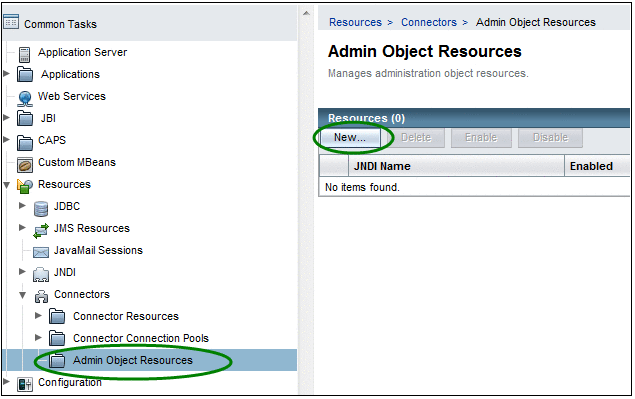
Create an Admin Object Resource.
Figure 1–1 Admin Object Resources
-
Enter the required fields.
Figure 1–2 New Admin Object Resources (Step 1 of 2)

-
JNDI Name = jms/Queue1
-
Resource Type = javax.jms.Queue
-
Resource Adapter = sun-jms-adapter
-
-
Click Next.
You will be directed to step 2 of the process.
-
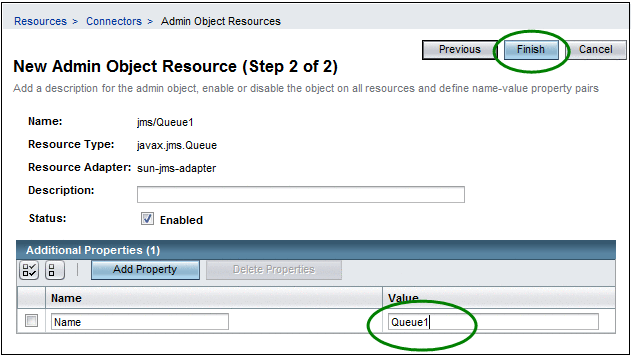
Enter the physical destination name of this resource.
Figure 1–3 New Admin Object Resources (Step 2 of 2)
-
Name = Queue1
-
-
Click Finish.
-
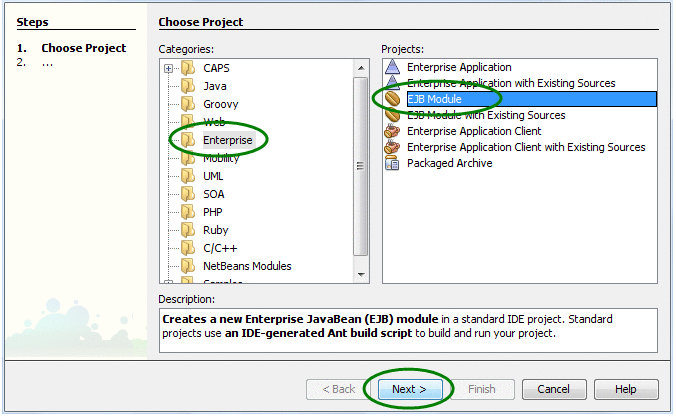
Start NetBeans IDE and create a new EJB Module Project. Choose Project by selecting New Project->Enterprise->EJB Module.
Figure 1–4 Choose New Project
-
Click Next.
The Name and Location window will be displayed.
-
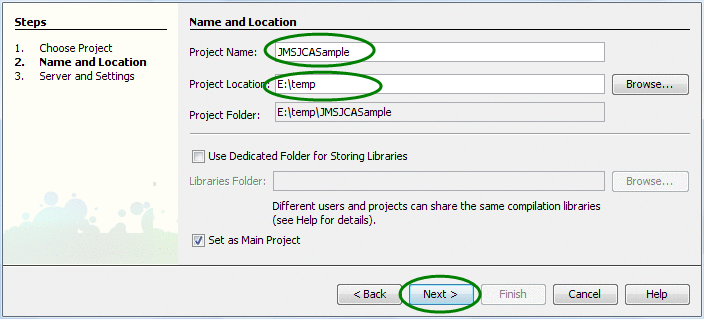
Enter the Project Name and Location fields.
Figure 1–5 EJB Module Project Name and Location
-
Project Name = JMSJCASample
-
Project Location = a directory on your filesystem
-
-
Click Next.
The Server and Settings window will be displayed.
-
In the Server and Settings window, leave everything as default and Click Finish.
-
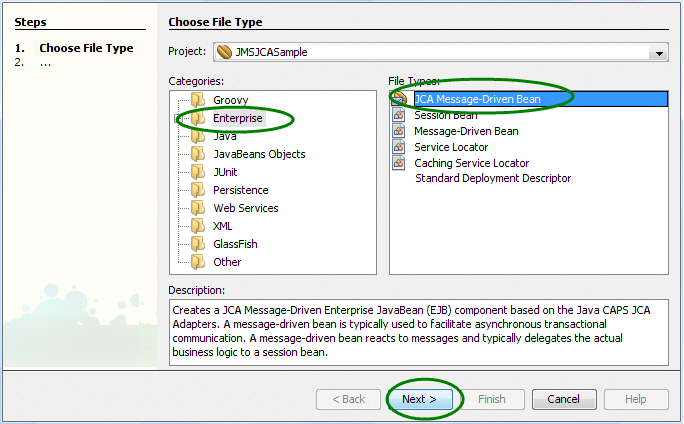
Right-click on the Project node. Select New->Other->Enterprise->JCA Message-Driven Bean.
Figure 1–6 Choose JCA Message-Driven Bean
-
Click Next.
The JCA Message-Driven Bean Name and Location window will appear.
-
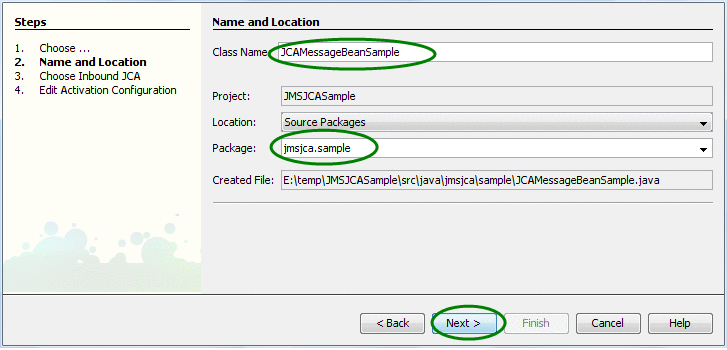
Enter the Name and Location fields.
Figure 1–7 JCA Message-Driven Bean Name and Location
-
Class Name = JCAMessageBeanSample
-
Package = jmsjca.sample
-
-
Click Next.
The Choose Inbound JCA window is displayed.
-
Select JMS Adapter and click Next.
Note –Currently only JMS Adapter can be selected in the window.
The Edit Activation Configuration window is displayed.
-
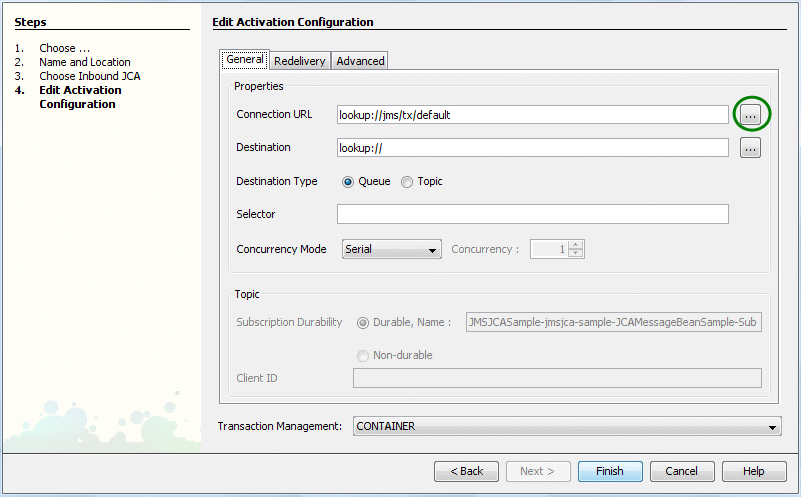
Configure the Inbound JMS connection by clicking on the "..." button next to the Connection URL box (as shown below).
You can configure many different options for the Inbound JMS connection. Things such as the JNDI name of the JMS connection resource to use or the JNDI name of the JMS destination. You can also configure the more advanced options such as message re-delivery, selector, concurrency mode, etc. In this simple case, only the Connection URL and Destination options for our sample code to work.
Figure 1–8 Edit Activation Configuration
-
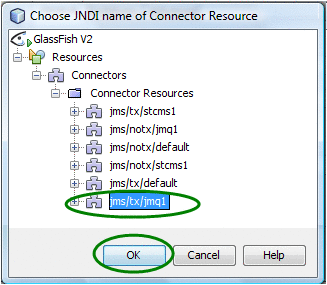
Expand the tree node all the way and select jms/tx/jmq1 (as shown below).
This resource connects the embedded Sun MQ JMS server inside the Glassfish AppServer and is created by default with the installer. The default connection url is mq://localhost:7676
Figure 1–9 Connector Resource — Connection URL
-
Click on the "..." button next to Destination box.
The Connector Resource dialog box for the Destination is displayed.
-
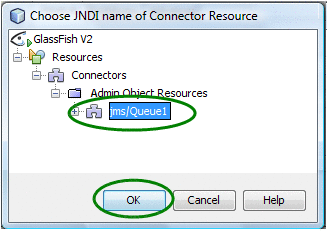
Expand the tree node all the way and select jms/Queue1 (as shown below).
This is the Admin Object Resource created earlier for the Queue1 destination using the Glassfish admin console.
Figure 1–10 Connector Resource — Destination
-
Click Finish in the wizard dialog box to create the Message-Driven Bean.
A Java source file will be created and opened in the editor view. The source file is a skeleton file with most of the boiler-plate code already generated, as shown below.
Figure 1–11 Java Source Code
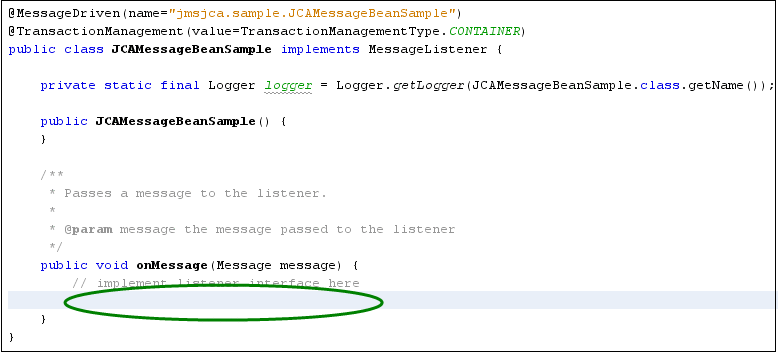
Any JMS messages sent to the Queue1 destination will be passed to the onMessage(...) method in this Java file. The login can be processed inside the onMessage() method as needed. Because the purpose of this task is to simply print out the message content of the JMS message (if the message is of type javax.jms.TextMessage), the implementation code would look something like the following:
Figure 1–12 TextMessage

-
Click Save when you are done editing the file.
-
Run the sample code by completing the following steps:
-
Right-click on the Project node and select Build
-
Right-click on the Project node and select Undeploy and Deploy.
-
Use your favorite JMS client to send a TextMessage to Queue1 on the to JMS server, located at mq://localhost:7676.
The contents of the TextMessage will be logged in the Glassfish AppServer's server.log file.
-
 To Send a JMS TextMessage
This topic provides instructions on sending a JMS message to a destination (Queue2). For purposes of these instructions, the message content to Queue2 will be "Hello " concatenated with the message content received from the "onMessage()" method from Queue1(refer to the previous topic for more information about receiving JMS messages).
-
Go to the Glassfish admin console and create an Admin Object Resource for Queue2, similar to the steps for Queue1.
-
Go back to the NetBeans IDE.
-
After the JMS message is received inside the MDB file of the onMessage() method, send a message to Queue2. To send a message, do the following:
-
Obtain a JMS Session instance.
-
Create a new JMS message, object, or message producer.
-
Drag-and-drop the Session icon from the palette window (located on the right side) to the inside of onMessage() method as shown in the figure below:
Figure 1–13 JCA Message Bean Sample — Session
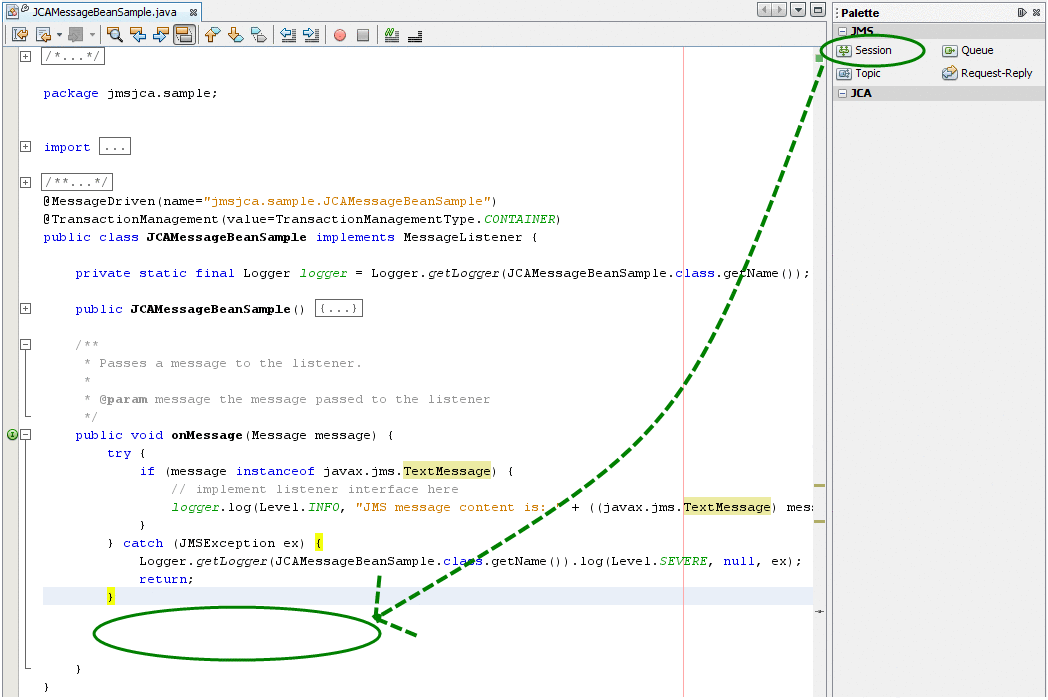
The JCA Wizard dialog box will be displayed.
-
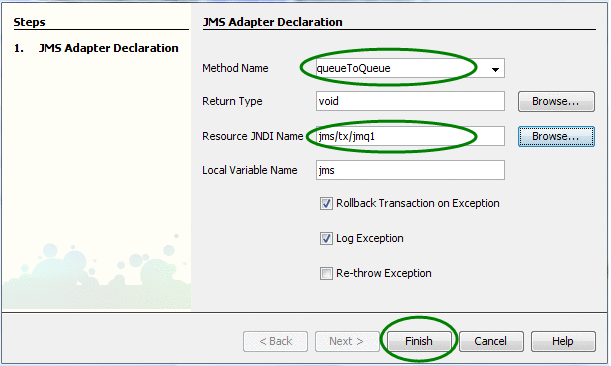
Enter information for the following fields:
-
Method Name = queueToQueue
-
Resource JNDI Name = jms/tx/jmq1
Figure 1–14 JCA Adapter Declaration
-
-
Click Finish.
Several Java code fragments will be generated as a result, in particular the queueToQueue(...) method, which can be implemented to process the incoming message.
-
-
Create a reference to the Queue2 destination object.
This allows a message to be sent to the destination object in the Java code.
-
Drag-and-drop the Queue icon from the palette window (located on the right side) to any place in Java editor as shown below:
Figure 1–15 JCA Message Bean Sample — Queue
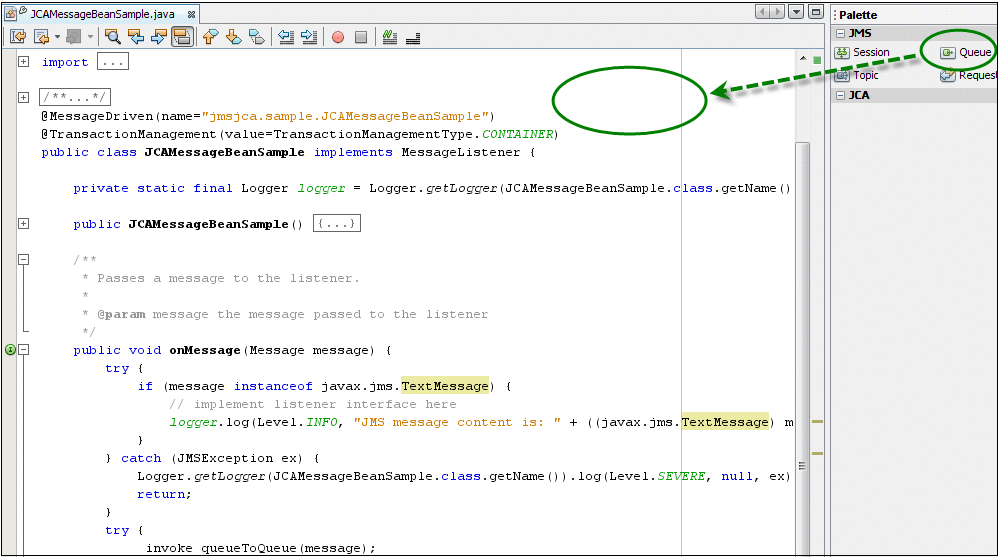
The Create JMS Destination dialog box will display.
-
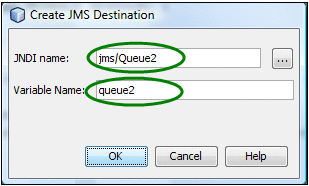
Enter the required information into the following fields:
-
JNDI name = jms/Queue2 (You can select this value using the browse button, instead of typing)
-
Variable Name = queue2
Figure 1–16 Create JMS Destination
-
-
Click OK.
-
Write the actual code to create a new JMS message and send it to Queue2.
The code fragment inside the queueToQueue(...) method will look like the example shown below:
Figure 1–17 Sample code

-
Save the modifications made.
 To Test JMS Messages
To test that JMS messages are being properly passed from Queue1 to Queue2complete the following steps.
-
Right-click on the Project node and select Build.
-
Right-click on the Project node, and select Undeploy and Deploy.
-
Use your preferred JMS client to send a TextMessage to Queue1 (located at mq://localhost:7676,).
-
Use another JMS client (or the same client) to receive a TextMessage from Queue2 in the JMS server (located at mq://localhost:7676,).
 To Initiate a Request-Reply
JMS messaging solutions need to satisfy requirements of operating on a fire-and-forget, or a store-and-forward basis. This messaging infrastructure is used to deliver each message to the intended recipient whether that recipient is active at the time of send or not. In a Request-Reply pattern, messages are delivered to the messaging system, which immediately acknowledges that it has taken the responsibility for delivery to the ultimate recipient. That delivery, however, may take some time if the recipient is not active for some time or may not take place at all if the recipient never appears.
-
From the File menu, select New Project.
The New Project dialog box is displayed.
-
Select the Enterprise folder, then select the EJB Module from the Projects side of the dialog box and click Next
The New EJB Module dialog box is displayed.
-
Enter a unique Project Name and click Next.
The Server and Settings dialog box is displayed.
-
Accept the default settings for the server and click Finish.
The new project is created.
-
Right-click on the project, select New -> Other.
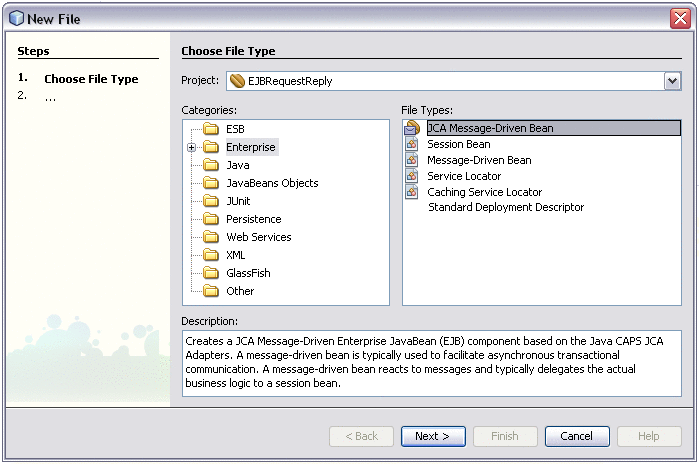
The New File dialog box is displayed.
Figure 1–18 New JCA Message-Driven Bean
-
Select the Enterprise folder, then select JCA Message-Driven Bean from the File Types side of the dialog box and click Next.
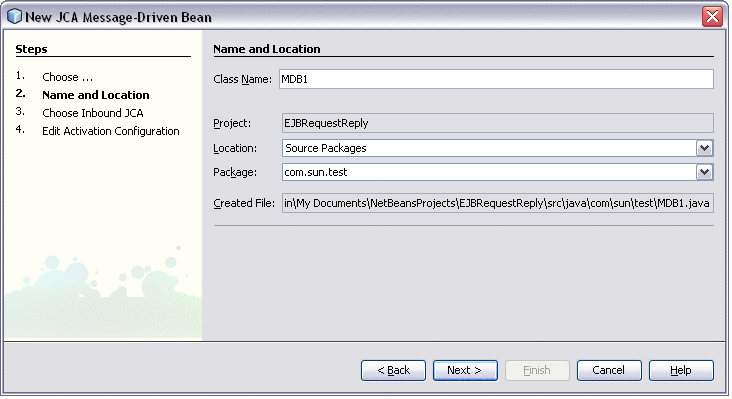
The New JCA Message-Driven Bean dialog box is displayed.
Figure 1–19 Configuring the Message-Driven Bean
-
Enter a unique Class Name, a valid Package name and click Next.
The Choose Inbound JCA dialog box is displayed.
-
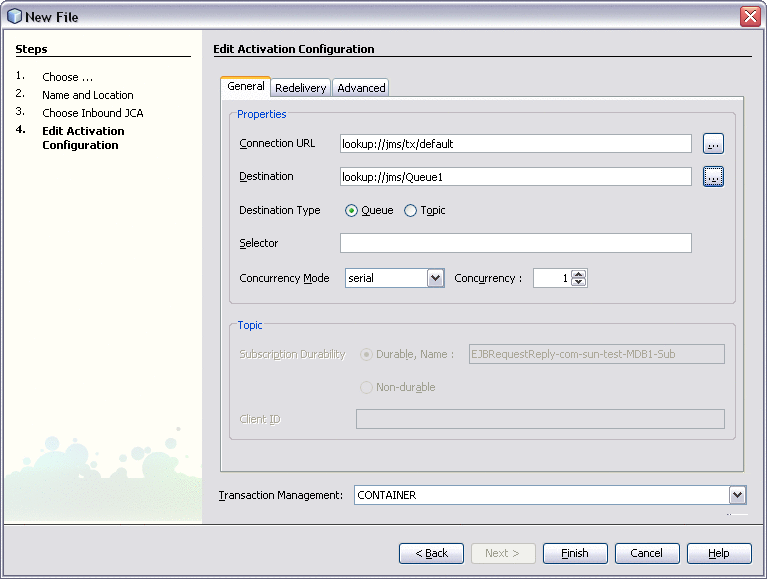
Select the JMS Adapter (default) and click Next.
The Edit Activation Configuration dialog box is displayed.
Figure 1–20 Edit Activation Configuration
-
Set the Destination lookup to the desired JNDI Name of the Queue and click Finish.
A new Message-Driven Bean is created.
-
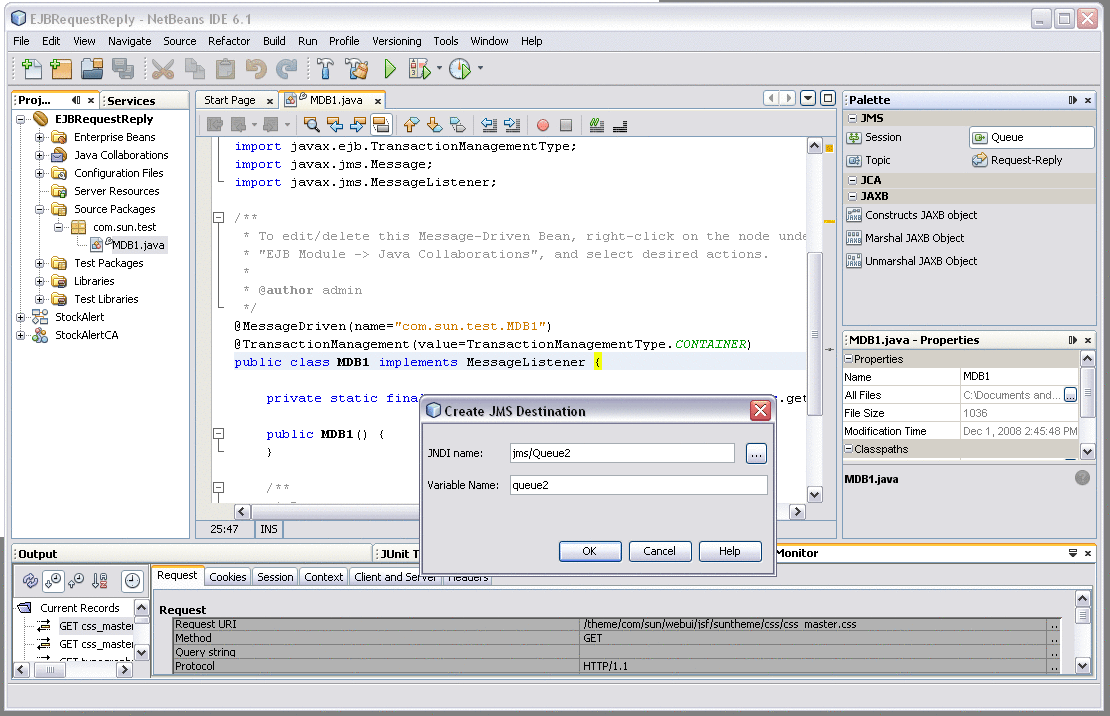
From the Palette window, drag an instance of a Queue into the Java Editor.
A Create JMS Destination dialog box is displayed.
Figure 1–21 JMS Destination
-
Enter a valid JNDI Name, Variable Name, and click OK.
The java code for the Queue instance is populated into the Java Editor. Repeat steps 10 and 11 for as many Queues that are needed.
-
From the Palette window, drag an instance of the JMS Session into the onMessage() method in the Java Editor.
The JMS Adapter Declaration dialog box is displayed.
Figure 1–22 JMS Adapter Declaration

-
Enter a valid Method Name and click Finish.
The java code for the JMS Session is populated into the Java Editor.
-
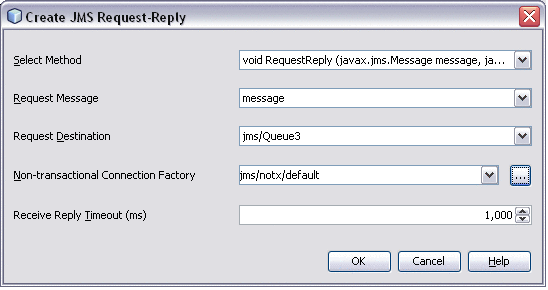
From the Palette window, drag an instance of the Request-Reply into the method created (described in Steps 12 and 13).
The Create JMS Request-Reply dialog box is displayed. The Select Method will already be set by default.
Figure 1–23 JMS Request-Reply
-
Select a valid Request Destination and the jms/notx/default setting for the Non-transactional Connection Factory, click OK.
-
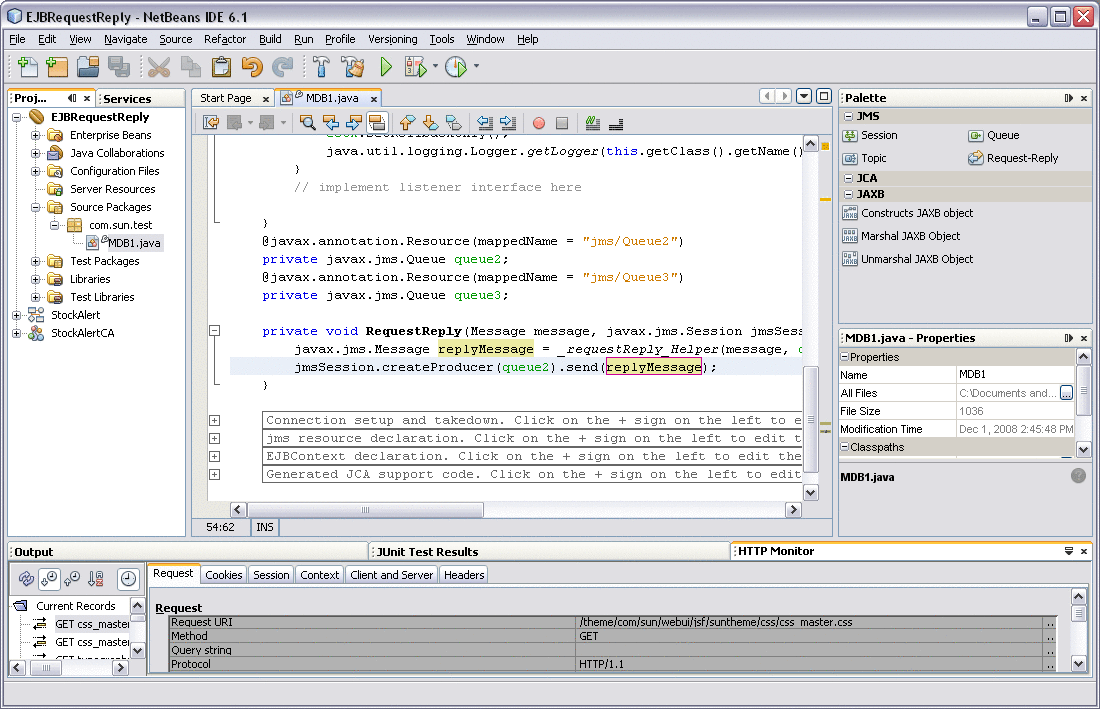
In the Request-Reply method, enter the following code:
jmsSession.createProducer(queue2).send(replyMessage);
Figure 1–24 Request-Reply Method
-
Save file.
-
Create a New JCA Message-Driven Bean (as described in steps 5 - 9) for the Queue Request-Reply destination (as described in step 15).
-
From the Palette window, drag an instance of the JMS Session into the onMessage() method in the Java Editor.
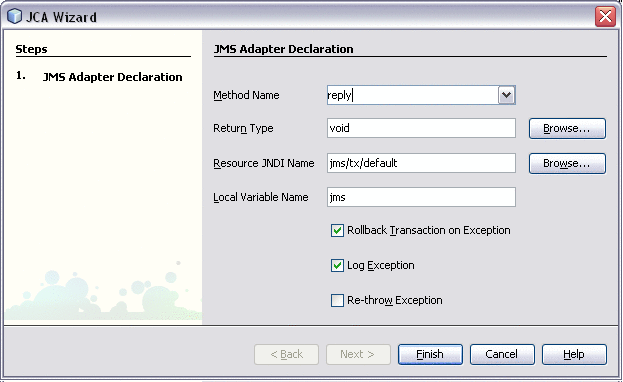
The JMS Adapter Declaration dialog box is displayed.
Figure 1–25 Reply Method
-
Enter "reply" as the Method Name and click Finish.
The java code for the JMS Session is populated into the Java Editor.
-
In the reply method enter the following code:
jmsSession.createProducer(message.getJMSReplyTo()).send(message);
Figure 1–26 Reply Method in the Java Editor
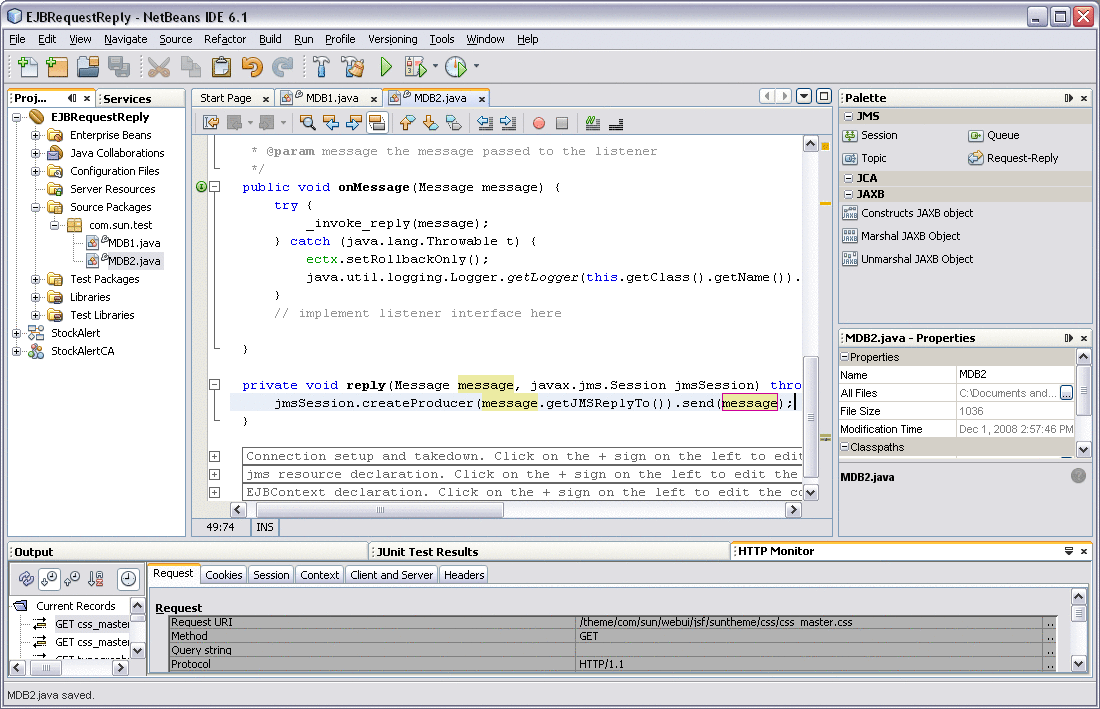
This code sends the incoming message to the reply destination.
-
Save file.
-
Build and deploy the project.
- © 2010, Oracle Corporation and/or its affiliates
