About the TCP/IP JCA Adapter
The following topics provide information on basic operations for the TCP/IP JCA Adapter. If you have any questions or problems, see the Java CAPS web site at http://goldstar.stc.com/support.
What You Need to Know
What You Need to Do
TCP/IP JCA Adapters Contrasted With TCP/IP eWay Adapters
JCA Adapters:
-
Are used from within Java EE 5 applications (EJB 3.0) to get connectivity with the external systems.
-
Have no dependency on the Java CAPS Repository.
-
Allow EJB applications (equivalent to Java Collaboration Definitions) to use the adapter's fine-grained API calls inside business logic
-
Are globally deployed and shared among more than one Java EE application.
-
Can share a common pool with a fixed set of properties.
-
Can easily have configuration properties changed after the project has been built and deployed.
-
Use the same code base as eWays.
eWay Adapters:
-
Are used in Java CAPS Repository-based projects to get connectivity with the external systems.
-
Are usually dependent on OTDs that provide fine-grained API for use in Java Collaboration Definitions where business logic is implemented.
-
Are embedded within the .EAR file; the scope of each eWay at runtime is limited to that EAR only.
Installing the TCP/IP JCA Adapter
The design-time and runtime files that constitute the TCP/IP JCA Adapter are supplied in the Java CAPS Adapter Pack.
Design-Time Files (*.nbm) Under .../AdapterPack/NetBeansModules/
-
com-sun-soabi-adapters-message-lib.nbm
-
com-sun-soabi-adapters-tcpip-jca.nbm
-
com-sun-soabi-adapters-tcpipext-jca.nbm
-
com-sun-soabi-adapters-tcpip-uitool.nbm
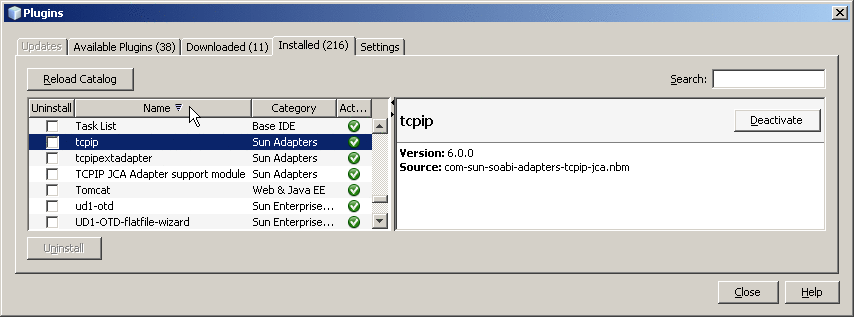
Design-time *.nbm files are installed using the NetBeans IDE, menu option Tools -> Plugins.
Runtime File (global RAR) Under .../AdapterPack/Runtime/adapters/
-
sun-tcpip-adapter.rar
Runtime *.rar files are installed using the GlassFish Admin Console
What You Need To Do
Installing the Design-Time *.nbm Files for the TCP/IP JCA Adapter
This section provides step-by-step instructions for installing the design-time files (NetBeans modules) for the TCP/IP JCA Adapter.
 To Install the NetBeans Modules
for the TCP/IP JCA Adapter
-
In the NetBeans IDE main menu, select Tools -> Plugins.
The Plugins dialog box appears and the list of plugins is initialized.
-
(Optional) If you want to check whether the modules for TCP/IP have already been installed:
-
Click the Downloaded tab.
The dialog box lists plugins that have been downloaded but not installed.
-
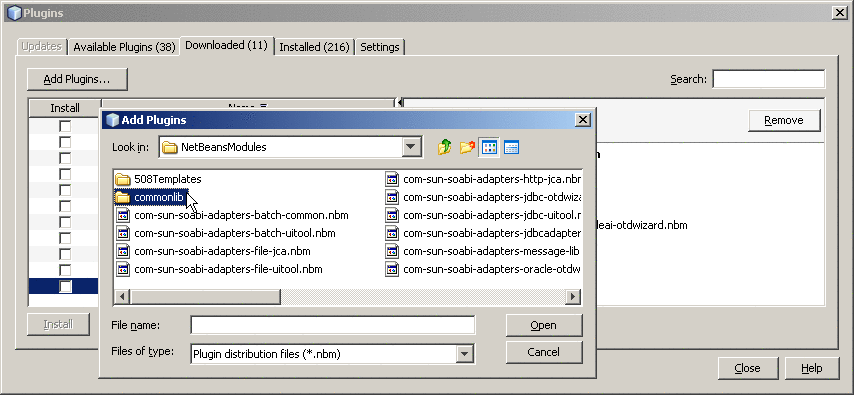
Click the “Add Plugins” button.
The Add Plugins dialog box appears.
-
In the Add Plugins dialog, take the following steps:
-
Navigate to the location of the *.nbm files in the Adapter Pack.
These are by default located in .../AdapterPack/NetBeansModules/.
-
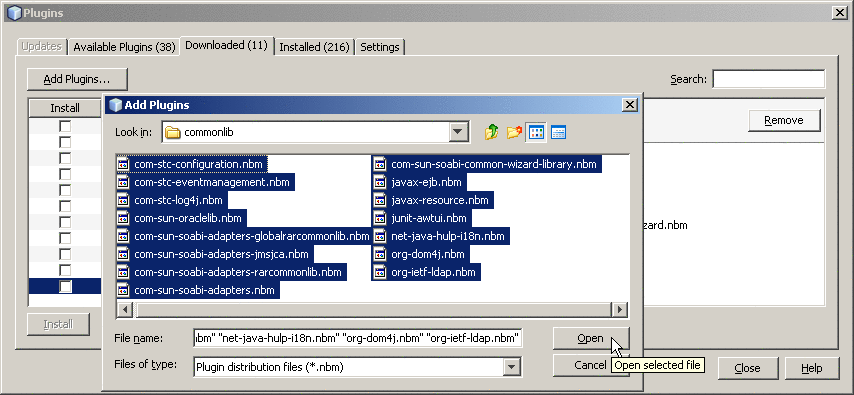
If you have not previously done so, open the commonlib folder and install at least the following*.nbm files:
-
com-stc-configuration.nbm
-
com-stc-eventmanagement.nbm
-
com-stc-log4j.nbm
-
com-sun-soabi-adapters.nbm
-
com-sun-soabi-adapters-globalrarcommonlib.nbm
-
com-sun-soabi-adapters-rarcommonlib.nbm
-
javax-resource.nbm
-
junit-awtui.nbm
-
net-java-hulp-i18n.nbm
-
org-ietf-ldap.nbm
-
-
Back in the NetBeansModules folder, group-select com-sun-soabi-adapters-message-lib.nbm and the three tcpip* files and click Open.
If any of the files has already been downloaded, you are prompted to overwrite the existing file(s) or cancel the operation.
-
-
Back in the Plugins dialog, click Install.
-
In the NetBeans Installer wizard, click Next, accept the terms of the license agreement, and then click Install.
-
When the installation ends, choose whether to restart the IDE immediately or later, and then click Finish.
-
Back in the Plugins dialog, click Close.
Setting Up the Runtime Environment for the TCP/IP JCA Adapter
This section provides step-by-step instructions for installing the RAR file for the TCP/IP JCA Adapter and setting up the GlassFish runtime environment using the Admin Console.
 To Install the Global RAR for
the TCP/IP JCA Adapter
-
Start the GlassFish application server.
-
Access Admin Console by pointing your browser at http://localhost:4848
If your application server is running on a remote machine, and/or uses a port other than 4848 for administration, make the appropriate changes to the URL.
-
Log in to Admin Console.
-
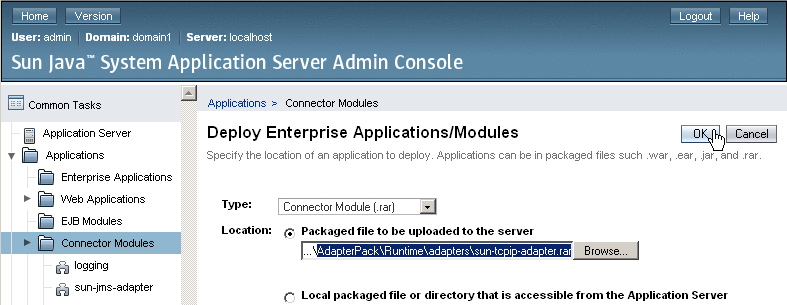
In the Common Tasks pane on the left side, expand Applications -> Connector Modules.
If “sun-tcpip-adapter” appears in the list, the RAR has already been installed.
-
In the “Deploy Enterprise Applications/Modules” pane, do the following and then click OK.
-
In the “Edit Resource Adapter Properties” pane, you can optionally supply or edit properties. Then click Finish.
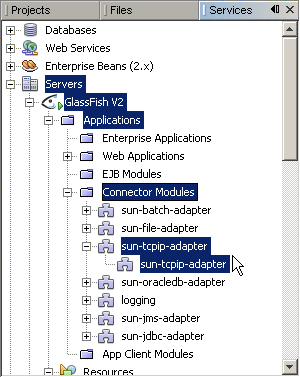
Result: Once you have deployed the global RAR onto the application server, you will be able to see it in the NetBeans IDE under Servers -> GlassFish V2 -> Applications -> Connector Module:
 To Add a Connector Connection
Pool for the TCP/IP JCA Adapter
You will use Admin Console Resources -> Connectors -> Connector Connection Pools to add a new pool for sun-tcpip-adapter.
-
If you have not already done so, start GlassFish and log in to Admin Console.
-
In the Common Tasks pane on the left, expand Resources -> Connectors -> Connector Connection Pools.
-
In the Connector Connection Pools pane on the right, click the “New” button.
-
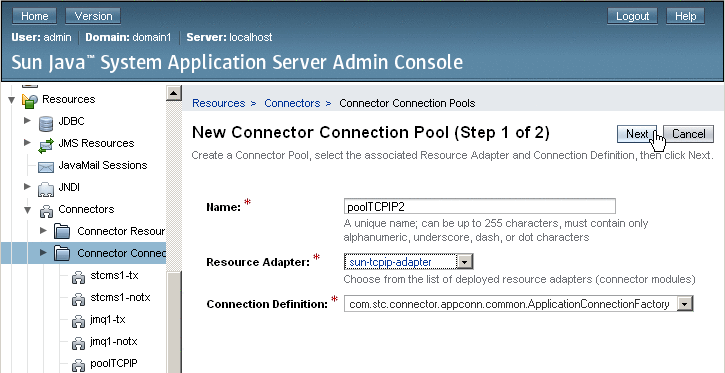
In step 1 of the wizard, supply the following information and then click Next.
-
Name: Supply a name for the TCPIP pool.
-
Resource Adapter: Choose sun-tcpip-adapter
-
Connection Definition: Retain the default provided when you choose the adapter.
-
-
In step 2 of the wizard, retain or change the settings provided and then click Finish.
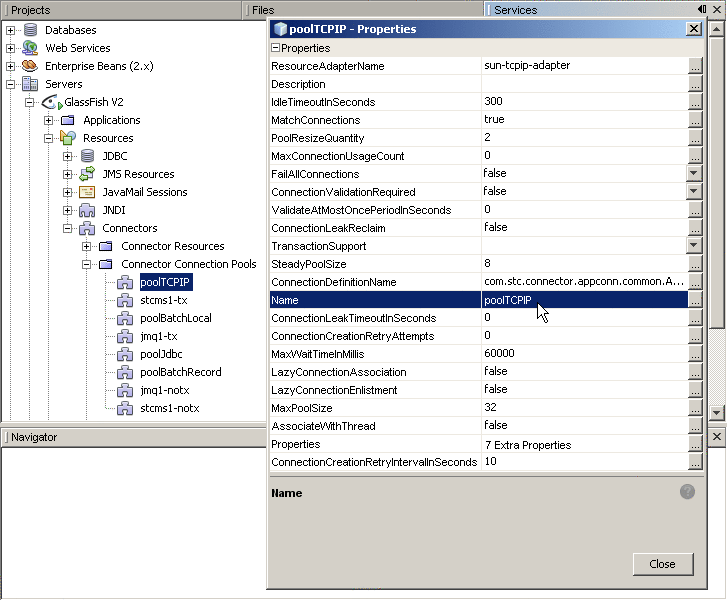
Result: The new pool appears in the tree. You will be able to see it in the NetBeans IDE under Servers -> GlassFish V2 -> Resources -> Connectors -> Connector Connection Pools:
 To Add a Connector Resource
for the TCP/IP JCA Adapter
-
If you have not already done so, start GlassFish and log in to Admin Console.
-
In the Common Tasks pane on the left, expand Resources -> Connectors -> Connector Resources.
-
In the Connector Resources pane on the right, click the “New” button.
-
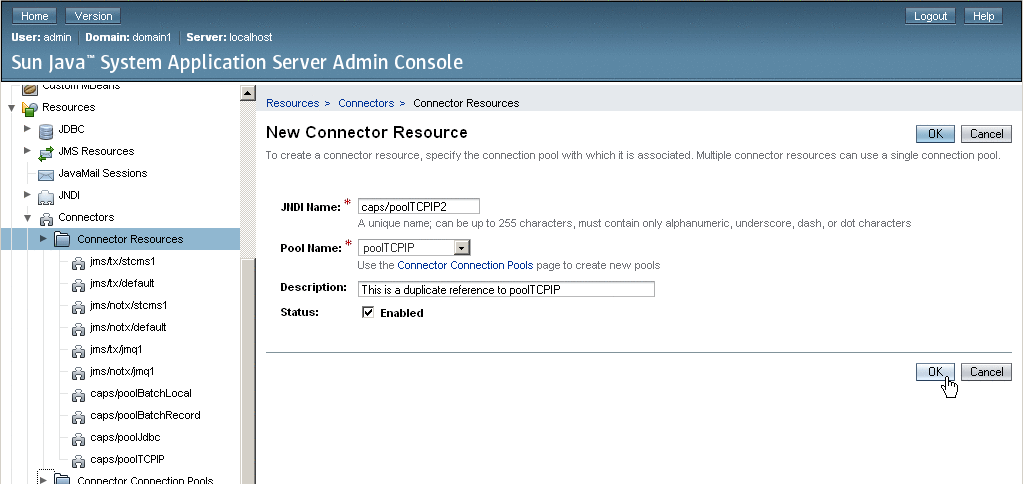
Supply the following information and then click OK.
-
JNDI Name: Supply a name, such as caps/poolTCPIP by which applications will reference the TCPIP pool.
-
Pool Name: Choose a connector connection pool for TCPIP, such as the one created in the previous procedure.
-
Description: Optionally, supply a meaningful description of this particular JNDI resource.
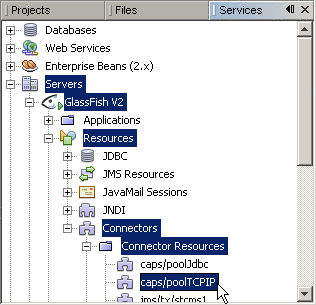
Result: The new resource appears in the tree. You will be able to see it in the NetBeans IDE under Servers -> GlassFish V2 -> Resources -> Connectors -> Connector Resources:
-
Configuring the TCP/IP JCA Adapter
The runtime properties of a TCP/IP JCA Adapter pool can be viewed in the NetBeans IDE, but can only be configured using the Admin Console. A subset of these properties can be overridden at the individual component level using the NetBeans IDE. For detailed step-by-step procedures, see:
Related Topics
For a complete list and description of all configuration settings, see:
For instructions on initially installing TCP/IP JCA Adapters, see:
For instructions on using TCP/IP JCA Adapters at design-time, see:
Configuring Runtime Properties of a TCP/IP JCA Adapter Pool
This section provides a step-by-step procedure for using the Admin Console to configure an existing connector pool for the TCP/IP JCA Adapter.
 To Configure a TCP/IP JCA Adapter Pool
You will use Admin Console to access the CAPS Connector Connection Pools and select an existing pool.
-
Start GlassFish if it is not already running.
-
Point your browser at http://localhost:4848 to access Admin Console.
If GlassFish is running on a remote host, or if the administration port is other than 4848, make the appropriate changes in the URL.
-
If necessary, log in to Admin Console.
-
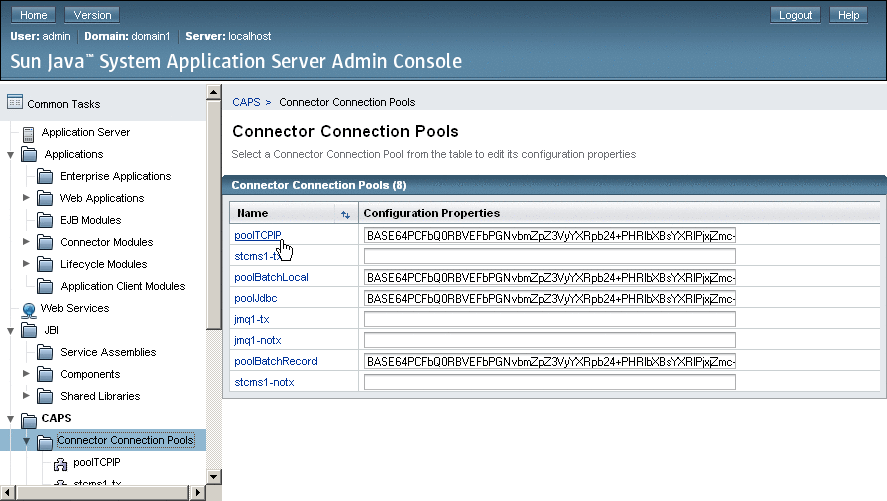
In the Common Tasks pane on the left, expand CAPS -> Connector Connection Pools:
-
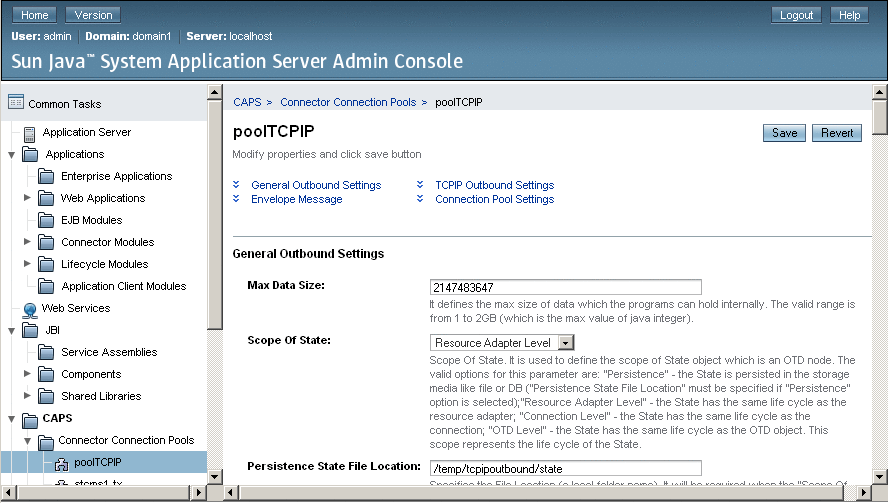
Click the connector connection pool for TCP/IP that you want to configure:
-
Make changes as needed to the configuration settings, and then click Save.
For a list and description of the parameters you can set, see Configuration Settings for the TCP/IP JCA Adapter.
Configuring Design-time Properties of an Individual TCP/IP JCA Adapter Component
This section provides a step-by-step procedure for using the NetBeans IDE to configure an existing instance of a TCP/IP JCA Adapter in an EJB project.
 To Configure a TCP/IP JCA Adapter Instance
You will use the NetBeans IDE Projects tab to open the EJB Module project and its Java Collaborations folder, allowing you to edit the configuration properties of an existing TCP/IP JCA Adapter instance.
-
In the NetBeans IDE, Projects tab, locate the EJB Module project containing the instance you want to configure
-
Open the project's Java Collaborations folder.
-
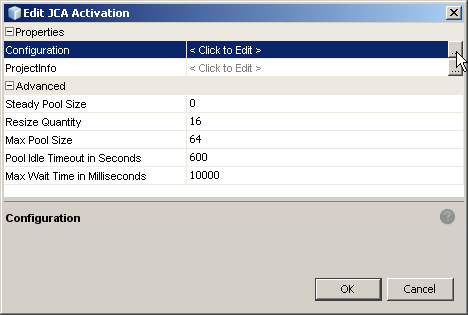
Right-click the package name and select Edit JCA Activation:
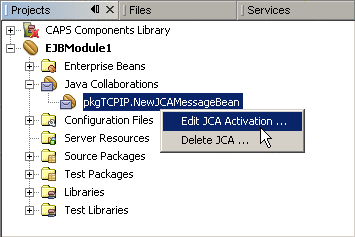
The Edit JCA Activation dialog box appears
-
In the Properties section, click the ellipsis [...] button to the right of “Configuration”:
-
Make changes as needed to the configuration settings, and then click OK.
For a list and description of the parameters you can set, see Configuration Settings for the TCP/IP JCA Adapter.
Using the TCP/IP JCA Adapter in an EJB Project
The following provides step-by-step instructions on creating an instance of a TCP/IP JCA Adapter in an EJB project.
What You Need to Do
Designing an EJB Module to Use TCP/IP JCA Adapter Code
This section provides step-by-step procedures for creating an EJB Module project and populating it with TCP/IP JCA Adapter code.
 To Create an EJB Module Project
-
In the NetBeans IDE main menu, click File -> New Project.
The New Project wizard appears.
-
Select the following category and project type and then click Next:
-
Category: Enterprise
-
Project: EJB Module
-
-
Provide a project name and location and then click Next.
-
Retain the default values for Server and Settings and then click Finish.
 To Add a TCP/IP JCA Adapter to an EJB
Project
-
Right-click the EJB Module project and select New -> JCA Message-Driven Bean:
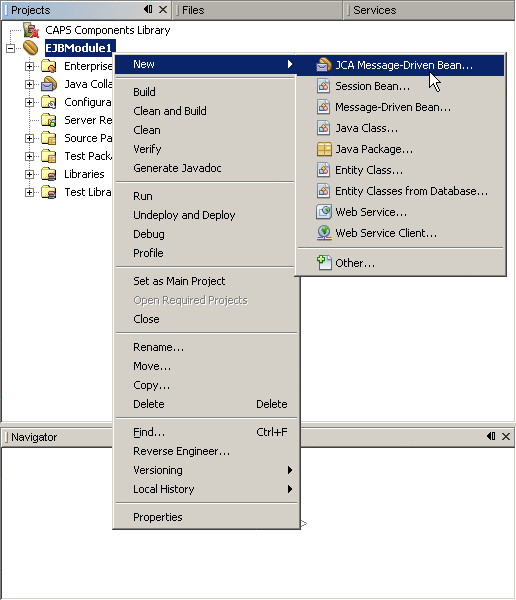
The New JCA Message-Driven Bean wizard appears.
-
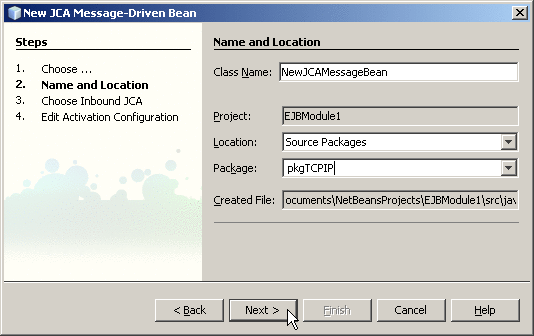
Provide a package name and then click Next:
-
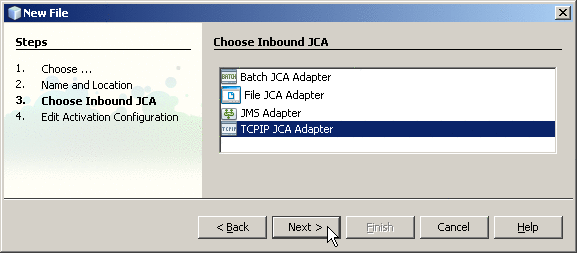
For the Choose Inbound JCA step, select TCPIP JCA Adapter and then click Next:
-
In the final step of the wizard, you can optionally edit the instance properties before clicking Finish.
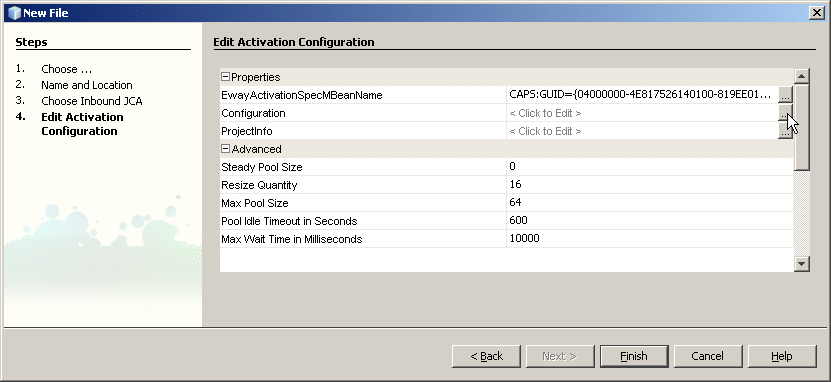
If you click the ellipsis to the right of the Configuration property (as shown above), you can view or edit configuration settings of the TCP/IP JCA Adapter:
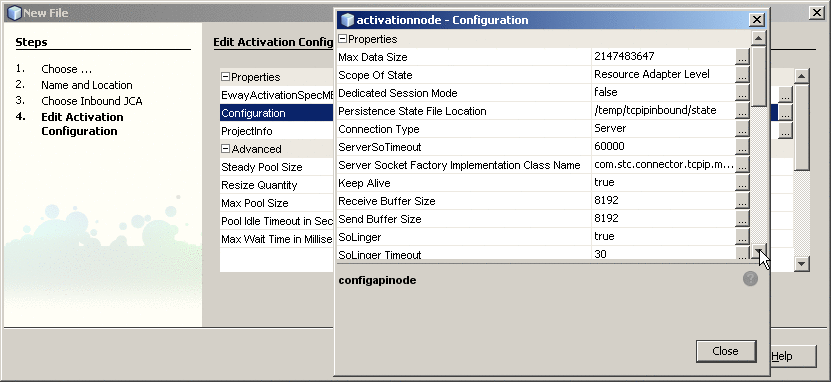
For a complete list and description of configuration properties, see Configuration Settings for the TCP/IP JCA Adapter.
 To Use TCP/IP-Specific Sample
Code
-
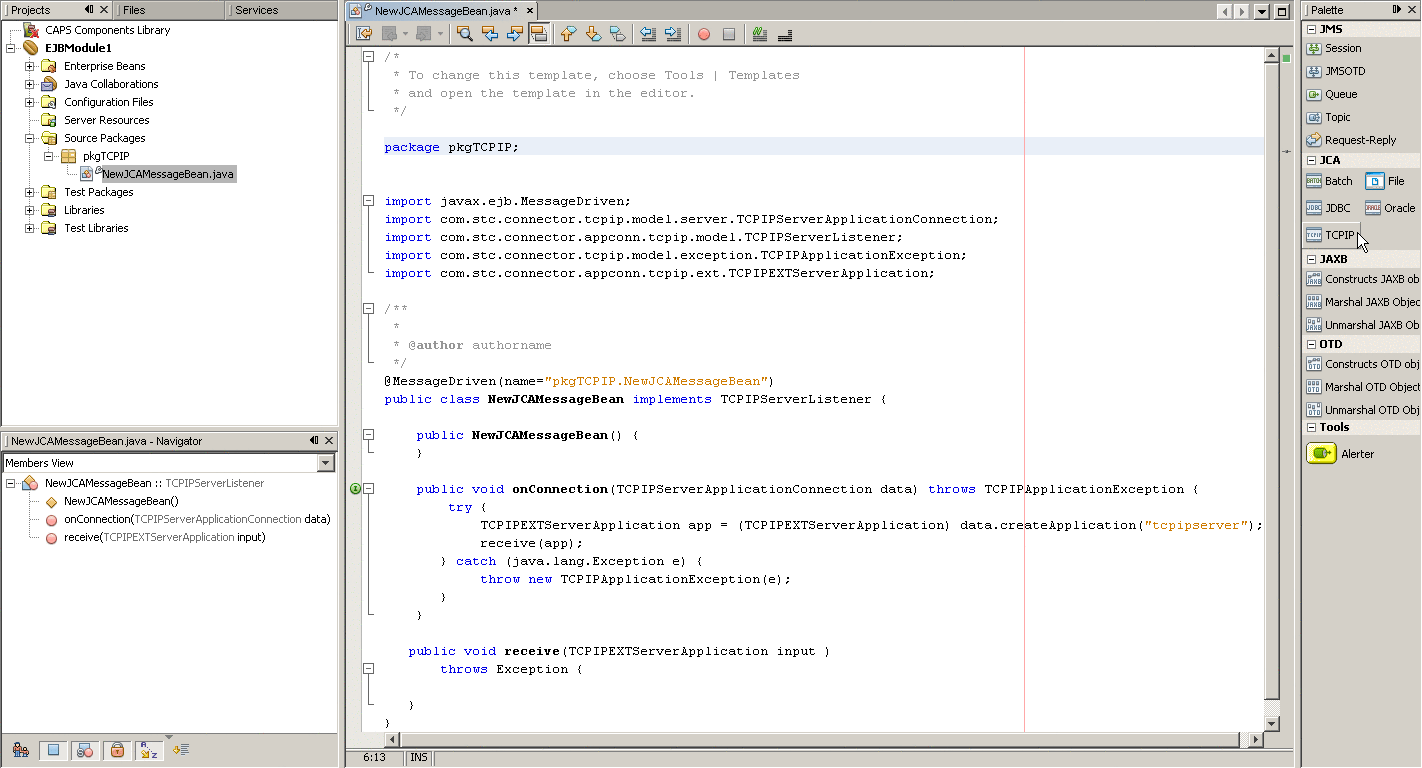
In the NetBeans IDE, open the .java file containing the message-driven bean you just created.
-
From the palette, under JCA, drag TCPIP onto the code canvas as shown in the far right of the following illustration:
-
In the JCA Wizard, provide appropriate values for the TCP/IP JCA Adapter declaration and then click Finish
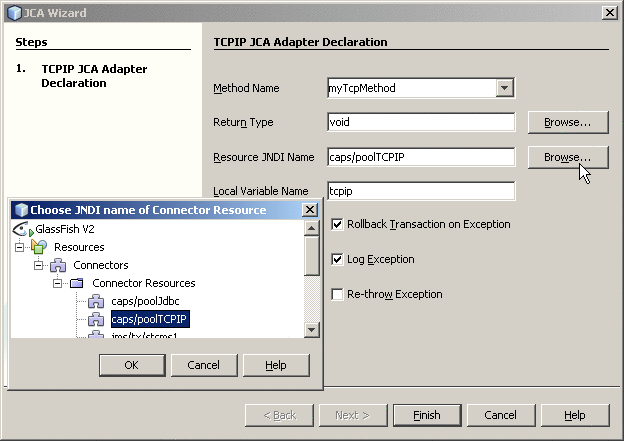
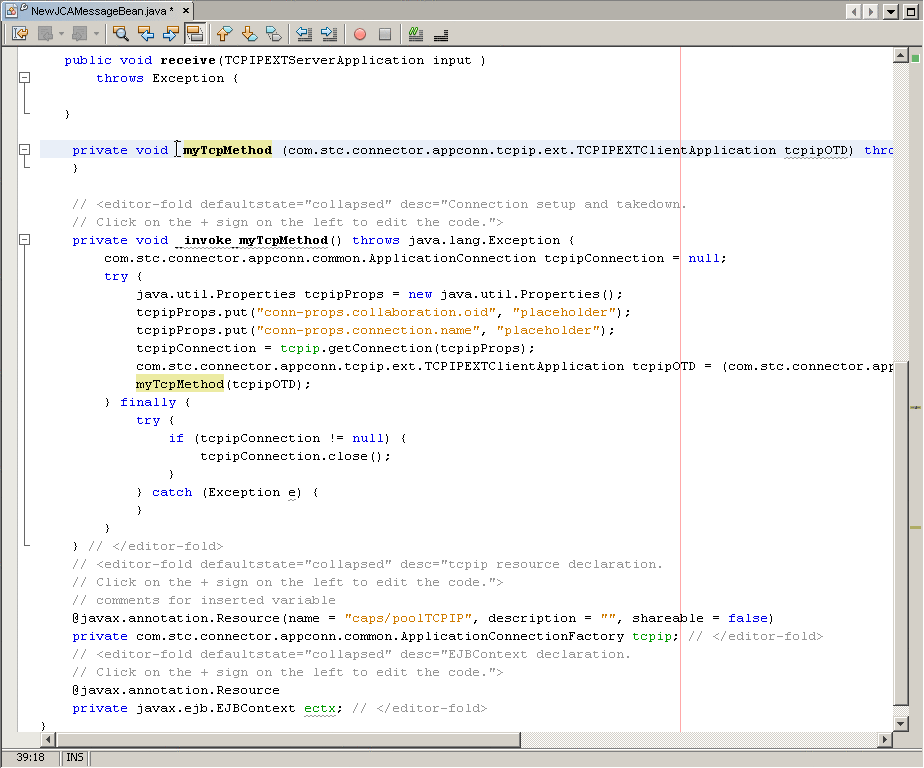
Result:Three blocks of sample code are added, as shown (expanded) below.
-
Expand each block and edit the code as needed for your implementation.
Configuration Settings for the TCP/IP JCA Adapter
The following categories of configuration parameters are listed and described:
For step-by-step procedures on configuring the TCP/IP JCA Adapter, refer to Configuring the TCP/IP JCA Adapter.
General Outbound Settings
The General Outbound properties specify top-level parameters for the TCP/IP JCA Adapter.
- Max Data Size
-
Default: 2147483647
Range: 1 to 2147483647 (bytes).
Maximum amount of data that can be held internally.
- Scope Of State
-
Default: Resource Adapter Level
Choices include:
- Resource Adapter Level
-
The state has the same lifecycle as the resource adapter.
- Persistence
-
The state is persisted; state files are stored in the location specified by Persistence State File Location setting.
- Connection Level
-
The state has the same lifecycle as the connection
- OTD Level
-
The state has the same lifecycle as the OTD object.
- Persistence State File Location
-
Default: C:/temp/tcpipinbound/state
Ignored unless Scope Of State is set to Persistence.
Location where state files are stored; a local path.
TCPIP Outbound Settings — Client Connection Establishment
The Client Connection Establishments settings control the connection when the Connection Type is Client.
- Time To Wait Before Attempting Connection
-
Default: 0 (milliseconds); in other words, no wait time
Specifies the number of milliseconds to wait before trying to establish a connection with an external server.
- Always Create New Connection
-
Default: false
Choices include:
- false
-
An attempt is made to match an existing connection managed by the container.
- true
-
A new connection is always attempted, without trying to match an existing connection.
- Auto Reconnect Upon Matching Failure
-
Default: true
Choices include:
- true
-
The invalid matching connection is discarded, and an attempt is automatically made to reconnect using a new connection.
- false
-
No automatic attempt is made to reconnect after an invalid match; instead, an exception is thrown. The user must detect this type of failure and act appropriately.
- Max Connection Retry
-
Default: 3
Specifies the maximum number of attempts at making a connection with the external TCP/IP server (host/port) before giving up.
- Retry Connection Interval
-
Default: 30000 (milliseconds); in other words, 30 seconds
Specifies the number of milliseconds to wait between attempts to connect to the external TCP/IP server (host/port).
TCP/IP Outbound Settings — Server Port Binding
The Server Port Binding settings control the connection when the Connection Type is Server (nondefault).
- Max Binding Retry
-
Default: 3
Specifies the maximum number of attempts to bind to the TCP/IP client before giving up.
- Retry Binding Interval
-
Default: 30000 (milliseconds); in other words, 30 seconds
Specifies the number of milliseconds to wait between attempts to bind to the TCP/IP client.
TCP/IP Outbound Settings
The TCP/IP Outbound properties specify general and socket settings (Java Socket Options) for the TCP/IP JCA Adapter.
- Connection Type
-
Default: Client
Choices include:
- Client
-
The adapter is in active mode, connecting to an external TCP/IP server (host/port).
- Server
-
The adapter is in passive mode, listening on a particular port for an incoming connection request from an external TCP/IP client.
- ServerSoTimeout
-
Default: 60000 (millseconds); in other words, one minute
Applies only when Connection Type is set to Server.
Gets or sets the value of the SO_TIMEOUT socket option for the ServerSocket, used for ServerSocket.accept(). A value of 0 is interpreted as an infinite timeout.
To have effect, this option must be enabled prior to entering the blocking operation. When it is set to a nonzero timeout, calling accept() for ServerSocket blocks for only the specified number of milliseconds. If the timeout expires, a java.net.SocketTimeoutException or java.net.InterruptedIOException is thrown, even though the ServerSocket remains valid.
- Keep Alive
-
Default: true
Choices include:
- true
-
The SO_KEEPALIVE socket option is enabled: After prolonged period of inactivity, a keepalive probe is sent automatically, and the socket is either kept open (if the probe fetches an ACK response) or closed (if the probe fetches a RST response or no response).
- false
-
The SO_KEEPALIVE socket option is disabled.
- Receive Buffer Size
-
Default: 8192 (bytes)
Gets or suggests the size of the client's SO_RCVBUF socket option; in other words, the buffer size used by the platform for input on the socket.
- Send Buffer Size
-
Default: 8192 (bytes)
Gets or suggests the size of the client's SO_SNDBUF socket option; in other words, the buffer size used by the platform for output on the socket.
- SoLinger
-
Default: true
Choices include:
- true
-
Enables the SO_LINGER socket option, causing a nonzero SoLinger Timeout value to be applied (see below)
- false
-
Disables the SO_LINGER socket option.
- SoLinger Timeout
-
Default: 30 (seconds)
Effective maximum is 65535 (in other words, 18.2 hours); values above 65535 are treated as if they were 65535.
If SoLinger is set to true (see above), this specifies the number of seconds to block a close() in order to allow for graceful transmission and acknowledgment of all data written. Reaching the timeout value, or setting it to 0, results in a forceful termination with a TCP RST.
- SoTimeout
-
Default: 10000 (milliseconds); in other words, 10 seconds
Gets or sets the value of the SO_TIMEOUT socket option, used for read(). A value of 0 is interpreted as an infinite timeout.
To have effect, this option must be enabled prior to entering the blocking operation. When it is set to a nonzero timeout, a read() call on the input stream blocks for the specified number of milliseconds. If the timeout expires, a java.net.SocketTimeoutException or java.net.InterruptedIOException is thrown, even though the ServerSocket remains valid.
- TcpNoDelay
-
Default: false
Choices include:
- false
-
Disables the TCP_NODELAY option Per Nagle's algorithm, data packets are not sent until the maximum transmission unit (MTU) value is achieved.
- true
-
Enables the TCP_NODELAY option. Data packets are sent out immediately, even if they have not filled the MTU.
- Socket Factory Implementation Class Name
-
Default: com.stc.connector.tcpip.model.factory.TCPIPSocketFactoryImpl
Specifies the name of the Java class that implements the client socket factory. Allows the user to specify a custom implementation. The class must implement the interface com.stc.connector.tcpip.model.factory.TCPIPSocketFactory.
- Host
-
Default: localhost
Applies only when Connection Type is set to Client.
Specifies the hostname or IP address to use for establishing a TCP/IP connection
- Port
-
Default: 8888
Specifies the port number of the TCP/IP destination, a number from 0 through 65535. If the Connection Type is set to Client, this indicates the port number on the external TCP/IP host. If the Connection Type is set to Server, this indicates the port on which the local host is listening.
- Backlog
-
Default: 50
Applies only when Connection Type is set to Client.
Specifies the maximum length of the queue when creating the ServerSocket; if a connection indication arrives when the queue is full, the connection is refused.
Envelope Message Settings
This section lists and describes message envelope types and their structures, as well as associated parameters. For all envelope types except MarkedAndFixed, the data is the same as the payload.
- EndMarked
-
Specifies the following two-block structure:
-
a variable number of bytes of data payload, followed by
-
a single-byte “store until” character
The “store until” character is not part of the payload; it signals that the data stream has ended.
-
- BeginEndMarked
-
Specifies the following three-block structure:
-
a single-byte “ignore until” character, followed by
-
a variable number of bytes of data payload, followed by
-
a single-byte “store until” character.
The “ignore until” and “store until” characters are not part of the payload; they signal that the data stream is about to begin and has ended.
-
- FixedLength
-
Specifies the following one-block structure:
-
a fixed number of bytes of data payload
The number of bytes of data in the block is specified by the setting of the “bytes to read” parameter.
-
- LengthPrefixed
-
Specifies the following two-block structure:
-
a two-part Length block consisting of a Numeric Representation part and a Width-of-Length part, followed by
-
a fixed number of bytes of data payload
The number of bytes of data in the block is specified by the setting of the “bytes to read” parameter.
-
- MarkedAndFixed
-
Specifies the following four-block structure:
-
a single-byte “ignore until” character, followed by
-
a variable number of bytes of data payload, followed by
-
a single-byte “store until” character, followed by
-
a fixed number of final bytes to read.
The “ignore until” and “store until” characters are not part of the payload; they signal that the variable-length data stream is about to begin and has ended. The number of bytes of data in the final block is specified by the setting of the “bytes to read” parameter.
-
- PerActiveConnection
-
Specifies the following one-block structure:
-
an expected or variable number of bytes of data payload
The connection is closed after the entire (unenveloped) message is sent. If the number of bytes has not been prearranged, then the receiver knows the entire message has been sent because the connection is closed.
-
- Custom
-
Can specify any type of structure, depending on the “custom enveloped class name” and “customer defined property” parameters.
For optimum performance, use the method receiveEnvelopedMsg() with custom messages that are enveloped. This method uses the envelope as its ending condition, whereas other receiving methods — receiveBytes() and receiveString() — use a time-out as their ending condition.
The following parameters support the message structures listed above.
- Custom Enveloped Class Name
-
Used only by the Custom message structure, which requires this parameter.
Specifies the Java class name to be used. Must be a fully qualified class name, such as “com.abc.MyClass”. The class must implement interfaces com.stc.connector.tcpip.ext.msg.EnvelopedMsgReceiver and com.stc.connector.tcpip.ext.msg.EnvelopedMsgSender.
- Customer Defined Property
-
Used only by the Custom message structure.
Specifies a list of user-defined parameters. You can parse this information, such as delimiters, into your customized envelope message implementation.
- Bytes to Read
-
Default: 1
Specifies the number of bytes of data in a FixedLength message or at the end of a MarkedAndFixed message.
- Width Of Length
-
Default: 1
Used only by the LengthPrefixed message structure, which requires this parameter.
Specifies the number of “digits” to be used to represent the Length field. Values depend on the Numeric Representation parameter, as follows:
- Decimal
-
Width can be set from 1 through 10.
- Octal
-
Width can be set from 1 through 8.
- Hexadecimal
-
Width can be set from 1 through 16.
- Network Short
-
Width must be set to 2.
- Network Long
-
Width must be set to 4.
- Numeric Representation
-
Default: Decimal
Used only by the LengthPrefixed message structure, which requires this parameter.
Specifies whether the number is represented in decimal, octal, hexadecimal, network-short, or network-long.
- “Ignore Until” Character Value
-
Default: 11 (in other words, ASCII character number hexadecimal 0B).
The “ignore until” character is not part of the data payload; it signals that the variable-length data stream is about to begin (in a BeginEndMarked or MarkedAndFixed message).
- “Store Until” Character Value
-
Default: 65 (in other words, ASCII character number hexadecimal 41).
The “store until” character is not part of the data payload; it signals that the variable-length data stream has ended (in an EndMarked, BeginEndMarked, or MarkedAndFixed message).
Connection Pool Settings
The Connection Pool properties specify pool parameters stored in sun-ra.xml for the TCP/IP JCA Adapter.
- Steady Pool Size
-
Default: 1
Maps to parameter “steady-pool-size” in sun-ra.xml.
Specifies the minimum number of resource adapter connections to be maintained. For nonzero values, the container populates the resource adapter connection pool with the specified number and tries to maintain at least this many resource adapter connections in the free pool, ensuring a sufficient number of connections in the ready-to-serve state to process user requests.
- Max Pool Size
-
Default: 32
Maps to parameter “max-pool-size” in sun-ra.xml.
Specifies the maximum number of resource adapter connections in the pool. A value of 0 means the pool is unbounded.
- Pool Idle Timeout In Seconds
-
Default: 30
Maps to parameter “pool-idle-timeout-in-seconds” in sun-ra.xml.
This parameter provides a suggestion to the server for how often to run a timer thread that periodically removes unused resource adapter connections whose timeout has expired. This parameter defines the interval at which this thread runs; when it is set to greater than 0, the container removes or destroys any resource connection instance that has idle for this number of seconds. Thus, in other words, this parameter specifies the maximum number of seconds that a component can remain idle in the pool; after this amount of time, the pool can remove the bean. A value of 0 specifies that idle resource adapter connections can remain in the pool indefinitely.
- © 2010, Oracle Corporation and/or its affiliates

