|
| |
| Sun Java Enterprise System 5 Upgrade Guide for UNIX | |
Chapter 14
Access ManagerThis chapter describes how to upgrade Access Manager software from previous Java ES versions to Java ES 5 (Release 5): Sun Java System Access Manager 7.1.
The chapter provides a general overview of Access Manager upgrade issues and procedures for the different upgrade paths supported by Release 5. The chapter covers upgrades on both the Solaris and Linux operating systems:
Overview of Access Manager UpgradesThis section describes the following general aspects of Access Manager that impact upgrading to Java ES 5 (Release 5):
About Java ES Release 5 Access Manager
Java ES Release 5 Access Manager represents a minor release. It contains a number of bug fixes and enhancements to Java ES Release 4 Access Manager, which was a major release. Among the enhancements in Release 5 is a new monitoring capability based on the Java ES monitoring framework. For more information about Release 5 enhancements, see the Sun Java System Access Manager 7.1 Release Notes, http://docs.sun.com/doc/819-4683.
Similar to Release 4, Release 5 Access Manager supports multiple identity repositories, or user data stores. Thus Release 5 Access Manager supports not only an LDAP directory such as Directory Server, but other data storage protocols and formats as well.
On the front end, Access Manager Console is used to configure the new Access Manager services and identity repositories.
In order to provide backward compatibility with other Java ES components, Release 5 can be run in legacy mode, which supports the Java ES components that depend on Release 3 Access Manager services (for more information, see Compatibility Issues).
Access Manager Upgrade Roadmap
Table 14-2 shows the supported Access Manager upgrade paths to Java ES Release 5. The table applies to both Solaris and Linux operating systems.
Table 14-2 Upgrade Paths to Java ES 5 (Release 5): Access Manager 7.1
Java ES Release
Access Manager Version
General Approach
Reconfiguration Required
Release 4
Sun Java System Access Manager 7.0 2005Q4
Direct upgrade:
Performed by using a pre-upgrade script to remove the Release 4 version and then doing a full installation and reconfiguration of Release 5.Configuration data
Customized JSPs for Access Manager Console and authentication UI
Directory schema
Release 3
Sun Java System Access Manager 6.3 2005Q1
Direct upgrade:
Performed by using a pre-upgrade script to remove the Release 3 version and then doing a full installation and reconfiguration of Release 5.Configuration data
Customized JSPs for Access Manager Console and authentication UI
Directory schema
Release 2
Sun Java System Identity Server
6.2 2004Q2
and also 6.2 SP1Direct upgrade:
Performed by using a pre-upgrade script to remove the Release 2 version and then doing a full installation and reconfiguration of Release 5.Configuration data
Customized JSPs for Access Manager Console and authentication UI
Directory schema
Release 1
Sun ONE Identity Server 6.1
No direct upgrade:
But you can upgrade first to Release 3 using procedures in the Java Enterprise System 2005Q1 Upgrade and Migration Guide, http://docs.sun.com/doc/819-0062.Then upgrade from Release 3 to Release 5.
Configuration data
Customized JSPs for Access Manager Console and authentication UI
Directory schema
Pre-dates Java ES releases
Sun ONE Identity Server 6.0 or 6.0 SP 1 or
iPlanet Directory Server Access Management Edition (DSAME) 5.1
No direct upgrade.
Access Manager Data
Access Manager, like other Java ES components, makes use of various kinds of data that for any specific upgrade might need to be migrated to an upgraded version. The following table shows the type of data that could be impacted by an upgrade of Access Manager software.
Access Manager Upgrade Strategy
Your strategy for upgrading Access Manager generally depends on the many considerations discussed in Chapter 1, "Planning for Upgrades": upgrade path, dependencies between Java ES components, selective upgrade versus upgrade all, multi-instance deployments, and so forth.
This section is to particularize that general discussion to Access Manager by presenting issues that might influence your Access Manager upgrade plan.
Compatibility Issues
Release 5 Access Manager is backwardly compatible with Release 4 Access Manager, however Release 4 Access Manager was a major release that, except when configured to run in Legacy mode, broke compatibility with earlier releases. Similarly, Release 5 Access Manager, unless configured to run in Legacy mode, is not backwardly compatible with Release 3 Access Manager (or Release 4 Access Manager running in Legacy mode).
In addition, Release 5 Access Manager is not backwardly compatible with Release 2 Access Manager in any mode; Release 5 Access Manager cannot interoperate with Release 2 Access Manager SDK, nor visa versa.
Release 5 Access Manager, when configured to run in the newer Realm mode, supports multiple identity repositories and data storage protocols. Directory data has to be migrated to a new structure to support Realm mode operation. In addition, Realm mode does not support other Java ES components, such as Portal Server, or Sun Java Communications Suite components, such as Communications Express, Messaging Server, and others.
When configured to run in Legacy mode, however, Release 5 Access Manager, with some minor exceptions (see the Sun Java System Access Manager 7.1 Release Notes, http://docs.sun.com/doc/819-4683), is backwardly compatible with Release 3 Access Manager and corresponding directory data.
Legacy mode is necessary to support other Java ES components, as well as older versions of Access Manager policy agents, which cannot interoperate with Access Manager in Realm mode. This incompatibility is an important upgrade consideration, and means in most Java ES deployments, that Access Manager should be upgraded to Release 5 Legacy mode.
Even when configured to run in Legacy mode, however, Release 5 Access Manager is not compatible with Release 3 or earlier Sun Java Communications Suite components. If Access Manager is upgraded to Release 5, then Release 3 or earlier Delegated Administrator also must be upgraded to Release 5 to provision users for Messaging Server and Calendar Server. However, Messaging Server and Calendar Server do not, themselves, have to be upgraded to Release 5.
Release 5 Access Manager Console, like the Release 4 Console, supports both Realm mode and Legacy mode. However, if you have configured Access Manager to run in Legacy mode, you can still use the Legacy-only Console that was distributed in Release 2 and Release 3.
Access Manager Dependencies
Access Manager dependencies on other Java ES components can impact the procedure for upgrading and re-configuring Access Manager software. Changes in Access Manager interfaces or functions, for example, could require upgraded version of components upon which Access Manager depends. The need to upgrade such components depends upon the specific upgrade path.
Access Manager has dependencies on the following Java ES components:
- Shared components. Access Manager has dependencies on specific Java ES shared components (see Table 1-9). Access Manager upgrades might depend upon upgraded versions of these shared components.
- Web Container. Access Manager has a mandatory dependency on web container services, which can be provided either by Java ES Web Server, Java ES Application Server, or third-party web containers (from Weblogic and WebSphere). Access Manager upgrades might require that customized JSPs for the Access Manager Console or for the authentication UI be migrated to the upgraded Access Manager environment.
- Directory Server. Access Manager has a mandatory dependency on Directory Server, which is used to store configuration data and user data. As a result, Access Manager upgrades might require extensions of directory schema.
Web Container Upgrade Scenarios
Access Manager can be deployed in a web container provided by either Web Server or Application Server. As a result, the upgrade of Access Manager to Release 5 can be complicated by the possibility of also having upgraded to Release 5 the web container in which it is deployed. In this regard, there are a number of web container upgrade scenarios possible, enumerated in the following table.
You must be careful when upgrading Access Manager (for example when using the amconfig script) to provide values appropriate to the upgrade scenario in Table 14-4 that applies, especially when there is a major version upgrade of the web container.
Dual Upgrade
Dual upgrades, in which both Access Manager and operating system are upgraded (as described in Dual Upgrades: Java ES and Operating System Softwared) is not supported for Access Manager.
As a result, if you have a situation in which a dual upgrade is required, you have to perform an operating system install or upgrade, after which you re-install and freshly configure Access Manager.
Upgrading Access Manager from Java ES Release 4This section includes information about upgrading Access Manager from Java ES 2005Q4 (Release 4) to Java ES 5 (Release 5). The section covers the following topics:
Introduction
When upgrading Java ES Release 4 Access Manager to Release 5, consider the following aspects of the upgrade process:
- General Upgrade Approach. The upgrade is performed by removing previous versions of binaries and newly installing Release 5. An ampre71upgrade script is provided for removing the Release 4 version and the Java ES installer is then used to install Release 5. Reconfiguration of Access Manager is subsequently performed using the amconfig script, and directory schema is migrated using the amupgrade script.
- Upgrade Dependencies. Access Manager has dependencies on a number of Java ES shared components (see Table 1-9), all of which are automatically upgraded to Release 5 by the Java ES installer when you perform an upgrade of Access Manager. This includes support for the new Java ES monitoring framework, which requires a number of shared components not required for Release 4 Access Manager.
In addition, Release 5 Access Manager is dependent upon Directory Server and Web Server (or Application Server or third-party web containers), as described in Access Manager Dependencies. However, these are soft upgrade dependencies; upgrade of these components is optional with respect to upgrade of Access Manager to Release 5.
- Backward Compatibility. Release 5 Access Manager is compatible with Release 4, but is not compatible with earlier Access Manager releases (see Compatibility Issues).
- Upgrade Rollback. There is no utility for rolling back the Access Manager upgrade. In fact, the number of re-configurations required to roll back Access Manager to its original state make such a rollback impractical. The best approach to rollback is to create a parallel installation using backed-up configuration files, and testing this parallel installation before performing the upgrade. This allows you to revert to the parallel installation if necessary.
- Platform Issues. The general approach for upgrading Access Manager is the same on both Solaris and Linux operating systems. The procedures that follow indicate platform-specific commands or file locations where appropriate.
Full Release 4 Access Manager Upgrade
This section describes how to perform a full Access Manager upgrade from Java ES Release 4 to Java ES Release 5:
Pre-Upgrade Tasks
Before you upgrade Access Manager, you should perform the following tasks:
Verify Current Version Information
You can verify the current version of Access Manager using the following command:
Upgrade Access Manager Dependencies
It is generally recommended that all Java ES components on a computer system (and in a computing environment) be upgraded to Java ES Release 5. Access Manager has hard upgrade dependencies on a number of shared components (see Table 1-9).
If you choose to upgrade Access Manager product component dependencies, you should do so in the order below (skipping any that might already have been upgraded), before you upgrade Access Manager. Upgrade of shared components is normally achieved automatically by the Java ES installer.
- Shared Components. Instructions for synchronizing Java ES shared components to Release 5 are provided in Upgrading Java ES Shared Components. However, all shared components required by Access Manager are upgraded automatically by the Java ES installer when you perform an upgrade of Access Manager to Release 5.
- Directory Server (soft upgrade dependency). Instructions for upgrading Directory Server to Release 5 are provided in Chapter 5, "Directory Server".
- Web Container Software (soft upgrade dependency). Instructions for upgrading Web Server or Application Server are provided in Chapter 7, "Web Server" and Chapter 11, "Application Server", respectively.
If web container software is not upgraded before Access Manager, the upgrade procedure (using the amconfig script) will configure and re-deploy Access Manager to the existing web container.
Back Up Directory Server Data
The Access Manager upgrade process uses scripts that modify Directory Server schema. Therefore, before you upgrade Access Manager, back up your Directory Server data using the Directory Server Console or a command-line utility such as db2bak. You can use db2ldif to back up Access Manager schema and directory information tree (DIT).
For more information about backing up Directory Server, see the Sun Java System Directory Server Enterprise Edition 6.0 Administration Guide, http://docs.sun.com/doc/819-0995.
Back Up Release 4 Access Manager Configuration Information
Because the reconfiguration of Release 5 Access Manager software requires the reconfiguration of the Release 4 version, it is important to back up configuration files to a known location. The following files should be backed up:
- The AMConfig.properties file
AccessManagerConfig-base/config/AMConfig.properties- The serverconfig.xml file
AccessManagerConfig-base/config/serverconfig.xml- Web container configuration files:
- For Web Server: see the location of the server.policy and server.xml files in Table 14-3
- For Application Server: see the location of the server.policy and domain.xml files in Table 14-3
- For third-party web containers: the appropriate configuration files
- JAR files for authentication and customized modules.
Back Up Web Container Customized Files
If you have any web container customized files referenced by Access Manager, you should back them up. These customizations might include the following:
Back Up Release 4 Access Manager Log and Debug Files
For the purpose of analyzing system state information, it is a good idea to back up log and debug files so they are not lost. These files are at the following locations:
Back Up Custom Localization Files
If you have made any customization to the localized files installed by the Java ES installer or have added a new language localization that is not installed by the Java ES installer, then you should back up these customizations. The customizations might include the following:
Obtain Required Configuration Information and Passwords
To upgrade Access Manager, you must provide specific configuration information, including:
Upgrading Release 4 Access Manager
The upgrade of Access Manager software to Java ES Release 5 includes procedures for re-configuring Access Manager and for migrating Access Manager data.
Upgrade Summary
The procedure for upgrading Access Manager consists of the following steps:
- Remove the Java ES Release 4 Version of Access Manager. Use the ampre71upgrade script.
- If the upgrade to Release 5 needs to be localized, remove the Release 4 localization packages. This step has to be performed by hand.
- Install the Java ES Release 5 Version of Access Manager. Use the Java ES installer with the Configure Later option.
- Undeploy Access Manager, re-configure, and re-deploy into a Web Container. Use the amconfig script.
- Update the directory structure and schema. Use the amupgrade script.
These steps are each documented in the following procedures.
Upgrade Procedure
- Upgrade Access Manager mobile access software.
Access Manager mobile access software needs to be upgraded by patching the Release 4 version. The patches needed are shown in the following table:
Table 14-6 Patches1 to Upgrade Access Manager Mobile Access Software
Description
Patch ID: Solaris 9 & 10
Patch ID: Linux
Mobile Access software
119530-05 (SPARC)
119531-05 (x86)
119532-05
1Patch revision numbers are the minimum required for upgrade to Java ES Release 5. If newer revisions become available, use the newer ones instead of those shown in the table.
- Obtain the required patches using the patch numbers from Table 14-6.
Patches can be downloaded to /tmp from: http://sunsolve.sun.com/pub-cgi/show.pl?target=patches/patch-access
- Perform any pre-patch procedures indicated in the patch README files.
- Obtain the values of the following parameters to be requested by the patch:
Table 14-7 Mobile Access Patch Parameters
Parameter
Value
Directory Manager’s DN
default: cn=Directory Manager
Directory Manager’s Password
- Apply the patches in Table 14-6.
On Solaris:
patchadd /tmp/patch_IDOn Linux:
./updatePerform any post-patch procedures indicated in the patch README files.
- Remove the Java ES Release 4 Version of Access Manager.
- Log in as root to the computer hosting Release 4 Access Manager or become superuser.
su -
- Change directory to the os_arch/Product/identity_svr/Tools directory in the Java ES Release 5 distribution, where os_arch matches your platform, such as Solaris_sparc.
- Obtain the values of the following parameters to be requested by the ampre71upgrade script:
Table 14-8 Access Manager Configuration Parameters: ampre71upgrade
Parameter
Value
Directory Server Host
Set the fully-qualified name: hostname.domain
Directory Server Port
Specify a non-SSL port number1
Default: 389Top-Level Administrator DN
Default: uid=amadmin,ou=People,default_org_DN
Top-Level Administrator Password
Directory to store back up files
Default: AccessManager-base
1The pre-upgrade process will not complete successfully if you specify a Directory Server SSL port such as the default SSL value of 636.
- Make sure that Directory Server is running or start it if it is not.
- Run the ampre71upgrade script.
./ampre71upgrade
The script backs up Access Manager configuration files and removes Release 4 base packages (localized packages must be removed manually per Step 3, below).
- If the upgrade to Release 5 needs to be localized, remove the Release 4 localization packages.
The ampre71upgrade script run in Step 2 above does not remove localization packages, so you have to remove them manually, as follows.
On Solaris:
- Check for localization packages.
pkginfo | grep SUNWaml
pkginfo | grep SUNWamclnt
pkginfo | grep SUNWamdistauth- Remove any localization packages found in Step a above.
pkgrm SUNWamlLocale
pkgrm SUNWamclntLocale
pkgrm SUNWamdistauthLocaleOn Linux:
- Check for localization RPMs.
rpm -qa | grep sun-identity-sdk-*
rpm -qa | grep sun-identity-clientsdk-*
rpm -qa | grep sun-identity-distauth-*- Remove any localization RPMs found in Step a above.
rpm -e sun-identity-sdk-Locale-*
rpm -e sun-identity-clientsdk-Locale-*
rpm -e sun-identity-distauth-Locale-*- Install the Java ES Release 5 Version of Access Manager.
Perform the following steps:
- Launch the Java ES installer on the computer hosting Release 4 Access Manager.
cd Java ES Release 5 distribution/os_arch
./installerwhere os_arch matches your platform, such as Solaris_sparc. (Use the installer -nodisplay option for the command line interface.)
After the Welcome and License Agreement pages are displayed, you will be presented with a component selection page. (When installed components are detected that can be directly upgraded by the Java ES installer, they are shown with a status of “upgradable.”)
- Select Access Manager from the component selection page.
- Specify the same installation directory in which Release 4 was installed.
- Select the Configure Later option.
- If needed, select the option to install localized packages.
- Exit the Java ES installer when installation is complete.
- Re-customize JSPs for Access Manager.
Re-apply the Release 4 customizations to JSPs for the Access Manager Console and authentication user interface (UI) that you saved under Back Up Web Container Customized Files.
Then, copy the customized JSP files to the correct directories:
- Realm/Legacy Access Manager Console
AccessManager-base/web-src/services/console- Legacy-only Access Manager Console
AccessManager-base/web-src/applications/console- Authentication UI: AccessManager-base/web-src/services/config/auth/default or AccessManager-base/web-src/services/config/auth/default_Locale (where Locale is a locale indicator like ja)
For more information, see the Sun Java System Access Manager 7.1 Developer's Guide, http://docs.sun.com/doc/819-4675.
- Undeploy Access Manager, re-configure, and re-deploy into a Web Container.
Configure Access Manager for your specific web container by running the amconfig script. The amconfig script (and the associated amsamplesilent template input file) resides in the following directory:
AccessManager-base/bin
For information about the amconfig script and the amsamplesilent template file, see the Sun Java System Access Manager 7.1 Administration Guide, http://docs.sun.com/doc/819-4670.
Perform the following steps to re-configure and re-deploy Access Manager to the web container:
- If you choose to upgrade your web container software, as described in Upgrade Access Manager Dependencies, make sure the upgrade is complete.
- Make sure that the administrative instance of your web container is running, and is in a mode supported by the amconfig script, as indicated in the table below:
- If the web container is running in SSL mode, make sure that the container’s SSL certificates have not expired and are still valid.
- If Access Manager is deployed in Release 5 Web Server, disable all Java ES components depending on Access Manager that are running in the same instance as Access Manager.
These would likely be components such as Portal Server or Sun Java Communications Suite Components such as Communications Express, Instant Messaging, or Delegated Administrator.
The procedure is as follows:
- Check that Directory Server and the appropriate web container are running.
- Create an amconfig input file based on the amsamplesilent template input file:
cp amsamplesilent config-file
(In subsequent steps, config-file is assumed to reside in the same directory as amsamplesilent.)
- Set the configuration parameters in config-file.
All the parameters need to be set correctly. Some of the values can be migrated from the AMConfig.properties file and others are more specific to the upgrade procedure, as shown in the following table.
Table 14-10 Access Manager Configuration Parameters: amconfig
Parameter
Value
Upgrade Parameters
DEPLOY_LEVEL
Set to 26 for undeploy or
Set to 1 for re-configure and deployDIRECTORY_MODE
Set to 5
AM_REALM1
Set to disabled if Legacy Mode is enabled)
Set to enabled if Realm Mode is enabled
Default: enabledJAVA_HOME
Set to JDK Release 5 directory: /usr/java/jdk1.5.0_04/
WEB_CONTAINER
Set to WS for Web Server 7.x
Set to WS6 for Web Server 6.x
Set to AS8 for Application Server 8.x
Set to WAS5 for IBM WebSphere 5.x
Set to WL8 for BEA WebLogic 8.x
and fill out only the corresponding section of config-file.WS_INSTANCE
(If using Web Server 7.x as the web container)Set to the case-sensitive instance configuration directory name: https-configName/
The directory is in the following path: WebServer7Config-base/https-configName/
WS61_INSTANCE
(If using Web Server 6.x as the web containerSet to the case-sensitive instance configuration directory name: https-instanceName
The directory is in the following path: WebServer6-base/https-instanceName/
AS81_INSTANCE
(Using Application Server 8.x as the web container)Set to Application Server 8.x instanceName
Default: server
AS81_INSTANCE_DIR
(Using Application Server 8.x as the web container)Set to the Application Server 8.x domain directory for the instance, which, by default is
AppServer8Config-base/domains/domain1
AS81_DOCS_DIR
(Using Application Server 8.x as the web container)Set to the Application Server 8.x docroot directory for the instance, which, by default is
AppServer8Config-base/domains/domain1/docroot
Migrated from AMConfig.properties
SERVER_PROTOCOL
com.iplanet.am.server.protocol
SERVER_PORT
com.iplanet.am.server.port
SERVER_HOST
com.iplanet.am.server.host
DS_HOST
com.iplanet.am.directory.host
DS_PORT
com.iplanet.am.directory.port
ROOT_SUFFIX2
com.iplanet.am.defaultOrg
CONSOLE_DEPLOY_URI
com.iplanet.am.console.deploymentDescriptor
SERVER_DEPLOY_URI
com.iplanet.am.services.deploymentDescriptor
PASSWORD_DEPLOY_URI
com.sun.identity.password.deploymentDescriptor
AM_ENC_PWD2
am.encryption.pwd3
1For more information on Realm and Legacy modes, see Compatibility Issues.
2The value of this parameter should be the same as in the previous version of Access Manager.
3When Access Manager and Access Manager SDK are both deployed, the value of this property must be the same for both the Access Manager instance and its associated Access Manager SDK instance.
For other parameters, provide the same values that were used in the Release 4 configuration that you are upgrading, unless you are changing web container or passwords. For example, if you have upgraded Web Server to Release 5, provide the following values:
- Run amconfig to undeploy Access Manager
Set the value of DEPLOY_LEVEL in config-file to 26.
cd /AccessManager-base/bin
./amconfig -s AccessManager-base/bin/config-file- Check to make sure that the Common Agent Container is running.
netstat -an | grep 11163
If it is not running, start it up.
/usr/sbin/cacaoadm start
- Run amconfig to reconfigure Access Manager and deploy into web container.
Set the value of DEPLOY_LEVEL in config-file to 1.
cd /AccessManager-base/bin
./amconfig -s AccessManager-base/bin/config-file- Update the directory structure and schema.
Release 5 Access Manager co-exists with the Release 4 directory structure, but the structure must be modified to support Release 5 capabilities. Update the Access Manager directory structure and schema to Release 5 by running the amupgrade script, which is installed in the following directory:
- On Solaris:
AccessManager-base/upgrade/scripts- On Linux:
AccessManager_base/identity/upgrade/scripts- Obtain the values of the following parameters to be requested by the amupgrade script:
Table 14-12 Access Manager Configuration Parameters: amupgrade
Parameter
Value
Directory Server fully qualified host name
Set the fully qualified name: hostname.domain
Directory Server port
Specify a non-SSL port number1
Default: 389Directory Manager DN
Default: cn=Directory Manager
Directory Manager Password
Top-Level Administrator DN
Default: uid=amadmin,ou=People,default_org_DN
Top-Level Administrator Password
Enable Realm Mode
(This parameter value not requested when upgrading from Release 4 Realm Mode.)Y/N: Yes means Realm Mode is enabled and services data is migrated to new Realm tree2. No (default) means services data remain in Legacy Mode.
1You must specify a Directory Server SSL port different from the default SSL value of 636.
- Run the amupgrade script.
cd AccessManager-base/upgrade/scripts
./amupgradeIf the upgrade is successful, the script displays “Upgrade completed.”
- Check the following upgrade log file for information about the directory schema extensions:
On Solaris:
/var/sadm/install/logs/
Sun_Java_System_Access_Manager_upgrade_dit_log.mmddhhmmOn Linux:
/var/log/Sun_Java_System_Access_Manager_upgrade_dit_log.mmddhhmm- Enable any components that were disabled in Step d.
- Re-start the web container in which Access Manager is deployed.
- Start Access Manager.
Re-start the web container in which Access Manager is deployed.
Verifying the Access Manager Upgrade
After you finish the upgrade procedure, verify that it was successful as follows:
AccessManager-base/bin/amadmin --version
See Table 14-5 for output values.
- Review the status of the upgrade by checking the following installer log files in the /var/sadm/install/logs directory:
- Review the status of the Access Manager migration by checking the terminal window for errors while running the amupgrade script.
Also, check the following log file in the /var/sadm/install/logs directory:
Sun_Java_System_Access_Manager_upgrade_dit_log.timestamp
- Review Access Manager trouble shooting files for errors.
The files are located at the location specified in the com.iplanet.services.debug.directory property of the AMConfig.properties file. The default values are:
On Solaris:
/var/opt/SUNWam/debugOn Linux:
/var/opt/sun/identity/debugPost-Upgrade Tasks
Please note the post-upgrade procedures required to address the following situations:
Migrating to Realm Mode
If you have migrated to Realm Mode when upgrading Access Manager to Release 5, (that is, when using amupgrade to update the directory structure and schema, you answer Yes to enabling Realm mode), then perform the following steps:
Security Assertion Markup Language
If you are using the Security Assertion Markup Language (SAML) service, you must add and enable a SAML authentication module using the Access Manager Console. For information on creating a SAML authentication module instance, refer to the Sun Java System Access Manager 7.1 Administration Guide, http://docs.sun.com/doc/819-4670.
Rolling Back the Upgrade
No scripts are provided for rolling back Access Manager to its pre-upgrade state. The process must be performed manually using Access Manager data that was backed up as part of the pre-upgrade tasks (see Back Up Release 4 Access Manager Log and Debug Files). Backing out the upgrade is too difficult to be practical.
One approach to rollback is to perform a re-install of Release 4 and migrate all the backed-up configuration files to their rightful locations. Another is to create a parallel system before upgrading, using the backed-up configuration files, and testing the parallel system before attempting an upgrade.
Multiple Instance Upgrades
In some deployment architectures Access Manager is deployed on multiple computer systems to provide for high availability and scalability.
It is usually desirable to upgrade the Access Manager instances sequentially without interrupting service. This section discusses the procedure for performing such rolling upgrades from Release 4 Access Manager to Release 5.
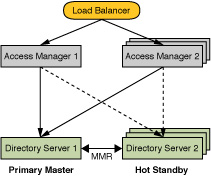
The deployment architecture shown in the following figure will be used to illustrate the rolling upgrade procedure.
Figure 14-1 Example Deployment Architecture for Multiple Access Manager Instances
In this architecture, multiple Access Manager instances are accessed through a load balancer, and these instances, in turn, access a directory that is set up for multi-master replication (MMR). While other Directory Server replication schemes are possible, MMR is representative of highly available and scalable directory services. In Figure 14-1, the multiple instances of Access Manager and Directory Server are grouped to facilitate explanation of the upgrade procedure. Access Manager 2, for example, is representative of the second through nth instances of Access Manager.
The procedure for performing a rolling upgrade from Release 4 Access Manager to Release 5 is based on the following interoperability: Release 5 Access Manager and Release 4 Access Manager instances can coexist and run concurrently against the same directory if the directory schema has not yet been updated to Release 5.
Hence, for Access Manager instances that point to a single Directory Server instance, you can perform a rolling upgrade by delaying the update of the directory schema until all Access Manager instances have been upgraded.
You can perform a rolling upgrade from Release 4 Access Manager to Release 5 using the following procedure:
- Back up Release 4 configuration information on all Access Manager instances.
See Table 14-3.
- Upgrade Access Manager 1.
- Disable Access Manager 1 in the load balancer.
Requests will no longer be routed to Access Manager 1.
- Partially upgrade Access Manager 1.
Upgrade Access Manager as described in Upgrading Release 4 Access Manager, except for updating the directory structure and schema, Step 7.
- Enable Access Manager 1 in the load balancer.
- Upgrade Access Manager 2 through Access Manager n.
For brevity, in succeeding steps, “Access Manager 2” will mean Access Manager 2 through Access Manager n.
- Disable Access Manager 2 in the load balancer.
Requests will no longer be routed to Access Manager 2.
- Partially upgrade Access Manager 2.
Upgrade each instance of Access Manager as described in Upgrading Release 4 Access Manager, except for updating the directory structure and schema, Step 7.
- Enable Access Manager 2 in the load balancer.
Requests will be once again routed to Access Manager 2.
- Update the directory structure and schema for Directory Server 1.
Use the amupgrade script as documented in Step 7. Access Manager 1 through n will continue to function when the schema for Directory Server 1 has been updated.
Release 4 Access Manager SDK-only Upgrades
In some deployment architectures, the Access Manager SDK component is installed on one or more computer systems without installing other Access Manager components on those computers. Access Manager SDK serves as a remote interface to Access Manager and must be re-configured for the same operational mode as Access Manager: Legacy or Realm.
Access Manager SDK and the full Access Manager for which it serves as a remote interface should both be upgraded to Release 5. However Release 5 Access Manager is backwardly compatible with Release 4 Access Manager SDK, so Access Manager should generally be upgraded first before upgrading Access Manager SDK on other computers.
As a remote interface to Access Manager, the SDK does not need to be configured to access Directory Server. If Access Manager SDK is being used to support a web component, such as Portal Server, which depends upon web container services, Access Manager SDK must be configured for the corresponding web container. However, Access Manager SDK can also support non-web components, and no web container is needed.
The procedure for upgrading Access Manager SDK is a subset of the procedure for the full Access Manager upgrade, based on the above characteristics.
This section describes how to perform an Access Manager SDK-only upgrade from Java ES Release 4 to Java ES Release 5:
Pre-Upgrade Tasks
The pre-upgrade tasks for Access Manager SDK are the same as for the full Access Manager upgrade (see Pre-Upgrade Tasks), but exclude those tasks related to Directory Server and to Access Manager administration tool JSP customizations. The pre-upgrade tasks needed for Access Manager SDK are the following:
Upgrading Release 4 Access Manager SDK
The upgrade procedures for Access Manager SDK are the same as for the full Access Manager upgrade, but exclude those related to localization, Access Manager administration tool JSP customizations, and migrating directory schema.
- Remove the Java ES Release 4 version of Access Manager SDK.
Follow the instructions in Remove the Java ES Release 4 Version of Access Manager., except remove only Access Manager SDK.
- Install Java ES Release 5 version of Access Manager SDK.
Follow the instructions in Install the Java ES Release 5 Version of Access Manager., except install only Access Manager SDK.
- Re-configure Access Manager SDK.
Follow the instructions in Undeploy Access Manager, re-configure, and re-deploy into a Web Container., except set the DEPLOY_LEVEL parameter as follows:
Verifying the Access Manager SDK Upgrade
There are three ways you can verify a successful Access Manager SDK upgrade:
- Run Portal Server or other component that uses Access Manager SDK to interface with Access Manager, and check that the authentication works.
- Run the Access Manager SDK examples provided in the following location:
AccessManager-base/samples/sdk
- Check the value of the com.iplanet.am.version property, which is in the AMConfig.properties file:
AccessManagerConfig-base/config/AMConfig.properties
Upgrade Rollback
No scripts are provided for rolling back Access Manager to its pre-upgrade state. The process must be performed manually using Access Manager data that was backed up as part of the pre-upgrade tasks (see Back Up Release 4 Access Manager Log and Debug Files). Backing out the upgrade is too difficult to be practical.
One approach to rollback is to perform a re-install of R4 and migrate all the backed-up configuration files to their rightful locations. Another is to create a parallel system before upgrading, using the backed-up configuration files, and testing the parallel system before attempting an upgrade.
Upgrading Access Manager from Java ES Release 3The procedure for upgrading Java ES 2003Q1 (Release 3) Access Manager or Access Manager SDK to Release 5 is similar to that for upgrading Release 4 Access Manager or Access Manager SDK to Release 5, with the exception of how to perform multi-instance upgrades.
Release 3 Access Manager Upgrade
To upgrade Release 3 Access Manager or Access Manager SDK to Release 5, use the instructions in Upgrading Access Manager from Java ES Release 4, except substitute Release 3 wherever Release 4 is referenced.
Multiple Instance Upgrades
In some deployment architectures Access Manager is deployed on multiple computer systems to provide for high availability and scalability.
It is usually desirable to upgrade multiple Access Manager instances sequentially without interrupting service. This section discusses the procedure for performing such rolling upgrades from Release 3 Access Manager to Release 5.
The deployment architecture shown in the following figure will be used to illustrate the rolling upgrade procedure.
Figure 14-2 Example Deployment Architecture for Multiple Access Manager Instances
In this architecture, multiple Access Manager instances are accessed through a load balancer, and these instances, in turn, access a directory that is set up for multi-master replication (MMR). While other Directory Server replication schemes are possible, MMR is representative of highly available and scalable directory services. In Figure 14-2, the multiple instances of Access Manager and Directory Server are grouped to facilitate explanation of the upgrade procedure. Access Manager 2, for example, is representative of the second through nth instances of Access Manager.
The procedure for performing a rolling upgrade of Release 3 Access Manager to Release 5 is based on the following constraint: Release 5 Access Manager can not co-exist with the Release 3 directory structure. However, if Directory Server instances are replicated, as in Figure 14-2, then you can perform a rolling upgrade using the following procedure:
- Back up Release 3 configuration information on all Access Manager instances.
See Table 14-3.
- Modify the configuration of Access Manager 1.
- Upgrade Access Manager 2 through Access Manager n.
For brevity, in succeeding steps, “Access Manager 2” will mean Access Manager 2 through Access Manager n.
- Disable Access Manager 2 in the load balancer.
Requests will no longer be routed to Access Manager 2.
- Partially upgrade Access Manager 2.
Upgrade each instance of Access Manager as described in Upgrading Release 4 Access Manager, except for updating the directory structure and schema, Step 7.
- Disable Directory Server MMR.
- Update the directory structure and schema for Directory Server 1.
Use the amupgrade script as documented in Step 7. Access Manager 1 will continue to function because the schema for Directory Server 2 is not being updated.
- Restart Access Manager 2.
- Enable Access Manager 2 in the load balancer.
Requests will be once again routed to Access Manager 2.
- Upgrade Access Manager 1.
- Disable Access Manager 1 in the load balancer.
Requests will no longer be routed to Access Manager 1.
- Partially upgrade Access Manager 1.
Upgrade Access Manager as described in Upgrading Release 4 Access Manager, except for updating the directory structure and schema, Step 7.
- Enable Directory Server MMR.
The schema (and data) for Directory Server 2, is now updated.
- Restore the configuration of Access Manager 1 to point to Directory Server 1.
- Restart Access Manager 1.
- Enable Access Manager 1 in the load balancer.
Requests will be once again routed to Access Manager 1 as well as to all other upgraded Access Manager instances.
Upgrading Access Manager from Java ES Release 2The procedure for upgrading Java ES 2004Q2 (Release 2) Access Manager to Release 5 is similar to that for upgrading Release 4 Access Manager to Release 5, with a few differences, as indicated in the sections below:
Also, the procedure for upgrading Java ES 2004Q2 (Release 2) Access Manager SDK to Release 5 is similar to that for upgrading Release 4 Access Manager SDK to Release 5 (see Release 4 Access Manager SDK-only Upgrades), with similar exceptions. Access Manager SDK-only upgrade excludes procedures related to localization, Access Manager administration tool JSP customizations, and migrating directory schema.
Release 2 Access Manager SDK and the full Release 2 Access Manager for which it serves as a remote interface must both be upgraded to Release 5. Mixtures of Release 2 and Release 5 components are not supported. Hence, all instances of Release 2 Access Manager and Release 2 Access Manager SDK on all computers must be upgraded to Release 5.
Note
If you are upgrading from Release 2 Access Manager on the Linux platform, then you will have to perform a dual upgrade, in which both Access Manager and the operating system are upgraded (Release 5 Access Manager is not supported on RHEL 2.1). See Dual Upgrade for more information.
Pre-Upgrade Tasks
Before you upgrade Access Manager, perform the procedures described in Pre-Upgrade Tasks, with the following exceptions and additions:
Upgrade Access Manager Dependencies
As compared to the upgrade from Release 4, the Release 2 to Release 5 pre-upgrade tasks require the upgrading to Release 5 of all shared components (see Table 1-9) and all locally-resident product components upon which Access Manager depends.
When upgrading Access Manager dependencies, they should be upgraded in the following order, all before you upgrade Access Manager. You can skip any that might already have been upgraded.
- Shared Components. Instructions for synchronizing Java ES shared components to Release 5 are provided in Chapter 2, "Upgrading Java ES Shared Components". However, Java ES shared components will be upgraded automatically by the installer when you perform a fresh install of Release 5 Access Manager.
- Directory Server. Directory Server rarely resides on the same computer as Access Manager, however, instructions for upgrading Directory Server to Release 5 are provided in Upgrading Directory Server from Java ES Release 2.
- Web Container Software. Instructions for upgrading Web Server or Application Server are provided in Upgrading Web Server from Java ES Release 3 and Upgrading Application Server from Java ES Release 2, respectively.
Upgrade Directory Schema
If Directory Server was configured with Sun Java Communications Suite’s Directory Preparation Tool (comm_dssetup.pl) to support Communication Suite components, such as Messaging Server and Calendar Server, you must first upgrade the directory schema using Directory Preparation Tool 6.4 before upgrading Access Manager (see the Sun Java Communications Suite 5 Upgrade Guide, http://docs.sun.com/doc/819-7561). Perform this pre-upgrade task after you have upgraded Access Manager dependencies.
Re-index the Directory
In order to avoid complications when performing the upgrade of Access Manager after having upgraded the directory schema (see Upgrade Directory Schema, above), you need to manually re-index the Access Manager directory root suffix, as follows:
Release 2-Release 4 Directory Server:
Release 5 Directory Server:
Depending on the number of entries in the directory, it can take a significant amount of time to complete the re-indexing.
Release 2 Access Manager Upgrade
The procedure for upgrading Access Manager from Release 2 to Release 5 depends on the web container in which you are deploying Access Manager software.
Upgrading Release 2 Access Manager: Web Server Web Container
To upgrade Release 2 Access Manager to Release 5, when deploying into a Web Server web container, follow the instructions in Upgrading Release 4 Access Manager, except substitute Release 2 wherever Release 4 is referenced.
Upgrading Release 2 Access Manager: Application Server Web Container
To upgrade Release 2 Access Manager to Release 5, when deploying into an Application Server web container, there are two cases:
- Release 5 Application Server has been freshly installed. In this case, to upgrade Release 2 Access Manager to Release 5, follow the instructions in Upgrading Release 4 Access Manager, except substitute Release 2 wherever Release 4 is referenced.
- Release 2 Application Server has been upgraded to Release 5. In this case, the Release 2 Application Server instance in which Access Manager was originally deployed (instanceName), when upgraded to Release 5, was migrated under a node agent created by the upgrade process. Upgrade of Access Manager in this upgraded Application Server instance requires the steps in the following sections:
Upgrade Summary
The procedure for upgrading Access Manager consists of the following steps:
- Remove the Java ES Release 2 Version of Access Manager. Use the ampre71upgrade script.
- If the upgrade to Release 5 needs to be localized, remove the Release 2 localization packages. This step has to be performed by hand.
- Install the Java ES Release 5 Version of Access Manager. Use the Java ES installer with the Configure Later option.
- Start the following Application Server instances: Domain Administration Server (DAS), node agent, and server instance in which Access Manager is deployed.
- Undeploy Access Manager, reconfigure, and re-deploy into the Application Server instance. Use the amconfig script
- Update the directory structure and schema. Use the amupgrade script.
These steps are documented in the following procedure.
Upgrade Procedure
- Upgrade Access Manager mobile access software.
Access Manager mobile access software needs to be upgraded by patching the Release 2 version. The patches needed are shown in the following table:
Table 14-13 Patches1 to Upgrade Access Manager Mobile Access Software
Description
Patch ID: Solaris 9 & 10
Patch ID: Linux
Mobile Access software
119530-05 (SPARC)
119531-05 (x86)
119532-05
1Patch revision numbers are the minimum required for upgrade to Java ES Release 5. If newer revisions become available, use the newer ones instead of those shown in the table.
- Obtain the required patches using the patch numbers from Table 14-6.
Patches can be downloaded to /tmp from: http://sunsolve.sun.com/pub-cgi/show.pl?target=patches/patch-access
- Perform any pre-patch procedures indicated in the patch README files.
- Obtain the values of the following parameters to be requested by the patch:
Table 14-14 Mobile Access Patch Parameters
Parameter
Value
Directory Manager’s DN
default: cn=Directory Manager
Directory Manager’s Password
- Apply the patches in Table 14-6.
On Solaris:
patchadd patch_IDOn Linux:
./updatePerform any post-patch procedures indicated in the patch README files.
- Remove the Java ES Release 2 Version of Access Manager.
- Log in as root to the computer hosting Release 4 Access Manager or become superuser.
su -
- Change directory to the os_arch/Product/identity_svr/Tools directory in the Java ES Release 5 distribution, where os_arch matches your platform, such as Solaris_sparc.
- Obtain the values of the following parameters to be requested by the ampre71upgrade script:
Table 14-15 Access Manager Configuration Parameters: ampre71upgrade
Parameter
Value
Directory Server Host
Set the fully-qualified name: hostname.domain
Directory Server Port
Specify a non-SSL port number1
Default: 389Top-Level Administrator DN
Default: uid=amadmin,ou=People,default_org_DN
Top-Level Administrator Password
Directory to store back up files
Default: AccessManager-base
1You must specify a Directory Server SSL port different from the default SSL value of 636.
- Make sure that Directory Server is running or start it if it is not.
- Run the ampre71upgrade script.
./ampre71upgrade
The script backs up Access Manager configuration files and removes Release 4 base packages (localized packages must be removed manually per Step 3, below).
- If the upgrade to Release 5 needs to be localized, remove the Release 2 localization packages.
The ampre71upgrade script run in Step 2 above does not remove localization packages, so you have to remove them manually, as follows.
On Solaris:
- Check for localization packages.
pkginfo | grep SUNWaml
pkginfo | grep SUNWamclnt
pkginfo | grep SUNWamdistauth- Remove any localization packages found in Step a above.
pkgrm SUNWamlLocale
pkgrm SUNWamclntLocale
pkgrm SUNWamdistauthLocaleOn Linux:
- Check for localization RPMs.
rpm -qa | grep sun-identity-sdk-*
rpm -qa | grep sun-identity-clientsdk-*
rpm -qa | grep sun-identity-distauth-*- Remove any localization RPMs found in Step a above.
rpm -e sun-identity-sdk-Locale-*
rpm -e sun-identity-clientsdk-Locale-*
rpm -e sun-identity-distauth-Locale-*- Install the Java ES Release 5 Version of Access Manager.
Perform the following steps:
- Launch the Java ES installer on the computer hosting Release 2 Access Manager.
cd Java ES Release 5 distribution/os_arch
./installerwhere os_arch matches your platform, such as Solaris_sparc. (Use the installer -nodisplay option for the command line interface.)
After the Welcome and License Agreement pages are displayed, you will be presented with a component selection page. (When installed components are detected that can be directly upgraded by the Java ES installer, they are shown with a status of “upgradable.”)
- Select Access Manager from the component selection page.
- Specify the same installation directory in which Release 2 was installed.
- Select the Configure Later option.
- If needed, select the option to install localized packages.
- Exit the Java ES installer when installation is complete.
- Re-customize JSPs for Access Manager.
Re-apply the Release 2 customizations to JSPs for the Access Manager Console and authentication user interface (UI) that you saved under Back Up Web Container Customized Files.
Then, copy the customized JSP files to the correct directories:
- Legacy-only Access Manager Console
AccessManager-base/web-src/applications/console- Authentication UI: AccessManager-base/web-src/services/config/auth/default or AccessManager-base/web-src/services/config/auth/default_Locale (where Locale is a locale indicator like ja)
For more information, see the Sun Java System Access Manager 7.1 Developer's Guide, http://docs.sun.com/doc/819-4675.
- Check that Directory Server is running.
- Start the following Application Server instances:
In the following commands, and in subsequent steps, the following conventions are used:
- where nodeagentName has the form hostName_domainName, but is simply hostName by default
- The default domainName is domain1
- The default instanceName is server1
Note
Be sure to separately start the node agent, as shown below, using the startinstances=false option before starting the server instance.
- Start the Domain Administration Server (DAS)
AppServer8-base/bin/asadmin start-domain --user admin_ID
domainName- Start the node agent under which the upgraded Application Server instance has been migrated
AppServer8-base/bin/asadmin start-node-agent --startinstances=false --user admin_ID nodeagentName
- Start the server instance in which Access Manager is deployed (instanceName), if that server instance is not already running.
AppServer8-base/bin/asadmin start-instance --user admin_ID instanceName
- Undeploy Access Manager, reconfigure, and re-deploy into the Application Server instance.
- If the web container is running in SSL mode, make sure that the container’s SSL certificates have not expired and are still valid.
- Create an amconfig input file based on the amsamplesilent template input file:
cp amsamplesilent config-file
(In subsequent steps, config-file is assumed to reside in the same directory as amsamplesilent.)
- Set the configuration parameters in config-file.
All the parameters need to be set correctly. Some of the values can be migrated from the AMConfig.properties file and others are more specific to the upgrade procedure, as shown in the following table.
Table 14-16 Access Manager Configuration Parameters: amconfig
Parameter
Value
Upgrade Parameters
DEPLOY_LEVEL
Set to 26 for undeploy or
Set to 1 for re-configure and deployDIRECTORY_MODE
Set to 5
AM_REALM1
Set to disabled if Legacy Mode is enabled)
Set to enabled if Realm Mode is enabled
Default: enabledJAVA_HOME
Set to JDK Release 5 directory: /usr/java/jdk1.5.0_04/
WEB_CONTAINER
Set to AS8 for Application Server 8.x
and fill out only the corresponding section of config-file.AS81_INSTANCE
(Using Application Server 8.x upgraded from Application Server 7.x as the web container)Set to Application Server 7.x instanceName, which, by default is server1
AS81_INSTANCE_DIR
(Using Application Server 8.x as the web container)Set to the Application Server 8.x domain directory for the instance, which, by default is
AppServer8Config-base/domains/domain1
AS81_DOCS_DIR
(Using Application Server 8.x as the web container)Set to the Application Server 8.x docroot directory for the instance, which, by default is
AppServer8Config-base/domains/domain1/docroot
Migrated from AMConfig.properties
SERVER_PROTOCOL
com.iplanet.am.server.protocol
SERVER_PORT
com.iplanet.am.server.port
SERVER_HOST
com.iplanet.am.server.host
DS_HOST
com.iplanet.am.directory.host
DS_PORT
com.iplanet.am.directory.port
ROOT_SUFFIX2
com.iplanet.am.defaultOrg
CONSOLE_DEPLOY_URI
com.iplanet.am.console.deploymentDescriptor
SERVER_DEPLOY_URI
com.iplanet.am.services.deploymentDescriptor
PASSWORD_DEPLOY_URI
com.sun.identity.password.deploymentDescriptor
AM_ENC_PWD2
am.encryption.pwd3
1For more information on Realm and Legacy modes, see Compatibility Issues.
2The value of this parameter should be the same as in the previous version of Access Manager.
3When Access Manager and Access Manager SDK are both deployed, the value of this property must be the same for both the Access Manager instance and its associated Access Manager SDK instance.
For other parameters, provide the same values that were used in the Release 2 configuration that you are upgrading, unless you are changing web container or passwords.
- Run amconfig to undeploy Access Manager.
Set the value of DEPLOY_LEVEL in config-file to 26.
cd /AccessManager-base/bin
./amconfig -s AccessManager-base/bin/config-file- Check to make sure that the Common Agent Container is running.
netstat -an | grep 11163
If it is not running, start it up.
/usr/sbin/cacaoadm start
- Run amconfig to reconfigure Access Manager and deploy into web container.
Set the value of DEPLOY_LEVEL in config-file to 1.
cd /AccessManager-base/bin
./amconfig -s AccessManager-base/bin/config-file- Verify that Access Manager classpath-suffix and server-classpath information have been migrated to the Release 5 Application Server domain.xml file.
- Note the Access Manager classpath-suffix and server-classpath information in the server.xml file of the Release 2 Application Server instance in which Access Manager was originally deployed:
AppServer7Config-base/domains/domainName/instanceName/config/server.xml
- Check that the classpath-suffix and server-classpath entries, have been appended to the domain.xml file of the upgraded Application Server instance in which Access Manager is deployed:
AppServer8Config-base/nodeagents/nodeagentName/instanceName/
config/domain.xmlThe classpath information should be added to the instanceName-config block of the Release 5 Application Server domain.xml file. This block begins with the following line:
<config dynamic-reconfiguration-enabled="true" name="instanceName-config">
- Update the directory structure and schema.
Release 5 Access Manager co-exists with the Release 4 directory structure, but the structure must be modified to support Release 5 capabilities. Update the Access Manager directory structure and schema to Release 5 by running the amupgrade script, which is installed in the following directory:
- On Solaris:
AccessManager-base/upgrade/scripts- On Linux:
AccessManager_base/identity/upgrade/scripts- Obtain the values of the following parameters to be requested by the amupgrade script:
Table 14-17 Access Manager Configuration Parameters: amupgrade
Parameter
Value
Directory Server Host
Set the fully qualified name: hostname.domain
Directory Server Port
Specify a non-SSL port number1
Default: 389Directory Manager DN
Default: cn=Directory Manager
Directory Manager Password
Top-Level Administrator DN
Default: uid=amadmin,ou=People,default_org_DN
Top-Level Administrator Password
Enable Realm Mode
(This parameter value not requested when upgrading from Release 4 Realm Mode.)Y/N: Yes means Realm Mode is enabled and services data is migrated to new Realm tree. No (default) means services data remain in Legacy Mode.
1The upgrade process will not complete successfully if you specify a Directory Server SSL port such as the default SSL value of 636.
- Run the amupgrade script.
cd AccessManager-base/upgrade/scripts
./amupgradeIf the upgrade is successful, the script displays “Upgrade completed.”
- Check the following upgrade log file for information about the directory schema extensions:
On Solaris:
/var/sadm/install/logs/
Sun_Java_System_Access_Manager_upgrade_dit_log.mmddhhmmOn Linux:
/var/log/Sun_Java_System_Access_Manager_upgrade_dit_log.mmddhhmm- Stop the Domain Administration Server (DAS), node agent, and server instance.
These are the instances that were started in Step 7.
AppServer8-base/bin/asadmin stop-domain --user admin_ID
domainNameAppServer8-base/bin/asadmin stop-node-agent --user admin_ID
nodeagentName- Restart the Domain Administration Server (DAS), node agent, and server instance.
Note
Be sure to separately start the node agent using the startinstances=false option before starting the server instance, as shown below.
AppServer8-base/bin/asadmin start-domain --user admin_ID
domainNameAppServer8-base/bin/asadmin start-node-agent --port DASportNumber --startinstances=false --user admin_ID --password password nodeagentName
AppServer8-base/bin/asadmin start-instance --port DASportNumber --user admin_ID --password password instanceName
The default value for DASportNumber is 4848.
Verifying the Access Manager Upgrade
After you finish the upgrade procedure, verify that it was successful, as described in Verifying the Access Manager Upgrade.
Post-Upgrade Tasks
If you are using the Security Assertion Markup Language (SAML) service, you must add and enable a SAML authentication module using the Access Manager console. For information on creating a SAML authentication module instance, refer to the Sun Java System Access Manager Administration 7.1 Guide, http://docs.sun.com/doc/819-4670.
Rolling Back the Upgrade
No scripts are provided for rolling back Access Manager to its pre-upgrade state. The process must be performed manually using Access Manager data that was backed up as part of the pre-upgrade tasks (see Back Up Release 4 Access Manager Log and Debug Files). Rollback is too difficult to be practical.
Multiple Instance Upgrades
In some deployment architectures Access Manager is deployed on multiple computer systems to provide for high availability and scalability.
It is usually desirable to upgrade the Access Manager instances sequentially without interrupting service. The procedure for performing a rolling upgrade of Release 2 Access Manager to Release 5 is based on the following constraint: Release 5 Access Manager can not co-exist with the Release 2 directory structure. However, if Directory Server instances are replicated, as in Figure 14-2, then you can perform a rolling upgrade as documented in Multiple Instance Upgrades.