|
| |
| Sun[TM] Identity Manager 8.0 Administration | |
Chapter 14
Auditing: Audit PoliciesThis chapter describes how to create, edit, delete, and assign Audit Policies using the Audit Policy Wizard.
In this chapter, you will learn about the following concepts and tasks:
Working with Audit PoliciesTo create an audit policy, use Identity Manager’s Audit Policy Wizard. After defining an audit policy, you can then perform various actions on the policy, such as modifying or deleting it.
Audit Policy Rules
Audit policy rules define specific violations. Policy rules can contain functions written in the XPRESS, XML Object, or JavaScript languages.
You can use the Audit Policy Wizard to create simple rules, or use the Identity Manager IDE or an XML editor to create more powerful rules.
Rules created using the Audit Policy Wizard will return a value of true or false. Policy rules that return a value of true result in a policy violation. Using the Identity Manager IDE, however, you can create a rule that will skip a user during an audit scan or access review. Audit policy rules that return a value of ignore will stop rule processing for that user and skip to the next target user.
For information on creating audit policy rules, see “Working with Rules” in the Identity Manager Deployment Tools book.
Creating an Audit PolicyTo create an Audit Policy, use the Audit Policy Wizard.
Opening the Audit Policy Wizard
The Audit Policy Wizard guides you through the process of creating an audit policy.
To access the Audit Policy Wizard, follow these steps:
- Log in to the Administrator interface ((more...) ).
- Click the Compliance tab.
The Manage Policies subtab or menu opens.
- To create a new audit policy, click New.
Creating an Audit Policy: Overview
Using the wizard, you will perform the following tasks to create an audit policy:
After completing the task presented in each wizard screen, click Next to move to the next step.
Before You Begin
Plan carefully before creating an audit policy! Before you begin, verify that you have completed these tasks:
- Identify the rules you will use to create the policy in the Audit Policy Wizard. The rules you choose are determined by the type of policy you are creating and the specific limitations you want to define. See “Identify the Rules You Need” in the next section for more information.
- Import any remediation workflow or rule that you want to include in the new policy. See “(Optional) Import a Workflow into Identity Manager” (below) for more information.
- Ensure that you have the required capabilities to create audit policies. See the required capabilities in Understanding and Managing Capabilities.
Identify the Rules You Need
The constraints you specify in the policy are implemented in a set of rules that you create or import. When using the Audit Policy Wizard to create a rule, do the following:
For information on creating audit policy rules outside of the Audit Policy Wizard, see the Identity Manager Deployment Tools book.
(Optional) Import Separation of Duty Rules into Identity Manager
The Audit Policy Wizard cannot create Separation of Duty rules. These rules must be constructed outside of Identity Manager and imported by using the Import Exchange File option on the Configure tab.
(Optional) Import a Workflow into Identity Manager
To use a remediation workflow that is not currently available from Identity Manager, import the external workflow. You can create custom workflows using an XML editor or the Identity Manager IDE ((more...) ).
To import an external workflow, follow these steps:
- Set authType=’AuditorAdminTask’ and add subtype=’SUBTYPE_REMEDIATION_WORKFLOW’. You can use the Identity Manager IDE or your XML editor of choice to set these configuration objects.
- Import the workflow by using the Import Exchange File option.
- Log in to the Administrator interface ((more...) ).
- Click the Configure tab, then click the Import Exchange File subtab or menu.
The “Import Exchange File” page opens.
- Browse to the workflow file to upload, then click Import.
After you have successfully imported the workflow, it appears in the Audit Policy Wizard ((more...) ) Remediation Workflow list of options.
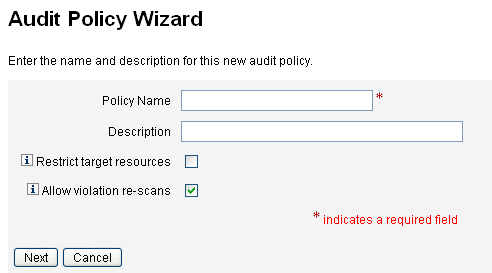
Name and Describe the Audit Policy
Enter the name of the new policy and a brief description in the Audit Policy Wizard (shown in Figure 14-1).
Figure 14-1 Auto Policy Wizard: Enter Name and Description Screen
If you want only selected resources to be accessed when executing the scan, select the Restrict target resources option.
If you want a remediation of a violation to result in an immediate re-scan of the user, then select the Allow violation re-scans option.
Click Next to proceed to the next page.
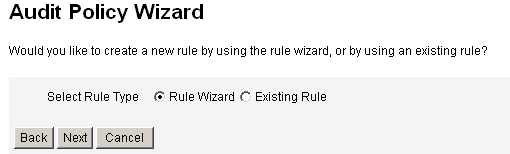
Select a Rule Type
Use this page to start the process of defining or including rules in your policy. (The bulk of your work while creating a policy is defining and creating rules.)
As shown in Figure 14-2, you can choose to create your own rule by using the Identity Manager rule wizard, or you can incorporate an existing rule. The Rule Wizard only allows one resource to be used in a rule. Imported rules can reference as many resources as needed.
By default, the Rule Wizard option is selected.
Figure 14-2 Audit Policy Wizard: Select Rule Type Screen
Click Existing Rule, then click Next to select a rule you created using the Identity Manager IDE ((more...) ). Follow the steps in the next section, “Select an Existing Rule.”
Otherwise, click Rule Wizard, then click Next. Follow the steps on in the section.
Select an Existing Rule
To include an existing rule in the new policy, select Existing Rule on the Select Rule Type Screen (Figure 14-2) and click Next. Then, select an existing audit policy rule from the Select Existing Rule drop-down menu.
Note
If you cannot see the name of a rule that you have previously imported into Identity Manager, confirm that you have added to the rule the additional attributes that are described in Creating a Policy with Audit Policy Rules.
Click Next.
Skip to the section Add Additional Rules.
Use the Rule Wizard to Create a New Rule
If you choose to create a rule by using the Rule Wizard selection in the Audit Policy Wizard, proceed by entering information on the pages discussed in the following sections.
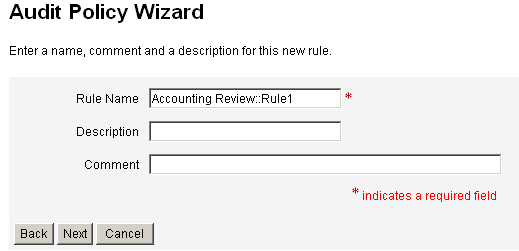
Name and Describe the New Rule
Optionally name and describe the new rule. Use this page to enter descriptive text that appears next to the rule name whenever Identity Manager displays the rule. Enter a concise and clear description that is meaningful in describing the rule. This description is displayed within Identity Manager in the Review Policy Violations page.
Figure 14-3 Audit Policy Wizard: Enter the Rule Description Screen
For example, if you are creating a rule that will identify users who have both an Oracle ERP responsibilityKey attribute value of Payable User and a Receivable User attribute value, you could enter the following text in the Description field: Identifies users with both Payable User and Receivable User responsibilities.
Use the Comments field to provide any additional information about the rule.
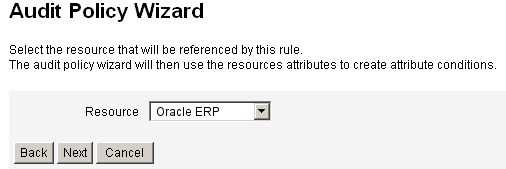
Select the Resource Referenced by the Rule
Use this page to select the resource that the rule will reference. Each rule variable must correspond to an attribute on this resource. All resources that you have view access to will appear in this options list. In this example, Oracle ERP is selected.
Figure 14-4 Audit Policy Wizard: Select Resource Screen
Note
Most, but not all, attributes of each available resource adapter are supported. For information on the specific attributes that are available, see Identity Manager Resources Reference.
Click Next to move to the next page.
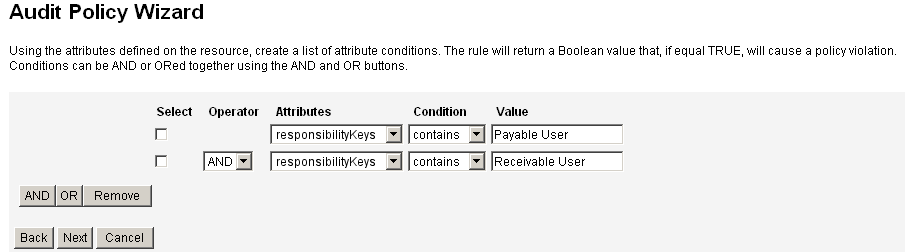
Create the Rule Expression
Use this screen to enter the rule expression for your new rule. This example creates a rule in which a user with an Oracle ERP responsibilityKey attribute value of Payable User cannot also have a Receivable User attribute value.
- Select a user attribute from the list of available attributes. This attribute will directly correspond to a rule variable.
- Select a logical condition from the list. Valid conditions include = (equal to), != (not equal to), < (less than), <= (less than or equal to), > (greater than), >= (greater than or equal to), is true, is null, is not null, is empty, and contains. For the purpose of this example, you could select contains from the list of possible attribute conditions.
- Enter a value for the expression. For example, if you enter Payable user, you are specifying an Oracle ERP user with the value of Payable user in the responsibilityKeys attribute.
- (Optional) Click AND or OR operators to add another line and create another expression.
Figure 14-5 Audit Policy Wizard: Select Rule Expression Screen
This rule returns a Boolean value. If both statements are true, then the policy rule returns a value of TRUE, which causes a policy violation.
The following code example shows the XML for the rule you have created in this screen:
Code Example 14-1 Example of XML Syntax for a Newly Created Rule
To remove an expression from the rule, select the attribute condition and then click Remove.
Click Next to continue in the Audit Policy Wizard. You will have the opportunity to add more rules, either by adding existing rules, or by again using the wizard.
Add Additional Rules
You can create additional rules by importing existing rules ((more...) ), or by using the wizard ((more...) ).
Click AND or OR to continue adding rules as necessary. To remove a rule, select it and then click Remove.
Policy violations occur only if the Boolean expression of all rules evaluates to true. By grouping rules with AND/OR operators, it is possible for the policy to evaluate to true, even though all rules do not. Identity Manager creates violations only for rules that evaluate to true, and only if the policy expression evaluates to true. The Audit Policy Wizard does not provide explicit control over the Boolean expression nesting, so it is best not to build deep expressions.
Note
Identity Manager does not support the control of rule nesting. In addition, using the Audit Policy Wizard to create policies with Boolean expression nesting can produce unpredictable results.
For complex Rule expressions, use an XML editor to create a separate XPRESS rule that references all of the rules you want to use.
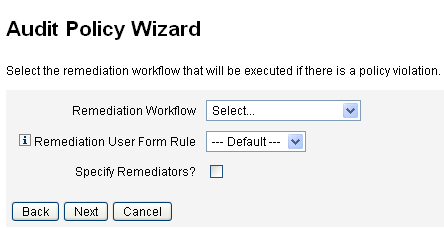
Select a Remediation Workflow
Use this screen to select a Remediation workflow to associate with this policy. The workflow assigned here determines the actions taken within Identity Manager when an audit policy violation is detected.
Note
One workflow is started for each failed audit policy. Each workflow will contain one or more work items for each compliance violation created by the policy scan for the specific policy.
Figure 14-6 Audit Policy Wizard: Select Remediation Workflow Screen
Note
For information about importing a workflow that you have created by using an XML editor or the Identity Manager Integrated Development Environment (IDE), see (Optional) Import a Workflow into Identity Manager.
Use the Remediation User Form Rule drop-down menu to select a rule that will calculate the user form that should be applied when editing a user through a remediation. By default, a remediator that edits a user in response to a remediation work item will use the user form assigned to the remediator. If an audit policy specifies a remediation user form, then this form is used instead. This allows a very specific form to be used when an audit policy indicates a corresponding, specific problem.
To specify remediators to be associated with this remediation workflow, select the Specify Remediators? check box. If you select this option, then clicking Next will display the “Assign Remediators” page. If you do not select this option, then the wizard will next display the “Audit Policy Wizard Assign Organizations” screen.
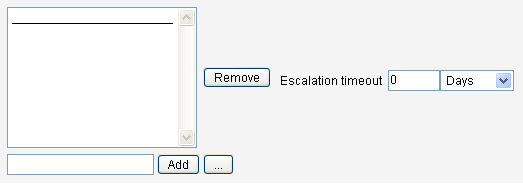
Select Remediators and Timeouts for Remediations
If you specify remediators, the remediators assigned to this audit policy will be notified when a violation of this policy is detected. Also, the default workflow assigns a remediation work item to them. Any Identity Manager user can be a remediator.
You might choose to assign at least one Level 1 remediator, or designated user. Level 1 remediators are contacted first through email launched by the remediation workflow when a policy violation is detected. If the designated escalation timeout period is reached before a Level 1 remediator responds, Identity Manager next contacts the Level 2 remediators that you specify here. Identity Manager contacts Level 3 remediators only if neither Level 1 nor Level 2 remediators respond before the escalation time period lapses.
Note
If you specify an escalation timeout value for the highest-level remediator selected, then the work item is removed from the list when the escalation times out. By default, an escalation timeout is set to a value of 0. In this case, the work item does not expire and remains in the remediator’s list.
Assigning Remediators is optional. If you select this option, then click Next to proceed to the next screen after specifying the settings.
To add users to the available list of remediators, enter a user ID and then click Add. Alternatively, click ... (More) to search for a user ID. Enter one or more characters in the Starts With field, and then click Find. After selecting a user from the search list, click Add to add it to the list of remediators. Click Dismiss to close the search area.
To remove a user ID from the list of remediators, select it in the list, and then click Remove.
Figure 14-7 Audit Policy Wizard: Select Level 1 Remediator Area
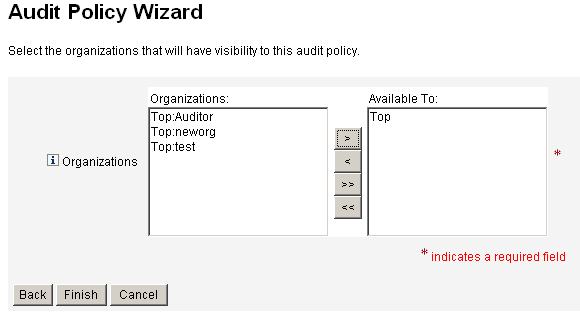
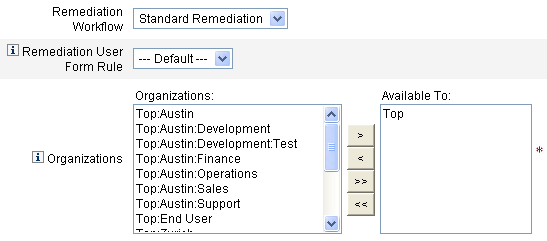
Select Organizations that Can Access this Policy
Use this screen, illustrated in Figure 14-8, to select the organizations that can view and edit this policy.
Figure 14-8 Audit Policy Wizard: Assign Organizations Visibility Screen
After making organization selections, click Finish to create the audit policy and return to the Manage Policies page. The newly created policy is now visible in this list.
Editing an Audit PolicyCommon editing tasks on audit policies include:
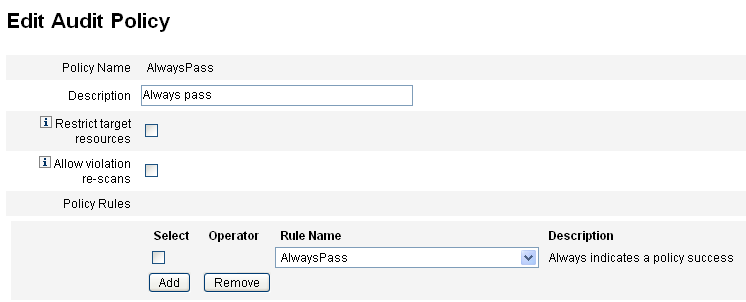
The Edit Policy Page
Click a policy name in the Audit Policy name column to open the Edit Audit Policy page. This page categorizes audit policy information in these areas:
Use this area of the page to:
Edit Audit Policy Description
Edit the audit policy description by selecting the text in the Description field and then entering new text.
Edit Options
Optionally select or de-select the Restrict target resources or Allow violation re-scans options.
Delete a Rule from the Policy
To delete a rule from the policy, click the Select button that precedes the rule name, and then click Remove.
Add a Rule to the Policy
Click Add to append a new field that you can use to select a rule to add.
Change a Rule used by the Policy
In the Rule Name column, select another rule from the selection list.
Remediators Area
Figure 14-10 shows a portion of the Remediators area, where you assign Level 1, Level 2, and Level 3 remediators for a policy.
Figure 14-10 Edit Audit Policy Page: Assign Remediators
Use this area of the page to:
Remove or Assign Remediators
Select a remediator for one or more remediation levels by entering a user ID and then clicking Add. To search for a user ID, click ... (More). You must select at least one remediator.
To remove a remediator, select a user ID in the list, and then click Remove.
Adjust Escalation Timeouts
Select the timeout value, then enter the new value. By default, no timeout value is set
.
Note
If you specify an escalation timeout value for the highest-level remediator selected, then the work item is removed from the list when the escalation times out.
Remediation Workflow and Organizations Area
Figure 14-11 shows the area in which you specify the remediation workflow and organizations for an audit policy.
Figure 14-11 Edit Audit Policy Page: Remediation Workflow and Organizations
Use this area of the page to:
Change the Remediation Workflow
To change the workflow assigned to a policy, you can select an alternative workflow from the list of options. By default, no workflow is assigned to an audit policy.
Note
If no workflow is assigned to the Audit Policy, the violations will not be assigned to any remediators.
Select a remediation workflow from the list, and then click Save.
Select Remediation User Form Rule
Optionally select a rule to calculate the user form applied when editing a user through a remediation.
Assign or Remove Visibility to Organizations
Adjust the organizations to which this audit policy will be available, and then click Save.
Sample Policies
Identity Manager provides these sample policies, accessible from the Audit Policies list:
IDM Role Comparison Policy
This sample policy allows you to compare a user’s current access to the access specified by Identity Manager roles. The policy ensures that all resource attributes specified by roles are set for the user.
This policy fails if:
IDM Account Accumulation Policy
This sample policy verifies that all accounts held by the user are referenced by at least one role also held by that user.
This policy fails if the user has accounts on any resources that are not explicitly referenced by a role assigned to the user.
Deleting an Audit PolicyWhen an audit policy is deleted from Identity Manager, all violations that reference the policy are also deleted.
Policies can be deleted from the Compliance area of the interface, when you click Manage Policies to view policies. To delete an audit policy, select the policy name in the policy view, and then click Delete.
Troubleshooting Audit PoliciesProblems with your audit policy typically are best addressed through policy rule debugging.
Debugging Rules
To debug a rule, add the following trace elements to the rule code.
<block trace='true'>
<and>
<contains>
<ref>accounts[AD].firstname</ref>
<s>Sam</s>
</contains>
<contains>
<ref>accounts[AD].lastname</ref>
<s>Smith</s>
</contains>
</and>
</block>Problem
I can’t see my workflow in the Identity Manager interface.
Resolution
Confirm that:
Problem
I imported rules, but do not see them in the Audit Policy Wizard.
Resolution
Confirm that:
Assigning Audit PoliciesTo assign an audit policy to an organization, the user must have (at least) the Assign Organization Audit Policies capability. To assign an audit policy to a user, the user must have the Assign User Audit Policies capability. A user with the Assign Audit Policies capability has both of these capabilities.
To assign organization-level policy, select the Organization on the Accounts tab, and then select the policies in the Assigned audit policies list.
To assign user-level policy, follow these steps:
Resolving Auditor Capabilities Limitations
By default, capabilities needed to perform auditing tasks are contained in the Top organization (object group). As a result, only those administrators who control Top can assign these capabilities to other administrators.
You can resolve this limitation by adding the capabilities to another organization. Identity Manager provides two utilities, located in the sample/scripts directory, to assist with this task.
To add the capabilities needed to perform auditing tasks to an organization other than Top, follow these steps:
- Run the following command to list all capabilities (AdminGroups) and their associated organizations (object groups):
beanshell objectGroupUpdate.bsh -type AdminGroup -action list -csv
This command captures the output to a comma-separated value (CSV) file.
- Edit the CSV file to adjust the capabilities organizational locations as desired.
- Run this command to update Identity Manager.
beanshell objectGroupUpdate.bsh -data CSVFileName -action add -groups NewObjectGroup