|
| |
| Sun[TM] Identity Manager 8.0 Administration | |
Chapter 5
Configuration & System MaintenanceThis chapter provides information and procedures for using the Administrator Interface to set up and maintain Identity Manager objects and server processes. For more information about Identity Manager objects, see Identity Manager Objects of the Overview chapter.
Note
For information about configuring Identity Manager for a Service Provider implementation, see Chapter 17, "Service Provider Administration."
This chapter is organized in the following topics:
Configuring Identity Manager PoliciesRead this section for information and procedures for configuring user policies.
What are Policies?
Identity Manager policies set limitations for Identity Manager users by establishing constraints for Identity Manager account ID, login, and password characteristics.
Note
Identity Manager also provides Audit policies that are specifically designed to audit user compliance. Audit policies are discussed in Chapter 13, "Identity Auditing: Basic Concepts."
Opening the Policies Page
You create and edit Identity Manager user policies from the Policies page.
To open the Policies page, follow these steps:
Policy Types
Using the Policies page you can edit existing policies and create new ones.
Policies are categorized as the following types:
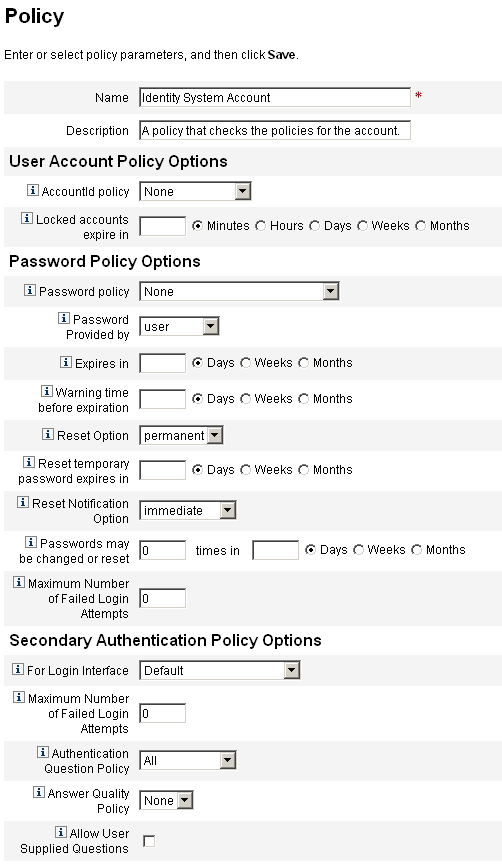
- Identity System Account policies — Establish user, password, and authentication policy options and constraints. You assign Identity System Account policies (shown in Figure 5-1) to organizations or users, through the Create and Edit Organization and Create and Edit User pages.
Options you can set or select include:
- User policy options — Specify how Identity Manager treats user accounts if a user fails to correctly answer authentication questions
- Password policy options — Set password expiration, warning time before expiration, and reset options
- Authentication policy options — Determine how authentication questions will be presented to the user, whether the user can provide his own authentication questions, enforce authentication at login, and establish the bank of questions that can be presented to a user.
Figure 5-1 Identity Manager Policy
- Service Provider System Account policies — This policy type is used in a service provider implementation to establish user, password, and authentication policy options and constraints for service provider users. You assign the policies to organizations or users, through the Create and Edit Organization and Create and Edit Service Provider User pages.
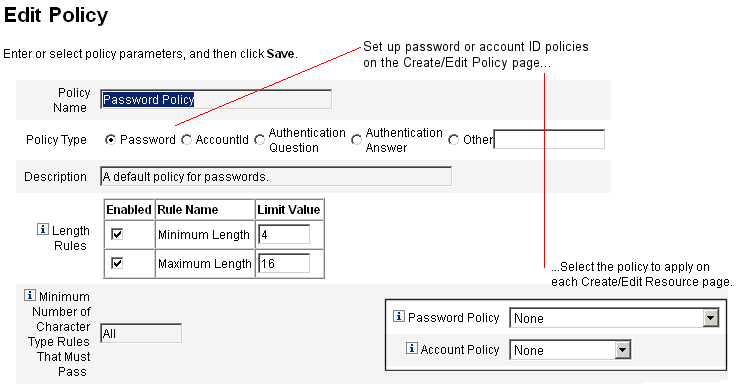
- String Quality Policies — String quality policies include policy types such as password, AccountID, and authentication, and set length rules, character type rules, and allowed words and attribute values. This type of policy is tied to each Identity Manager resource, and is set on each resource page. Figure 5-2 provides an example.
Figure 5-2 Create/Edit Password Policy
Options and rules you can set for passwords and account IDs include:
- Length rules — Determine minimum and maximum length.
- Character type rules — Set minimum and maximum allowable values for alphabetic, numeric, uppercase, lowercase, repetitive, and sequential characters.
- Password re-use limits — Specify the number of passwords preceding the current password that cannot be re-used. When a user attempts to change his password, the new password will be compared to the password history to ensure this is a unique password. For security reasons, a digital signature of the previous passwords is saved; new passwords are compared to this.
- Prohibited words and attribute values — Specify words and attributes that cannot be used as part of an ID or password.
Must Not Contain Attributes in Policies
You can change the allowed set of “must not contain” attributes in the UserUIConfig configuration object. Attributes are listed in UserUIConfig as follows:
Dictionary Policy
A dictionary policy enables Identity Manager to check passwords against a word database to ensure that they are protected from a simple dictionary attack. By using this policy with other policy settings to enforce the length and makeup of passwords, Identity Manager makes it difficult to use a dictionary to guess passwords that are generated or changed in the system.
The dictionary policy extends the password exclusion list that you can set up with the policy. (This list is implemented by the Must Not Contain Words option on the Administrator Interface password Edit Policy page.)
Configuring the Dictionary Policy
To set up the dictionary policy, you must:
To set up the dictionary policy, follow these steps:
- Open the Policies page ((more...) ).
- Click Configure Dictionary to display the Dictionary Configuration page.
- Select and enter database information:
- Database Type — Select the database type (Oracle, DB2, SQLServer, or MySQL) that you will use to store the dictionary.
- Host — Enter the name of the host where the database is running.
- User — Enter the user name to use when connecting to the database.
- Password — Enter the password to use when connecting to the database.
- Port — Enter the port on which the database is listening.
- Connection URL — Enter the URL to use when connecting. These template variables are available:
- Driver Class — Enter the JDBC driver class to use while interacting with the database.
- Database Name — Enter the name of the database where the dictionary will be loaded.
- Dictionary Filename — Enter the name of the file to use when loading the dictionary.
- Click Test to test the database connection.
- If the connection test is successful, click Load Words to load the dictionary. The load task may take a few minutes to complete.
- Click Test to ensure that the dictionary was loaded correctly.
Implementing the Dictionary Policy
To implement the dictionary policy, follow these steps:
- Open the Policies page ((more...) ).
- Click the Password Policy link to edit the password policy.
- On the Edit Policy page, select the Check passwords against dictionary words option.
- Click Save to save your changes.
Once implemented, all changed and generated passwords will be checked against the dictionary.
Customizing Email TemplatesIdentity Manager uses email templates to deliver information and requests for action to users and approvers. The system includes templates for:
- Access Review Notice — Sends notification that the access rights for a user needs to be reviewed. The system sends this notification when a violation of an access policy must be remediated or mitigated.
- Account Creation Approval — Sends notification to an approver that a new account is awaiting his approval. The system sends this notification when the Provisioning Notification Option for the associated role is set to approval.
- Account Creation Notification — Sends notification that an account has been created with a particular role assignment. The system sends this notification when one or more administrators are selected in the Notification recipients field on the Create Role or Edit Role pages.
- Account Deletion Approval — Sends notification to an approver that a user account deletion action is awaiting approval. The system sends this notification when one or more administrators are selected in the Notification recipients field on the Create Role or Edit Role pages.
- Account Deletion Notification — Sends notification that an account has been deleted.
- Account Update Notification — Sends notification to the specified email addresses or user accounts that an account has been updated.
- Password Reset — Sends notification of a Identity Manager password reset. Depending on the Reset Notification Option value selected for the associated Identity Manager policy, the system displays notification immediately (in the Web browser) to the administrator resetting the password or emails the user whose password is being reset.
- Password Synchronization Notice — Notifies the user that a password change has completed successfully on all resources. The notification lists which resources were updated successfully and indicates the origin of the password change request.
- Password Synchronization Failure Notice — Notifies the user that the password change was not successful on all resources. The notification provides a list of errors and indicates the origin of the password change request.
- Policy Violation Notice — Sends a notice that an account policy violation has occurred.
- Reconcile Account Event, Reconcile Resource Event, Reconcile Summary — Called from the Notify Reconcile Response, Notify Reconcile Start, and Notify Reconcile Finish default workflows, respectively. Notification is sent as configured in each workflow.
- Report — Sends a generated report to a specified list of recipients.
- Request Resource — Sends notification to a resource administrator that a resource has been requested. The system sends this notification when an administrator requests a resource from the Resources area.
- Retry Notification — Sends notification to an administrator that a particular operation has been unsuccessfully attempted on a resource a specified number of times.
- Risk Analysis — Sends a risk analysis report. The system sends this report when one or more email recipients are specified as part of a resource scan.
- Temporary Password Reset — Sends notification to the user or role approver that a temporary password has been provided for the account. Depending on the Password Reset Notification Option value selected for the associated Identity Manager policy, the system displays notification immediately (in the Web browser) to the user, emails the user, or emails the role approvers.
- User ID Recovery — Sends a recovered user ID to the specified email address.
Editing an Email Template
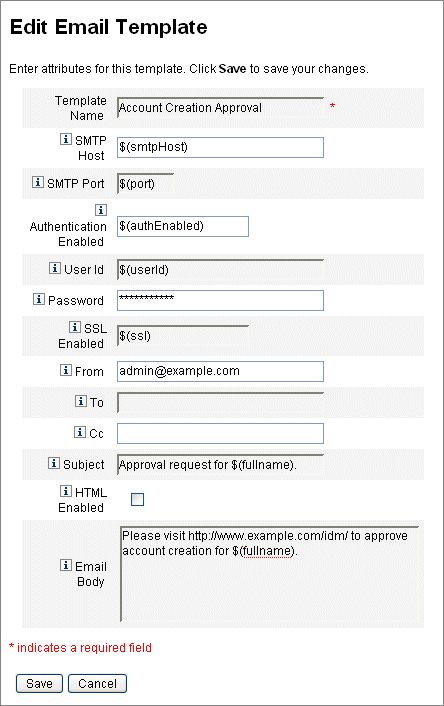
You can customize email templates to provide specific directions to the recipient, telling him how to accomplish a task or how to see results. For example, you might want to customize the Account Creation Approval template to direct an approver to an account approval page by adding the following message:
Please go to http://host.example.com:8080/idm/approval/approval.jsp to approve account creation for $(fullname).
To customize an email template, use the following procedure using the Account Creation Approval template as an example:
- In the Administrator interface, click the Configure tab, then click the Email Templates subtab.
The Email Templates page opens.
- Click to select the Account Creation Approval template.
Figure 5-3 Editing an Email Template
- Enter details for the template:
- In the SMTP Host field, enter the SMTP server name so that email notification can be sent.
- In the From field, customize the originating email address.
- In the To and Cc fields, enter one or more email addresses or Identity Manager accounts that will be the recipients of the email notification.
- In the Email Body field, customize the content to provide a pointer to your Identity Manager location.
- Click Save.
You can also modify email templates by using the Identity Manager IDE. For information on the IDE, see Identity Manager IDE.
HTML and Links in Email Templates
You can insert HTML-formatted content into an email template to display in the body of an email message. Content can include text, graphics, and Web links to information. To enable HTML-formatted content, select the HTML Enabled option.
Allowable Variables in the Email Body
You can also include references to variables in the email template body, in the form $(Name); for example: Your password $(password) has been recovered.
Allowable variables for each template are defined in the following table.
.
Configuring Audit Groups and Audit EventsSetting up audit configuration groups allows you to record and report on system events you select.
The Audit Configuration Page
Use the Audit Configuration page to set up audit groups. Setting up audit groups will enable you to run AuditLog reports later.
Opening the Audit Configuration Page
To open the Audit Configuration page, follow these steps:
Configuring Audit Groups
Configuring audit groups and events requires the Configure Audit administrative capability.
If it is not already open, open the Audit Configuration page. (See steps, above.)
The Audit Configuration page shows the list of audit groups, each of which may contain one or more events. For each group, you can record successful events, failed events, or both.
Click an audit group in the list to display the Edit Audit Configuration Group page. This page lets you select the types of audit events to be recorded as part of an audit configuration group in the system audit log.
Check that the Enable auditing check box is selected. Clear the check box to disable the auditing system.
Note
For more information about audit groups, see Audit Configuration in the Audit Logging chapter.
Editing Events in the Audit Configuration Group
To edit events in the group, you can add or delete actions for an object type. To do this, move items in the Actions column from the Available to the Selected area for that object type, and then click OK.
Adding Events to the Audit Configuration Group
To add an event to the group, click New. Identity Manager adds an event at the bottom of the page. Select an object type from the list in the Object Type column, and then move one or more items in the Actions column from the Available area to the Selected area for the new object type. Click OK to add the event to the group.
Remedy IntegrationYou can integrate Identity Manager with a Remedy server, enabling it to send Remedy tickets according to a specified template.
Set up Remedy integration in two areas of the Administrator interface:
- Remedy server settings — Set up Remedy configuration by creating a Remedy resource from the Resources area. (See Creating Resources.) After setting up the resource, test the connection to ensure integration is enabled.
- Remedy template — After setting up the Remedy resource, define a Remedy template. To do this, open the Administrator interface, click the Configure tab, then click Remedy Integration. You will then select the Remedy schema and resource.
Creation of Remedy tickets is configured through Identity Manager workflow. Depending on your preferences, a call can be made at an appropriate time that uses the defined template to open a Remedy ticket. For more information about configuring workflows, see Identity Manager Workflows, Forms, and Views.
Configuring Identity Manager Server SettingsYou can edit server-specific settings so that Identity Manager servers run only specific tasks.
To configure server-specific settings, follow these steps:
- In the Administrator interface, click Configure in the main menu, then click Servers.
The Configure Servers page opens.
- Click a server in the list on the Configure Servers page to edit settings for an individual server.
Identity Manager displays the Edit Server Settings page, where you can edit reconciler, scheduler, JMX and other settings.
Reconciler Settings
The reconciler is the Identity Manager component that performs reconciliation. To learn about reconciliation, see Reconciliation.
To configure reconciler settings, follow the steps under Configuring Identity Manager Server Settings. Select the Reconciler tab.
By default, reconciler settings display on the Edit Server Settings page. You can accept the default values or de-select the Use default option to specify custom values.
Note
To change the default reconciler settings used by Identity Manager servers, see Editing Default Server Settings.
Configure the reconciler using the following settings:
- Parallel Resource Limit — Specify the maximum number of resource threads that the reconciler can process in parallel. Resource threads allocate work items to worker threads, so if you add additional resource threads, you may also need to increase the maximum number of worker threads. For new installations, the default value is 3.
- Minimum Worker Threads — Specify the number of processing threads that the reconciler will always keep alive. For new installations, the default value is 2.
- Maximum Worker Threads — Specify the maximum number of processing threads that the reconciler can use. The reconciler will only start as many threads as the workload requires. This places a limit on that number. Worker threads automatically close if they are idle for a short duration. For new installations, the default value is 6.
For information about tuning and troubleshooting the reconciler, see Identity Manager Tuning, Troubleshooting, and Error Messages.
Viewing Reconciler Status
To view reconciler status information, open the Reconciler Status debug page.
Note
You must have the Debug capability to view /idm/debug/ pages. For information about capabilities, see Assigning Capabilities.
To open the Reconciler Status debug page, type this URL into your browser:
http://<AppServerHost>:<Port>/idm/debug/Show_Reconciler.jsp
where AppServerHost is a host that has the reconciler enabled.
Refresh the Reconciler Status page to view updated reconciler status information. For additional information about this page, click Help.
Scheduler Settings
The scheduler component controls task scheduling in Identity Manager.
To configure scheduler settings on a particular server, follow the steps under Configuring Identity Manager Server Settings. Select the Scheduler tab.
You can accept the default values or de-select the Use default option to specify custom values.
- Scheduler Startup — Select a startup mode for the scheduler on this server:
- Tracing Enabled — Select this option to activate scheduler debug tracing to standard output on this server.
- Maximum Concurrent Tasks — Select this option to specify the maximum number of tasks, other than the default, that the Scheduler will run at any one time. Requests for additional tasks above this limit will either be deferred until later or run on another server.
- Task Restrictions — Specify the set of tasks that can execute on the server. To do this, select one or more tasks from the list of available tasks. The list of selected tasks can be an inclusion or exclusion list depending on the option you select. You can choose to allow all tasks except those selected in the list (the default behavior), or allow only the selected tasks.
Click Save to save changes to the server settings.
To change the default scheduler settings for Identity Manager servers, see Editing Default Server Settings.
For information about tuning and troubleshooting the scheduler, see Identity Manager Tuning, Troubleshooting, and Error Messages.
Email Template Server Settings
To configure SMTP server settings, follow the steps under Configuring Identity Manager Server Settings. Select the Email Template tab.
Specify the default email server by clearing the Use Default selection and entering the mail server to use, if other than the default. The text you enter is used to replace the smtpHost variable in Email Templates.
Simple Mail Transfer Protocol (SMTP) is the standard for email transmissions across the Internet.
To change the default SMTP settings for Identity Manager servers, see Editing Default Server Settings.
JMX
Java Management Extensions (JMX) is a Java technology that allows for managing and/or monitoring applications, system objects, devices, and service oriented networks. The managed/monitored entity is represented by objects called MBeans (for Managed Bean).
This section describes how to configure JMX on an Identity Manager server so that a JMX client can monitor the system for changes. (Identity Manager can also be configured to make audit events available via JMX. For information, see (more...) .)
Configure JMX Polling Settings
To configure JMX polling settings on an individual server, follow these steps:
- Follow the steps under Configuring Identity Manager Server Settings. Select the JMX tab.
- Enable JMX cluster polling and configure the interval for the polling threads by using the following options:
- Enable JMX — Use this option to enable or disable the polling thread for the JMX Cluster MBean. To enable JMX, clear the default selection (Use Default (false)). Because of the use of system resources for polling cycles, enable this option only if you plan to use JMX.
- Polling Interval (ms) — Use this option to change the default interval at which the server will poll the repository for changes, when JMX is enabled. Specify the interval in milliseconds.
- Click Save to save changes to the server settings.
Note
To change the default JMX polling settings for Identity Manager servers, see Editing Default Server Settings.
Viewing JMX Data
Use a JMX client to view data gathered by JMX. JConsole, which is included in the JDK 1.5, is one such client.
Using JConsole Locally
To use JConsole on the same machine your server is running on, set the following property:
JConsole will connect using the correct PID.
Using JConsole Remotely
To use JConsole remotely, set the following properties:
Other settings may also be necessary depending on your environment. Refer to the JConsole documentation for more information.
Note
JMX data can also be viewed by going to the Identity Manager debug page ((more...) ) and clicking the Show MBean Info button.
For more information on JMX, visit this website:
http://java.sun.com/javase/technologies/core/mntr-mgmt/javamanagement/docs.jsp
Editing Default Server Settings
The Default Server Settings feature lets you set the default settings for all Identity Manager servers. The servers inherit these settings unless you select differently in the individual server settings pages.
To edit the default server settings, follow these steps:
The Edit Default Server Settings page displays the same options as the individual server settings pages. For help, refer to the documentation for the individual server settings pages.
Changes you make to each default server setting is propagated to the corresponding individual server setting, unless you have de-selected the Use default option for that setting.
Click Save to save changes to the server settings.
Configuring the End-User InterfaceAdministrators can configure certain aspects of the end-user interface by modifying a form in the Administrator interface.
To set options for displaying information in the end-user interface, follow these steps:
- In the Administrator interface, click Configure in the main menu.
- Click User Interface in the secondary menu.
The User Interface page opens.
- Complete and save the End User Dashboard portion of the form. Click Help if you need help with the form.
For information on completing the Anonymous Enrollment portion of the form, see Anonymous Enrollment.
Enabling Process Diagrams in the End-User Interface
Process diagrams depict the workflow that Identity Manager follows when end-users launch a request or update their profile. When enabled, process diagrams display on the results page after the end-user submits a form.
Process diagrams must be enabled in the Administrator interface before they can be enabled in the end-user interface. See Enabling Process Diagrams for more information.
To enable process diagrams in the end-user interface, follow these steps:
- Open the User Interface configuration page by following the steps in Configuring the End-User Interface.
- Select the Enable End-User Process Diagrams option, which is located in the Result Pages section of the form.
If the Enable End-User Process Diagrams option is not available, then you must first enable process diagrams in the Administrator interface. See Enabling Process Diagrams.
- Click Save.
Registering Identity ManagerAdministrators are encouraged to register their installation of Identity Manager.
To register, you will need a Sun Online Account and password. If you do not have a Sun Online Account, you can register for one by completing the form at this address:
Identity Manager can be registered from the console or by using the Administrator interface.
Registering from the console allows you to also create a local service tag, which can be used with Sun Service Tag software to track your inventory of Sun systems, software, and services. The service tags client package should be installed before you create a local service tag. This package can be downloaded by clicking the Download Service Tags button at the following address:
http://inventory.sun.com/inventory
In order to register Identity Manager, you should be logged on with an administrator account that allows you to configure Identity Manager objects. This account should have the Product Registration capability. For information about capabilities, see Assigning Capabilities.
Registering Identity Manager from the Console
To create a local service tag, or register Identity Manager over the Internet with Sun, follow these steps:
- To create a local service tag, use the following command:
register -local
To register Identity Manger over the Internet with Sun, use the following command:
register -remote -u <userid> -p <password> -userSOA <soaUserid>
-passSOA <soaPassword> -proxy <proxyHost> -port <proxyPortNumber>where:
- userid is the Identity Manager userID of the Identity Manager administrator who is authorized to do the registration
- password is the Identity Manager password of the Identity Manager administrator who is authorized to do the registration
- soaUserid is the user ID of the Sun Online Account that will be used for registration.
- soaPassword is the password of the Sun Online Account that will be used for registration.
- proxyHost is the network proxy to use for access to the Sun online registration service. Only required if your network is configured to use a proxy to reach external Internet addresses.
- proxyPortNumber is the port on the network proxy to use for access to the Sun online registration service. Only required if your network is configured to use a proxy to reach external Internet addresses
The register Command
Usage
register -local
register -remote [-u <userid> [-p <password>]] [-prompt] -userSOA <userid> -passSOA <password> [-proxy <proxyHost> [-port <proxyPortNumber>]] register [-help | -?]
Options
Use these options with the register command.:
Registering Identity Manager from the Administrator Interface
If you do not need to create a local service tag, register Identity Manager from the Administrator interface.
To register Identity Manager from the Administrator interface, follow these steps:
- In the Administrator interface, click Configure.
- In the secondary menu, click Product Registration.
The Product Registration page opens.
- Complete the form and click Register Now. Click the i-Helps for information about individual form fields.
Editing Identity Manager Configuration ObjectsIn the course of administering Identity Manager, you will occasionally be called upon to edit the Identity Manager system configuration object (also referred to as the System Configuration File), or other similar objects.
To edit objects using the Administrator interface, follow these steps:
- Open the Identity Manager Debug Page by typing the following URL into your browser:
http://<AppServerHost>:<Port>/idm/debug/session.jsp
The System Settings page opens.
- Find the List Objects button, then select Configuration from the adjacent Type drop-down list.
Click the List Objects button.
The “List Objects of type: Configuration” page opens.
- In the list of objects, find the object you need, then click edit. For example, to edit the system configuration object, find System Configuration, then click edit.
- Edit the object as directed.
- Click Save.
- If directed to do so, restart your server (or servers).
Removing Records from the System LogThe system log captures errors generated by Identity Manager. Periodically, the system log should be truncated to keep it from growing too large. Use the System Log Maintenance Task to remove old records from the system log.
To schedule a task to remove old records from the System Log, follow these steps: