| Sun StorageTek Common Array Manager Software Installation Guide |
| C H A P T E R 2 |
|
Installing the Common Array Manager Software |
This chapter describes how to install the management software using a graphical interface or the command line interface. It contains the following sections:
This chapter describes the installation of Common Array Manager on a new management host. These procedures apply equally to installing a new release of the software on a host already running an earlier version of the software. When you proceed to upgrade an existing management host to a new release, you run the install program exactly as described for a fresh installation. The install script searches to see if there is an earlier version of the software present on the system and if so, updates and adds only those files that require change. Existing settings and other data are preserved, and after the upgrade normal operations can resume. It is not necessary to manually run an uninstall or re-register devices, redefine users, or reset other system parameters.
Any release-specific considerations, including those pertaining to upgrades, are provided in the Sun StorageTek Common Array Manager Software Release Notes.
The Sun StorageTek Common Array Manager Installation Software CD provides three installation-related wizards:
You can also download the latest version of the Common Array Manager software from System Administration/Storage Management category on: http://www.sun.com/download.
The current URL is: http://www.sun.com/download/index.jsp?cat=Systems%20Administration&tab=3&subcat=Storage%20Management
If installing from a downloaded file on Solaris or Linux, you must do the following to unpack the file and run the install program:
2. Change to the directory where the install files are unpacked, for example:
cd /install_dir/Host_Software_6.x.x.x
3. Begin the installation procedure as follows:
1. Unzip the host_sw_windows_6.x.x.x file using a Windows zip application.
2. Change to the directory where the install files are unpacked, for example:
3. Begin the installation procedure as follows:
4. Begin the Windows installation procedure at the “Review the README.txt file” step.
Before installing the management software, do the following:
Before unpacking the compressed installation files, check that the installation space requirements are met, as listed in TABLE 2-1. (The installation script verifies these requirements. If a requirement is not met, the script informs you.)
These user names are not added to the system by the CAM installer. They are default users with storage and guest roles and are required to be present in order to use them to log into CAM.
The storage and guest roles are defined in CAM. The storage role has write privileges in CAM, while the guest role has read-only privileges. By default, the root user (or the administrative user in Windows) has the storage role, the storage user has the storage role, and the guest user has the guest role.
Additional users should be added to the storage or guest roles by using the CAM User Management interface. The password for these accounts is the password for the user on the operating system. For more information, see Adding Users And Assigning Roles.
Solaris and Linux: Uninstall all versions of the Sun StorageTek Configuration Service management software prior to the Common Array Manager 5.0.1.1 release. Later versions do not have to be removed.
Windows: Uninstall all versions of the Sun StorageTek Configuration Service management software prior to the Common Array Manager 5.1.0.10 release. Later versions do not have to be removed.
The following tables show the location of the files and logs for the Sun StorageTek Common Array Manager software by Operating System.
/var/opt/CommonArrayManager/Host_Software_6.x.x.x/bin |
|
/var/sadm/install/se6000 |
|
TABLE 2-6 summarizes the commands you need to install the management software using either a GUI wizard or a CLI script.
If you are using the Solaris or Linux operating system and a path is not defined, use ./ to run the commands (./RunMe.bin).
If you are using a Windows platform, if the command alone does not work, add .\ to run the commands (.\RunMe.bat).
You can install software by using telnet from a remote terminal to the server that will perform as the actual management host. If you are planning to use the graphic installation wizard in Solaris or Linux, you must set the X Windows DISPLAY setting so the wizard pages will display locally on the remote terminal.
The set up will depend on the shell you use.
The following shows an example of setting up the local terminal display:
1. On the local terminal, enter the following to enable display from the Common Array Manager host:
2. Telnet to the Common Array Manager host (where the Common Array Manager Installation CD or download file is located, and where the Common Array Manager will be installed):
3. After logging in, switch user to root:
4. Enter and export the following DISPLAY variable:
# DISPLAY=mgt_server.your_net:0.0; export DISPLAY
where mgt_server.your_net is the IP address of the local terminal from which you are telnetting.
5. Confirm that the remote display is working by entering the following command to see if it displays to your local terminal:
The following covers installing the management software on a host running the Solaris Operating System as described in the following sections:
You can use a wizard to install the Common Array Manager software on a SPARC, X86,or X64 system running the Solaris Operating System.
The array installation files and installers are provided in a compressed .bin file on the CD.
The process unpacks the contents of the file on the host and then proceeds with the installation.
Before you continue, check that all of the requirements are met, as listed in Check the installation space requirements..
You can install from a CD or from a download of the install files from the Sun Software Download Center. If installing from a download, run tar -xvf filename to unpack the file, then change to the Host_Software_6.x.x.x directory and begin the following procedure at Step 3.
1. Log in to the management host Solaris OS as root.
2. Insert the host software installation CD into a drive on the management host.
If the compressed installation files do not appear in a directory window:
a. Change to the /cdrom/cdrom0 directory:
b. Display the contents of the CD:
3. Review the README.txt file for the latest information on the product and the installation process.
4. To begin unpacking the contents of the compressed installation file, enter the following command or click the RunMe icon if using a file manager:
The files are unpacked in the default directory - /var/opt/CommonArrayManager.
The Host_Software_6.x.x.x directory is unpacked into the default directory. The unpacking process takes a couple of minutes. The contents of this directory includes:
If the wizard screen is not redisplayed or if you receive an error message, recheck that the host requirements in Check the installation space requirements. are met.
Summary information about the installation is displayed.

6. Click Next to display the license agreement screen.

7. Click the radio button to accept the license agreement, and then click Next to continue the host installation.

8. You are prompted to select the installation type. Make your selection as follows, and then click Next.

9. If you selected Custom in Step 8, you are prompted to select the installation components. Make your selection as follows, and then click Next.

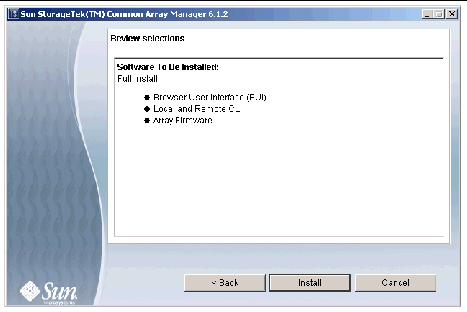
10. When prompted to review your selection, check it and click the Install button.
When the host installation is complete, the View results screen is displayed.

12. Eject the CD and remove it from the drive.
You can use the CLI to install the Common Array Manager software on a SPARC system running the Solaris 8, 9, or 10 Operating System, or on an X86 or X64 System running the Solaris OS.
The array installation files and installers are provided in a compressed .bin file on the CD.
The process unpacks the contents of the file on the host and then proceeds with the installation.
| Note - Before you continue, check that all of the requirements are met, as listed in Check the installation space requirements.. |
You can install from a CD or from a download of the install files from the Sun Software Download Center. If installing from a download, run tar -xvf filename to unpack the file, then change to the Host_Software_6.x.x.x directory and begin the following procedure at Step 3.
1. Log in to the management host Solaris OS as root.
2. Insert the host software installation CD into a drive on the management host.
If the compressed installation file does not appear in a directory window:
a. Change to the /cdrom/cdrom0 directory:
b. Display the contents of the CD:
3. Review the README.txt file for the latest information on the product and the installation process.
4. To unpack the contents of the compressed installation file, enter the following command:
The files are unpacked in the default directory - /var/opt/Common Array Manager.
The Host_Software_6.x.x.x directory is unpacked into the default directory. To use a different directory, enter the following command:
RunMe.bin -c /path-to-new-directory
The following message is displayed:
Initializing InstallShield Wizard
Launching InstallShield Wizard
The host software installer is launched automatically after the installation files are unpacked and the initial host installer prompt is displayed.
5. When prompted about the license agreement, accept the agreement and press Return.
6. When prompted to select the installation type, do one of the following:
7. If you selected Custom in Step 6, you are prompted to select the installation components, as follows:
When the installation is complete, the host software installer Installation Summary screen is displayed.
8. Press Return to complete the installation.
9. Eject the CD and remove it from the drive.
The following covers installing the management software on a host running a Linux Operating System as described in the following sections:
You can install the Common Array Manager software on a host system running the Red Hat or SUSE Linux Operating System.
The array installation files and installers are provided in a compressed .bin file on the CD.
The process unpacks the contents of the file on the host and then proceeds with the installation.
| Note - Before you continue, check that all of the requirements are met, as listed in Check the installation space requirements.. |
You can install from a CD or from a download of the install files from the Sun Software Download Center. If installing from a download, run tar -xvf filename to unpack the file, then change to the Host_Software_6.x.x.x directory and begin the following procedure at Step 3.
1. Log in to the management host Linux OS as root.
2. Insert the host software installation CD into a drive on the management host.
If the compressed installation files do not appear in a directory window:
a. Change to the /media/cdrom directory:
b. Display the contents of the CD:
3. Review the README.txt file for the latest information on the product and the installation process.
4. To begin unpacking the contents of the compressed installation file, enter the following command or click the RunMe icon if using a file manager:
The files are unpacked in the default directory - /var/opt/CommonArrayManager.
The Host_Software_6.x.x.x directory is unpacked into the default directory. The contents of this directory includes:
If the wizard screen is not redisplayed or if you receive an error message, recheck that the host requirements in Check the installation space requirements. are met.
Summary information about the installation is displayed.

6. Click Next to display the license agreement screen.

7. Click the radio button to accept the license agreement, and then click Next to continue the host installation.
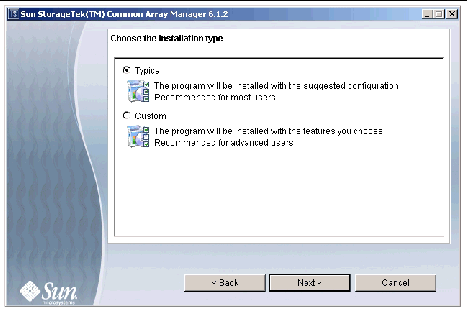
8. You are prompted to select the installation type. Make your selection as follows, and then click Next.

9. If you selected Custom in Step 8, you are prompted to select the installation components. Make your selection as follows, and then click Next.

10. When prompted to review your selection, check it and click the Install button.
When the host installation is complete, the host software installer Installation Summary screen is displayed.

12. Eject the CD and remove it from the drive.
You can use the CLI to install the Common Array Manager software on a host system running the Red Hat or SUSE Linux Operating System.
The array installation files and installers are provided in a compressed .bin file on the CD.
The process unpacks the contents of the file on the host and then proceeds with the installation.
| Note - Before you continue, check that all of the requirements are met, as listed in Check the installation space requirements.. |
You can install from a CD or from a download of the install files from the Sun Software Download Center. If installing from a download, run tar -xvf filename to unpack the file, then change to the Host_Software_6.x.x.x directory and begin the following procedure at Step 3.
1. Log in to the management host Linux OS as root.
2. Insert the host software installation CD into a drive on the management host.
If the compressed installation file does not appear in a directory window:
a. Change to the /media/cdrom directory:
cd /media/cdrom
b. Display the contents of the CD:
3. Review the README.txt file for the latest information on the product and the installation process.
4. To unpack the contents of the compressed installation file, enter the following command:
The files are unpacked in the default directory: /var/opt/CommonArrayManager/Host_Software_6.x.x.x
The Host_Software_6.x.x.x directory is unpacked into the default directory. To use a different directory, enter the following command:
RunMe.bin -c /path-to-new-directory
The following message is displayed:
Initializing InstallShield Wizard
Launching InstallShield Wizard
The host software installer is launched automatically after the installation files are unpacked and the initial host installer prompt is displayed.
5. When prompted about the license agreement, accept the agreement and press Return.
6. When prompted to select the installation type, do one of the following:
7. If you selected Custom in Step 6, you are prompted to select the installation components, as follows:
When the installation is complete, the host software installer Installation Summary screen is displayed.
8. Press Return to complete the installation.
9. Eject the CD and remove it from the drive.
The following covers installing the management software on a host running a Microsoft Windows Operating System as described in the following sections:
You can use a wizard to install the Common Array Manager software on a system running Windows 2000, 2003, or XP. The system must have Windows Installer 3.1 already installed. If not, download it from the Microsoft Download site.
You must be logged in to the Windows system as an administrative user. For information on setting up administrative users and root users on Windows, see Adding an Administrator User.
The array installation files and installers are provided in a compressed file on the CD.
The process unpacks the contents of the file on the host and then proceeds with the installation.
| Note - Before you continue, check that all of the requirements are met, as listed in Check the installation space requirements.. |
You can install from a CD or from a download of the install files from the Sun Software Download Center. If installing from a download, unzip the file, change to the Host_Software 6.x.x.x directory and begin the following procedure at Step 2.
1. Insert the host software installation CD into a local drive.
If the compressed installation file does not appear in a directory window, click on the CD drive (example: D:).
2. To begin unpacking the contents of the compressed installation file, double click on the following icon:
The files are unpacked in the default directory path <system drive>:\Sun\CommonArrayManager\Host_Software_6.x.x.x\bin. When the unpacking is complete, the host software installer begins automatically.
If the wizard screen is not redisplayed or if you receive an error message, check that the host requirements in Check the installation space requirements. are met.
Summary information about the installation is displayed.

3. Click Next to begin the installation of the software.
The license agreement screen is displayed.

4. Click the radio button to accept the license agreement, and then click Next to continue the host installation.

5. You are prompted to select the installation type. Make your selection as follows, and then click Next.
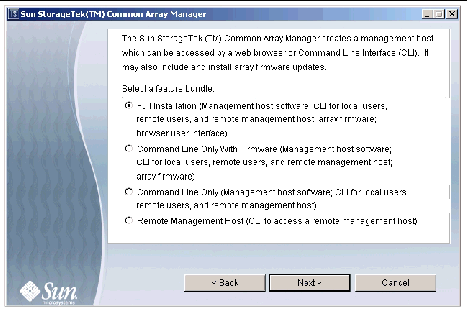
6. If you selected Custom in Step 5, you are prompted to select the installation components. Make your selection as follows, and then click Next.

7. When prompted to review your selection, check it and click the Install button.
When the installation is complete, the View Results screen reports the installation status.

9. Eject the CD and remove it from the drive.
10. After the installation on a Windows platform, you will need to configure the Windows firewall.
Set the Windows firewall to allow an exception for port 6789. Some firewall programs prompt for your agreement to allow new programs to communicate through the firewall, and set the port for you. Refer to your firewall documentation for instructions on how to open a port through the firewall.
You can use the CLI to install the Common Array Manager software on a system running Windows 2000, 2003, or XP.
The array installation files and installers are provided in a compressed file on the CD.
The process unpacks the contents of the file on the host and then proceeds with the installation.
| Note - Before you continue, check that all of the requirements are met, as listed in Check the installation space requirements.. |
1. Log into Windows as Administrator.
2. Insert the host software installation CD into a local drive.
If the compressed installation file does not appear in a directory window, access the CD drive (example: D:).
3. Review the README.txt file for the latest information on the product and the installation process.
4. To unpack the contents of the compressed installation file in the default directory, enter the following command:
RunMe.bat -c
The following message is displayed:
Initializing InstallShield Wizard
Launching InstallShield Wizard
The files are unpacked in the default directory:
<system drive>:\Sun\CommonArrayManager\Host_Software_6.x.x.x
When the unpacking is complete, the host software installer begins automatically.
5. When prompted about the license agreement, accept the agreement and press Return.
6. When prompted to select the installation type, do one of the following:
7. If you selected Custom in Step 6, you are prompted to select the installation components, as follows:
When the installation is complete, the host software installer Installation Summary screen is displayed.
9. Eject the CD and remove it from the drive.
10. After the installation on a Windows platform, you will need to configure the Windows firewall.
Set the Windows firewall to allow an exception for port 6789. Some firewall programs prompt for your agreement to allow new programs to communicate through the firewall, and set the port for you. Refer to your firewall documentation for instructions on how to open a port through the firewall.
If you need to remove the Common Array Manager software from your system, there are wizards and scripts to uninstall the software and its baseline firmware. Also refer to Backing Out of Firmware Upgrades.
|
1. Log in to the management host as root.
2. Change to the bin directory in the installation directory as described in Locating Files and Logs.
cd /var/opt/CommonArrayManager/Host_Software_6.x.x.x/bin

The Review Selections window is displayed.
5. Select the software to be uninstalled, and click the Uninstall button.
When the uninstall completes, the View Results screen is displayed.

|
1. Log in to the management host as root.
2. Change to the bin directory in the installation directory as described in Locating Files and Logs.
cd /var/opt/CommonArrayManager/Host_Software_6.x.x.x/bin
3. Execute the uninstall command
4. Follow the prompts in the install console dialog.
If for any reason the uninstallation has failed, run the uninstall script with the -f option:
|
1. Navigate to the host CD bin directory:
<system drive>:\Sun\CommonArrayManager\Host_Software_6.x.x.x\bin
2. Click on the uninstall.bat icon.
To run the uninstaller in console mode, enter: uninstall.bat -c
To clean up (remove all associated files), enter: uninstall.bat -f
Alternatively, you can remove the Common Array Manager using the Control Panel - Add/Remove Programs.
3. Follow the uninstall wizard steps as described in the To Uninstall the Management Software on Solaris or Linux Using the GUI.
You can verify the installation by bring up the Sun StorageTek Common Array Manager browser or CLI prompt, as discussed in Starting the Management Software of the next chapter.
In the browser, you can click the Version button to verify the release version information.
You can also verify the success of the installation by reviewing the installation logs. Note that the installation logs are mainly intended for debugging by developers. By scrolling to the end of the installation log, you can verify the successful installation message or any error messages.
If an error occurs, review the requirements in Check the installation space requirements.. Also, review the Readme.txt file located in the installation directory (see Locating Files and Logs) for late-breaking information and attempt a reinstallation.
The installation logs are located:
/var/sadm/install/se6000/se6000_Host_SW.log
\Program Files\Common Files\Sun Microsystems\se6000
For Windows, verify that you made the firewall changes after you finished the installation.
You are now ready to log in to the browser interface, discover the arrays, install the array baseline firmware, and set up an array.
| Sun StorageTek Common Array Manager Software Installation Guide | 820-5747-10 |
Copyright © 2008 Sun Microsystems, Inc. All Rights Reserved.
 To Install the Software (