| Exit Print View | |
Sun Installation Assistant 2.3 through 2.4 User's Guide for x64 Servers |

|
About This Documentation (PDF and HTML)
Shell Prompts in Command Examples
Introduction to Sun Installation Assistant
Getting Started With Sun Installation Assistant
SIA Version 2.3 Through 2.4 Features and Benefits
Supported Servers and SIA Media Availability
Starting SIA and Preparing for Deployment or Recovery Tasks
Local and Remote Media Options
How to Start SIA and Prepare for Tasks Using Local or Remote Media
How to Create a RAID Volume Using SIA
How to Delete a RAID Volume Using SIA
How to Install Windows With SIA Using Local or Remote Media
How to Install Linux With SIA Using Local or Remote Media
Using SIA to Upgrade System Firmware
How to Upgrade the System BIOS and ILOM Firmware
How to Upgrade Expander Firmware
Using SIA to Recover a Service Processor
How to Recover a Service Processor
Performing an SIA PXE-Based Attended Installation
Obtain the SIA PXE Image Files
How to Create the SIA Image and Prepare for PXE Boot
Performing an SIA PXE-Based Unattended Installation
Obtain the SIA PXE Image Files
Contents of the SIA State File
How to Prepare for an Unattended SIA Installation of Linux
How to Prepare for an Unattended SIA Installation of Windows Server
How to Prepare for an Unattended SIA Firmware Upgrade
How to Create the SIA Image and Prepare for PXE Boot
How to Boot SIA From a PXE Server and Perform an Unattended Installation
Observing an SIA PXE-Based Unattended Installation
Set Up Passwords for Root and Virtual Access
Using a Virtual Console or Secure Shell (SSH) Connection
Debugging Unattended Installation Problems
Creating a Bootable SIA USB Flash Drive
Setting BIOS Parameters and Booting Off the SIA USB Flash Drive
Identifying a Linux Boot Device on a Sun Fire X4500 Server
How to Identify a Linux Boot Device on a Sun Fire X4500 Server
How to Install Service Tags in Linux
The following procedure explains the initial steps you must perform to boot SIA from a PXE Linux-based server. After SIA boots, you perform your installation tasks interactively using the graphical user interface (GUI).
Note - The SIA program files are Linux-based and must be configured to boot from a Linux PXE environment. However, the SIA program even when booted from a Linux-based PXE environment supports the installation of Windows or Linux from distribution media (CD or ISO image) accessible from the network.
Ensure that the target Sun server is attached to the network configured with the PXE boot environment.
From the service processor (Integrated Lights Out Manager) Remote Console web interface, click Remote Control->Remote Power Control then select Reset to reset the host server.
—Or—
Press the Power button on the front panel of the server to turn it off (hold the button in until the server powers off), then press the Power button to turn on the server.
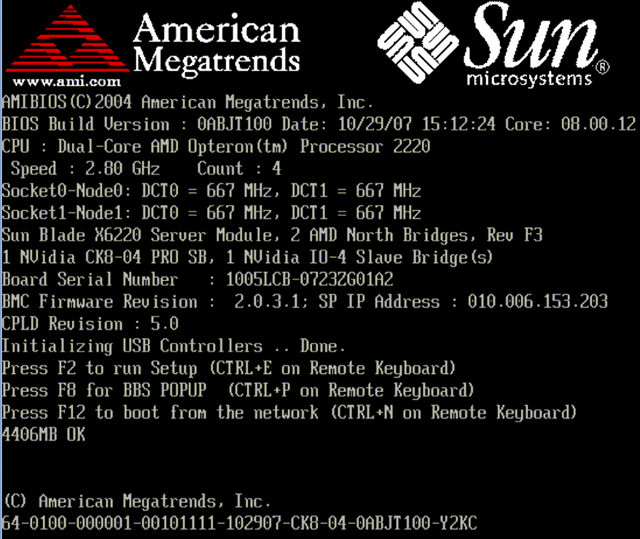
The BIOS screen appears. An example is shown below (your server’s BIOS screen might look different).

Tip - The next events occur very quickly; therefore, focused attention is needed for the following steps. Watch carefully for these messages, as they appear on the screen for a brief time. You might want to enlarge the size of your screen to eliminate scroll bars.
As the system boots, do one of the following to start a network boot:
Press F12 to boot from the first network boot device found.
—Or—
Press F8 to display the boot menu and specify the network boot device.
Tip - On a Sun Blade server module, you can determine the PXE interface boot device by (1) matching the PXE:Slot# or Network:Slot# (listed on the F8 BBS Popup menu) with the physical NEM or EM slot number label on the chassis, and (2) matching the F# (listed on the Please Select Boot Device menu) with the physical NIC port number label on the NEM (ports 0.0 to 9.0 and 0.1 to 9.1) or EM (ports 0 or port 1).
After the network boot device is specified, the system attempts to get the IP address from the DHCP PXE boot server. After the PXE server is found, the PXE boot prompt appears.
At the PXE boot prompt, press Enter or type: install
The SIA installation image downloads to the Sun server and SIA launches.
For further instructions about how to continue an attended installation after booting SIA
from PXE, follow the steps (beginning at Step 2) in the procedure ![]() How to Start SIA and Prepare for Tasks Using Local or Remote Media.
How to Start SIA and Prepare for Tasks Using Local or Remote Media.