| Sun Ray Server Software 4.0 Administrator’s Guide for Solaris |
| Sun Ray Server Software 4.0 Administrator’s Guide for Solaris |
| C H A P T E R B |
|
Troubleshooting and Tuning Tips |
This appendix contains the following sections:
Sun Ray Server Software on-screen displays (OSD) to help administrators and others identify problems visually. The most important information about the Sun Ray DTU and its current state is displayed on the screen.
The original OSD supplied with earlier versions of Sun Ray Server Software and DTU firmware have now been replaced with larger icons that provide the same information in an easier to read format. It is always a good idea to make sure that you are using the latest firmware. See Managing Firmware Versions. Both sets of OSD icons are composited live, based on the current state of connectivity at a given moment. Examples of the original OSD are shown at left in the figures below, with equivalent or similar examples of the newer OSD at the right.
FIGURE B-1 Layout of Old (left) and New (right) OSD Icons
")
To help you locate problems, the OSD icons display a numeric icon code followed by an alphabetic DHCP state code. You can look up the meaning of the numeric OSD message codes in TABLE B-1 and the alphabetic DHCP state codes in TABLE B-2, and firmware download error codes in TABLE B-4. Encryption and authentication information is also displayed when appropriate.
Sun Ray DTUs can function in a private interconnect or in a simple LAN environment with only an IP address, but additional basic parameters and Sun Ray-specific vendor options are needed for more complex LAN operations, such as when a DTU is located several hops away from the Sun Ray Server’s subnet.
OSD icon messages and codes are summarized in the following tables:
|
PROM is corrupted. Check that firmware downloads are properly configured and enabled, then power cycle the DTU. |
|
The first display a user should see is depicted below:

This icon indicates that the DTU has passed the power-on self test but has not detected an Ethernet signal yet. This icon is displayed as part of the normal startup phase and is usually displayed for only a few seconds.
1. Check that the Ethernet cable is correctly plugged into the DTU and the other end is plugged in to the correct hub, switch, or network outlet.
A link light on the switch or hub indicates that the connection is alive.
2. If the DTU is connected through a hub or a switch, make sure that the hub or switch is powered on and configured correctly.
After the Sun Ray DTU has verified its network connection, the user should see this OSD:
FIGURE B-3 Network Connection Verified
, and an icon code 21")
This icon indicates that the DTU has detected the Ethernet carrier but has not yet received its initial parameters or IP address from DHCP. This icon is displayed as part of the normal startup phase and is usually displayed for only a few seconds.
1. Make sure that the DHCP server is configured correctly, is up and running, and has not run out of IP addresses to assign to clients.
2. Verify that your DHCP server is configured properly for network parameters.
After the DHCP server has allocated an IP address, the icon is updated with the unit’s IP address; if the response is inadequate, the Sun Ray DTU issues a DHCP inform request to attempt to obtain the Sun Ray vendor-specific parameters. The Sun Ray DTU continues all the way through booting with just a DHCP supplied IP address but usually functions better with some additional parameters.
At this point, depending on whether you have configured your Sun Ray servers to run on a LAN or a dedicated interconnect, OSD 21A or 21B may display.
Code 21 A indicates that the DTU got an IP address and is waiting for a DHCP inform response to other parameters.
Code 21 B indicates that the DTU got an IP address and IP router and is waiting for Sun Ray vendor-specific options from DHCP inform.
| Note - If you see a 21 A or 21 B with a DTU IP address in a LAN deployment, the Sun Ray DTU is trying to use DHCP_INFORM to get Sun Ray-specific parameters. |
1. For LAN configurations with other (non-Sun Ray) DHCP services but no bootp proxy agent, verify the DHCP server and the Sun Ray vendor tags.
2. For routed configurations, verify that the bootp proxy agent is configured correctly in the Sun Ray DTU’s subnet and that it points to one of the Sun Ray servers in the failover group.
3. For non-routed private interconnect configurations, the Sun Ray server also performs the functions of a DHCP server. Verify that it is configured properly for DHCP services.
When DHCP finishes, the Sun Ray DTU tries to connect to a Sun Ray server and the Authentication Manager running on it.
FIGURE B-4 Waiting to Connect to Authentication Manager

This icon indicates that the DTU has received its initial parameters from DHCP but has not yet connected to the Sun Ray Authentication Manager. This icon is displayed as part of the normal startup phase and is usually displayed for only a few seconds.
|
|
1. Make sure that Sun Ray services, including the Authentication Manager, are up and running on the Sun Ray server.
In a LAN configuration or other routed environment:
2. Make sure that the Authentication Manager can be reached from the IP address assigned to the DTU.
3. Verify that the routing information the DTU receives is correct.
4. Run utquery for the DTU’s IP address.
The utquery command displays the parameters a Sun Ray DTU has received. If utquery fails to display an AuthSrvr parameter, the DHCP server for Sun Ray parameters may not be reachable or may not be configured properly. Confirm that the DHCPServer and INFORMServer values are appropriate. If not, look at your bootp relay configurations and DHCP server configurations for network and Sun Ray parameters. For details of these parameters, see the utquery man page.
| Note - To Restart DHCP on a Solaris server, type the following as superuser:
# /etc/init.d/dhcp stop # /etc/init.d/dhcp start |

This OSD indicates that the DTU is being redirected to a new server. This can occur for any of several reasons, including load balancing.
FIGURE B-6 Wait for Session OSD
.")
This OSD represents the transition state for the Sun Ray DTU. If it is displayed for an extended period, there is probably no X Window server running.
| Note - The current wait icon is a white “X” cursor. In earlier releases, the wait icon was displayed as a green newt cursor. |
| Tip - If you suspect that the configuration files have been corrupted, please see Determine the Integrity of the Configuration Files in the Sun Ray Server Software 4.0 Installation and Configuration Guide. |
This section applies to a normal dtlogin session.
The Xsun server is indirectly started by the dtlogin daemon. In the process of starting the Xsun server, the dtlogin daemon reads two configuration files:
If, after several retries, the Xsun process does not start, the dtlogin daemon just gives up. The problem can usually be traced back to an older version of the dtlogin daemon or the configuration files for the dtlogin daemon.
The dtlogin daemon has been part of the Solaris operating environment since long before Sun Ray Server Software existed. The Sun Ray administration model uses the dtlogin daemon in new ways, and certain bugs in the dtlogin daemon have become apparent. Patches to fix these bugs in the dtlogin daemon are available.
1. Check the messages file /var/opt/SUNWut/log/messages to verify the version number.
2. Correct, if necessary, with utadm -l.

This icon indicates that the Sun Ray USB bus is temporarily busy servicing a high-speed device, and the keyboard or mouse may not be responsive to user input.
This icon typically appears only during an unusually long print job and disappears when the job is done. This is an informational OSD; there is no particular action to take unless it is necessary to kill the print job.

This icon indicates that the DTU has an Ethernet address and an IP address but has lost the Ethernet signal. This icon is displayed only after the DTU successfully boots and receives an IP address, but then loses its Ethernet signal.
1. Check that the Ethernet cable is correctly plugged in to the back of the DTU and the other end is plugged into the correct switch or network outlet.
2. If the DTU is connected through a hub or switch, make sure that the hub or switch is on and configured correctly.

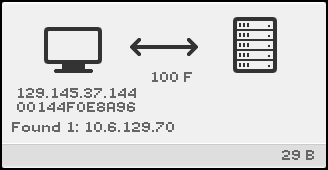
This OSD shows the Ethernet address, currently assigned IP address, currently connected server, encryption status, DHCP state, and link speed and mode. 10 stands for 10 Mbps, and 100 for 100 Mbps. F stands for full duplex, H stands for half-duplex mode.To display this OSD with current information, press the three audio volume keys simultaneously.
| Tip - To get the same effect on non-Sun keyboard, disconnect and reconnect the Ethernet cable. |
FIGURE B-10 Ethernet Address OSD with Different Encryption and Authentication States

The following icons are displayed in the event of a possible security breach.
FIGURE B-11 Session Refused by Client

Icon 15D indicates that the client is refusing to connect to a server because it is unable to verify the validity of the Sun Ray server. This error can occur only if an unknown Sun Ray server intercepts the messages and tries to emulate a valid Sun Ray server. This is a session security breach.
A graphically similar icon displaying the number 50 indicates that the server is refusing to grant a session to the client because the client is unable to fulfill the server’s security requirements.
1. Check the client’s firmware version.
This error may occur with firmware versions earlier than 2.0 if the server is configured for hard security mode.
As an alternative, confirm whether your site requires hard security mode. If not, the session can be enabled with soft security mode.
The following icon is displayed if the DTU is broadcasting to locate a server and either no servers respond or Sun Ray specific DHCP parameters have not been supplied correctly.
FIGURE B-12 DHCP Broadcast Failure

The following icon is displayed while a DTU is trying to establish a VPN connection.
FIGURE B-13 Establishing a VPN Connection

When the VPN connection is established, the following icon is displayed.
FIGURE B-14 VPN Connection Established
When firmware download error occurs, OSD icon 4 (see FIGURE B-15) displays the appropriate error code and a descriptive text string. These error codes are listed in TABLE B-4.
| Note - These error messages appear in English even in localized versions of Sun Ray Server Software. |
FIGURE B-15 OSD Icon 4 Displays Firmware Download Error Messages

The following OSD are typical of those that may display when new firmware is downloaded to a DTU from a Sun Ray server.
FIGURE B-16 Firmware Download in Progress

This icon indicates that the DTU is currently downloading new flash PROM software from the Sun Ray server.
1. Wait until the download is complete.
Downloading and saving the new PROM software usually takes less than a minute. If you interrupt the download, the DTU has to download new PROM software the next time it reboots.
If the firmware download fails, the following syslog message indicates that the barrier level has been set to prevent Sun Ray DTUs with SRSS 4.0 firmware from automatically downloading an earlier version of the firmware:
2. Check /var/opt/SUNWut/log/messages to confirm that your configuration is set up properly.
FIGURE B-17 Saving PROM Software

This icon indicates that the DTU has just downloaded new PROM software from the Sun Ray server and is saving it to the DTU’s PROM.
 Wait until the download is done.
Downloading and saving the new PROM software usually takes less than a minute. If you interrupt the download, the DTU has to download new PROM software the next time it reboots.
FIGURE B-18 Firmware Download Failed

This icon indicates that the DTU has failed to download new firmware. OSD 4 now includes error code text, as shown above.
When a site policy disallows pseudo-sessions, DTUs configured as token readers display the Card Reader icon instead of the Login Dialog box card.

FIGURE B-20 Card Read Error OSD
.")
This icon indicates that the Card Read Error OSD icon appears whenever the firmware is unable to read the card due to one of the following causes:
FIGURE B-21 Prompt for Card Insertion OSD

If the current authentication policy allows access only by card, this OSD icon appears and prompts the user to insert a card.

This icon indicates that the Access Denied OSD icon appears when the current authentication policy denies access to the presented token. Specifically, this icon is displayed if a disabled card has been inserted into a DTU.
The Sun Ray administration model has seven user session types:
The first three session types have normal login processes. When there is a problem, the administrator should examine:

|
Caution - Sun Ray Server Software modifies certain system configuration files. In most cases, these changes are identified with SRSS-specific comments. Please do not change these modifications. |
Although the last four session types display icons on the Sun Ray DTU, they do not have login processes at all. The icons indicate that the user must take steps before a successful login is possible. If the user immediately removes and reinserts the smart card, the icon disappears, but the Wait for Session OSD remains.
These last four session types and their OSDs should not cause alarm. The user can:
Authentication Manager errors can be found in the following error logs:
The general format of the log messages is:
timestamp thread_name message_class message
Message components are defined as follows:
year.month.day hours:minutes:seconds
There are several different types of threads. The most common thread handles DTU authentication, access control, and session monitoring. These threads are named “worker” plus number. The Worker# thread names are reused when a connection terminates. Other threads are:
Messages with the same thread name are related. The exception occurs when a Worker# thread disconnects a DTU and then purges the connection information from memory. After a Worker# DESTROY message, the next use of that Worker# thread name has no relation to previous uses of the thread name (in other words, the thread names are reused).
The most common problems encountered with USB mass storage devices on Sun Ray DTUs are described in the following sections.
Some mass storage device types are not supported on Sun Ray. Inspect the log file /var/opt/SUNWut/log/utstoraged.log for an indication as to why device nodes were not created.
If the storage medium does not have a OS-recognizable file system, it will not get automatically mounted. An error message will be logged to: /var/opt/SUNWut/log/utmountd.log
If the device is unplugged, or if the user’s session is disconnected from the DTU, all mount points for that DTU are automatically unmounted unless the user has open references to the mount point. In that case, the mount point becomes stale. A stale mount point persists until the administrator unmounts it manually or until the system is rebooted.
Run the following command to find stale mount points.
| Note - Close all references to the mount point or terminate all processes that refer to the mount before running the umount command. |
Each time a user logs in to a Sun Ray DTU, a script automatically assigns the $AUDIODEV environment variable to that session. One utaudio(1)real-time process is assigned to each session. Refer to the audio(7i)man page for more information.
The emulated audio device follows the user session during hotdesking. The device name appears in the $AUDIODEV environment variable but is transparently interpreted by audio programs for Sun systems. Device nodes are created in the /tmp/SUNWut/dev/utaudio directory. The directory tree is completely recreated at boot time.
|
|
Caution - Do not remove the /tmp/SUNWut/dev/utaudiodirectory. Deleting this directory prevents existing users with utaudiosessions from using their audio pseudo device nodes. |
If your application uses /dev/audio, the Sun Ray server software reroutes the audio signal appropriately.
If audio features are malfunctioning:
1. To confirm whether audio is working, run the following command on the DTU:
3. Verify that audio output is selected properly, for example, for headphones or speakers.
5. Verify that Mute is not selected.
Some applications are hard-coded to use /dev/audio for output. Sun Ray System Software provides a redirection library that you can use to correct this behavior.
1. Set the environment variable LD_PRELOAD to libc_ut.so in the shell or wrapper from which you started the audio player:
If your users have problems running PDASync on a Sun Ray DTU:
1. Get the latest Java Communications API (javax.comm api version 3 or later) from
http://java.sun.com/products/javacomm/
2. Make sure that you are using a supported USB-serial adapter.
A list of supported USB devices is available at:
http://www.sun.com/io_technologies/sunray/usb/
3. Click the change Synchronization Settings icon.
Select the port to which the Palm cradle is connected.
| Tip - If the ports are not shown correctly in the Serial Port drop-down menu, close the application and hot plug the device, then start the application again. |
For setup instructions, see PDA Synchronization.
Some applications, such as intensive 3-D visual simulations, may run very slowly on Sun Ray. Other applications, such as pseudo-stereo viewers using double-buffering, or high-frequency dynamic color table flips on 8-bit visuals, do not produce the expected visual result.
Placing the user’s interactive applications, such as Netscape or StarOffice, or PC interoperability tools, such as Citrix or Tarantella, on the Sun Ray server usually helps performance by reducing network load. The applications benefit from faster transport of commands to the Sun Ray’s X server.
Applications that can be configured to use shared memory instead of DGA or openGL usually perform better on Sun Ray when they used shared memory.
Sluggish Sun Ray server performance or excessive disk swapping is an indication that the Sun Ray server is under-provisioned. Under these circumstances, there is not enough virtual memory available to start an X Window server instance for a user’s session.
The solution in this situation is to add more memory or increase the size of the swap partition. In other situations, network load or packet loss may be too high. In very rare cases, network cables or switch equipment may be defective.
1. To determine whether there is excessive swapping, use vmstat 5.
If there is excessive swapping, the system may be undersized or overutilized.
2. Verify that network connections are 100F.
3. Use utcapture to assess network latency and packet loss.
As latency and packet loss increase, performance suffers.
Many graphics-intensive screensaver programs consume large amounts of CPU, memory, and network bandwidth. To avoid excessive resource consumption, they should be disabled on Sun Ray servers.
Remove the packages that contain the screensaver hacks:
On machines that have the SUNWxscreensaver-hacks-gl package installed, modify the pkgrm command as follows:
| Note - It may be necessary to remove the gl (graphics library) package first. |
For information on multihead displays, please see Multihead Administration.
First, eliminate the most obvious possible causes:
If the Sun Ray DTU is unable to read DDC data from the monitor, then it defaults to 640 x 480 pixels.
2. Restart the Sun Ray DTU after powering the monitor on
4. Use the utresadm to set persistent display setting to override the default.
If the old icons appear on the display, either the DTU’s firmware has not been upgraded or it is failing.
1. Upgrade the firmware to SRSS 4.0.
2. Follow the procedure to upgrade the firmware. See the Sun Ray Software 4.0 Installation and Configuration Guide.
You may need to use a dedicated private network.
If this message displays, use the following procedure to correct it:
1. Download the latest Java Communications API (javax.comm API version 2.0.2 and above)
2. Make sure that the supported USB-Serial Adapter is used.
The supported USB devices list is available at
http://www.sun.com/io_technologies/sunray/usb/
3. Click the Change Synchronization Settings icon and select the appropriate port (to which the Palm cradle should be connected), then click OK.
4. If the ports are not correctly shown in the Serial Port drop down menu, close the application and hot plug the device.
5. Start the application again.
Usually, if all the software is installed, the agent for Sun Ray monitoring starts automatically.
If the Sun Ray server has the Sun Management Center agent component installed, but the Detail window shows no Sun Ray object for the Sun Ray server node, load the Sun Ray module:
|
Note where the Sun Ray module is listed (if it is not listed, see No Sun Ray Module). For the module to be loaded, it should be listed in Modules with Load Status. In addition, it should be loaded and enabled.

2. If the Sun Ray module is listed, highlight it and then click the Load button.
This loads the module and moves it to the Modules with Load Status list.
3. If the Sun Ray module is disabled, highlight it and then click the Enable button.
4. Return to the Detail window.
The Detail window shows a Sun Ray object for the Sun Ray server node.
If, after clicking the Modules tab on the Details window of the Sun Ray server node, the Sun Ray module is not listed, activate the Sun Ray module:
|
1. Register the module by typing:
This command adds the module to the Sun Management Center and restarts the agent if it is active.
2. If you receive the following message, perform steps 3 and 4.
Starting the SunMC agent... NOTICE: SunMC agent failed to start. To start it manually run the command |
3. Check to see if the agent is running:
If the Sun Management Center agent is running, wait then check the Detail window.
4. If the agent is not running, type the following to start it:
| Sun Ray Server Software 4.0 Administrator’s Guide for Solaris | 820-0411 |
Copyright © 2007, Sun Microsystems, Inc. All Rights Reserved.
 If this icon stays on for more than 10 seconds