|
| |
| Sun Java Enterprise System 2005Q4 Deployment Example: Telecommunications Provider Scenario | |
Chapter 4
The Deployment SpecificationsThe deployment specifications comprise a technical description of a Java ES solution that is more detailed than the deployment architecture. The deployment specifications are based on the architecture, but they add more of the detailed information that is needed to install and configure the set of components identified in the architecture.
This chapter covers the deployment specifications for Telco’s deployment in the following sections:
The Computer Hardware and Operating System SpecificationThe computer hardware and operating system specification describes the operating system and hardware configuration required for each computer used in the deployment. The hardware chosen depends on the components installed on the computer and the level of performance required from the components. All computers used in the Telco deployment run the Solaris 10 operating system.
The computer hardware and operating system specification for Telco’s deployment is shown in Table 4-1.
Table 4-1 Computer Hardware and Operating System Specification
Computer
Component Subsystem
Description
Hardware Model
Installation Module
jesDSM1
Directory Server, Administration Server
Directory Server with Multimaster Replication
SunFire V240, 2 x 1GHz UltraSPARC III
1A and 1B, in Module #1: Directory Server with Multimaster Replication
jesDSM2
Directory Server, Administration Server
SunFire V240, 2 x 1GHz UltraSPARC III
jesDPA1
Directory Proxy Server
Load Balanced Directory Proxy Server
SunFire V240, 2 x 1GHz UltraSPARC III
jesDPA2
Directory Proxy Server
SunFire V240, 2 x 1GHz UltraSPARC III
jesPAM1
Portal Server, Access Manager, Web Server
Load Balanced Portal Server and Access Manager
SunFire V480, 2 x 1.05GHz UltraSPARC III
jesPAM2
Portal Server, Access Manager, Web Server
SunFire V480, 2 x 1.05GHz UltraSPARC III
jesMCS1b
Messaging Server, Calendar Server, Administration Server, Sun Cluster software
Clustered Messaging Server and Calendar Server for business class customers
SunFire V480, 2 x 1.05GHz UltraSPARC III
Module #5: Business-class Messaging Server and Calendar Server on Sun Cluster Nodes
jesMCS2b
Messaging Server, Calendar Server, Administration Server, Sun Cluster software
SunFire V480, 2 x 1.05GHz UltraSPARC III
jesMS1c
Messaging Server, Administration Server, Sun Cluster software
Clustered Messaging Server for consumer class customers
SunFire V480, 2 x 1.05GHz UltraSPARC III
Module #6 Consumer-class Messaging Server on Sun Cluster Nodes
jesMS2c
Messaging Server, Administration Server, Sun Cluster software
SunFire V480, 2 x 1.05GHz UltraSPARC III
jesSRA1
Portal Server Secure Remote Access
Load balanced Portal Server Secure Remote Access
SunFire V480, 2 x 1.05GHz UltraSPARC III
jesSRA2
Portal Server Secure Remote Access
SunFire V480, 2 x 1.05GHz UltraSPARC III
jesADM
Delegated Administrator, Web Server
Delegated Administrator for user management
SunFire V240, 2 x 1GHz UltraSPARC III
jesIMR1
Messaging Server (MTA)
Load-balanced incoming message relay
SunFire V240, 2 x 1GHz UltraSPARC III
9A, in Module #9: Load Balanced Messaging Server MTA (Inbound and Outbound)
jesIMR2
Messaging Server (MTA)
SunFire V240, 2 x 1GHz UltraSPARC III
jesOMR1
Messaging Server (MTA)
Load-balanced outgoing message relay
SunFire V240, 2 x 1GHz UltraSPARC III
9B, in Module #9: Load Balanced Messaging Server MTA (Inbound and Outbound)
jesOMR2
Messaging Server (MTA)
SunFire V240, 2 x 1GHz UltraSPARC III
jesMMP1
Messaging Server (MMP)
Load-balanced MMP and MEM for mail client access
SunFire V240, 2 x 1GHz UltraSPARC III
jesMMP2
Messaging Server (MMP)
SunFire V240, 2 x 1GHz UltraSPARC III
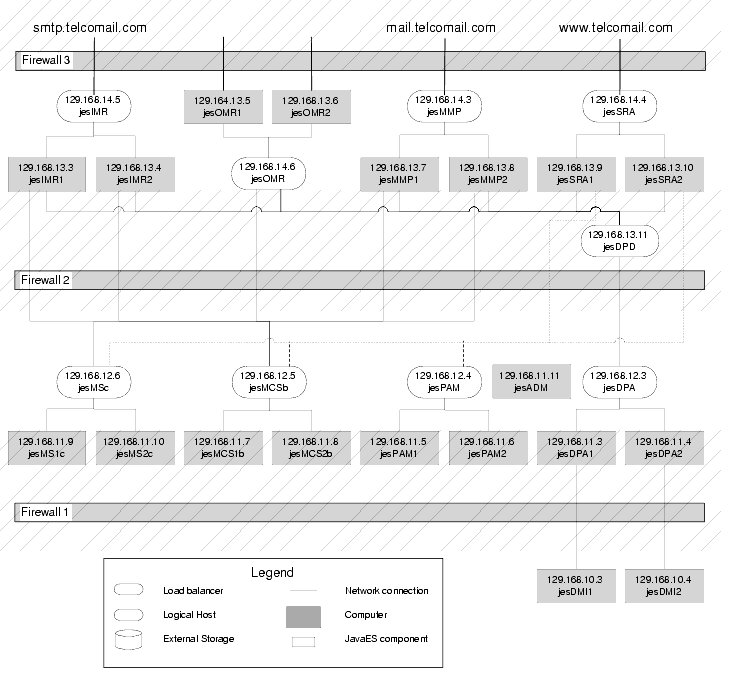
The Network and Connectivity SpecificationThe network and connectivity specification describes all of the network connections needed to implement the architecture. The network and connectivity specification for Telco’s deployment is displayed graphically in Figure 4-1.
Figure 4-1 Network and Connectivity Specification
The network topology in Figure 4-1 implements the security strategy described in Security Strategies Used in the Architecture. Figure 4-1 shows the private IP addresses that establish the multi-layer network topology.
Each computer and load balancer tier is on separate sub-net. As shown in figure Figure 4-1 there are effectively 5 layers of computers.
In terms of access from the Internet only the load balancers in Zone 3 (sub net 129.168.14.x) are actually exposed, at the URLs shown in Figure 4-1. Everything else, according to the philosophy of minimizing the surface of attack, is hidden, through use of private IP addresses.
Since the DMZ contains the computers that are accessed by the public, the IP addressing scheme for the load balancers jesIMR, jesOMR, jesMMP and jesSRA are normal IP addresses, which are accessible from the Internet. The IP address shown for these load balancers in Figure 4-1 are 129.168.14.xx. When you set up these load balancers, however, you should replace these addresses with the real, publicly accessible, addresses for your company.
All of the other hardware is assigned 129.168.13.xx IP addresses, which are private addressees. These private addressees are not recognized by the Internet and are not routed outside.
The load balancers bridge the subnets, and route communications between the subnets. That means that the load balancers control the traffic between the sub nets. Therefore, if one layer is compromised there is no direct route to the next layer.
Web access is restricted to HTTPS (SSL) when accessing the load balancer for the SRA gateways. In practice proper certificates would be used rather than the self-signed, self-generated ones used in this example.
The User Management SpecificationInstalling and configuring a Java ES solution establishes both the LDAP schema and the basic tree structure of the LDAP directory for the deployment. Specifications for the schema and the directory tree structure must be developed before installation begins, so that the correct values can be input during the installation and configuration process. This section specifies the schema and the directory tree for the Telco deployment. It also describes how the directory schema and the directory tree structure for the Telco deployment are established by the installation and configuration process.
The LDAP Schema
The Java ES installation and configuration process both establishes the LDAP schema for the deployment. The LDAP schema is constructed in stages, by the Java ES installer, several of the configuration tools, and the Delegated Administrator administration tool.
With Java ES solutions in general, you need to specify the LDAP schema before you install and configure, so that you can select the correct installation and configuration parameters. This section describes the LDAP schema for the Telco deployment.
The schema for the Telco deployment must support the following services:
The schema for the Telco deployment is constructed by the following steps of the installation and configuration process:
- Apply schema 2 to the directory.
Java ES solutions that use Directory Server can use either of two versions of a Sun standard LDAP schema for messaging and calendaring, which are known as Schema 1 and Schema 2. Schema 2 natively supports Access Manager and Access Manager’s single sign-on feature.
The Telco deployment uses Access Manager and the single sign-on feature, so the Directory Server instances in the deployment is configured for Schema 2.
To configure a Directory Server instance for Schema 2, you do the following:
- Install and configure the necessary Directory Server instances.
- Install Access Manager and specify the Directory Server instance that Access Manager will be using. Installing Access Manager automatically updates the directory schema. Note that the Directory Server instances must be installed before Access Manager, and the Directory Server instances must be up and running while Access Manager is installed.
- Run the Directory Preparation Tool, and restart Directory Server instances. This completes the preparation of the overall schema.
- Use the Delegated Administrator tool (either the console or the command line utility) to add object classes and attributes to the individual LDAP organizations that hold the user data (These organizations are described in The Directory Tree Structure.) Specifically, you add the following:
The installation and configuration plan for the Telco deployment includes all of these steps in the proper sequence. For more information, see The Installation and Configuration Plan.
The Directory Tree Structure
The LDAP directory for a Java ES solution can be simple or complex, depending on the organization’s needs for organizing user data. LDAP directories, are, by their nature, flexible in structure. Java ES does not require any particular structure, but you do use the installation and configuration process to implement the specified structure.
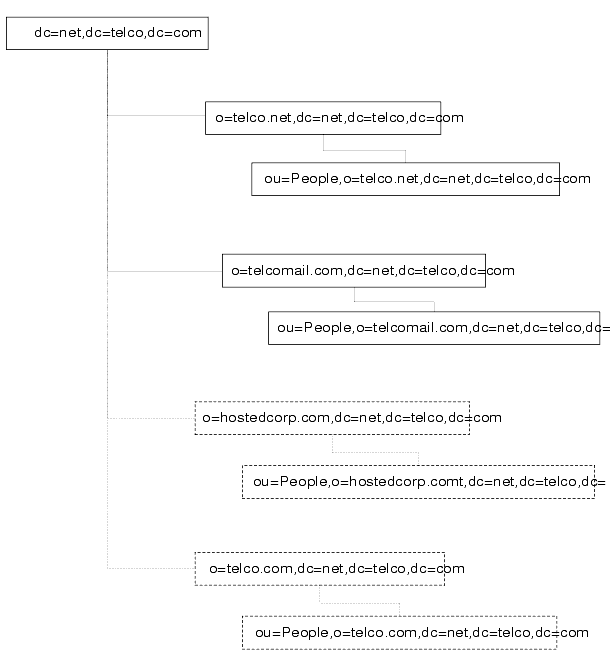
The LDAP directory for the Telco deployment must support Telco employees, consumer users, business users who use Telco’s domain name, and business users that use the hosted domain service. The directory structure developed to support this requirement is illustrated in Figure 4-2.
Figure 4-2 LDAP Directory Tree for the Telco Deployment
In Figure 4-2 the directory tree root is dc=net,dc=telco,dc=com. The tree has the following branches:
- o=telco.net This branch is for consumer class customers. This branch is provisioned for mail services only. The data for consumer class customers is stored in ou=People,o=telco.net,dc=net,dc=telco,dc=com.
- o=telcomail.com This branch is for business class customers that do not use the hosted domain service. This branch is provisioned for mail, calendar, portal, and file access services.
- o=hostedcorp.com This branch is for a business customer named hostedcorp that is using the hosted domain service. This branch is provisioned for mail, calendar, portal, and file access services.
- o=telco.com This branch is for Telco employees. This branch is provisioned for mail, calendar, portal, and file access services.
Chapter 5, "The Installation and Configuration Plan," explains how the installation and configuration process builds the directory tree. Chapter 6, "Software Installation and Configuration Procedures," contains instructions for creating and provisioning the o=telco.net and o=telcomail.com branches. The branches for hosted domains and internal users can be created by varying the instructions slightly.
The Administrator Accounts
In addition to setting up the basic structure of the LDAP directory, installing and configuring a Java ES deployment establishes a number of administrator accounts. For each component that you install and configure, the installer or configuration program creates one or more administrator accounts.
The installation and configuration instructions in this document create the following administrator accounts:
- Directory Server The administrator account name is admin, and the administrator password is password. The LDAP DN for the administrator account is uid=admin, ou=Administrators, ou=TopologyManagement, o=NetscapeRoot. You also create a Directory Manager account. The Directory Manager account name is cn=Directory Manager and the password is password. Other components use the Directory Manager account to access the directory at installation or configuration time.
- Administration Server The administrator account name is admin, and the administrator password is password. The LDAP DN for the administrator account is uid=admin, ou=Administrators, ou=TopologyManagement, o=NetscapeRoot.
- Access Manager The administrator user account is amadmin, and the administrator password is password. The LDAP DN for the administrator account is uid=amadmin,ou=People,dc=net,dc=telco,dc=com.
- Portal Server The administrator account is amadmin and the password is password.
- Portal Server Secure Remote Access The Portal Server Secure Remote Access core runs on jesPAM1 and jesPAM2. The administrator account for this instance is amadmin and the password is password. The Portal Server Secure Remote Access gateway runs on jesSRA1 and jesSRA2.
- Web Server The administrator account name is admin, and the administrator password is password.
- Messaging Server There are two administrator accounts, one for the consumer class service and one for the business class service. The administrator account name for the consumer class service is admin_telco.net, and the administrator password is password. The LDAP DN for this administrator account is uid=admin_telco.net,ou=People,o=telco.net,dc=net,dc=telco,dc=com. The administrator account name for the business class service is admin, and the administrator password is password. The LDAP DN for this administrator account is uid=admin,ou=People,o=telcomail.com,dc=net,dc=telco,dc=com.
- Calendar Server The administrator account name is calmaster, and the administrator password is password. The LDAP DN for the administrator account is uid=calmaster,ou=People,o=telcomail.com,dc=net,dc=telco, dc=com.
- Delegated Administrator The Telco deployment installs the Delegated Administrator server-side component on jesPAM1. The administrator account ID is admin and the password is password. The Telco deployment also installs the Delegated Administrator console on jesADM. The administrator account name for this instance is admin and the administrator password is password.
Chapter 5, "The Installation and Configuration Plan," explains how the installation and configuration process creates the administrator accounts. Chapter 6, "Software Installation and Configuration Procedures," contains installation and configuration input values for creating the administrator accounts.
If you adapt the instructions in this document for your own solution, you should consider your security requirements and develop a plan for your administrator accounts and administrator passwords.
The Delegated Administrator Instance
Delegated Administrator is the Java ES tool for managing the directory tree. Chapter 6, "Software Installation and Configuration Procedures," contains instructions for using the Delegated Administrator server side component in command line mode to create the directory tree branches described in The Directory Tree Structure and to create test user accounts.
This document also contains instructions for installing and configuring the Delegated Administrator console. For information on using the Delegated Administrator console, see the Delegated Administrator documentation.